-
-
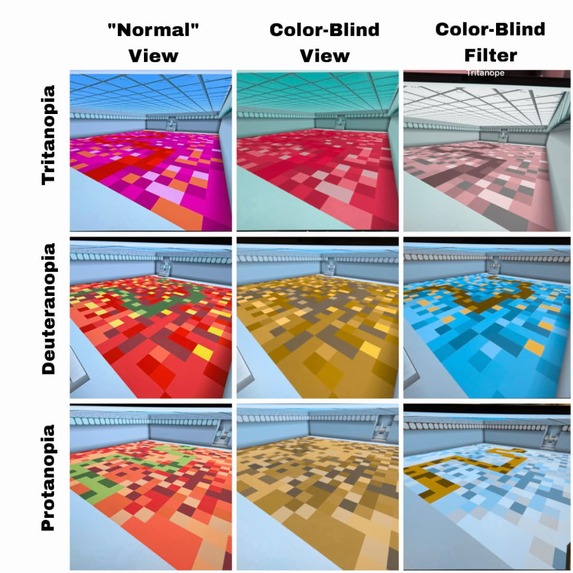
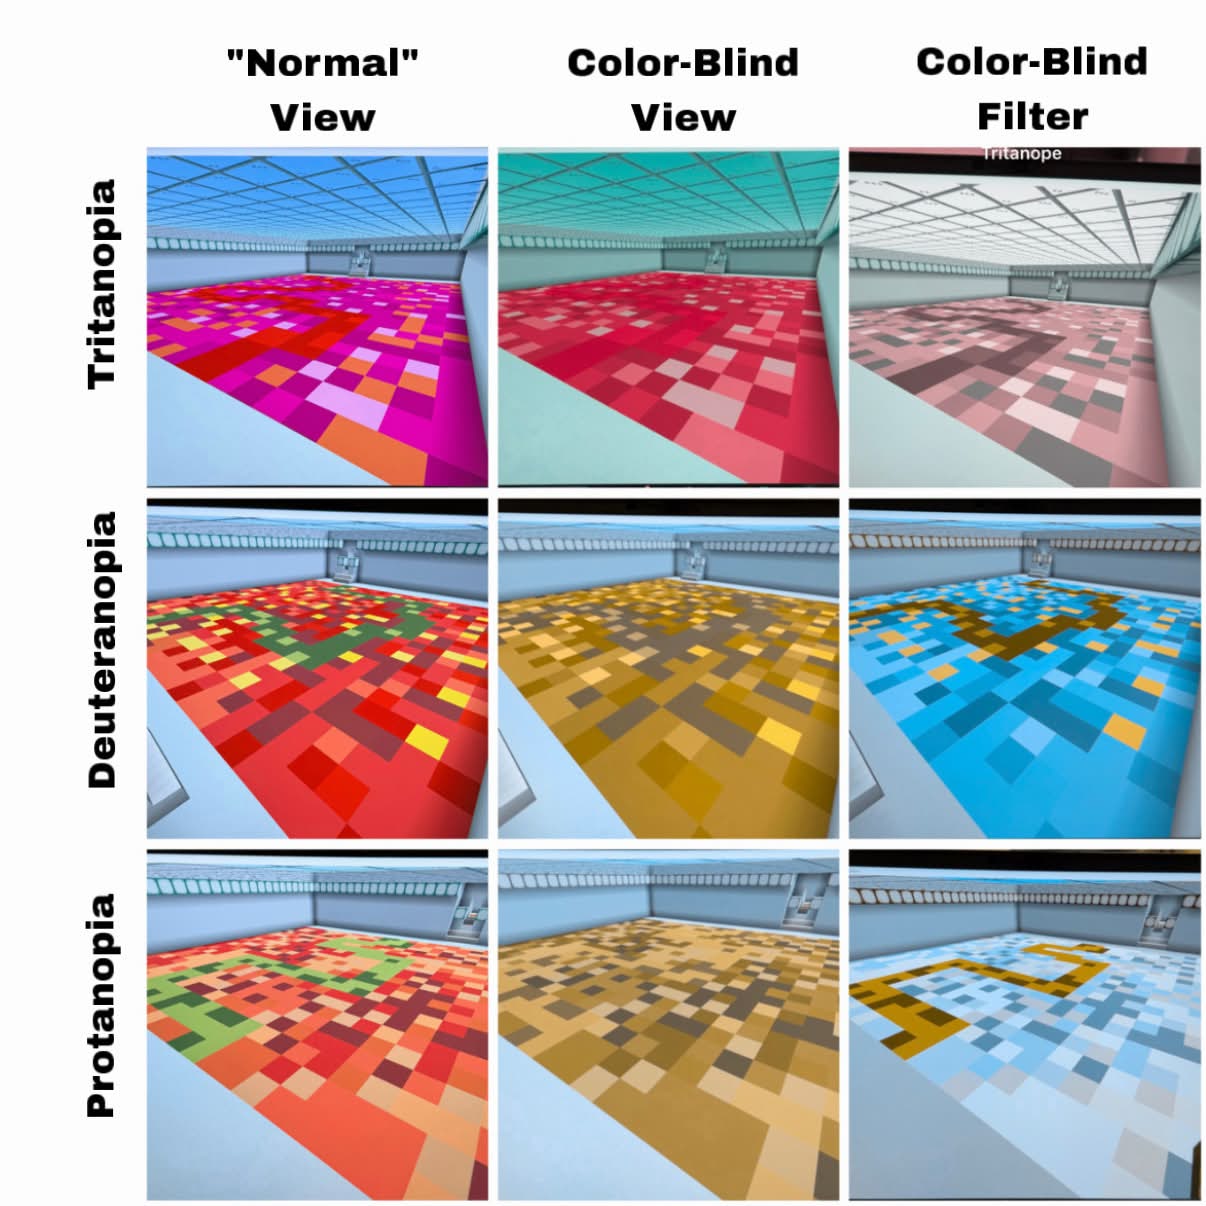
3 by 3 image showing three game levels with "normal" view, color blind view, and color blind filter view for three color blind types
Colorblindness Add-in For Minecraft
Created By Kaytor <3
Project Overview:
Problem: Minecraft does not have a built in color-blindness function. Small children can be confused when identifying a disability such as colorblindness.
Solution: We created a system within minecraft to test them in a relatively accessible, gamified way to allow them to both identify what type of colorblindness they have and better enjoy the game of minecraft with their peers. Pressing [k] on your keyboard while in game toggles/rotates the shader.
Research:
Initial Thoughts -
We researched color blindness and tests taken to identify them. There are seven types of colorblindness and we agreed to focus on 3 (Protanopia, Deuteranopia, Tritanopia) to initially create our Minecraft Test. Neither of us are colorblind, so we’re relying on a colorblind friend and the app CV Simulator to periodically test our creation.
Programming:
We chose MCreator because it is an open source IDE that allows the quick creation of modded minecraft items and blocks. It’s a lot of fun because you can use codeblocks if you want to. It also gives us the option to integrate with Github!
Guide to Blocks:
| Name | Purpose |
|---|---|
| “Lava” Block | Count the number of times the player walks on this block. If the number exceeds [20], then it triggers a bool to mark they are most likely colorblind. This count gets reset every time the player enters a new room. |
| Reset Block | This block resets the count of the “Lava” blocks when walked on. This helps keep score of each room. |
| Room Assigner | This block keeps track of the player progression in the room. |
| Custom Color Block | This block can be assigned colors when placed depending on the block on your offhand. There are *24 options. |
Color Vision Shader Documentation
Purpose
The mod is a color-vision test built around a "floor is lava" course. Players follow a colored path on the floor. At the end, the game gives them the daltonization mode that matches their result. This post-processing shader recolors the screen so that colors they have trouble telling apart become easier to separate.
Files
shaders/post/color_correction.jsonPost-chain. Renders the main screen into aswaptarget through the program, then blits the result back tominecraft:main.shaders/program/color_correction.jsonProgram definition. Uses vanilla'sblitvertex shader and declares theDiffuseSampler,ProjMat,OutSizeandModeuniforms.shaders/program/color_correction.fshFragment shader containing the color math.TintBlocks.javaClient code. It loads and unloads the effect, keepsModeup to date and registers the K key.
Modes
| Mode | Name | For |
|---|---|---|
| 0 | Off | Normal vision |
| 1 | Protanopia | Red-weak or red-blind |
| 2 | Deuteranopia | Green-weak or green-blind |
| 3 | Tritanopia | Blue-yellow |
How the shader works
- Converts the pixel from sRGB to linear RGB (gamma 2.2).
- Simulates what a viewer with that deficiency sees, using the Machado 2009 matrices at full severity.
- Takes the error, meaning the original minus the simulated color. That is the information the viewer loses.
- Shifts the error into channels the viewer can distinguish: green and blue for protan and deutan, red and green for tritan.
- Multiplies the shift by
STRENGTH(currently 2.5), clamps the result and converts back to sRGB.
Gray and white don't change, because they have no error. Saturated reds, greens and blues change the most.
Using it in Java
TintBlocks.setColorMode(TintBlocks.MODE_DEUTAN); // MODE_OFF, MODE_PROTAN, MODE_DEUTAN, MODE_TRITAN
int current = TintBlocks.getColorMode();
- K key: cycles through the modes (off, protan, deutan, tritan). The action bar shows "Color mode: ...".
- Tick sync: every client tick,
TintBlockswrites the current mode to theModeuniform.
Tuning and notes
STRENGTH: 2.5 some users might need more or less depending on the severity of their color-blindness- Client-only:
setColorModeonly affects the client. If a server-side procedure decides the result, a packet needs to tell the client which mode to use. - Whole screen: the effect applies to the entire screen, including the HUD.
Level Design:
There are a few reasons we choose to have the player follow the path of a squiggle on the floor:
-Very small children/or disabled individuals may not be able to correctly identify numbers or letters
-It makes for a more interesting experience than looking at an image and choosing an answer like the traditional test
-It still allows us to make deceptive paths in the case that we wanted to expand our test to more types of colorblindness
Blocks:
We created custom textures based on our needs for the "Lava" and "Safe" blocks. This makes them indistingushable from eachother to allow for better test results. Since we needed so many color variations, it was easier to create one of each block that was assigned a texture when it was placed.
To do so, based on the corresponding item in the player's offhand, the block's texture updated to the corresponding color at the time (the table below contains the assignments) that the block was placed. Compared to 48 different blocks, condensing them to 2 let us speed up creating the floors of each level.
Since Deuteranopia and Protanopia are similar to each-other their colors were assigned as such:
| Block Color | Minecraft Block Name/color |
|---|---|
| orange | Orange wool |
| grey | Grey wool |
| brown | Brown wool |
| yellow | Yellow wool |
| red | Red wool |
| default | White wool |
| Orange (variant) | Pink wool |
| Green (variant) | Lime wool |
| Light_green | bamboo |
| Dark_green | cactus |
| red2 | redstone |
| orange3 | glowstone |
| peach | Pink terracotta |
| coral | Pink concrete |
| yellow2 | Yellow concrete |
| Pale cream | concrete |
For those who are Red-weak or red-blind the line colors are the more red/peach/yellow values
While for those who are Green-weak or green-blind the lines are green values
For Tritanopia the colors selected were as follows
| hot_pink | Pink dye |
|---|---|
| magenta | Magenta dye |
| orange_red | Copper block |
| rust_red | brick |
| d_brown_red | cherry_wood |
| light_pink | cherry planks |
Installment via MCreator (easiest if you don't have a Minecraft client - view our GitHub!)
Install MCreator and JDK 21. Open wolfjammod.mcreator through File → Open workspace, or use Import workspace from ZIP file. Wait for Gradle to finish. Download the world ZIP and unzip it. You should get a folder containing level.dat, not a folder nested inside another folder. Put that folder in \run\saves. For example: run\saves\New World(2)\level.dat. In MCreator, click Run client. Pick the world under Singleplayer.
Notes: Make sure your workspace Minecraft version generator is Neoforge 1.21.1 (under Workspace ->Workspace settings) run\saves is created after the first Run client, so launch once before copying the world in. The world was made on Java Minecraft 1.21.1 with the mod, so the mod needs to be loaded. The MCreator dev client does that automatically. Opening a world in the dev client works offline. No account is needed.
Challenges we ran into
- Not many testers for the mod. The only color blind tester we had was someone with Deuteranopia.
- Easier to differentiate the paths closer. In the future would be better to have the player on top of glass looking down at the path/image (this making the colors look closer together like in traditional color blind tests)
Accomplishments that we're proud of
- Creating color blind filter
- When showed to our color blind tester he was very pleased and happy with how much easier it made everything to see. He had mentioned in minecraft he has always had a hard time differentiating dirt and grass blocks and with the filter he was able to tell the difference clearly
What we learned
- How shaders work in minecraft and how to make them
- How to better use AI in our workflow to make work more smooth and less frustrating
- Ex. making more descriptive prompts for better outcomes
** What's next for Wolfjam 2026 Minecraft Color Blind Mod**
- Unsure. If both of us have time we could potentially continue the project.
- We believe if worked on more this could be an excellent addition to the Minecraft Education Marketplace as mods can be made for the Education Edition of Minecraft as seen(here

