-
-
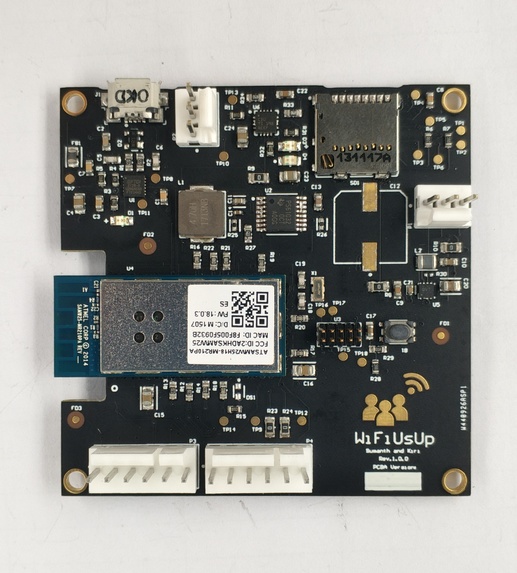
PCB-Top View
-
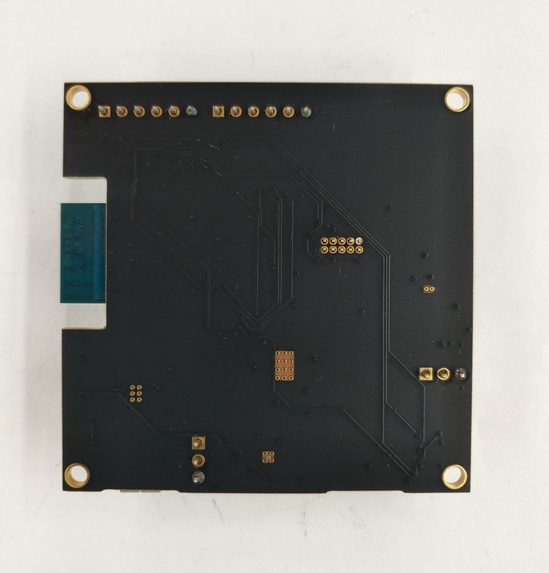
PCB-Bottom View
-
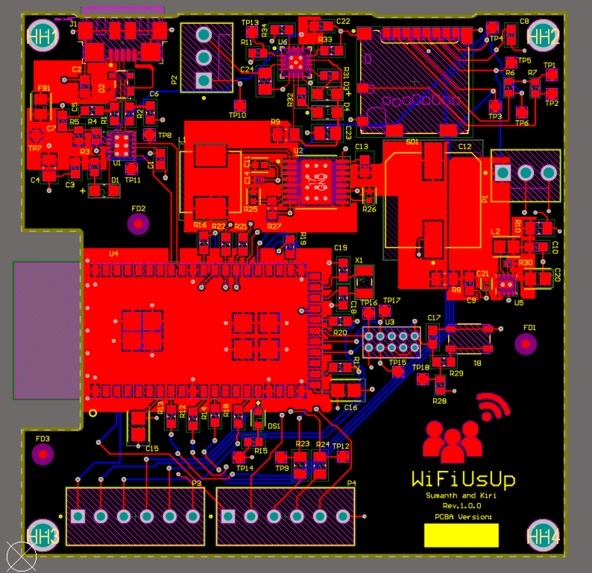
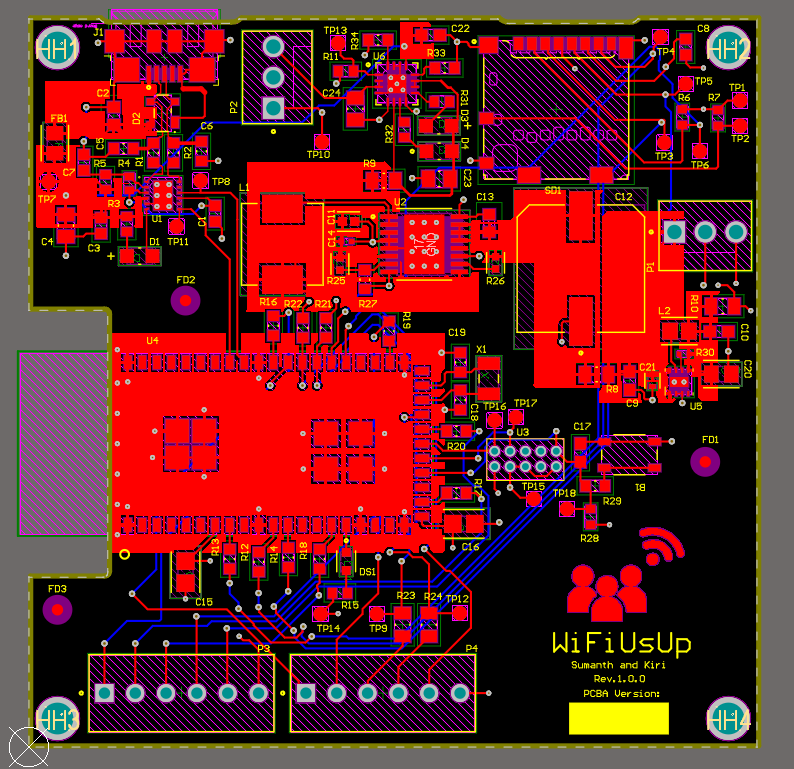
PCB 2D View
-

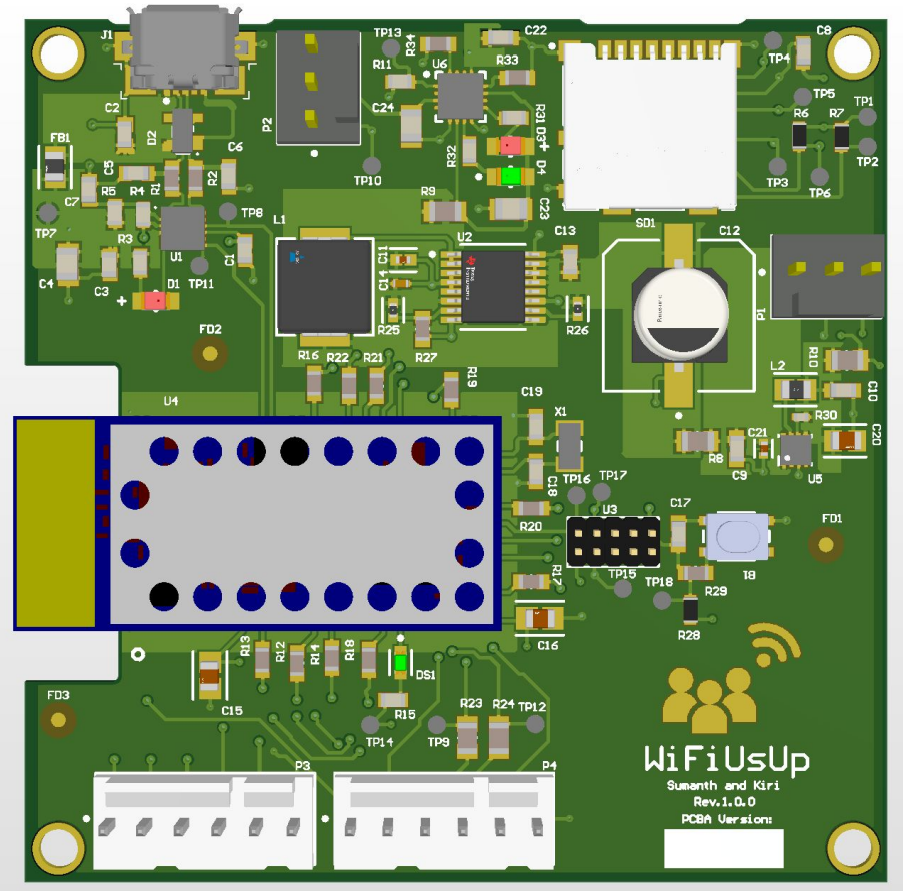
PCB 3D Render
-

PCB Isometric
-
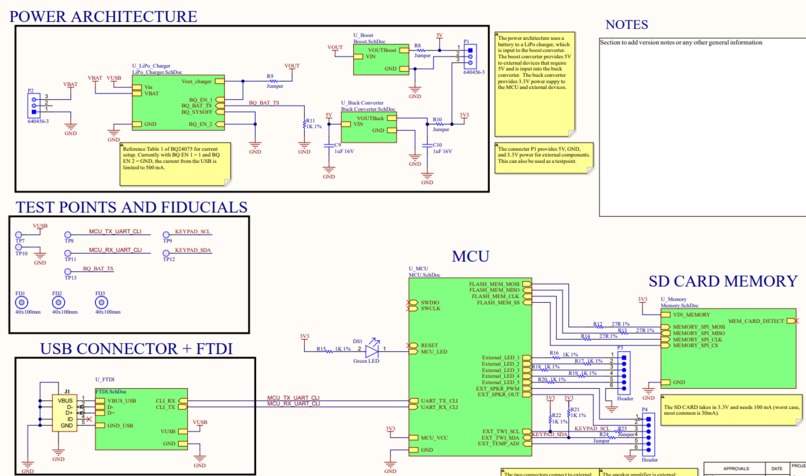
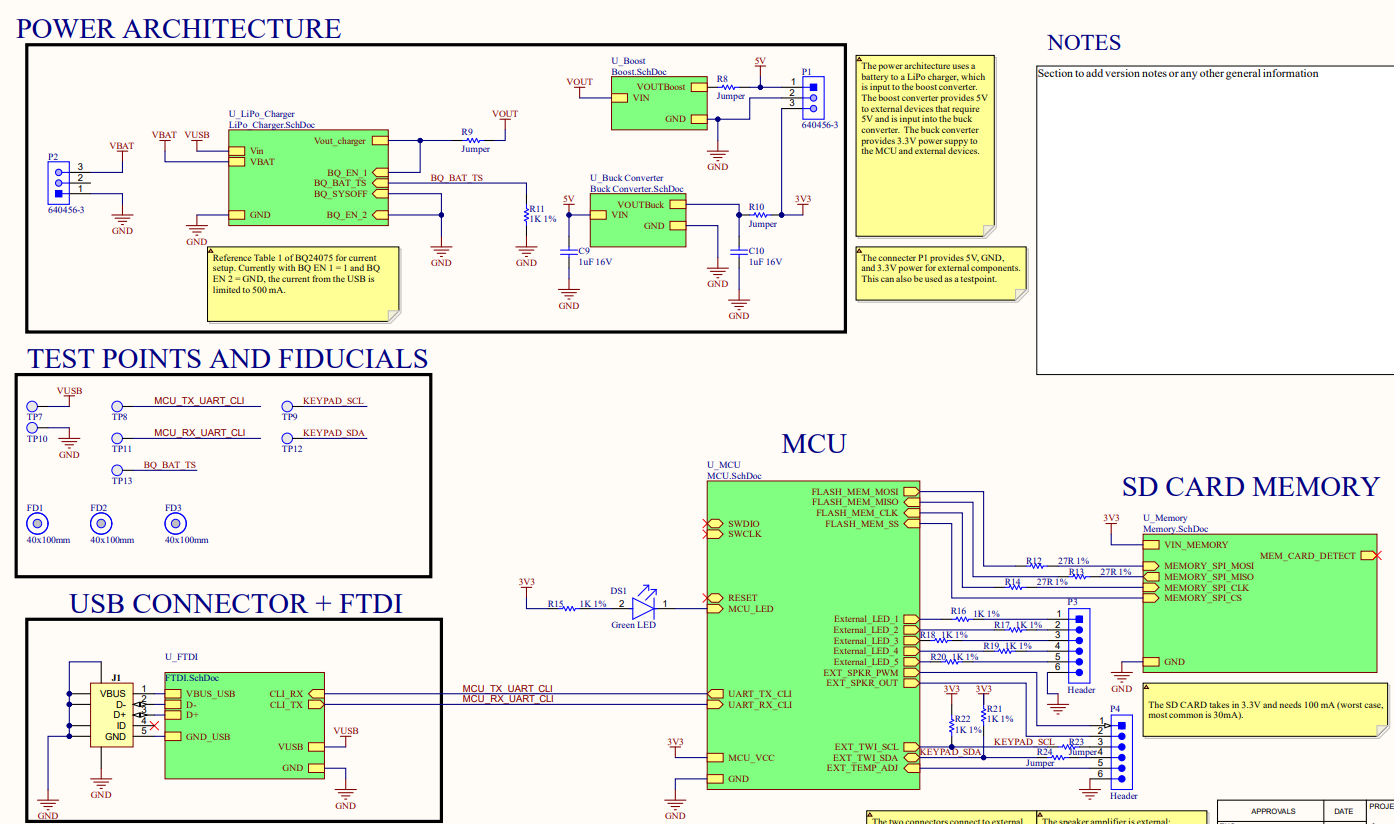
PCB Schematic
-

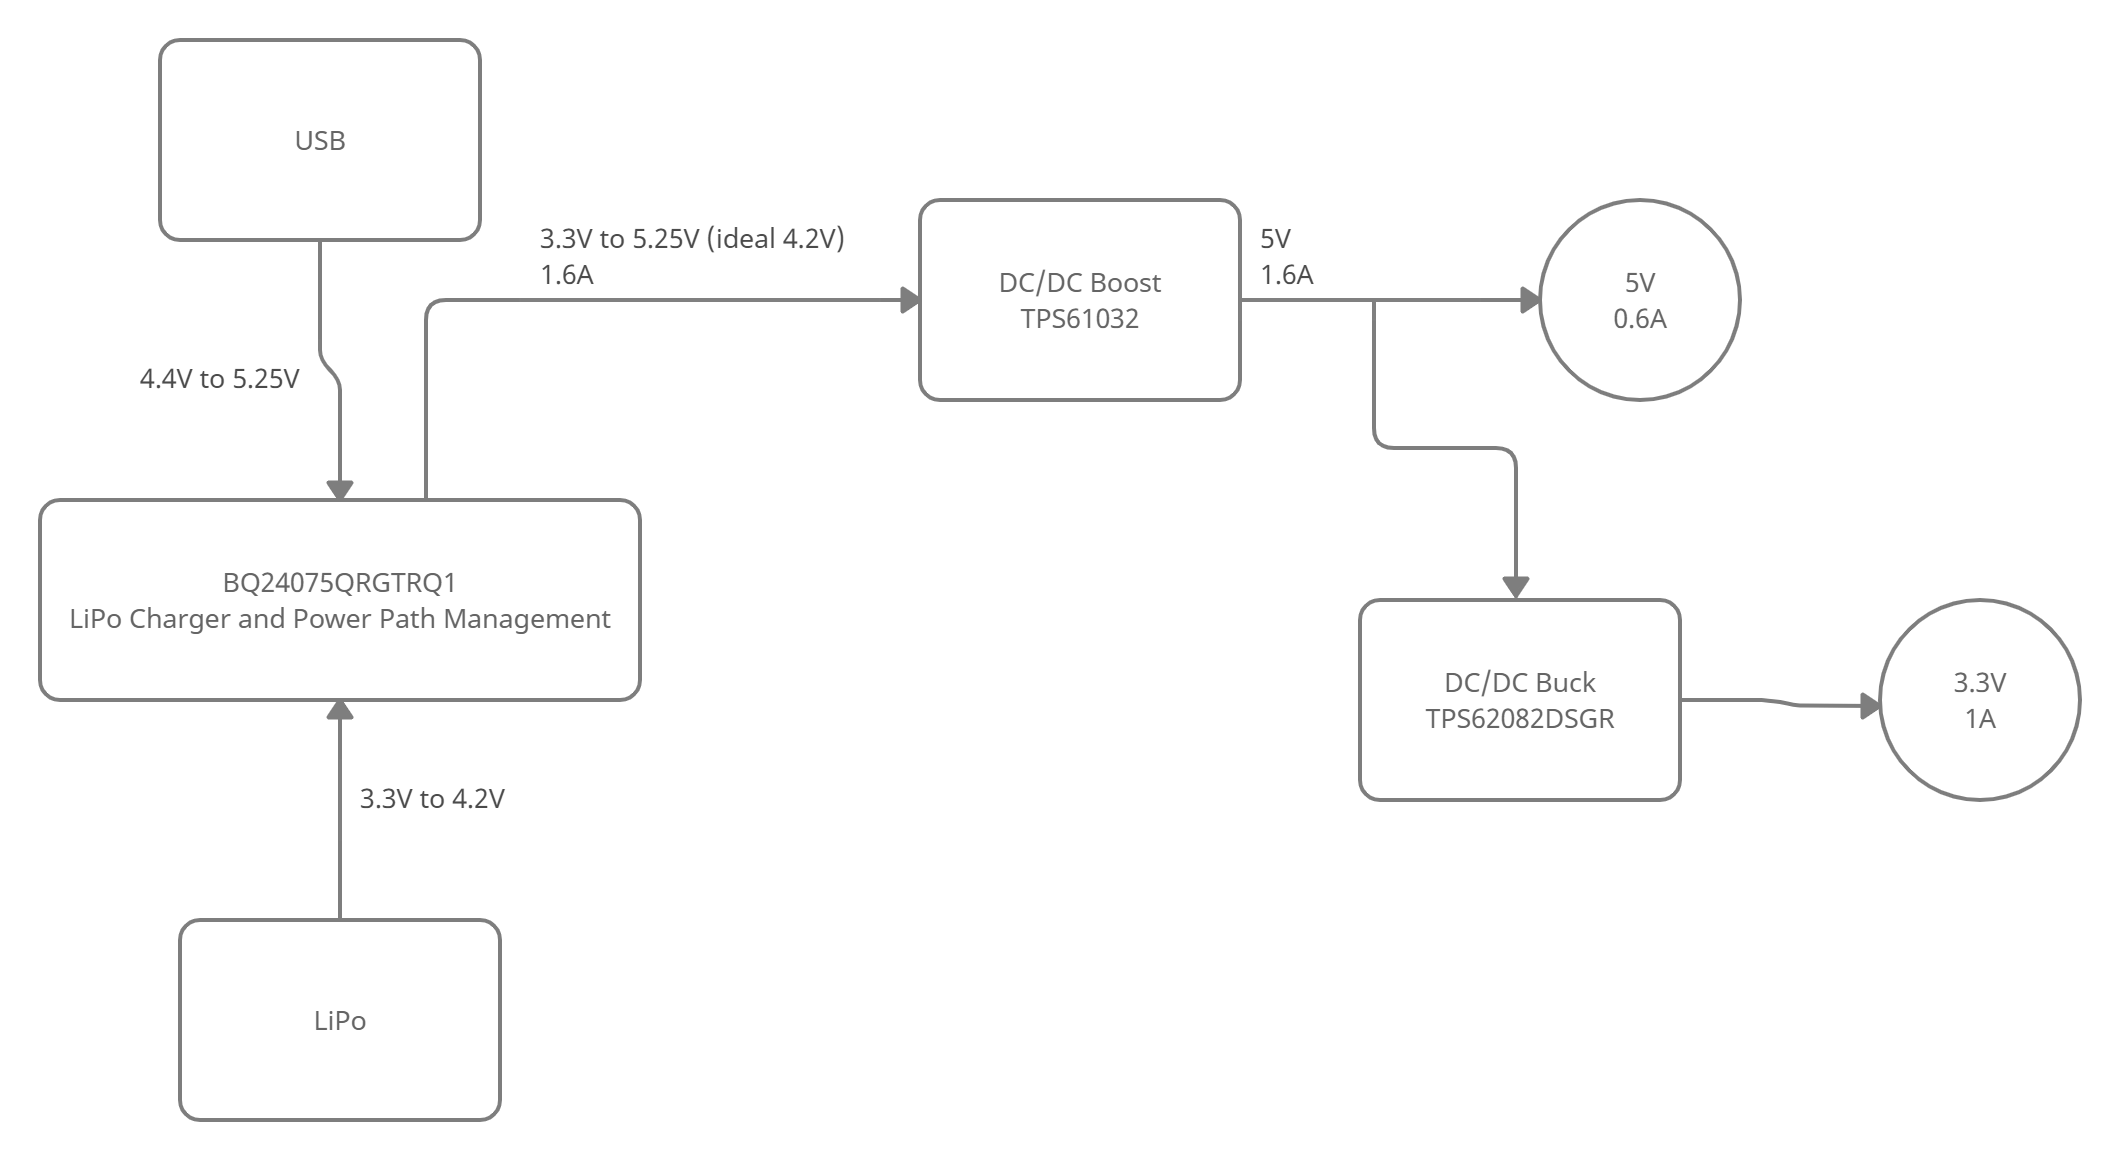
Power Architecture
-
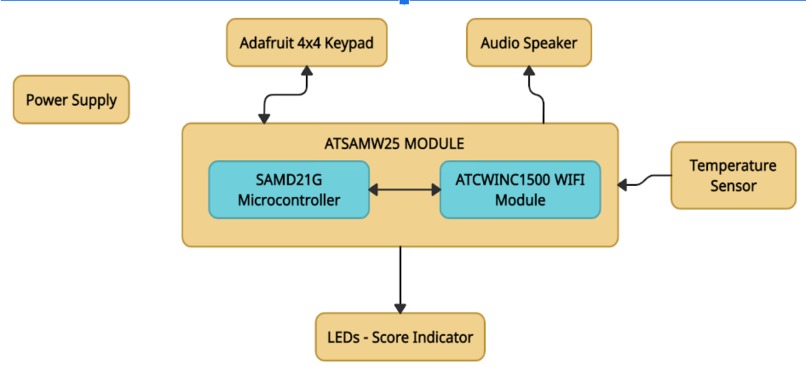
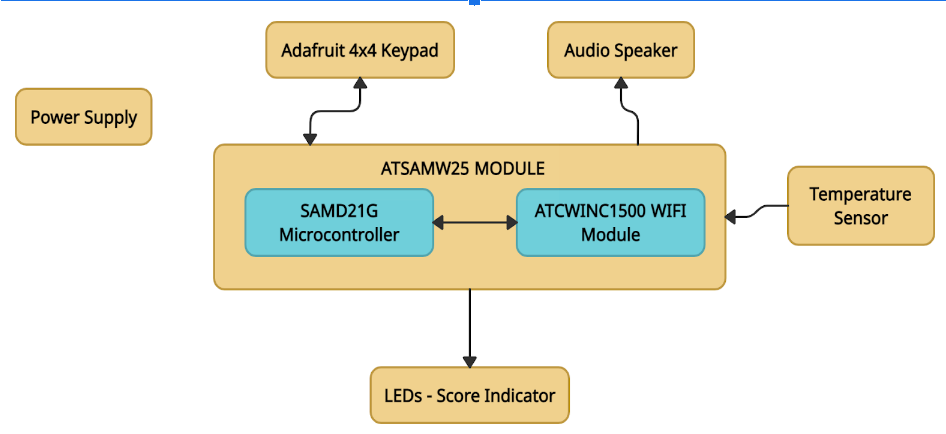
Block Diagram
-
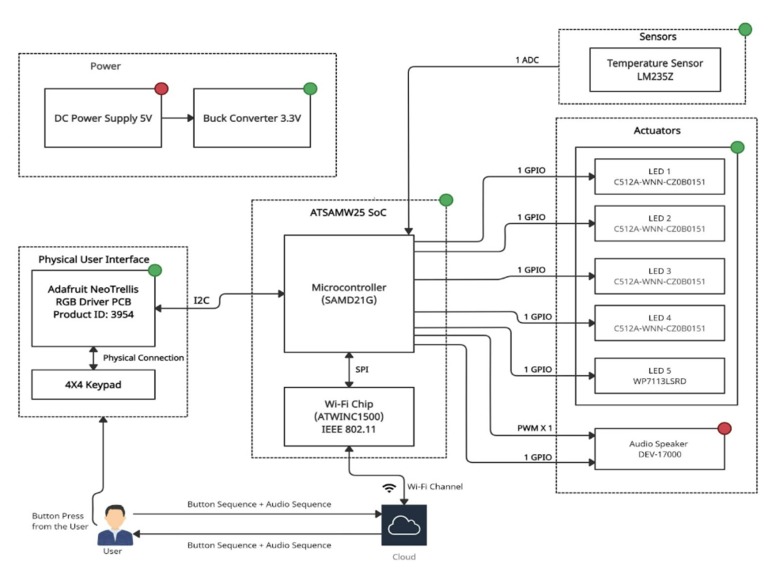
Detailed System Diagram
-
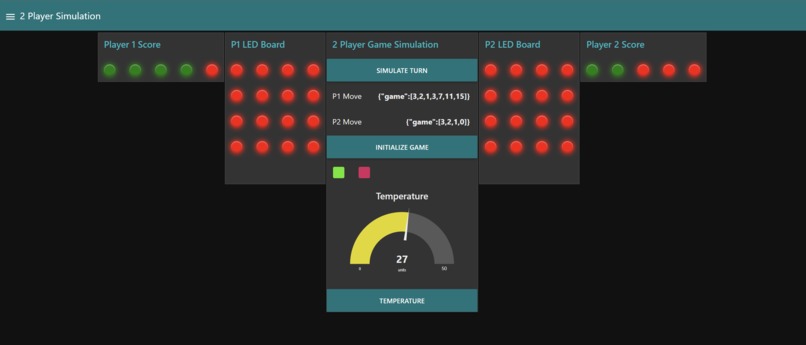
NODE RED - SIMULATION
-

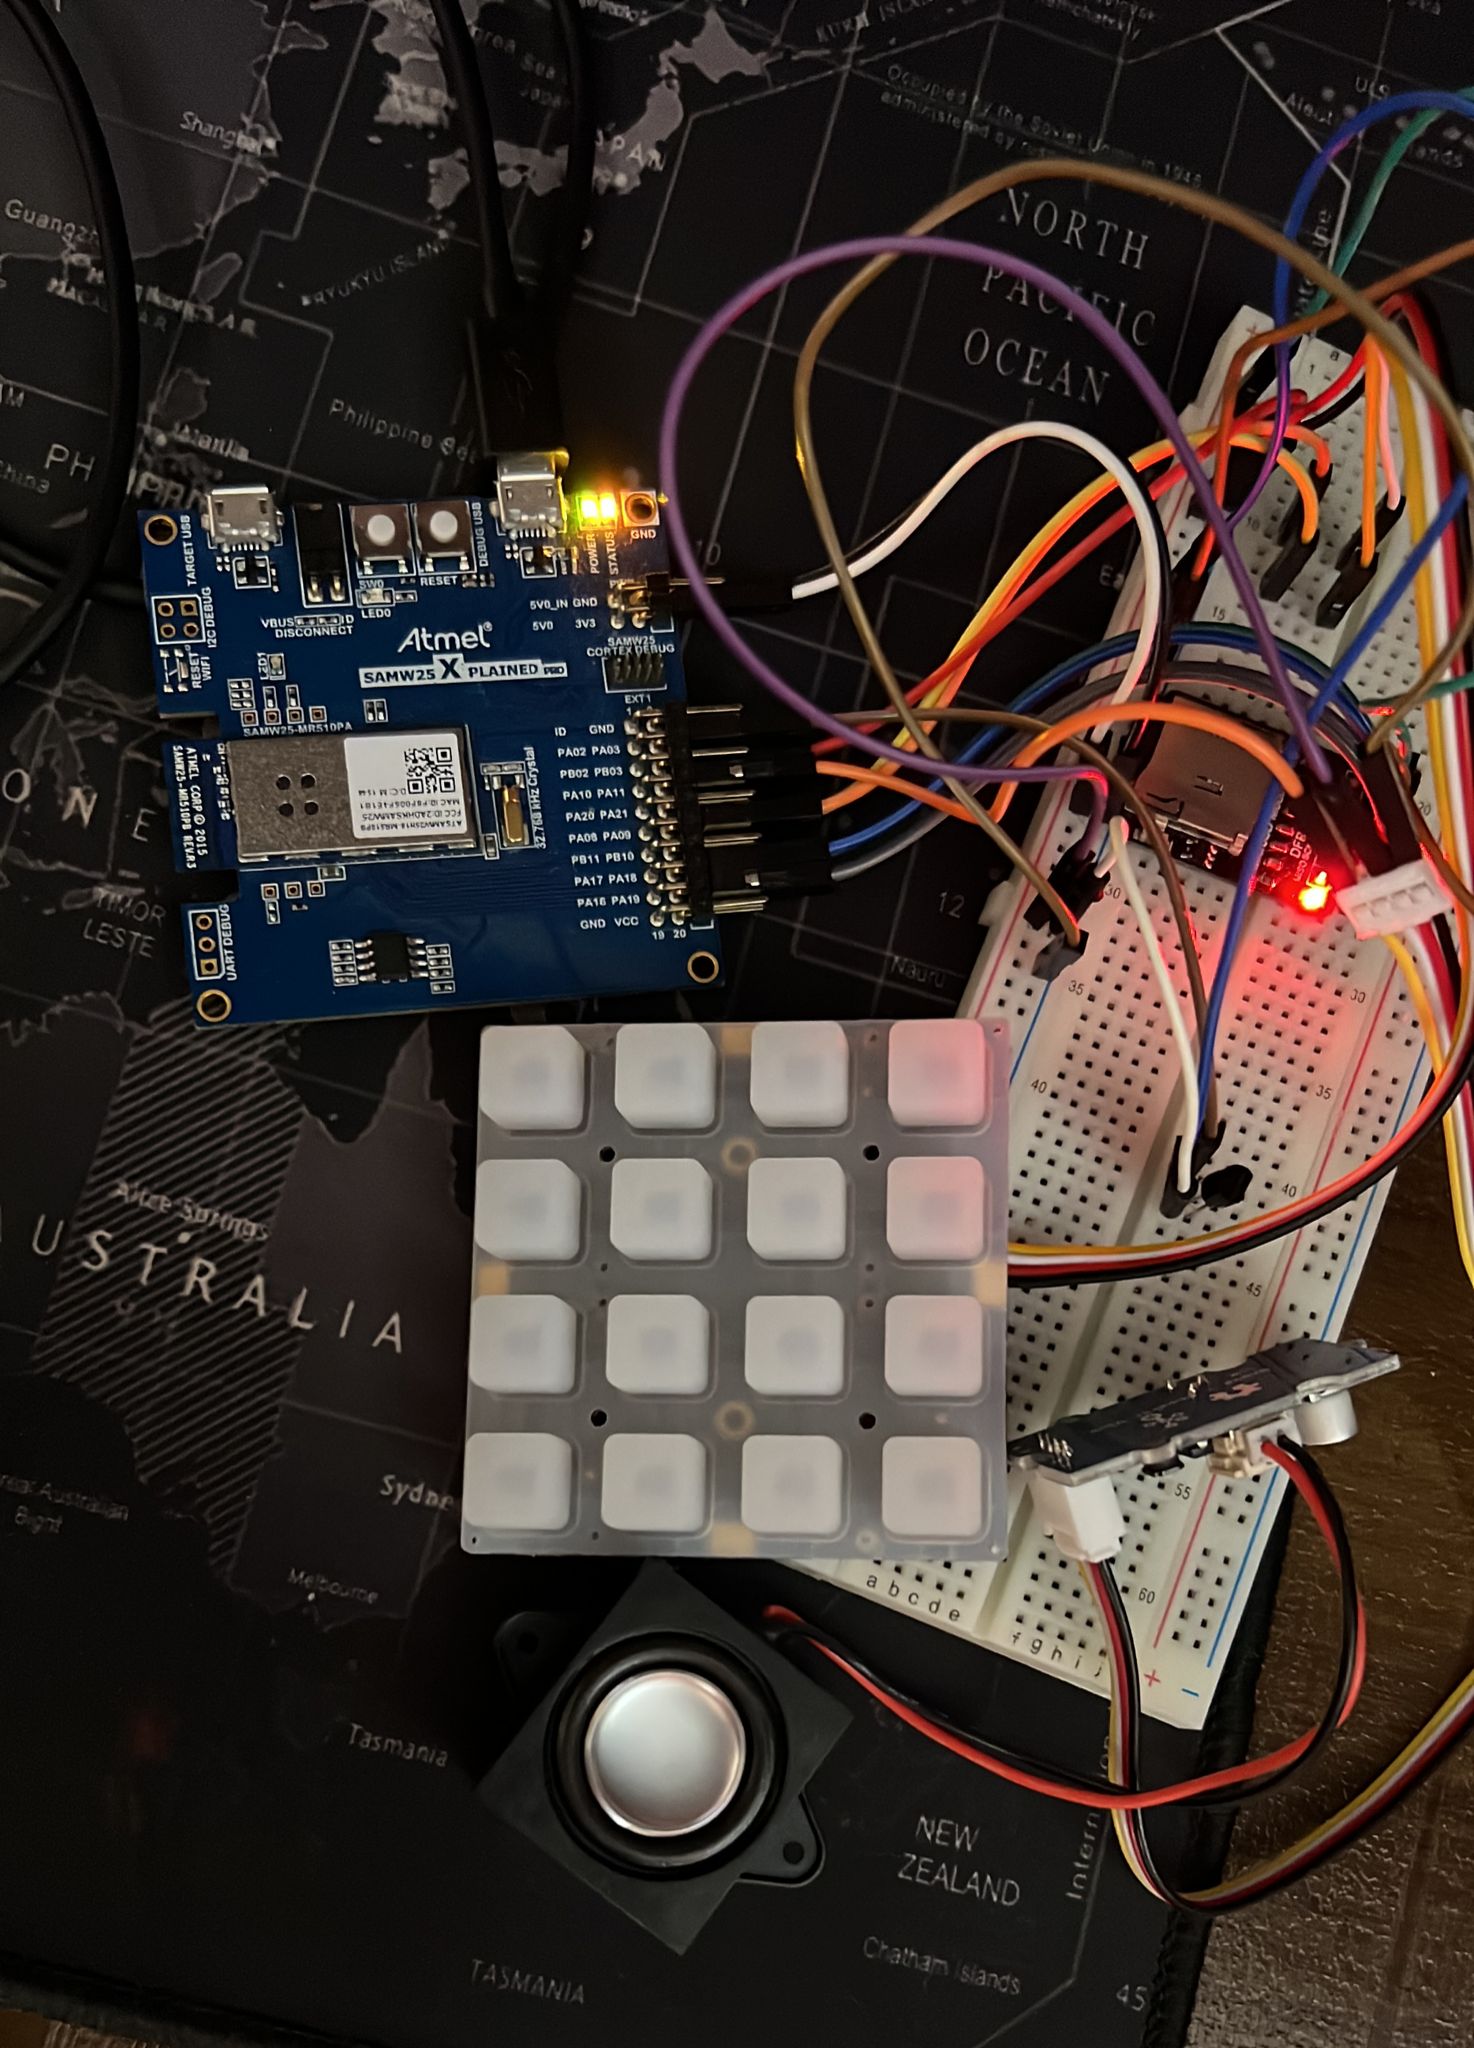
SETUP
-
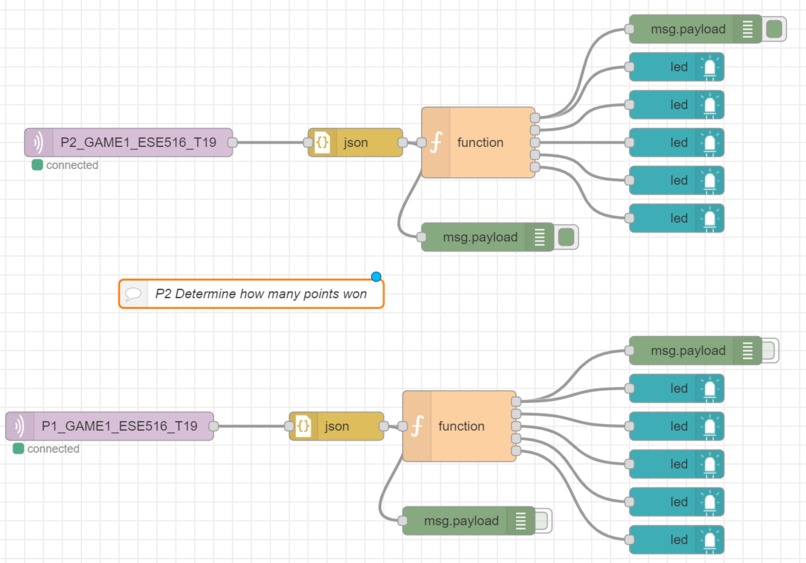
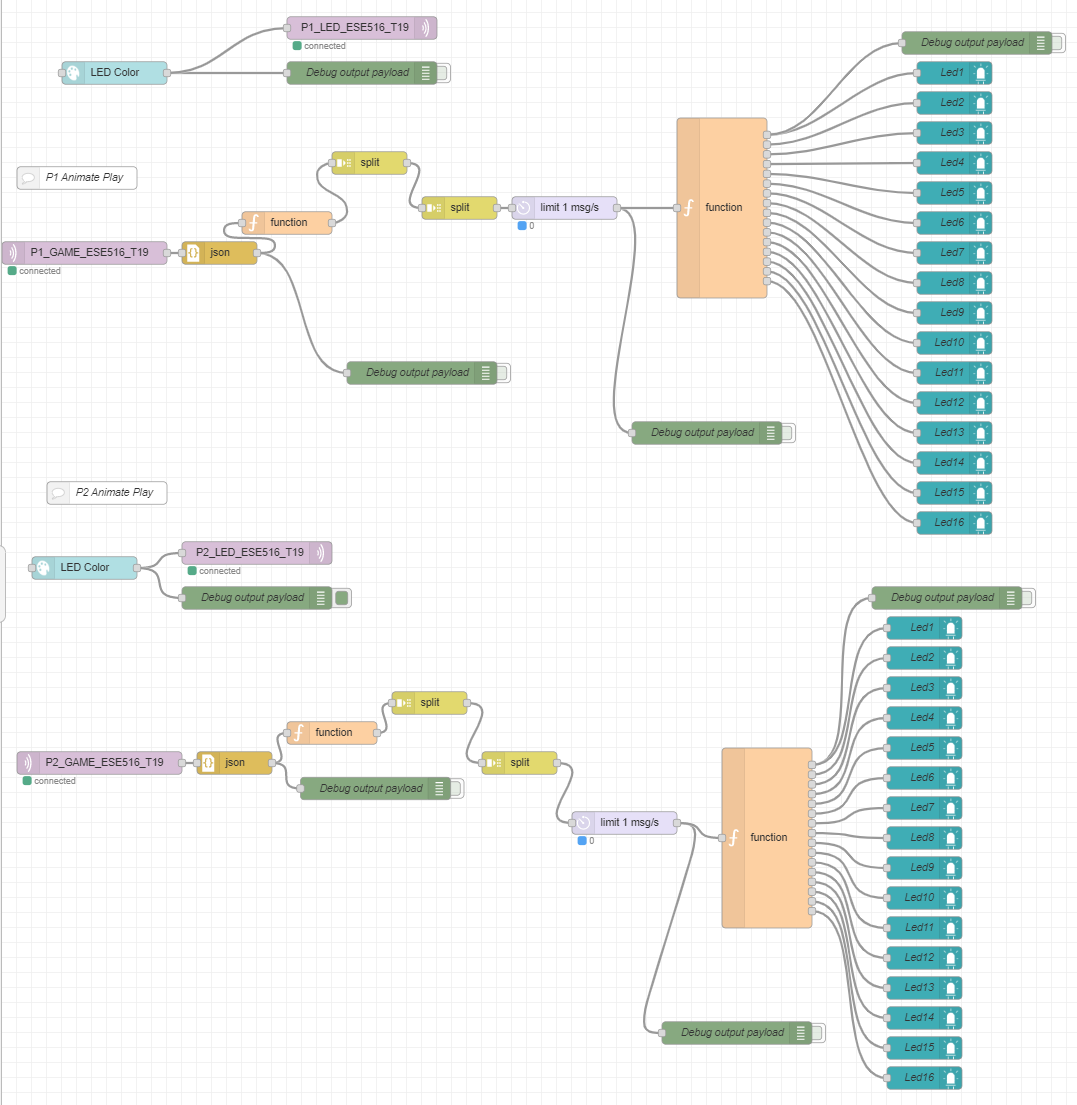
Node Red Backend
-

Node Red Backend
-
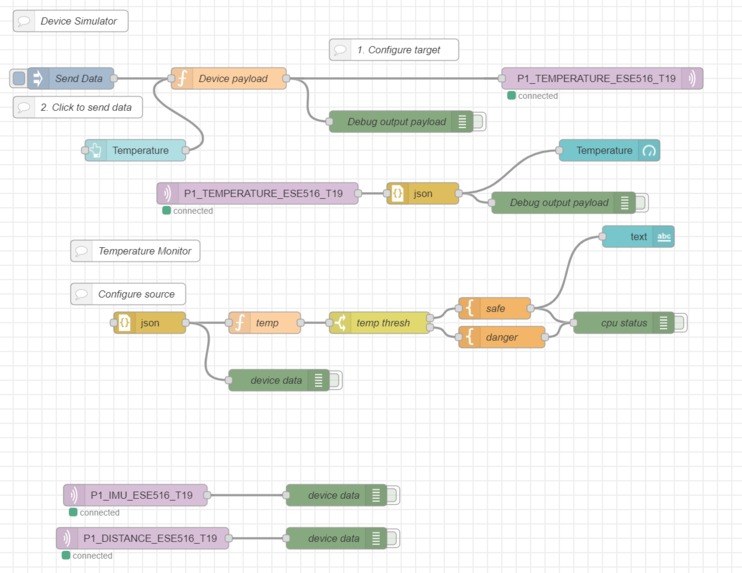
Node Red Backend


What it Does:
Our Spectacular project is built to play a Simon Says game on a Neotrellis keypad. Two players take turns pressing a sequence of buttons, which entails copying the other player's sequence with an additional button press at the end. The players must watch the LED panel on the Node Red Dashboard to see the sequence they must execute next. Each correct sequence gives the player a point, but if one of the players messes up the sequence, the other player wins! To add to this, we added a ear pleasing sound speaker as we press each button to confuse the players of the pattern! The game is not only fun but can also be used as a musical instrument! Each button on the keypad has a different sounds, so different notes can be played by pressing different buttons!
Inspiration:
We wanted to merge a classic game to sound, and this project gave us the ability to do so. Since our team has a musical background, we were inspired by the similarity of the Neotrellis keypad and a DJ Launchpad and hence came up with the concept to make a Simon Says game with the additional functionality of playing sound. We also wanted to incorporate IoT tools such as Node Red and HiveMQ into our system to make it more interactive. Therefore, this device can also be used to teach anyone to play certain musical notes!
How it works:
Overview:
This projects shows a fun game where two players are on the Node Red dashboard paying attention to the opponent pressing buttons on a Neotrellis 4x4 keypad. They are supposed to repeat the pattern that their opponent pressed, with an additional button press! This leads to a chain of pattern until one of them messes up the sequence! It is testing your memory to see if you can compete to get 5 points first!
PCB:
We developed a custom PCB board that is powered by a lithium polymer battery with converters to change the voltage to power the system. The PCB board has components such as a SAMD21G18A MCU, an SD card holder, FTDI chip, and USB ESD protection. We decided to use an external speaker that connects to the board so the sound is louder and nicer and the board would be smaller.
Bootloader:
We developed an OTAFU bootloader that updates the firmware using an HTTP server and the SD card on the PCB board. Once this is up to date, the main program can execute.
Program and Game
Player 1 starts the game by pressing any button on the keypad. Player 2 needs to watch the Node Red Player 1 LED dashboard to see which button was pressed, and then they should press that button on their keyboard along with another button. Player 1 should then watch the Node Red Player 2 LED dashboard to see what sequence of buttons was pressed, and then they should press that same sequence and then an additional button. This pattern repeats until 5 points are won or until one of the players presses an incorrect sequence. The points are displayed on the Node Red dashboard, under Player 1 Score and Player 2 Score. If a player messes up the sequence, the other player wins. On the Node Red Dashboard, the button, "Initialize Game", must be pressed to restart the game.
The command line interface (CLI) also has a variety of functions that can be used. The command, "getbutton", allows the user to play back what buttons they just pressed. The command, "game", allows a player to start the game of Simon Says. The command, "fw", triggers an over the air firmware update. The command, "led", allows the user to turn on or off a specific led on the keypad and determine its color. The command, "reset", allows the board to reset. The command, "game", sends game data to Node Red. The command, "gettemp", measures the temperature of the player's surroundings and sends it to be displayed on the Node Red dashboard.
Musical Instrument
This application may also be used as a musical instrument to play notes or a short melody. This is done by pressing buttons on the keypad, each of which has a different note programmed to it. The sound comes out of the speaker, which is driven by a PWM. The PWM is adjusted for each button, so each button has a different frequency of sound when pressed.
Temperature
This application is able to take the temperature of the surrounding area of the player through the use of a temperature sensor. The temperature is taken by executing the command, "gettemp" on the CLI, and this causes the temperature sensor to read the temperature (in Celsius) and send the information to Node Red, where it is then displayed on the dashboard.
Node Red
The Node Red dashboard allows each player to see how many points they have, the button presses of the other player (simulated on the LED board), and the temperature. The button, "Initialize Game", allows the dashboard to reset so the players can play another game of Simon Says.
Challenges we ran into:
Our first challenge was creating the PCB itself, as we had to ensure that our final PCB design had no errors from Altium. When picking the components for the PCB, we had to make sure that it was available for purchase and that our BOM was up to date. Placing the components on the PCB and placing the traces proved to be difficult sometimes, as we had to make full use of the top and bottom layer to make sure traces did not overlap with each other, especially since we had to have multiple traces connect from the top to the bottom.
We also could not pick up our PCB in time to execute the final project, as our PCB was shipped in the middle of finals week. This caused our original design to have to change, since the SAMW25 Xplained Pro does not have the same pins and the same amount of pins available on the header as the SAMD21 MCU. We were planning on using LEDs to visualize points won for the Simon Says game, however, there are not enough pins on the header for us to implement this aspect, so we decided to solely execute this in Node Red. Additionally, the pins we wanted to use for the temperature sensor and the speaker are not available on the SAMW25 Xplained Pro, so we had to adjust the wiring of our system and change the pins so we could build our project.
Another challenge we ran into was implementing the temperature sensor because it used ADC functionalities and we had trouble initializing the ADC. Additionally, we had the temperature sensor initially driven by 3.3 V, however, we discovered that the temperature sensor would not work at 3.3 V because there was not enough power so we moved it to 5 V and then it worked.
The PWM functionality also proved challenging, from initialization to execution. Initially, the PWM worked perfectly when used in a project solely centered around PWM, but when the code was ported to the entire project, the PWM failed to work. We were able to fix this by changing some of the settings and where the PWM was initialized.
Setting up Node Red was a little tricky since we needed to make sure the QoS was consistent and the right topics were subscribed to. Additionally, we had to use functions within Node Red so the dashboard would execute what we needed it to. Lastly, we had to change some of the data packets so Node Red would receive them properly and be able to understand the data.
What we Learned with the prototype:
We learned how to use Node Red to create an interactive application that is easy to use. We also learned how to initialize and use an SDC, PWM, and I2C on the SAMW25 Xplained Pro. There are resources, such as FreeRTOS and ASF, that provide initialization code that can be altered to the user since setup from scratch requires a lot of in depth knowledge about the specific MCU being used. CLI threads were also implemented to be able to send commands to the MCU.
What we learned:
We learned a lot about how embedded systems work in general. We expanded our knowledge on IoT platforms and the level of control we can achieve on external devices which come together to form a standalone device. We learned how to draw schematics and design a working PCB in Altium. CLI threads showed us the importance of how we can debug when we get stuck on a checkpoint. We also learned about MQTT and how to utilize it to send and receive data for an IoT device.
Next Steps:
The next step would be to implement a 4 player game to increase the complexity. We could also improve by displaying a random pattern after each user enters his pattern! Additionally, we could connect more keypads so more buttons with different notes can be pressed for both the game and for the instrument.

Log in or sign up for Devpost to join the conversation.