-
-
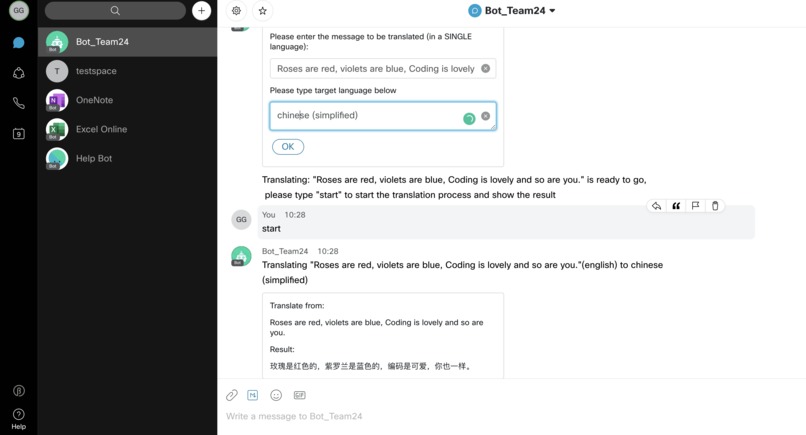
translating "Roses are red, violets are blue, Coding is lovely and so are you." to Simplified Chinese

Cisco Webex Teams Bot Extensions:
The whole story
For this hackathon, we added features to Webex like translation for all languages in the chat window, and we tried to add natrual language processing to support a more conversational bot and possibly a more interactive personal assistant to do more helpful things. (unfortunately not completed as time's up)
But, the value of these two days cannot be ignored. We learned a lot from this Hackathon experience. By attending Cisco's workshop, we learned how to use some of their Webex tools and how to extend the features of Webex Teams. As a group, we also learned more about teamwork, how to generate ideas and how to build a useful application from a given environment.
What we have done is successfully adding a translation function for our bot "Bot_Team24", now it can autodetect and translate a sentence in any language(as long as you input the right language, Klingon is not supported!!), and translate it into any language you want. We tried to add a conversational feature to it but it was not completed, unfortunately.
The main challenge we met was integrating Mindmeld into our bot. It seems that we need to deploy a new server for it but we ran out of time so we had to leave it as it was. but our goal is to complete the conversational bot in Webex Teams using our self-defined dialog library.
Here's the user instruction: Prerequisites
A Cisco Webex Teams bot is an automated user within the Webex Teams platform that can be interacted with, enhancing the user experience within an organisation.
Create a Webex account
Go to Cisco Webex for Developers and click Sign up on the top right corner. Fill in your details and follow the instructions to create an account.
Create a Webex Bot
Go back to Cisco Webex for Developers and log in with your account details.
Click Documentation on the top bar and select the Bots section on the left. On this Bots Documentation webpage you will find an extended explanation on what are Bots and how to create them.
To proceed, click on the Create a Bot button and fill up all the required information to describe your new Bot. Finally, scroll down and click on the Add Bot button.
Now that your Bot has been created, save the Access Token since you will need it later. (The existing one in code is for hackathon presentation use, will be discarded after 9 Feb. 2020.)
Install Git
"Git is a free and open source distributed version control system designed to handle everything from small to very large projects with speed and efficiency." Link to install git.
Install Python
"Python is an interpreted, high-level, general-purpose programming language" Link to install latest python version.
Download Ngrok
"Ngrok exposes local servers behind NATs and firewalls to the public internet over secure tunnels." Link to download ngrok.
Setup Bot
1. Open Terminal and Define Working Directory
Open a terminal and you can start working on your home directory (/Users/<username> for macOS, <root>\Users\<username> for Windows or /home/<username> for Linux). Otherwise, you can navigate to another directory using cd <other-directory>.
2. Clone git Repository and Install Dependencies
Clone the git repository to your local machine by running the following command on your terminal.
git clone https://github.com/sarupanda/webex-teams-python-bot.git --recursive
To go to the directory you have just cloned simply run cd webex-teams-python-bot. Try running ls and check that you can see all the files you will need to get your Bot up and running.
After installing Python, open terminal and run the following command to install dependencies.
pip3 install flask requests ./webexteamssdk
Run Bot
1. Run Ngrok
Unzip the ngrok file that you downloaded above and copy the executable file to the webex-teams-python-bot folder. On a terminal window, go to this directory and run the following command to expose a web server on port 5000 of your local machine to the internet.
./ngrok http 5000
2. Configure Access Token
Open hello_bot.py with your favourite text editor. If you still do not have one, take a quick look at Visual Studio Code, Atom or (in case you are a very brave developer) Vim.
Replace <my-bot-access-token> on Line 8 with the Access Token you saved during the Create a Bot step.
3. Run Bot
On the terminal window, run the following to get your bot working.
python3 hello_bot.py
4. Interact with your Bot
i. a build-in function: creating polls in a chat space.
Login to your Webex Teams account and Create a Space by clicking the + button. Then, enter your Bot Username (something like XXXX@webex.bot) as well as your own email address. The bot has four commands: create poll, add option, start poll and end poll. To invoke one of those commands, type @<bot_name>, a space, and then the command.
ii. Add-on function(what we did!): Adding translation for bot.
Login to your Webex Teams account clicking the bot you just created to start a chat window. Then, enter translation and hit the enter key. The bot will give a card in the chat window to obtain the translation source. after finishing the input, click 'OK' button and type a command start in the chat window to show the translation result.
For example, if your bot was named John, to create a poll, you would open a chat with bot 'John' and type translation, fill in the card with "I love you" and target language "japanese", click 'OK' and input start to get a result "わたしは、あなたを愛しています".
Resources
- Cisco Webex for Developers: Platform documentation
- Webex Teams APIs: Webex Teams SDK documentation
- Webex Cards Guide: Webex Teams SDK documentation for sending Adaptive Cards
- Adaptive Cards Spec: Schema Explorer for Adaptive Cards and interactive online demo
- Cisco Webex Teams App Hub: Get some inspiration to develop your own bot from this list of Cisco Webex Teams Bot examples
- RapidAPI: The world's largest API directory
- Googletrans-api An api to translate input messages.
Built With
- googletrans-api
- mindmeld
- python


Log in or sign up for Devpost to join the conversation.