-
-

Logo
-

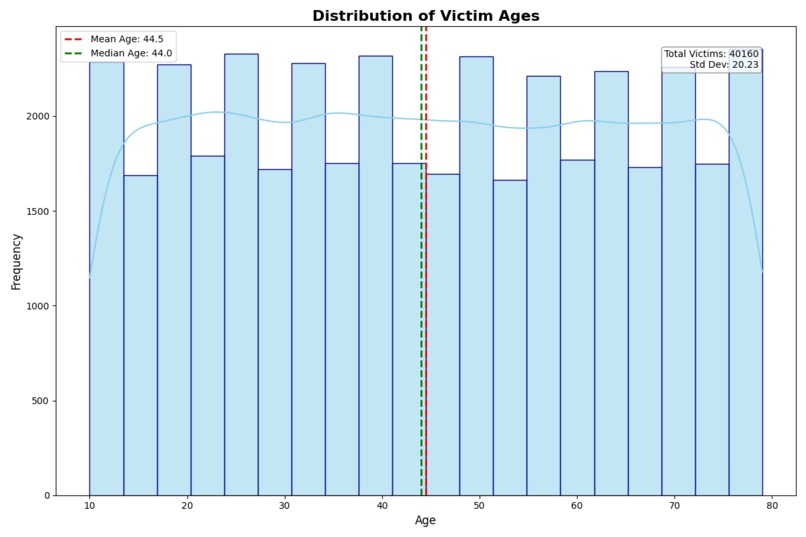
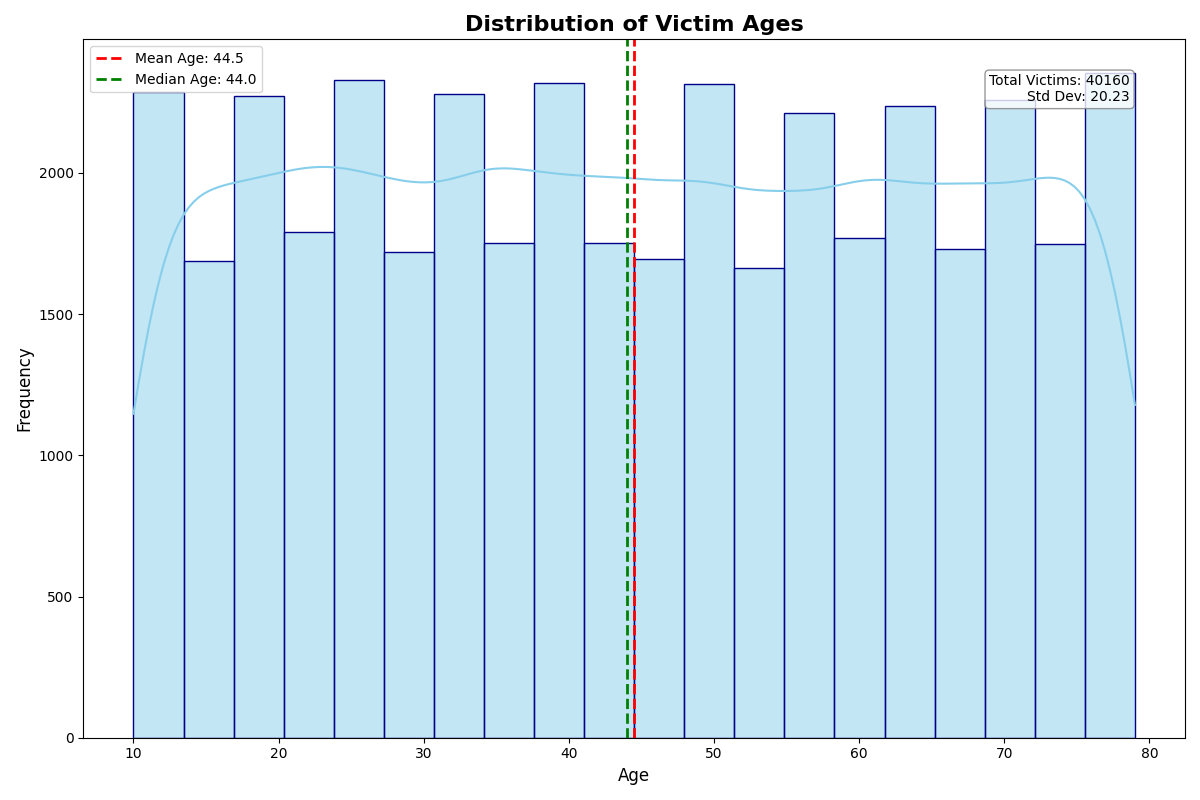
Graph 1
-
Graph 3
-

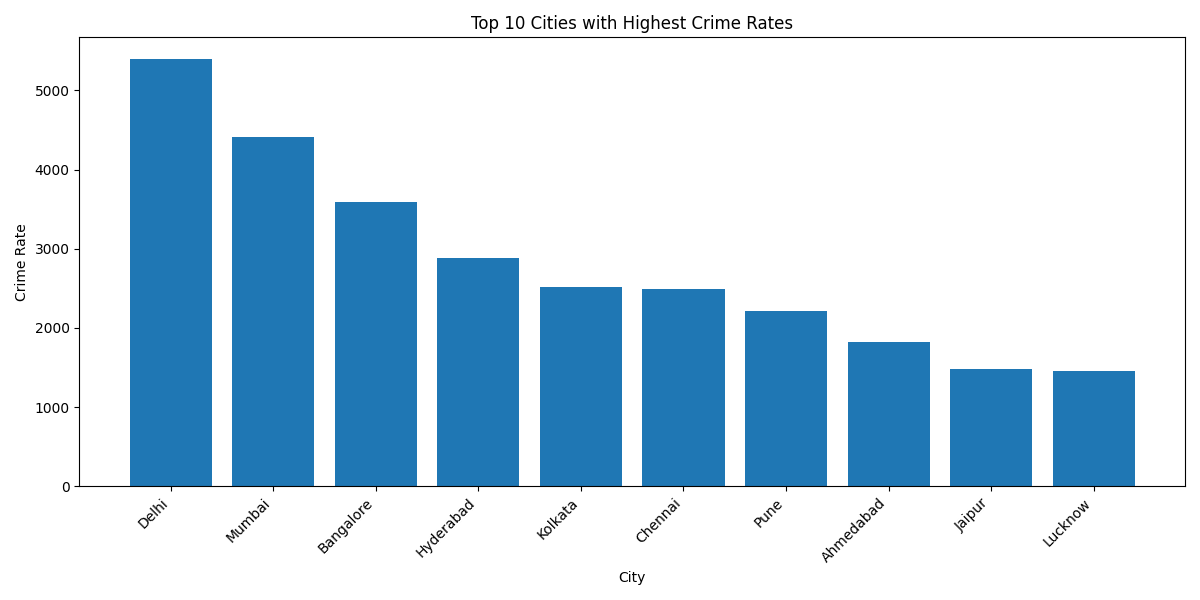
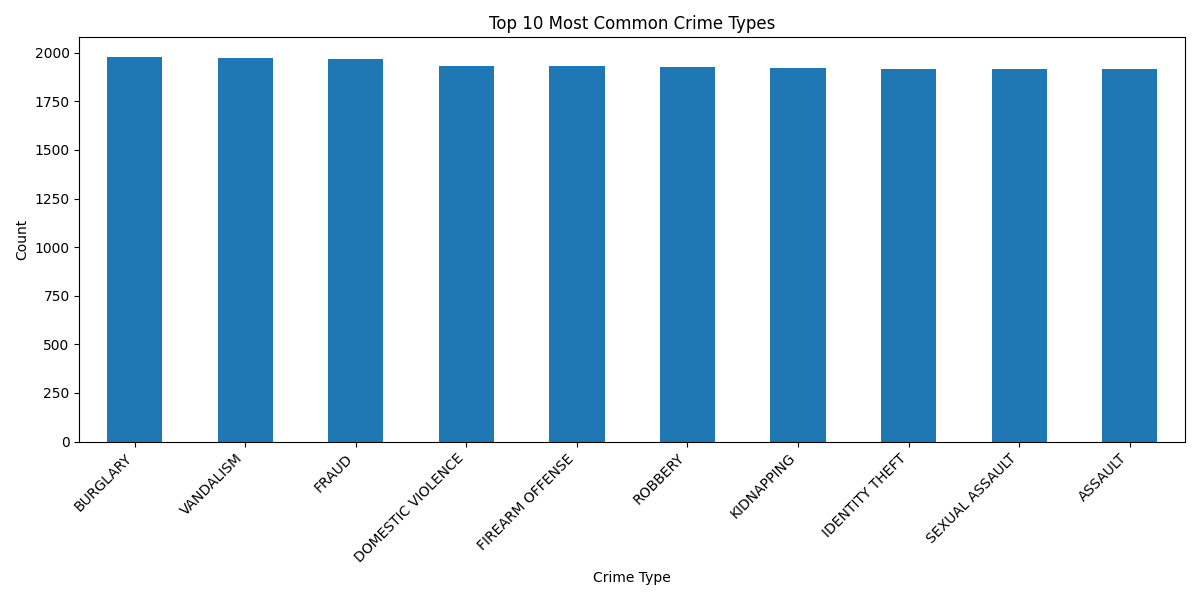
Graph 2
-
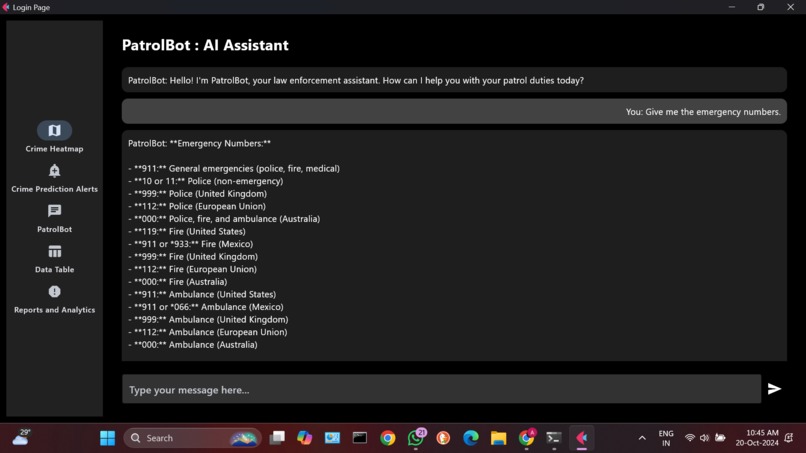
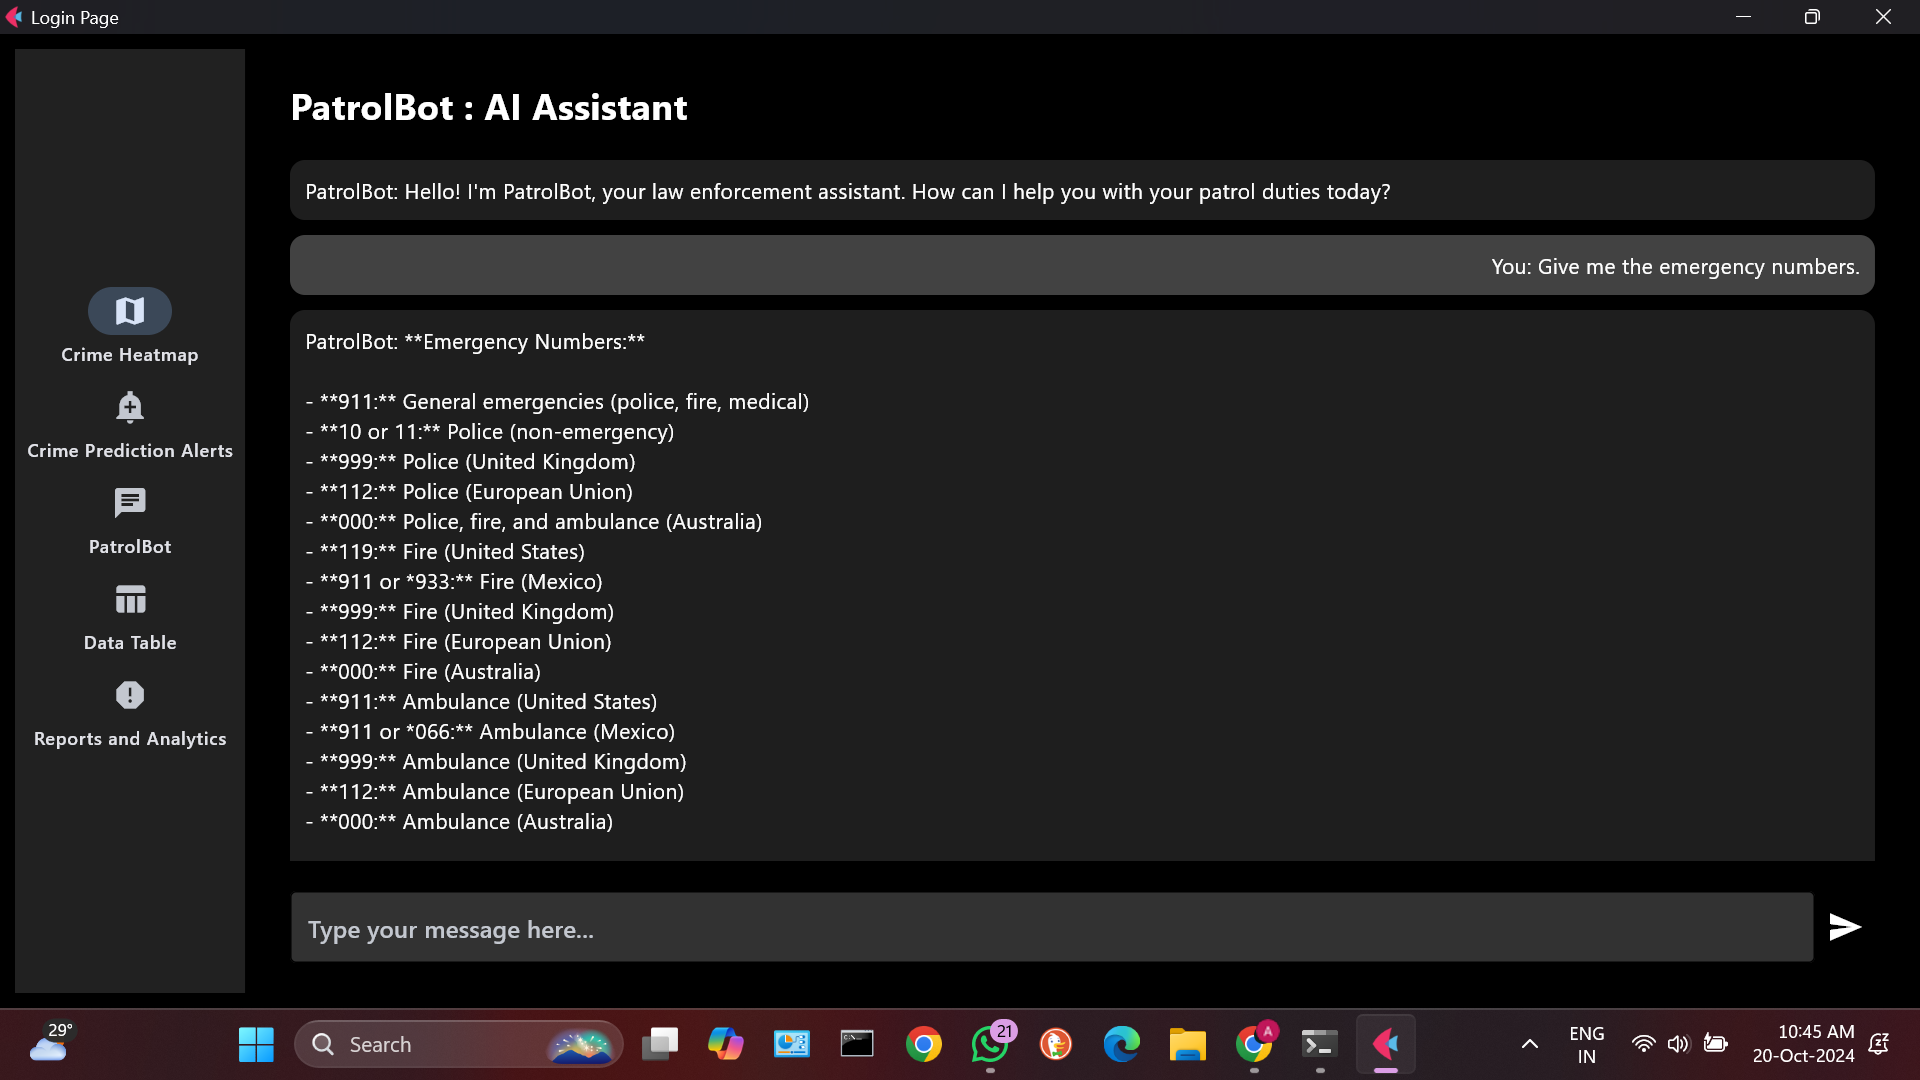
Chatbot
-
Login page
-

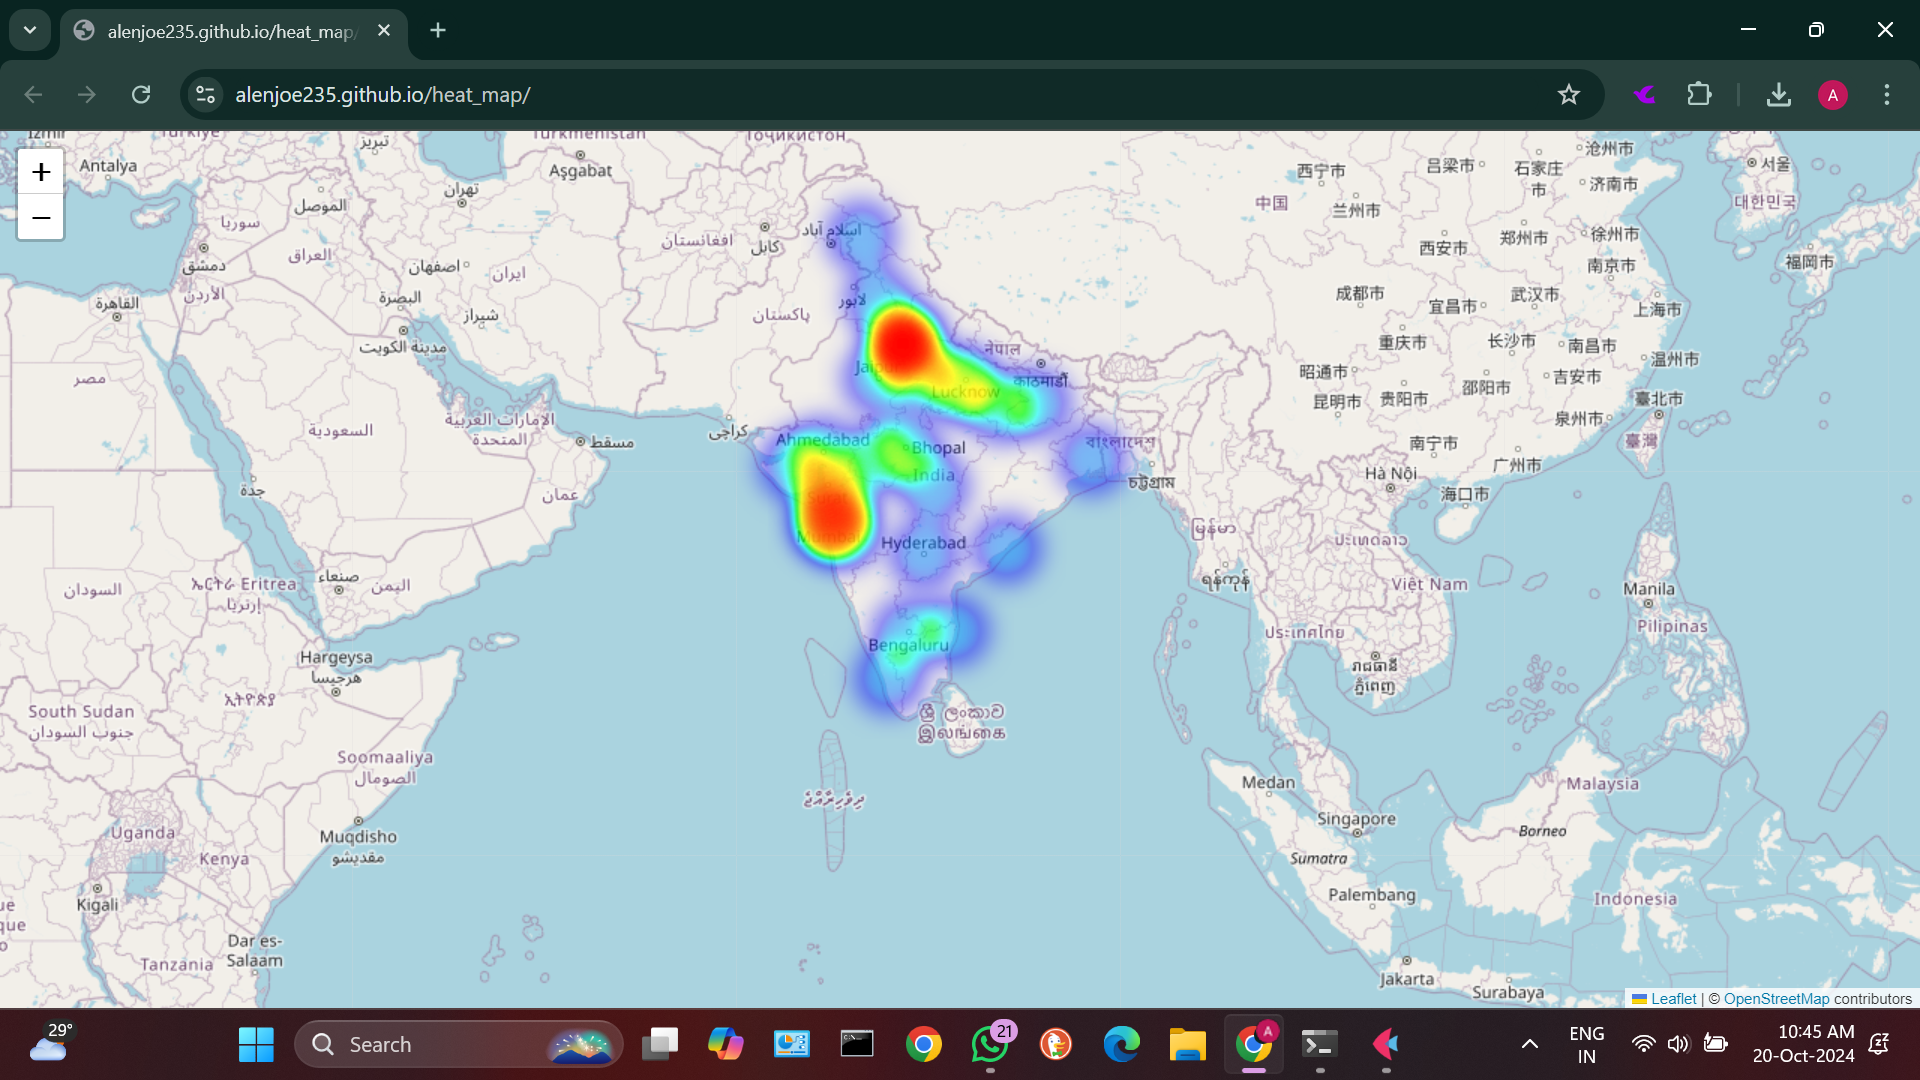
Crime based heat map
-

A view of the map


My Project Journey: Crime Prediction Model
Inspiration
The inspiration for this project came from the increasing need for data-driven solutions in urban planning and public safety. I noticed that crime prediction could significantly benefit from machine learning techniques, allowing law enforcement agencies to allocate resources more effectively and proactively address potential crime hotspots. This motivated me to create a model that could analyze historical crime data and predict future incidents based on various factors such as location, time, and type of crime.
What I Learned
Throughout the development of this project, I gained valuable insights and skills, including:
- Machine Learning Fundamentals: I deepened my understanding of machine learning concepts, particularly in natural language processing (NLP) and classification tasks.
- Transformers Library: I learned how to use the Hugging Face transformers library, which is essential for working with state-of-the-art NLP models like BERT.
- Data Preprocessing: I gained experience in data cleaning and preprocessing, which is crucial for preparing datasets for machine learning models.
- Model Training and Evaluation: I learned how to train models effectively and evaluate their performance using metrics like accuracy and classification reports.
- Error Handling: I improved my skills in debugging and error handling, particularly when dealing with module imports and package dependencies.
How I Built My Project
Step 1: Planning
I started by outlining the key features I wanted in my crime prediction model. This included:
- Data ingestion and preprocessing
- Model training using historical crime data
- Prediction capabilities based on user input
Step 2: Setting Up the Environment
I set up a virtual environment using venv to manage dependencies. This ensured that my project had a clean and isolated environment.
python -m venv myenv
source myenv/bin/activate  # On Windows, use `myenv\Scripts\activate`
pip install -r requirements.txt
Step 3: Data Collection and Preprocessing
I collected historical crime data and began preprocessing it. This involved cleaning the data, handling missing values, and encoding categorical variables. I also created a custom dataset class to facilitate loading the data into the model.
Step 4: Model Development
I implemented a BERT-based model for crime type classification. The model was trained using the transformers library, which provided pre-trained models and tokenizers. The training process involved:
- Splitting the data into training and validation sets
- Initializing the BERT tokenizer and model
- Defining a training loop to optimize the model's parameters
Step 5: Evaluation
After training the model, I evaluated its performance using a classification report, which provided insights into precision, recall, and F1-score for each class. This helped me understand how well the model was performing and where improvements were needed.
Step 6: Prediction Functionality
I implemented a prediction function that allows users to input city, location, and time to receive predictions about potential crime types. This function leverages the trained model to provide real-time insights.
Step 7: Containerization (Optional)
To ensure consistent deployment, I considered containerizing the application using Docker. This would allow the model to run in any environment without dependency issues.
Challenges Faced
- Module Import Errors: I encountered a ModuleNotFoundError for the transformers library, which required me to ensure that all dependencies were correctly installed in my virtual environment. This was resolved by installing the necessary packages using pip.
pip install transformers torch
Data Quality Issues: The historical crime data had inconsistencies and missing values, which required extensive cleaning and preprocessing. This taught me the importance of data quality in machine learning projects.
Model Overfitting: During training, I noticed that the model was overfitting to the training data. I addressed this by implementing techniques such as dropout and early stopping.
Time Management: Balancing this project with other commitments was challenging. I learned to set realistic goals and break the project into smaller, manageable tasks.
Implementation of Orkes Conductor
In addition to the core machine learning components, I integrated Orkes Conductor into this project to manage and orchestrate the workflow. Orkes Conductor, a cloud-native workflow orchestration platform, helped streamline our data processing and model prediction pipeline. Here's how I implemented it:
Step 1: Setting Up Orkes Conductor
Account Creation: I signed up for an Orkes Conductor account and set up a new project in their cloud console.
API Key Generation: Generated API keys for authentication with the Conductor server.
SDK Installation: Installed the Orkes Conductor Python SDK:
pip install conductor-python
Step 2: Defining Workflows
I created a main workflow for our crime prediction process:
- Data Ingestion Task: Retrieves the latest crime data from our database.
- Data Preprocessing Task: Cleans and prepares the data for the model.
- Model Prediction Task: Runs the crime prediction model on the prepared data.
- Result Storage Task: Stores the prediction results back in the database.
Here's a simplified example of how I defined this workflow:
from conductor.client.workflow import WorkflowBuilder

workflow = WorkflowBuilder(
    name="crime_prediction_workflow",
    version=1,
    description="Workflow for crime prediction model"
)

workflow.add_task(name="data_ingestion", task_reference_name="ingest_data")
workflow.add_task(name="data_preprocessing", task_reference_name="preprocess_data")
workflow.add_task(name="model_prediction", task_reference_name="predict")
workflow.add_task(name="result_storage", task_reference_name="store_results")

workflow_def = workflow.to_workflow_def()
Step 3: Implementing Tasks
For each task in the workflow, I implemented a corresponding Python function. Here's an example of the model prediction task:
from conductor.client.worker.worker_task import worker_task

@worker_task(task_definition_name="model_prediction")
def predict_crime(input_data):
    # Load the trained model
    model = load_model()

    # Perform prediction
    predictions = model.predict(input_data)

    return {"predictions": predictions.tolist()}
Step 4: Running Workers
To execute these tasks, I set up worker processes that listen for task assignments from the Conductor server:
from conductor.client.automator.task_handler import TaskHandler

task_handler = TaskHandler(
    workers=[predict_crime],
    url="https://play.orkes.io/api",
    api_key=YOUR_API_KEY,
    api_secret=YOUR_API_SECRET
)

task_handler.start_processes()
Step 5: Triggering Workflows
I implemented a function to trigger the workflow on a schedule or based on certain events:
from conductor.client.orkes_clients import OrkesClients
from conductor.client.workflow.conductor_workflow import ConductorWorkflow

def run_prediction_workflow():
    orkes_client = OrkesClients(
        server_api_url="https://play.orkes.io/api",
        api_key=YOUR_API_KEY,
        api_secret=YOUR_API_SECRET
    )

    workflow = ConductorWorkflow(
        name="crime_prediction_workflow",
        version=1,
        client=orkes_client
    )

    workflow_instance = workflow.execute()
    return workflow_instance.workflow_id

# Trigger the workflow
workflow_id = run_prediction_workflow()
print(f"Workflow started with ID: {workflow_id}")
Benefits of Using Orkes Conductor
- Scalability: Orkes Conductor allowed me to easily scale our workflow as the data volume increased.
- Visibility: The Conductor UI provided clear visibility into the workflow execution, making it easier to monitor and debug.
- Error Handling: Conductor's built-in retry mechanisms and error handling improved the robustness of our pipeline.
- Decoupling: By separating the workflow logic from task implementation, I achieved better modularity in the codebase.
Challenges and Solutions
- Learning Curve: Initially, understanding Conductor's concepts took some time. I overcame this by thoroughly studying their documentation and examples.
- Task Granularity: Deciding on the right level of task granularity was challenging. I iteratively refined our workflow, breaking down larger tasks when they became too complex.
- State Management: Managing state between tasks required careful consideration. I used Conductor's built-in payload management features to pass data between tasks effectively.
Conclusion
Building this crime prediction model was a rewarding experience that taught me a lot about machine learning, data preprocessing, and model evaluation. I am excited to continue improving the model and exploring new features that can enhance its predictive capabilities. This project not only addressed a significant societal issue but also provided me with valuable skills that I can apply in future endeavors.
Integrating Orkes Conductor into our crime prediction project significantly improved its scalability, reliability, and maintainability. It allowed me to focus on implementing the core machine learning logic while offloading the complexity of workflow management to a robust, cloud-native platform. This experience has not only enhanced this particular project but also provided me with valuable skills in workflow orchestration that I can apply to future data science and machine learning projects.


Log in or sign up for Devpost to join the conversation.