-
-
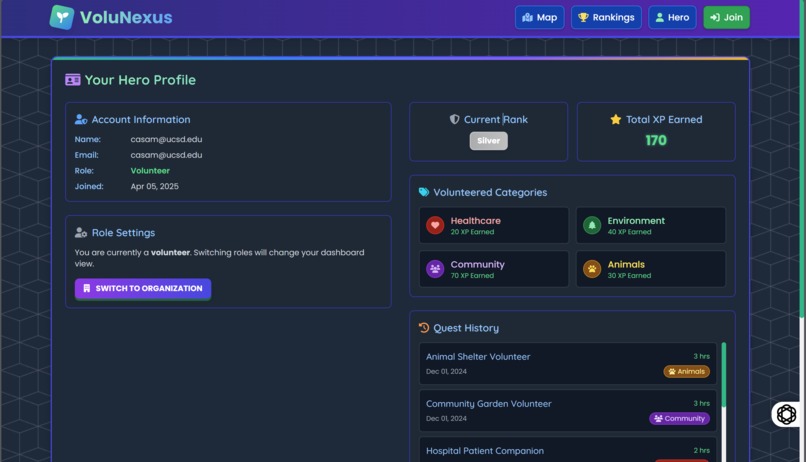
We forgot to show the profile in the video and dont have enough time to redo it so here's a screenshot.

This is a full-stack web application that allows you to discover and share volunteer opportunities via an interactive map. Built with Node.js, Express, MongoDB, and Tailwind CSS.
🌟 Inspiration
We overheard some kids at Warren Lawn talking about how their parents were making them volunteer for an animal shelter, which they were not very happy about. Recalling our own experience, many students and community members want to volunteer but struggle to find opportunities that are both local and engaging and usually do it just because of pressure from parents and for college admissions. We imagined a gamified, interactive platform that not only makes volunteer opportunities easy to discover but also motivates users to keep participating and, most importantly, have fun! That’s how VoluNexus was born.
💡 What it does
VoluNexus is a full-stack web application that allows users to:
- Discover nearby volunteer opportunities through an interactive map.
- Register for volunteer opportunities and track their volunteer hours.
- Earn points and climb the leaderboard.
- Organizations can post and manage their volunteer events.
With a playful quest-style interface, users feel like they’re embarking on real-world missions, making volunteering fun, meaningful, measurable, and comparable with their peers.
🛠️ How we built it
- Frontend: HTML, Handlebars.js, Tailwind CSS
- Backend: Node.js, Express
- Database: MongoDB (hosted via MongoDB)
- Auth: Auth0 for secure authentication and role-based access
- Mapping: Google Maps JavaScript API for the interactive volunteer map
We used modular architecture for easy scalability and split the logic across controllers, routes, and views. Styling was enhanced using Tailwind CSS for a clean and modern interface.
🚧 Challenges we ran into
- Google Maps Integration: Working with dynamic event pins and geolocation required a lot of tweaking.
- Auth0 Role Management: Differentiating between volunteers and organizations securely was tricky.
- Responsive Design: Ensuring a seamless experience across devices took several iterations.
- Data Relationships: Linking volunteers, organizations, and event data efficiently in MongoDB was challenging.
🏆 Accomplishments that we're proud of
- Fully integrated authentication and login system with distinct roles
- A smooth, responsive UI with real-time map interaction
- Gamification features like point tracking and leaderboards
- A beautiful and intuitive interface that mimics a fantasy quest system
📚 What we learned
- How to work with external APIs like Google Maps and Auth0
- Effective use of Tailwind CSS for layout and design
- Structuring large-scale Node.js applications
- The importance of user experience in making functional platforms feel fun and engaging
🚀 What's next for VoluNexus
- VolunteerMatch API integration and feature to confirm actual attendance
- Quest Chains: Multi-part volunteer challenges
- Social Features: Friend lists and team volunteering to accomplish some quests, join quests as teams
- Admin Dashboard: For deeper analytics and management
- Mobile App: Build a React Native version for on-the-go access
Prerequisites
- Node.js (v14 or higher)
- MongoDB Atlas account
- Auth0 account
- Google Maps API key
Setup
Clone the repository:
git clone https://github.com/yourusername/volunteer-map.git
cd volunteer-map
Install dependencies:
npm installCreate a
.envfile in the/configdirectory with the following variables:PORT=3000 MONGODB_URI=your_mongodb_connection_string SESSION_SECRET=your_session_secret AUTH0_DOMAIN=your_auth0_domain AUTH0_CLIENT_ID=your_auth0_client_id AUTH0_CLIENT_SECRET=your_auth0_client_secret AUTH0_CALLBACK_URL=http://localhost:3000/callback GOOGLE_MAPS_API_KEY=your_google_maps_api_keySet up MongoDB Atlas:
- Create a cluster in MongoDB Atlas
- Create a database user
- Get your connection string and add it to the
.envfile
Set up Auth0:
- Create a new application in Auth0 Dashboard
- Configure your application settings
- Add callback URLs
- Get your Auth0 credentials and add them to the
.envfile
Set up Google Maps:
- Create a project in Google Cloud Console
- Enable Maps JavaScript API and Places API
- Create an API key and add it to the
.envfile
Running the Application
Start the development server:
npm run dev
Or for production:
npm start
The application will be available at http://localhost:3000
Project Structure
volunteer-map/
├── config/               # Configuration files
├── controllers/          # Route controllers
├── middleware/           # Express middleware
├── models/               # Mongoose models
├── public/               # Static files
│   ├── css/              # CSS files
│   ├── js/               # Client-side JavaScript
│   └── images/           # Image assets
├── routes/               # Express routes
├── views/                # Handlebars templates
│   ├── layouts/          # Page layouts
│   └── partials/         # Reusable components
├── app.js                # Application entry point
└── package.json          # Project dependencies
License
This project is licensed under the MIT License.
Built With
- auth0
- css
- express.js
- google-maps
- mongodb
- node.js
- tailwind

Log in or sign up for Devpost to join the conversation.