-
-
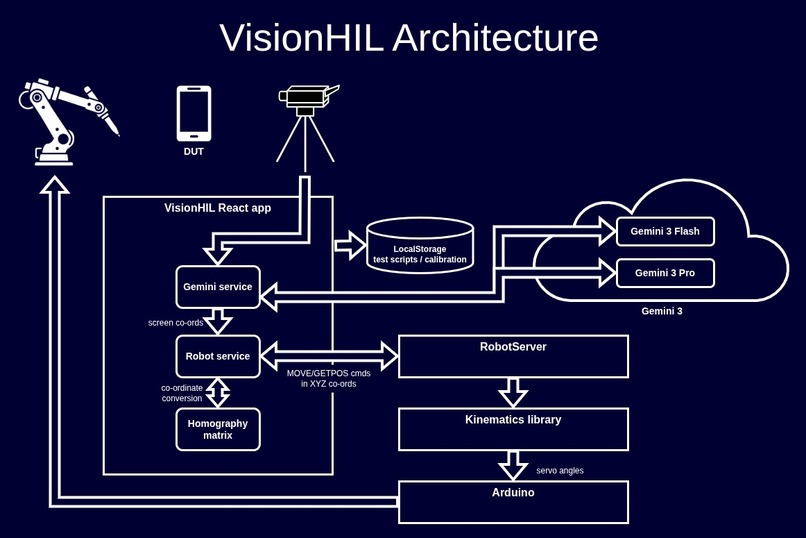
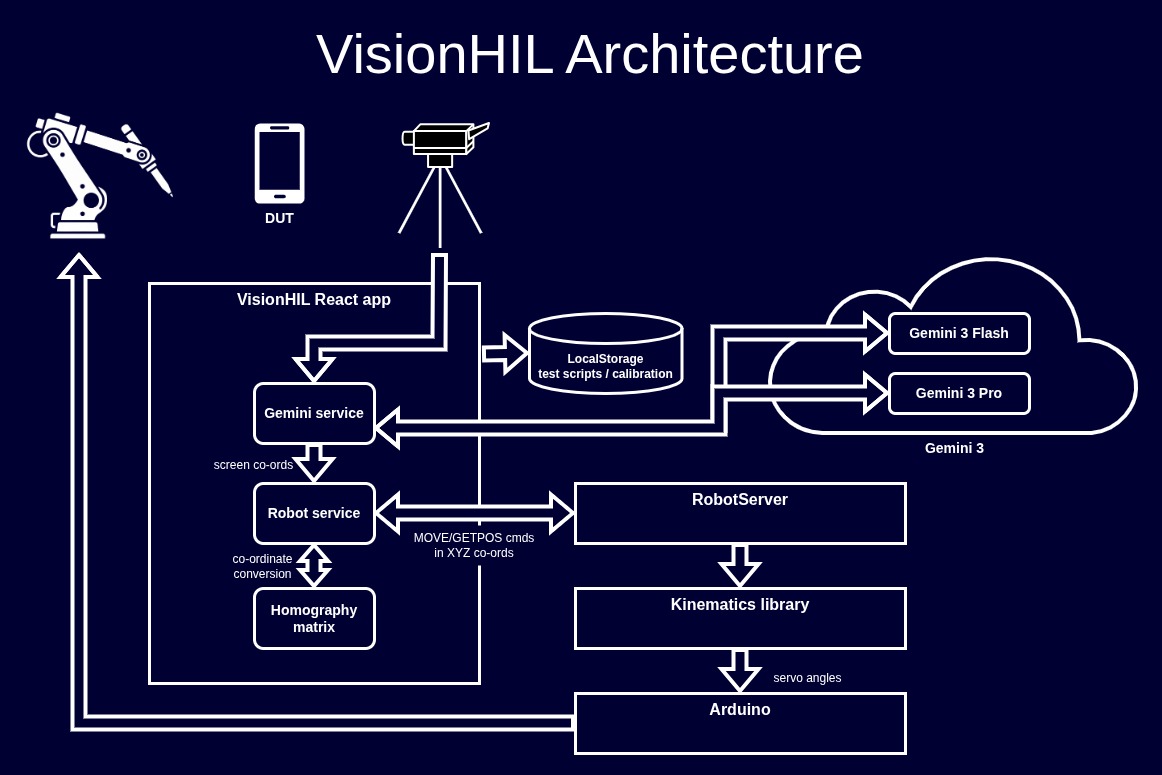
VisionHIL architecture diagram
-
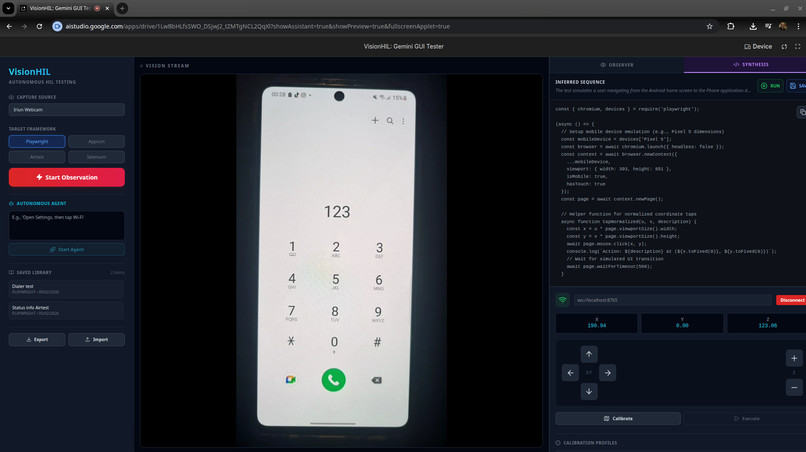
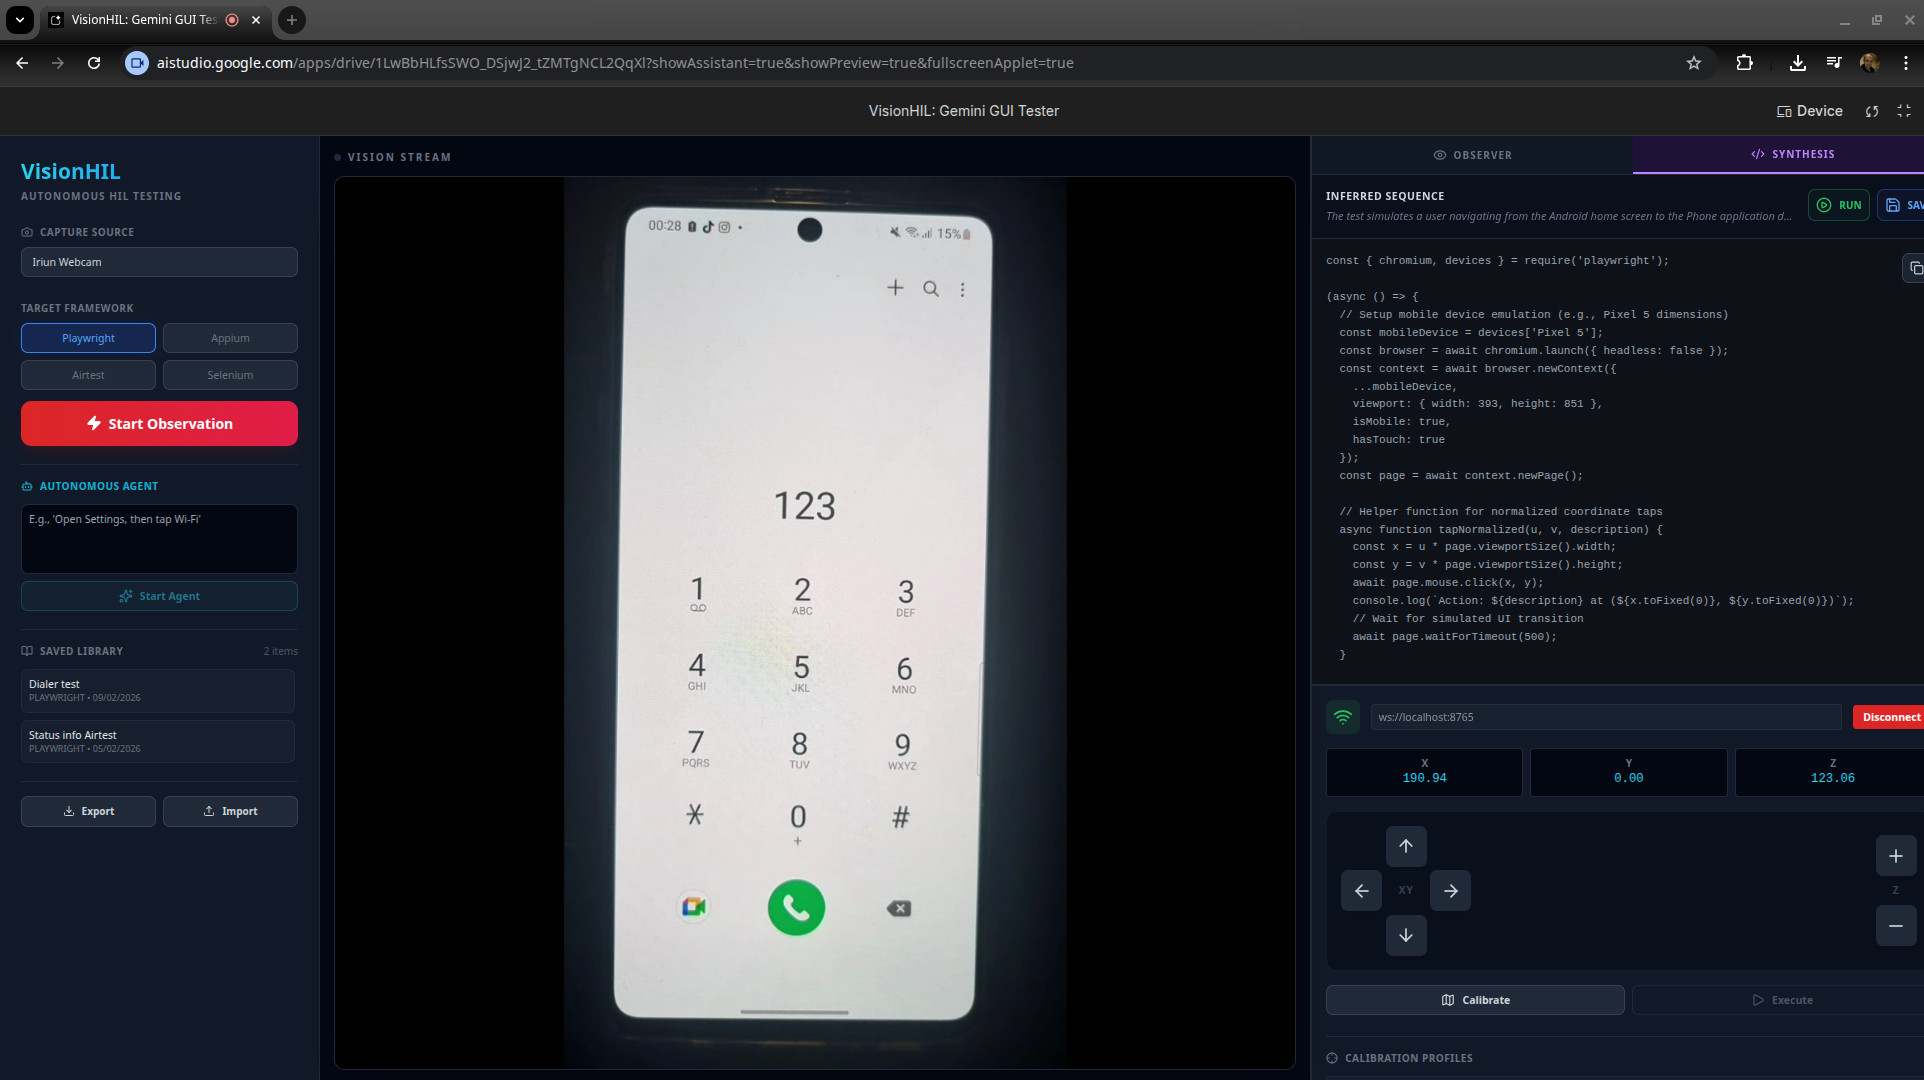
VisionHIL UI latest version
-
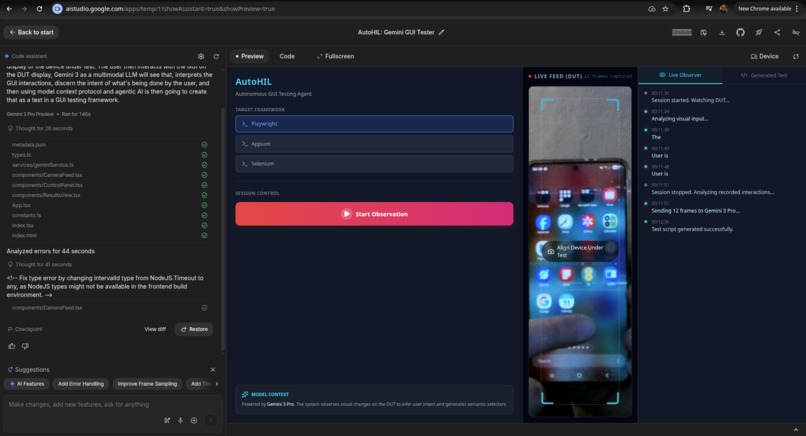
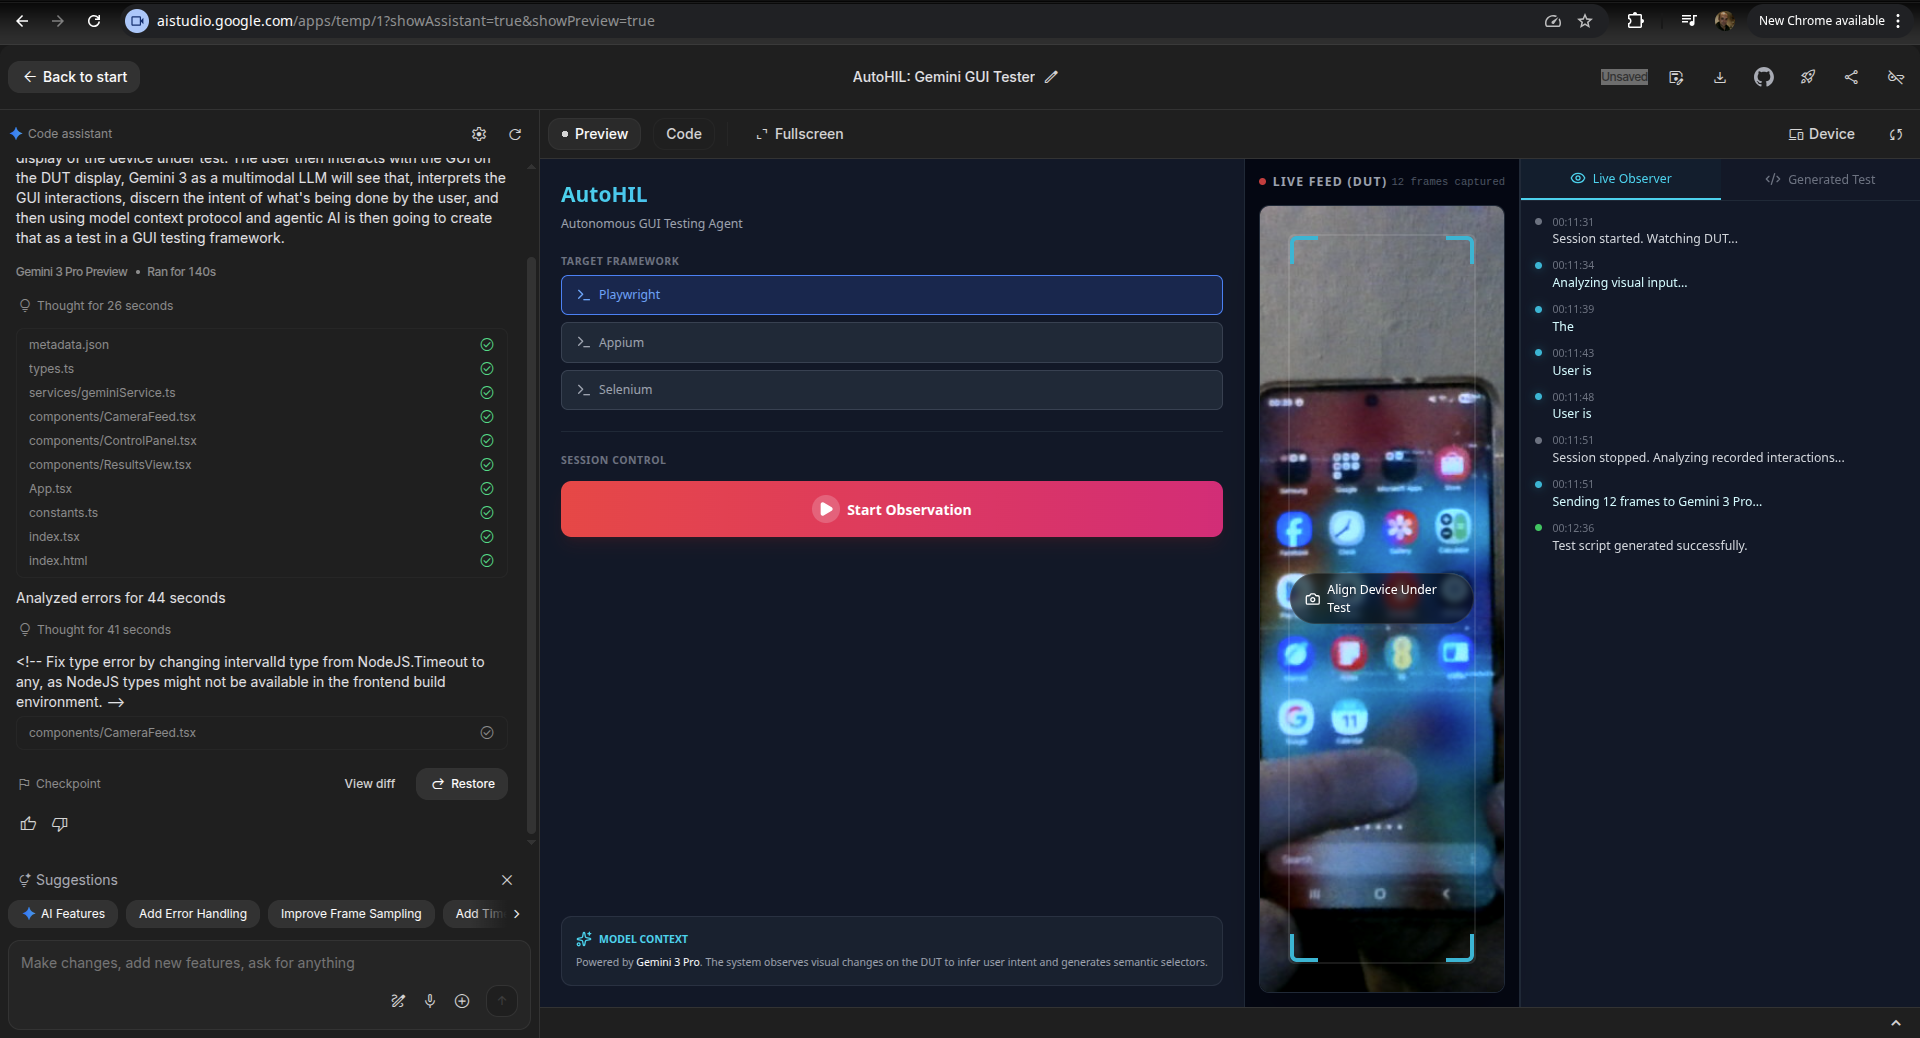
VisionHIL UI first version
-
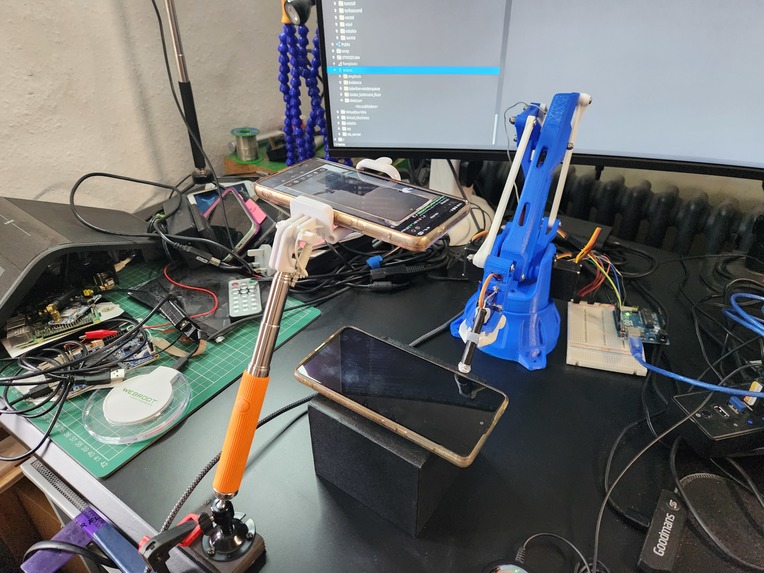
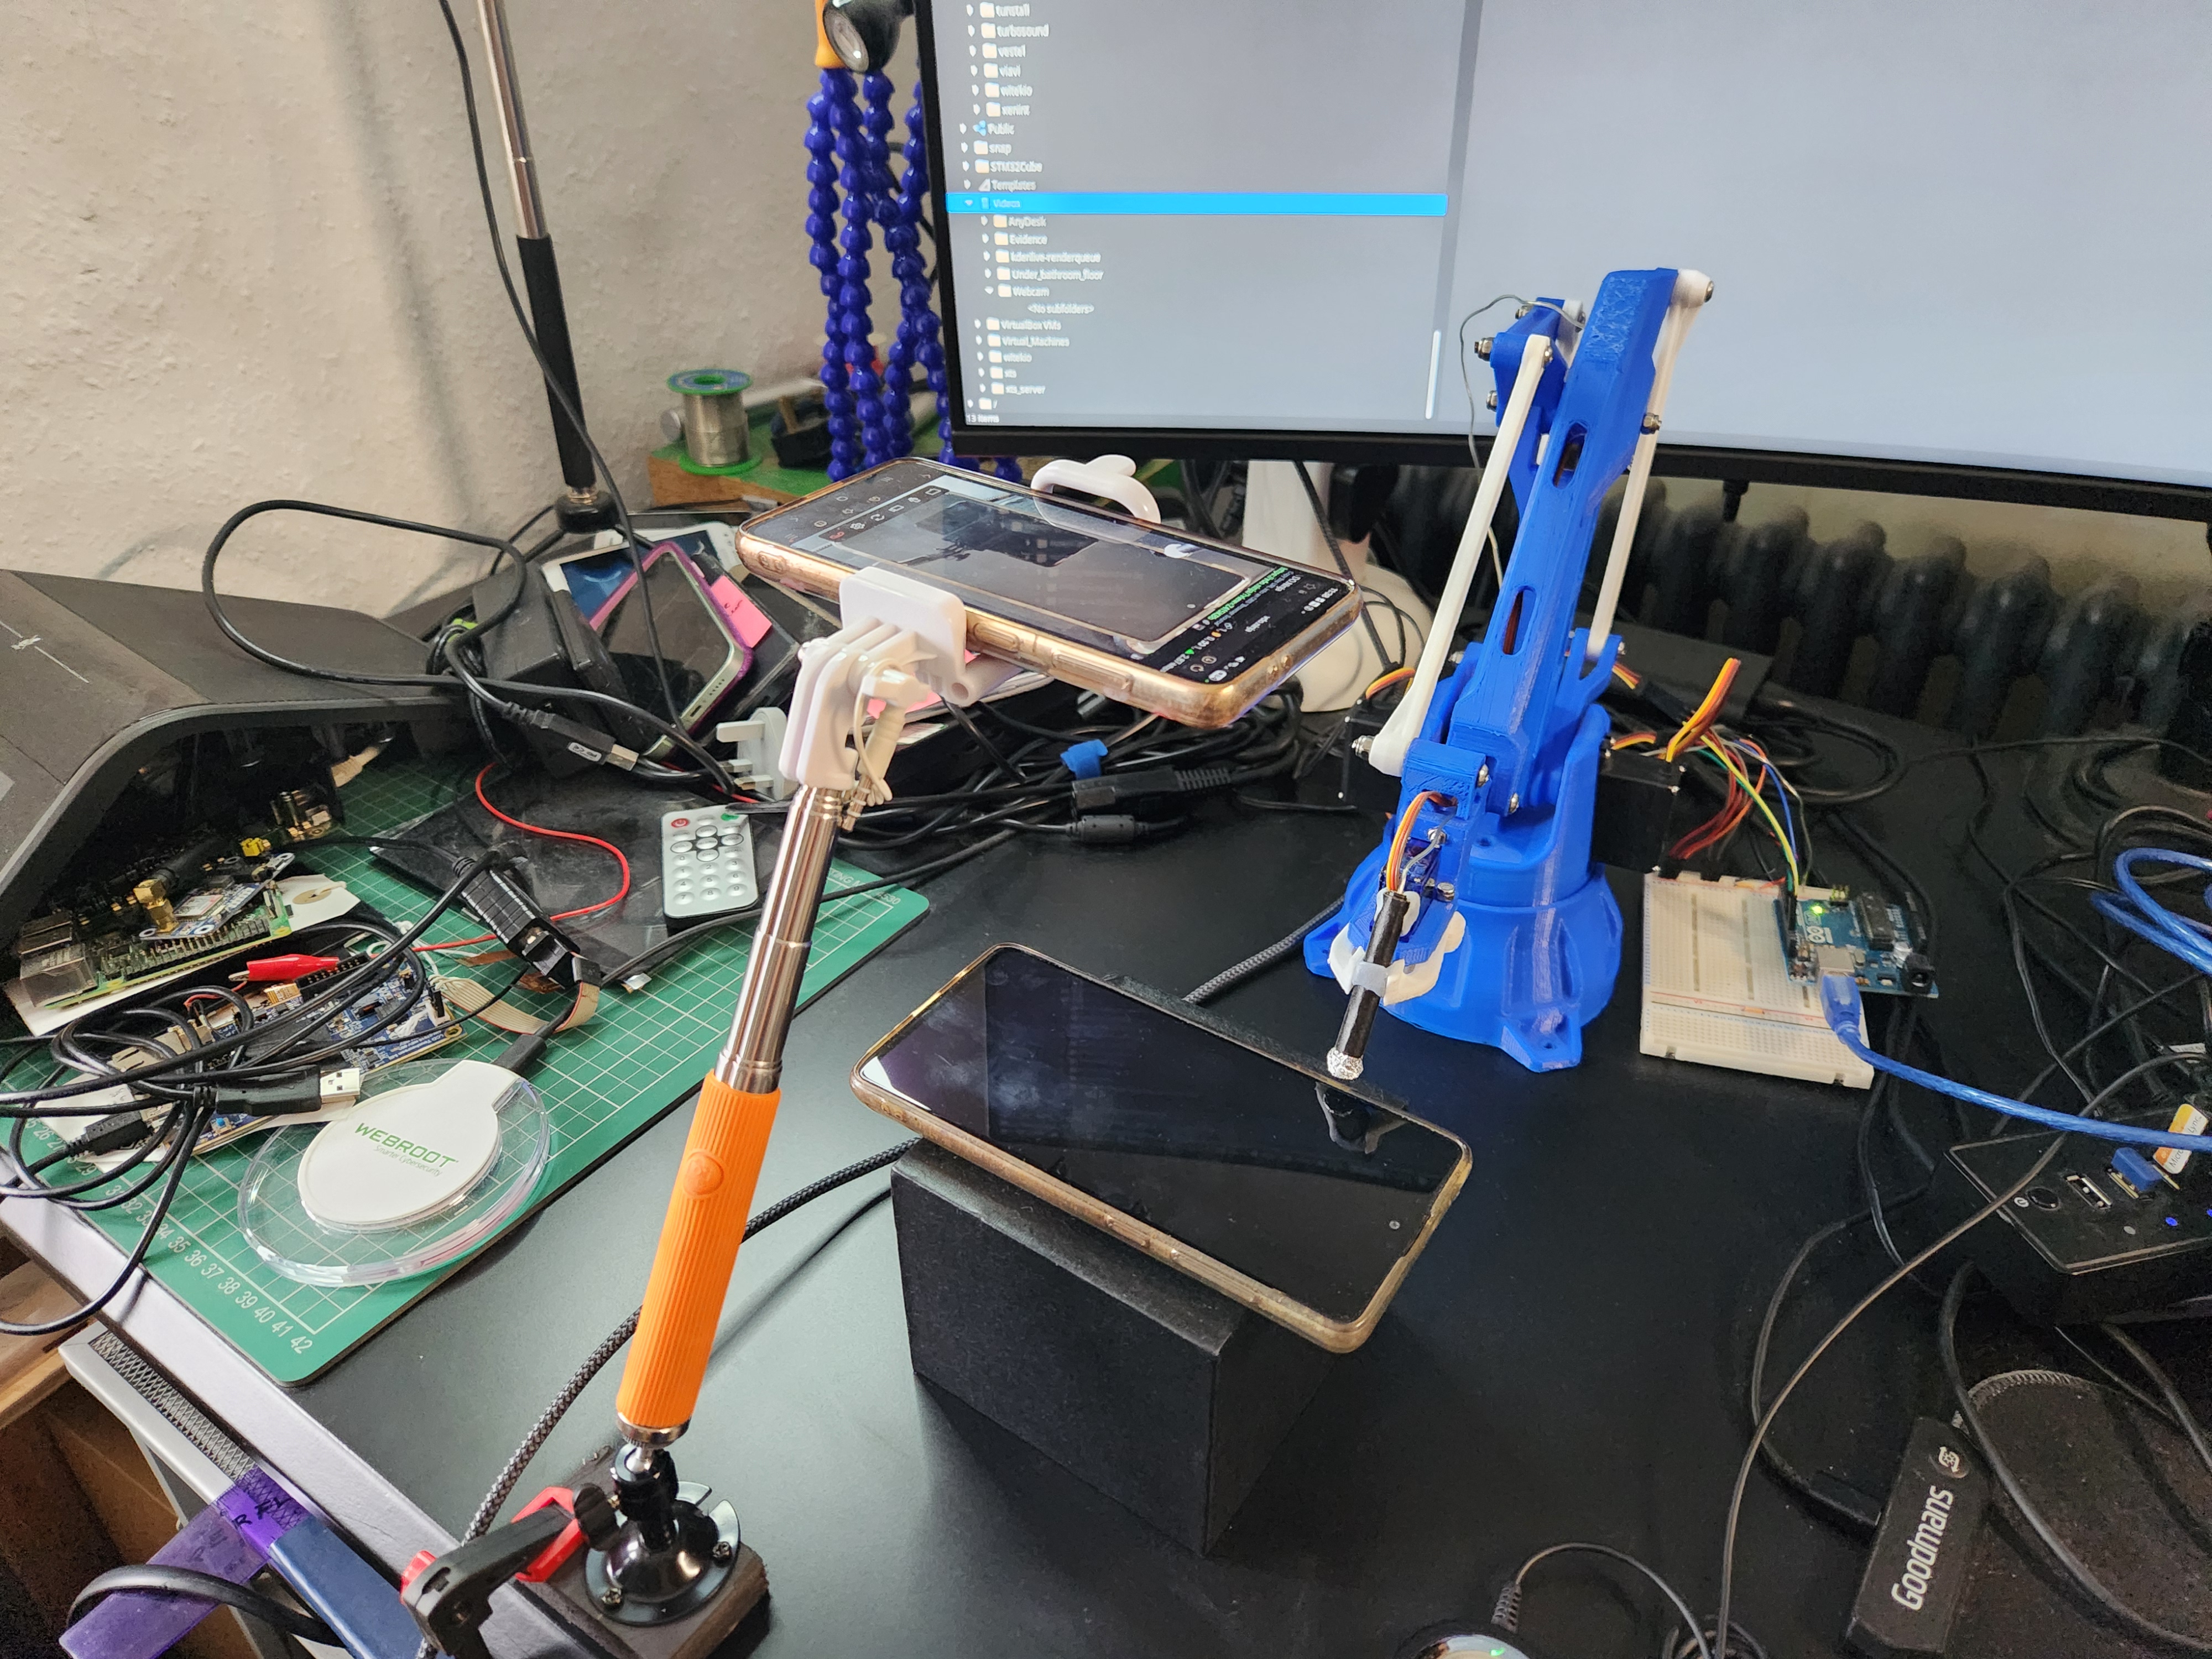
The device under test, with the robot arm and webcam above viewing it.
Inspiration
The problem
When developing devices with embedded software, which could be anything from a consumer gadget to an industrial control panel, they need testing. There are many types and levels of testing, but of particular interest here is the integration testing, i.e. testing the resulting overall functionality of the entire device.
The problem is, manual testing is time consuming and expensive. Automated testing can require a lot of development and setup.
Automated test frameworks do exist, but a lot of devices contain RTOSes or bare metal code, which do not support being able to connect into the device from those sophisticated test frameworks.
Devices with more advanced software inside, such as Android or Qt, can make use of advanced automation tools which will drive GUIs programmatically, or share the device's display contents to a computer remotely for automation. However, it can be restrictive to require a device under test to have a debug build or config loaded on it, before it can be tested in an automated fashion. The ideal would be to test a device with a production build on it.
The biggest problem of all though, is that often, even when sophisticated test automation tools could be used, they aren't, because there is a perception (which may be true) that setting up these test systems will take a lot of time and mental effort, so often becomes something that "we'll figure out later".
The vision
I dreamt up the idea for this project a few years ago, with my thinking being "What if any device could be automatically tested, regardless of what software is on it, without having to connect into it at all?" That would lower the barrier to entry and the level of investment, both time and mental effort, to the point where automated testing could be used on almost any embedded software device project. The way I envisioned this being done is to point a camera at the device under test, and use computer vision to guide a robot arm to interact with the device.
More recently, with the evolving multi-modal capabilities of LLMs, that thinking then extended to "What if we don't even need to write any automated tests either? We can just record the tests being done by hand!".
When the Gemini 3 hackathon came along, I decided that was the perfect time to try out this idea.
What it does
VisionHIL is a Hardware-in-the-Loop (HIL) device UI testing system. It records tests being performed manually on a device by a human, then converts what it sees into test scripts, with a choice of output formats for several different several different automated test frameworks (E.g. Playwright, Airtest, Selenium). By observing the human interactions with the device under test (DUT) through a standard webcam, VisionHIL uses the advanced visual analysis abilities of Gemini 3 to interpret not just what is being done on the device, but the purpose and intention of the actions, and from that create the test script outputs.
Those test scripts could then be loaded into the relevant test framework and used to drive the automated test on a device in the conventional manner. However, as mentioned, the vision of the project is to treat any hardware device as a "black box," requiring zero software instrumentation or electronic connections into the device. To achieve that, Gemini 3 also interprets the created test script into a set of actions for a robot arm to control the device, using the same buttons/touch interface of the device that the human uses.
An example action for the robot might be: touch the screen at screen co-ordinates x,y, or perform a swipe.
In the first working version of the project, the video feed of the device under test was only used to record and output the test script and robot actions. After the actions for the robot were output by Gemini 3, they were then "played" to the robot arm in an open loop mode. Although this was a good first proof of concept, it didn't yet utilise the AI in the way I had fully envisaged.
In the second phase of development, performing the tests is also driven by Gemini 3, in an agentic manner. The intial set of actions created for the robot are still used, but before and after each action is performed, the state of the device is captured through the video feed, and fed to Gemini 3 to process. That allows it to perform corrections such as repeat a press if the robot missed a button, or wait longer for an expected screen to load. In this closed loop agentic test execution mode, the multi-modal AI capabilities of Gemini 3 are utilised in a much more powerful way as a long running agent system (Depending on how long the test sequence is, which could in theory be several hours of actions on the device)
In the video, I demonstrated the system using an Android phone as the device under test. I used that as an example I had close to hand, but it doesn't show the true value of the system, given that various automated test frameworks can be used with Android. The system could be used to automatically test devices that you can't simply plug into, or iit could even drive devices that don't have a display at all, just physical buttons or switches that the robot could press or toggle.
How I built it
The project was built from scratch specifically for the Gemini 3 hackathon.
As shown in the architecture diagram, the main part of the system is a React application developed using Google AI studio. That part provides the frontend UI, handles the video feed from the webcam, makes the calls to the Gemini 3 API and provides saving/loading of test scripts and robot calibration profiles. When running tests, the device screen u,v co-ordinates are translated into x,y,z co-ordinates for the robot.
There is a RobotServer component to control the robot arm, that was developed as a Python application locally using Google Antigravity IDE. It's a fairly lightweight server which receives JOG and MOVE commands from the React app over a websocket connection, with the x,y,z co-ordinates as parameters to those commands. https://github.com/edlangley/VisionHIL-RobotServer
A fork of an open source Kinematics library, modified slightly for this project, is used to translate the co-ordinates to servo angles for the robot arm, before being sent over serial port to an Arduino. https://github.com/edlangley/easyEEZYbotARM/tree/dev/VisionHIL_changes
The robot arm I used is an EEZYbotARM Mk2 designed by Carlo Franciscone: https://www.thingiverse.com/thing:1454048
How use of Gemini 3 is integrated
While recording tests, Gemini 3 Flash is used for a "Live Observer" mode, leveraging its multimodal low-latency capabilities to provide real-time updates of observed UI interactions.
Synthesis of the test scripts is driven by Gemini 3 Pro, which analyses sequences of frames, inferring complex user workflows and generating test code (Playwright, Appium, or Airtest).
To run the tests using the robot arm, Gemini 3 Pro also synthesises target camera feed pixel coordinates for presses/swipes on the DUT. These pixel co-ords are transformed using a custom 4-point Homography Matrix (Created by a calibration process in the app) into physical Cartesian co-ords, before being sent to the robot.
Before every physical move of the robot, the agent captures a fresh video frame which is sent to Gemini 3 Flash. This allows the system to handle "Self-Healing", for example if a button has shifted due to a layout change, the AI corrects the coordinate before the robot moves.
After each physical action, a "Verification" frame is sent to Gemini 3 Pro. The model compares the Current State against the Expected State defined in the script summary, handling any loading delays on the DUT or other minor deviations etc.
Finally, the Thinking level in Gemini 3 is used to allow the model to reason through and assess non-deterministic UI behaviors, to decide if they are minor variations, or incorrect behaviour. Because remember, the aim of all this is to actually test the device, not just drive it automatically :-)
Challenges I ran into
The calibration of the robot arm caused quite a few issues. Specifically, the webcam feed was getting scaled by React before it was being shown in a frame on the webpage. The co-ordinates of the displayed video frame were being used for the calibration process to match u,v 2D screen co-ordinates to a given x,y,z robot position. However, the co-ordinates fed to Gemini to create the initial actions for the robot (before adjustment at test run-time) were based on the full webcam image frame, not the cropped version displayed in the UI, therefore not the same screen u,v co-ordinate space that the calibration wizard was using. This resulted in the robot moving to the right position in "execute" mode when checking the calibration (as shown in the video) but going to an incorrectly scaled position when running a test.
Conversely the easiest aspect of the development was using the Gemini 3 API :-)
Accomplishments that I'm proud of
I was very pleased to see the idea translate from vision to reality and get the whole system working end-to-end, from test capture to robot performing the tests.
In the past I had considered implementing this with traditional computer vision approaches to match expected display contents on the device-under-test up to what is seen on the camera feed. However using the multi-modal capabilities of Gemini 3 opens up much wider possibilities for versatility and capability of the system. So I was pleased to make the idea & technology fit.
What I learned
I have done some React before, but I learned more about it given that embedded software is my main area of expertise. This was also my first go at using any LLM APIs and after looking more deeply into it, that offers much more opportunity for implementing interesting ideas than I had previously appreciated.
What's next for VisionHIL
The UI could use some re-organising, it kind of grew organically during the development. I had the intention early on of moving parts of the UI around but ran out of time as I was focused on functionality.
The closed-loop agentic test execution mode is mostly implemented but was definitely still considered in-progress by the deadline and needs further testing. There's also more to do in detecting actual test failures when performing the tests.
But the main area for evolving the project is to increase the use of the AI. For example, at the moment the screen to robot position is manually calibrated, but in theory the AI could be used to perform that calibration automatically.
Built With
- gemini3
- python
- react
- websockets


Log in or sign up for Devpost to join the conversation.