-
-

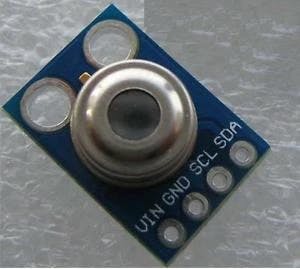
MLX90614
-
Schematics
-
Step-1

Story
Non Contact Thermometer Continuous monitoring of body temperature is one way to detect corona patients. So many types of thermometers are available in the market. A normal thermometer can measure the temperature of a Covid patient and can also spread the virus. In this particular situation we can use a Non Contact Thermometer. And this device is also known as temperature gun. Largest manufacture of this Chinese Temperature Gun. And these devices are expensive. But this Covid-19 lock and thread made the production of this device more difficult.
We can make a Non Contact Thermometer with some of the commonly available components.
Things used in this project
Hardware components MLX90614 1
Arduino Nano R3 1
Female/Female Jumper Wires 1 OTG Adapter 1 USB Mini to USBMicro Cable 1
Android device 1Software apps and online services Arduino IDE Arduino IDE Serial Monitor Android app
How it works ?
The main component of this Non Contact Thermometer is a MLX90614 Non contact temperature sensor. The working of MLX90614 is described in next paragraph. The output from this sensor is connected to Arduino Nano. Arduino print the temperature on smart phone with the help of Serial Monitor Android App. So no need of external power pack. Because Arduino and sensor will take power from smart phone.
*MLX90614 IR Temperature Sensor MLX90614 is an IR Temperature sensor for non-contact temperature measurements. It has an I2C Interface to communicate with microcontroller. Here we use Arduino Nano as microcontroller. This temperature sensor can measure the temperature without touch the object. It has 0.5 degree Celsius over a wide range of temperature.
Step
- 1 First we need create a sketch using Arduino IDE.
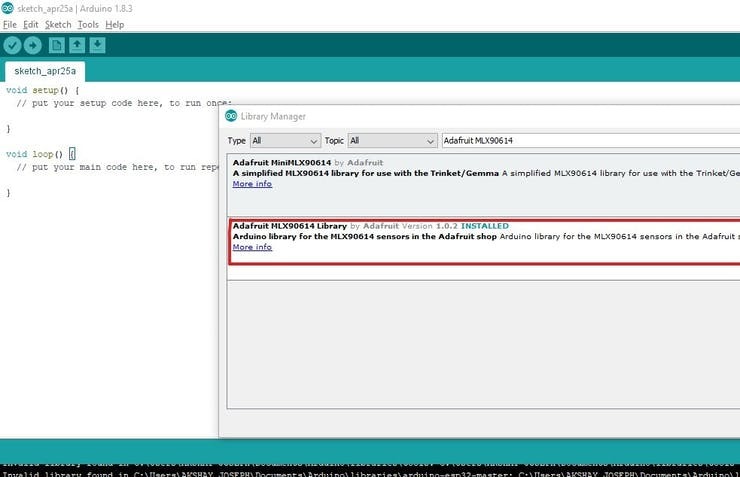
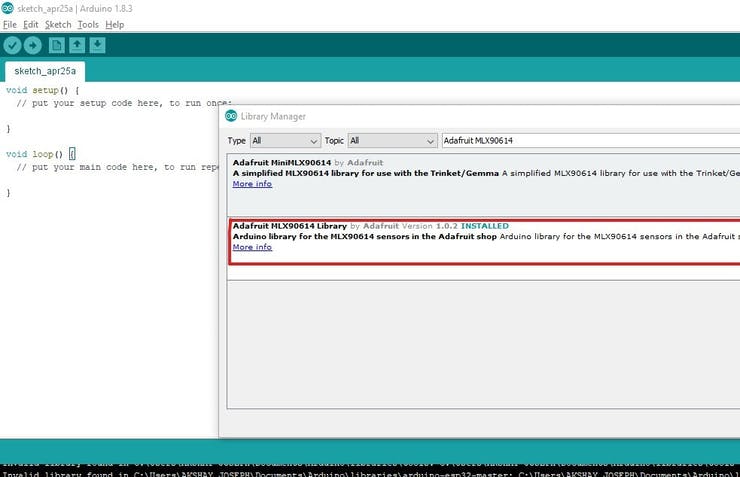
Open Arduino IDE and open a new workspace. We need to add a library. Go to Sketch>Include library >Library manager. Then Search Adafruit MLX90614 and Install it.
Then close Arduino IDE and The Open Arduino IDE again. Then add the header file "Adafruit_MLX90614.h" for better communication with MLX90614 Temperature sensor. Then add another header file "Wire.h" for I2C communication. Then define a variable "mlx" to call the MLX90614 sensor. And call the function Adafruit_MLX90614() to this variable.
include
include
Adafruit_MLX90614 mlx = Adafruit_MLX90614();
- 2 Now we need to code the setup part.
First begin the serial communication with the braud rate of 9600. Then begin the sensor by using the keyword "mlx.begin()".
void setup() {
Serial.begin(9600);
mlx.begin();
}
Setup part is completed. Next I am going to code the loop part.
First I print a word "Temperature" and then print the temperature detected by the sensor. Here the temperature in Celsius. So we call the function "mlx.readObjectTempC()" then print unit as "Celsius". In next line we need to print the word "Temperature" again. And then print the temperature in Fahrenheit. For this, we use the function "mlx.readAmbientTempF()". Then print the unit as "Fahrenheit". Next print a new line and wait 500 milliseconds for next reading.
void loop() {
Serial.print("Temperature : "); Serial.print(mlx.readObjectTempC()); Serial.println("Celsius");
Serial.print("Temperature : "); Serial.print(mlx.readObjectTempF()); Serial.println("Fahrenheit");
Serial.println(); delay(500); }
The coding part is completed. The complete code is given in the code part of this article. Upload the code to Arduino Nano.
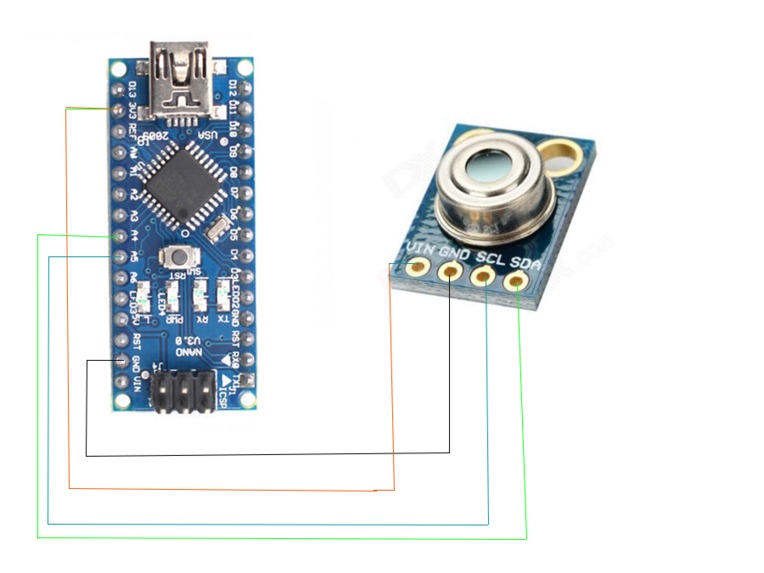
Hardware Connection
Arduino Nano MLX90614
A4 - SDA
A5 - SDL
3.3V - Vcc
GND - GND
Wire the circuit with the help of above data or circuit diagram. Now set the Arduino Nano and sensor in an enclosure. Put a hole on enclosure for the sensor to read the temperature. Put another hole to connect the USB cable to arduino board. Then connect the USB to Arduino and other end to smart phone Install the serial monitor app and set the baurd rate as 9600.
The project is completed.
STAY HOME, STAY SAFE, STAY CREATIVE. Let break the chain.


Log in or sign up for Devpost to join the conversation.