-
-
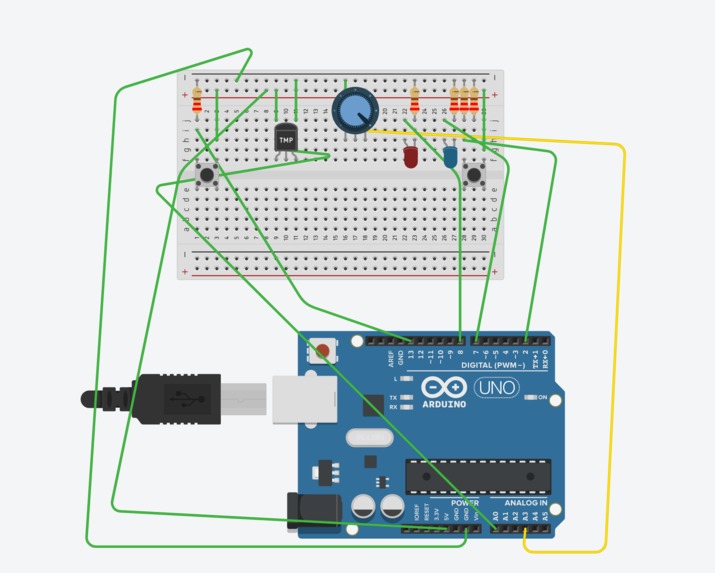
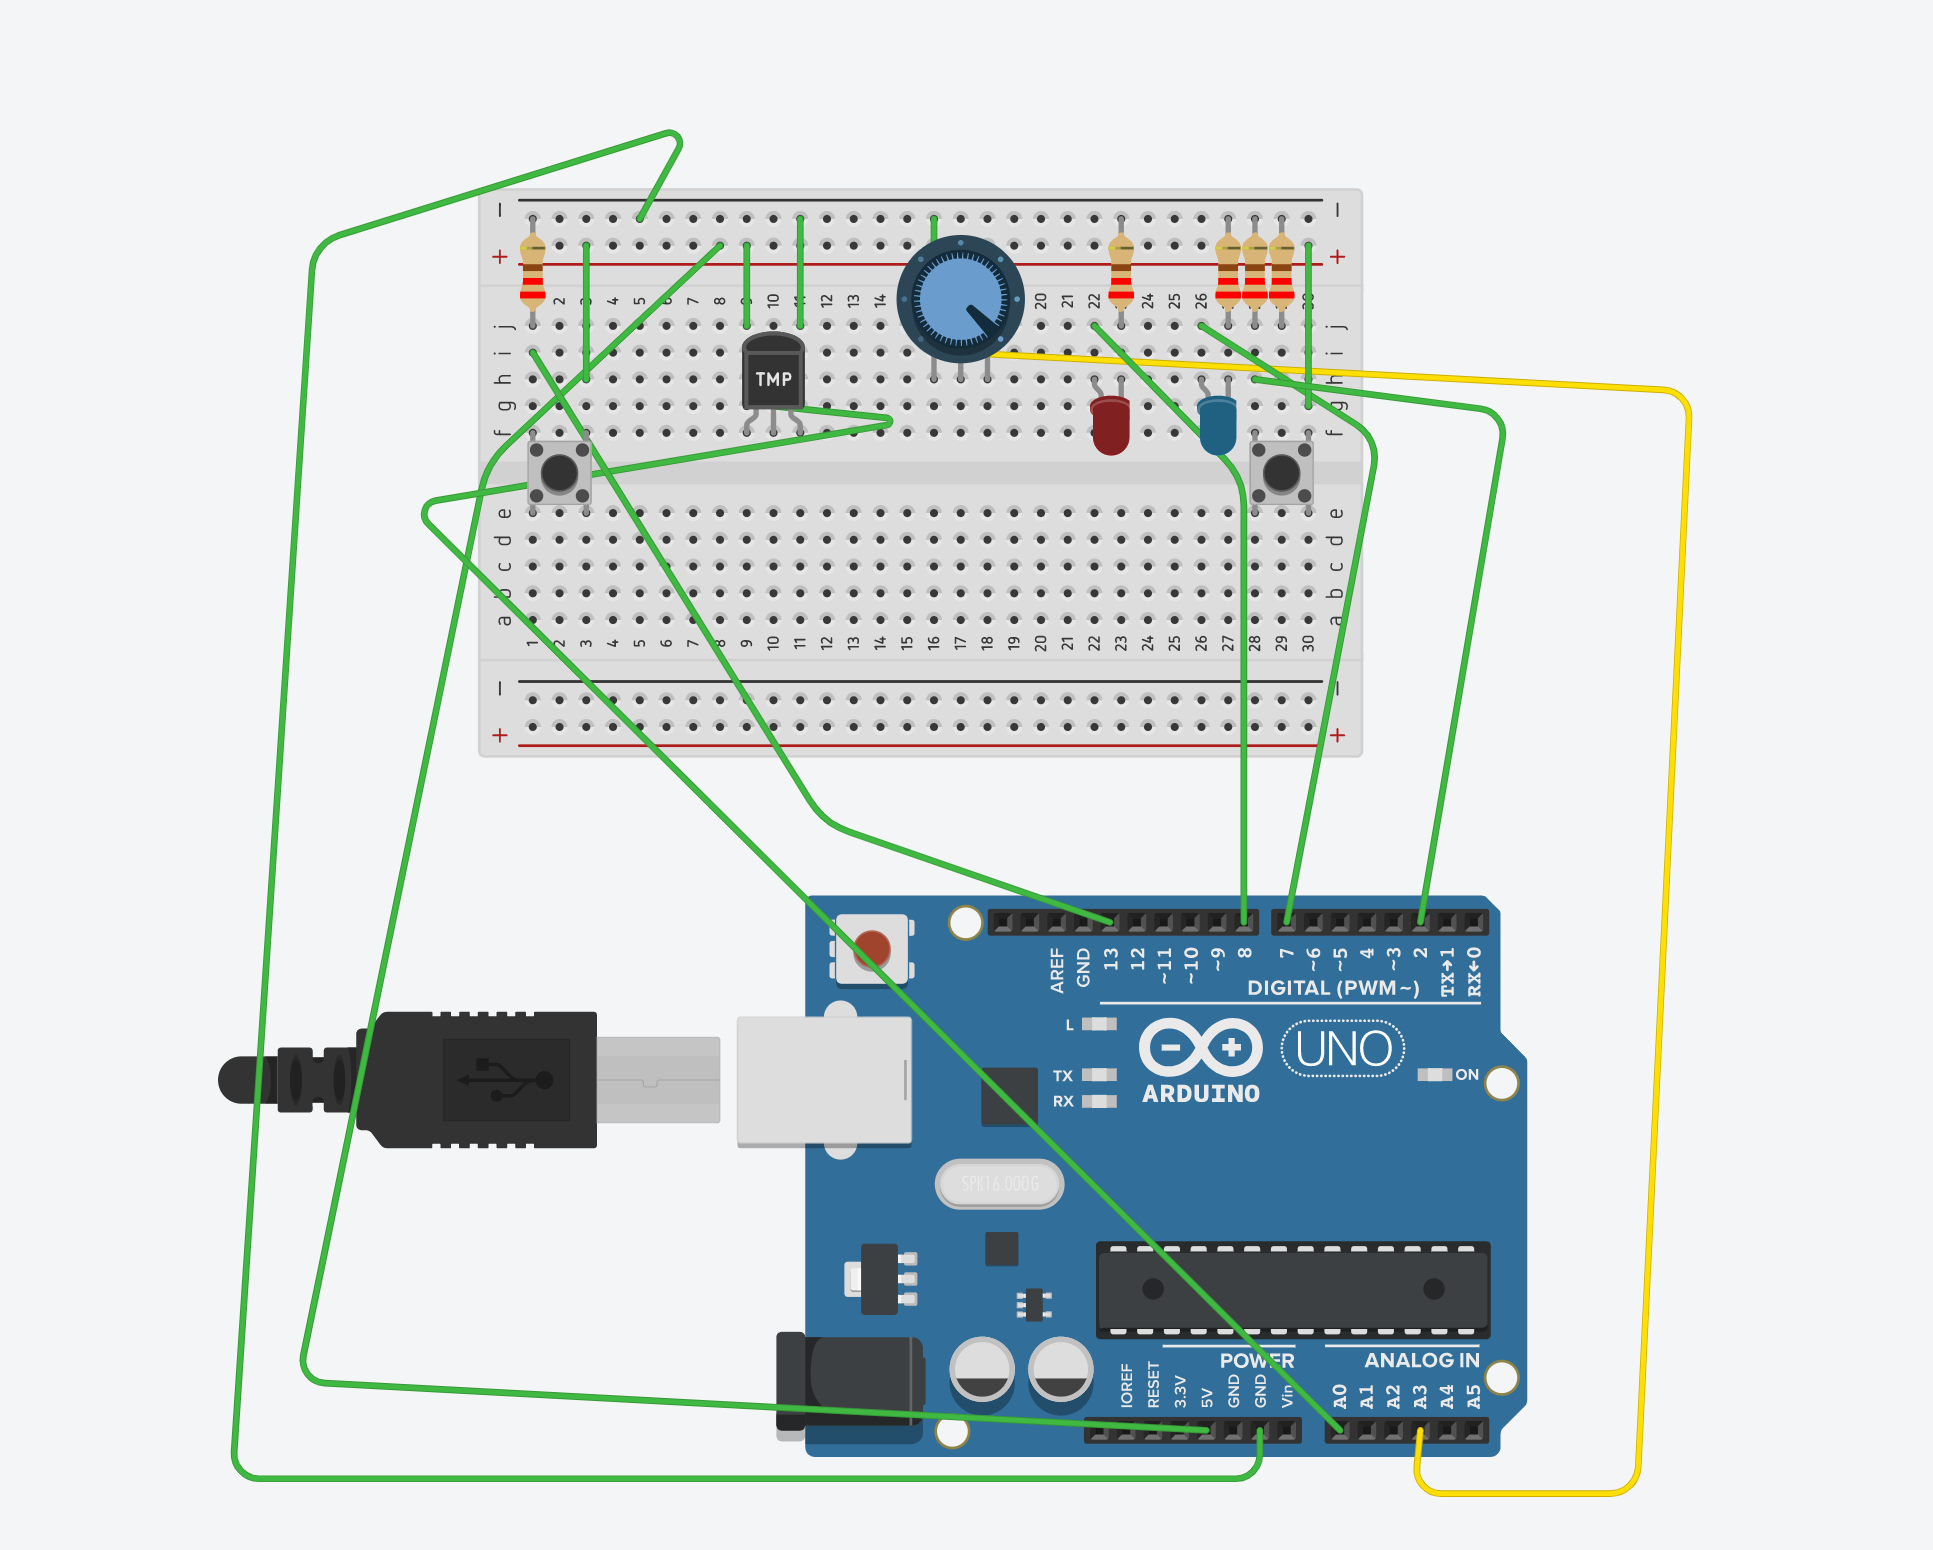
Arduino Set Up
-

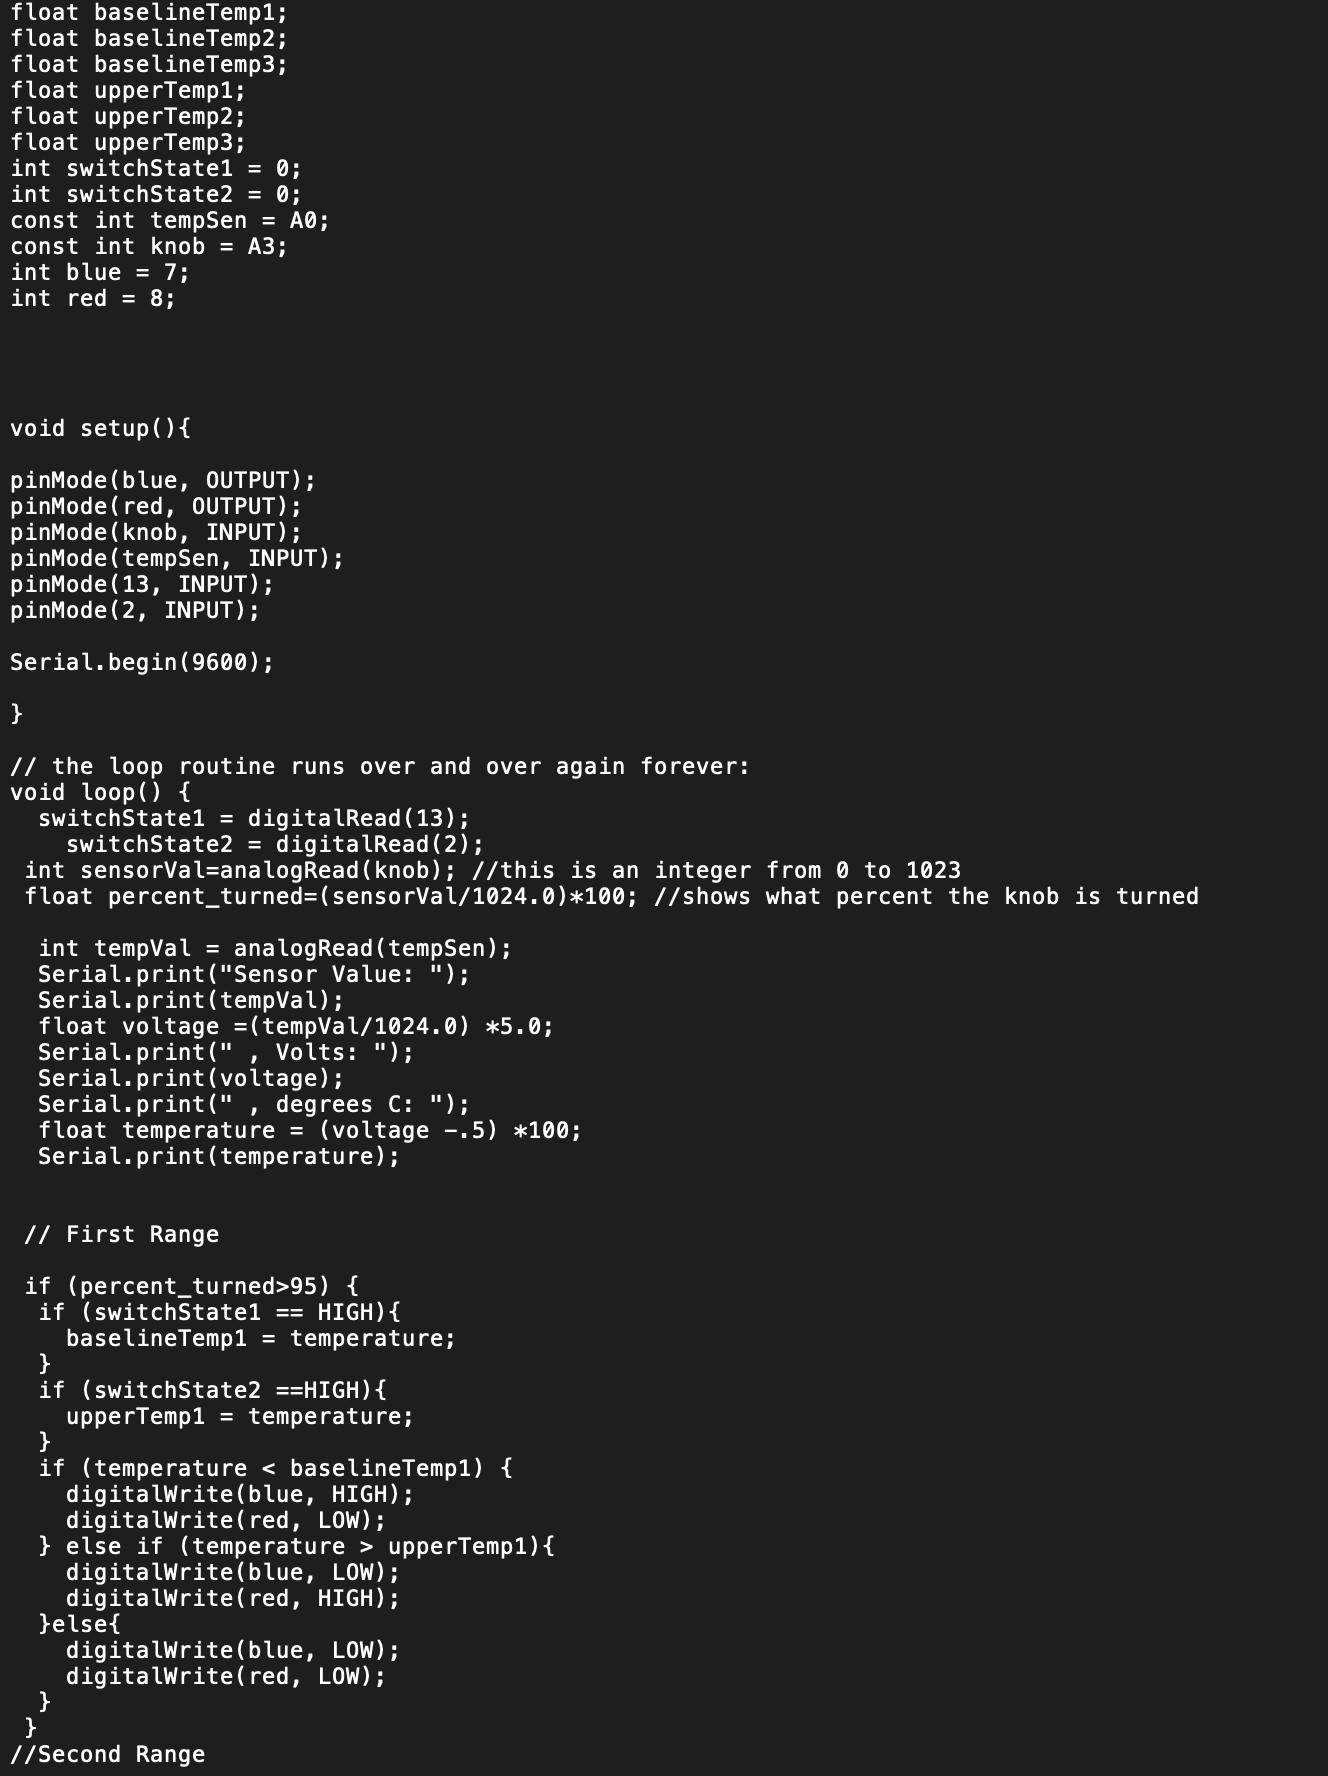
Code #1
-

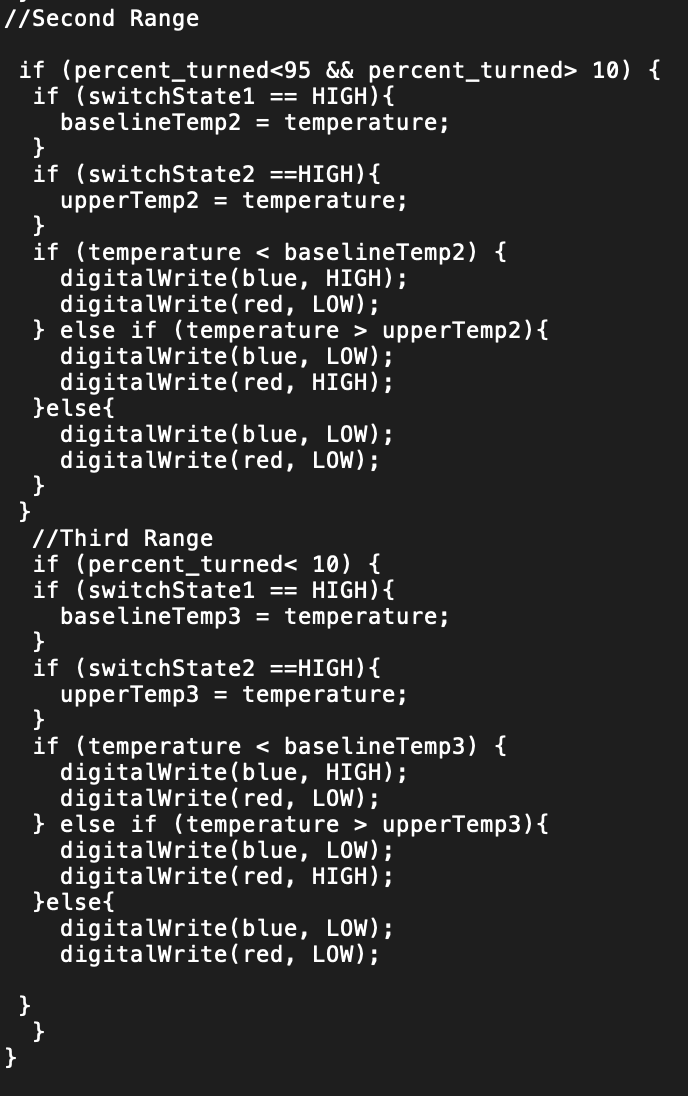
Code #2
Our product
The product that we made is called the temperature indicator, and as the name suggests, its function is to help indicate the temperature of a certain environment. The defining features of the temperature indicator are the potentiometer, temperature sensors, two buttons, and two different LED lights (colored blue and red). The potentiometer helps to create three different "settings" that correlate to three different temperature thresholds that can be set. In order to set the thresholds, the temperature sensor is utilized to fix the bounds of the thresholds, and the two buttons are used to lock the lower and upper bounds of the threshold at a certain temperature setting. Consequently, the threshold in each potentiometer setting will remain constant until changed otherwise. This allows for users to maintain three distinct temperature thresholds that they would like to measure if they would like to utilize the temperature indicator for different activities that may require different temperatures. When the temperature thresholds have been set, the user can now test the temperatures of his/her surroundings. If the temperature sensor reads a temperature value that is under the lower bound of the threshold, then the blue LED light will shine. If the temperature sensor reads a temperature value that is between the bounds or above the upper bound of the threshold, then no LED light or the red LED light will shine, respectively. This gives the user incredible knowledge while concurrently providing the user with latitude on the specific temperatures that he or she would like to test.
How I built it
Hardware: When making the temperature indicator, our group identified that instead of making a device that would allow for just a single range of temperatures to be measured, we would fabricate a contraption that would allow for a user to create his or her own set of temperature ranges for experimentation. Thus, we recognized that a potentiometer would be sufficient as its knob-like functions could be implemented by the user. If a user wanted a specific set of temperature ranges, then he or she should be able to select one by turning the potentiometer by a specific amount. Furthermore, we needed a device that would be able to specifically lock the bounds of the temperature ranges that we desired. We determined that two buttons would be both easy to utilize and user-friendly, so we were able to add the buttons into our configuration. In terms of temperature sensing, tinkerCAD provided a temperature sensor, which was able to detect the temperature of a person's surroundings. Finally, we needed an output that relayed information about the setting's temperature to the user. In order to display three different responses (below the range, inside the range, and above the range), we decided that two LED lights were enough as either light could turn on as a response (giving us two responses), and both of the lights turned off could be a third response. As a result, we connected each of the pieces to our Arduino and assembled it properly.
Software: In order to code our project, we had to utilize many integer and float values. In particular, we had to utilize the integer value that the potentiometer returned in order to convert it into a percentage that represented how much the knob was turned by. To do this, we divided the value turned by the maximum (1024) and multiplied it by 100, all while converting the value into a float to account for decimal values. Afterwards, we utilized this percentage value within an if statement in order to control the different settings that the user would be able to utilize. Then, within the if statement for the settings, we utilized the baselineTemp variables, changing them as a button was pressed in order to set the upper and lower bounds of the temperature range within the setting. Finally, we utilized a set of if-else statements in order to trigger the LED lights, making changing their states depending on the temperature that the temperature sensor read.
What I learned
Throughout this process, we were able to learn about different parts that could be utilized in Arduino. Prior to this project, we were not incredibly familiar with the uses of a potentiometer, and we did not know how to implement it for its knob-like function. We learned that the potentiometer was able to give us a certain value depending on how much it was turned, and we turned this into a percentage that allowed for us to control what setting the user would be on. We also learned about the potential of a temperature sensor, and how we could use the sensor in order to create a variation of a thermometer. Overall, we were able to learn how to construct different circuits with Arduino, and we learned how to code efficiently in order to maximize the functionality of our project. We would also like to thank the TA's and Sid for their guidance throughout this process.
How it would work in the real world
The temperature indicator has many potential usages in the world. Particularly today, in the dire situation of the world due to COVID-19, many thermometers and other temperature devices are in great demand. As fever is one of the primary symptoms of COVID-19, it is vital for hospitals and clinics to have an abundance of thermometers in order to identify patients who may have the fever symptom of COVID-19. Furthermore, the temperature indicator can have many uses in cooking. For example, when preparing chicken, many chefs will utilize a thermometer in order to determine whether or not chicken is prepared. Thus, if the chicken temperature falls between a certain range, then the chef will know that his masterpiece is ready as the chicken will have the perfect texture and color! Additionally, meteorologists can utilize a temperature indicator in order to determine the temperature of a certain geographical area. As a result, they can report accurate data on how hot or cold a region is.


Log in or sign up for Devpost to join the conversation.