-
-

Workflow
Smart Calendar
Project Overview
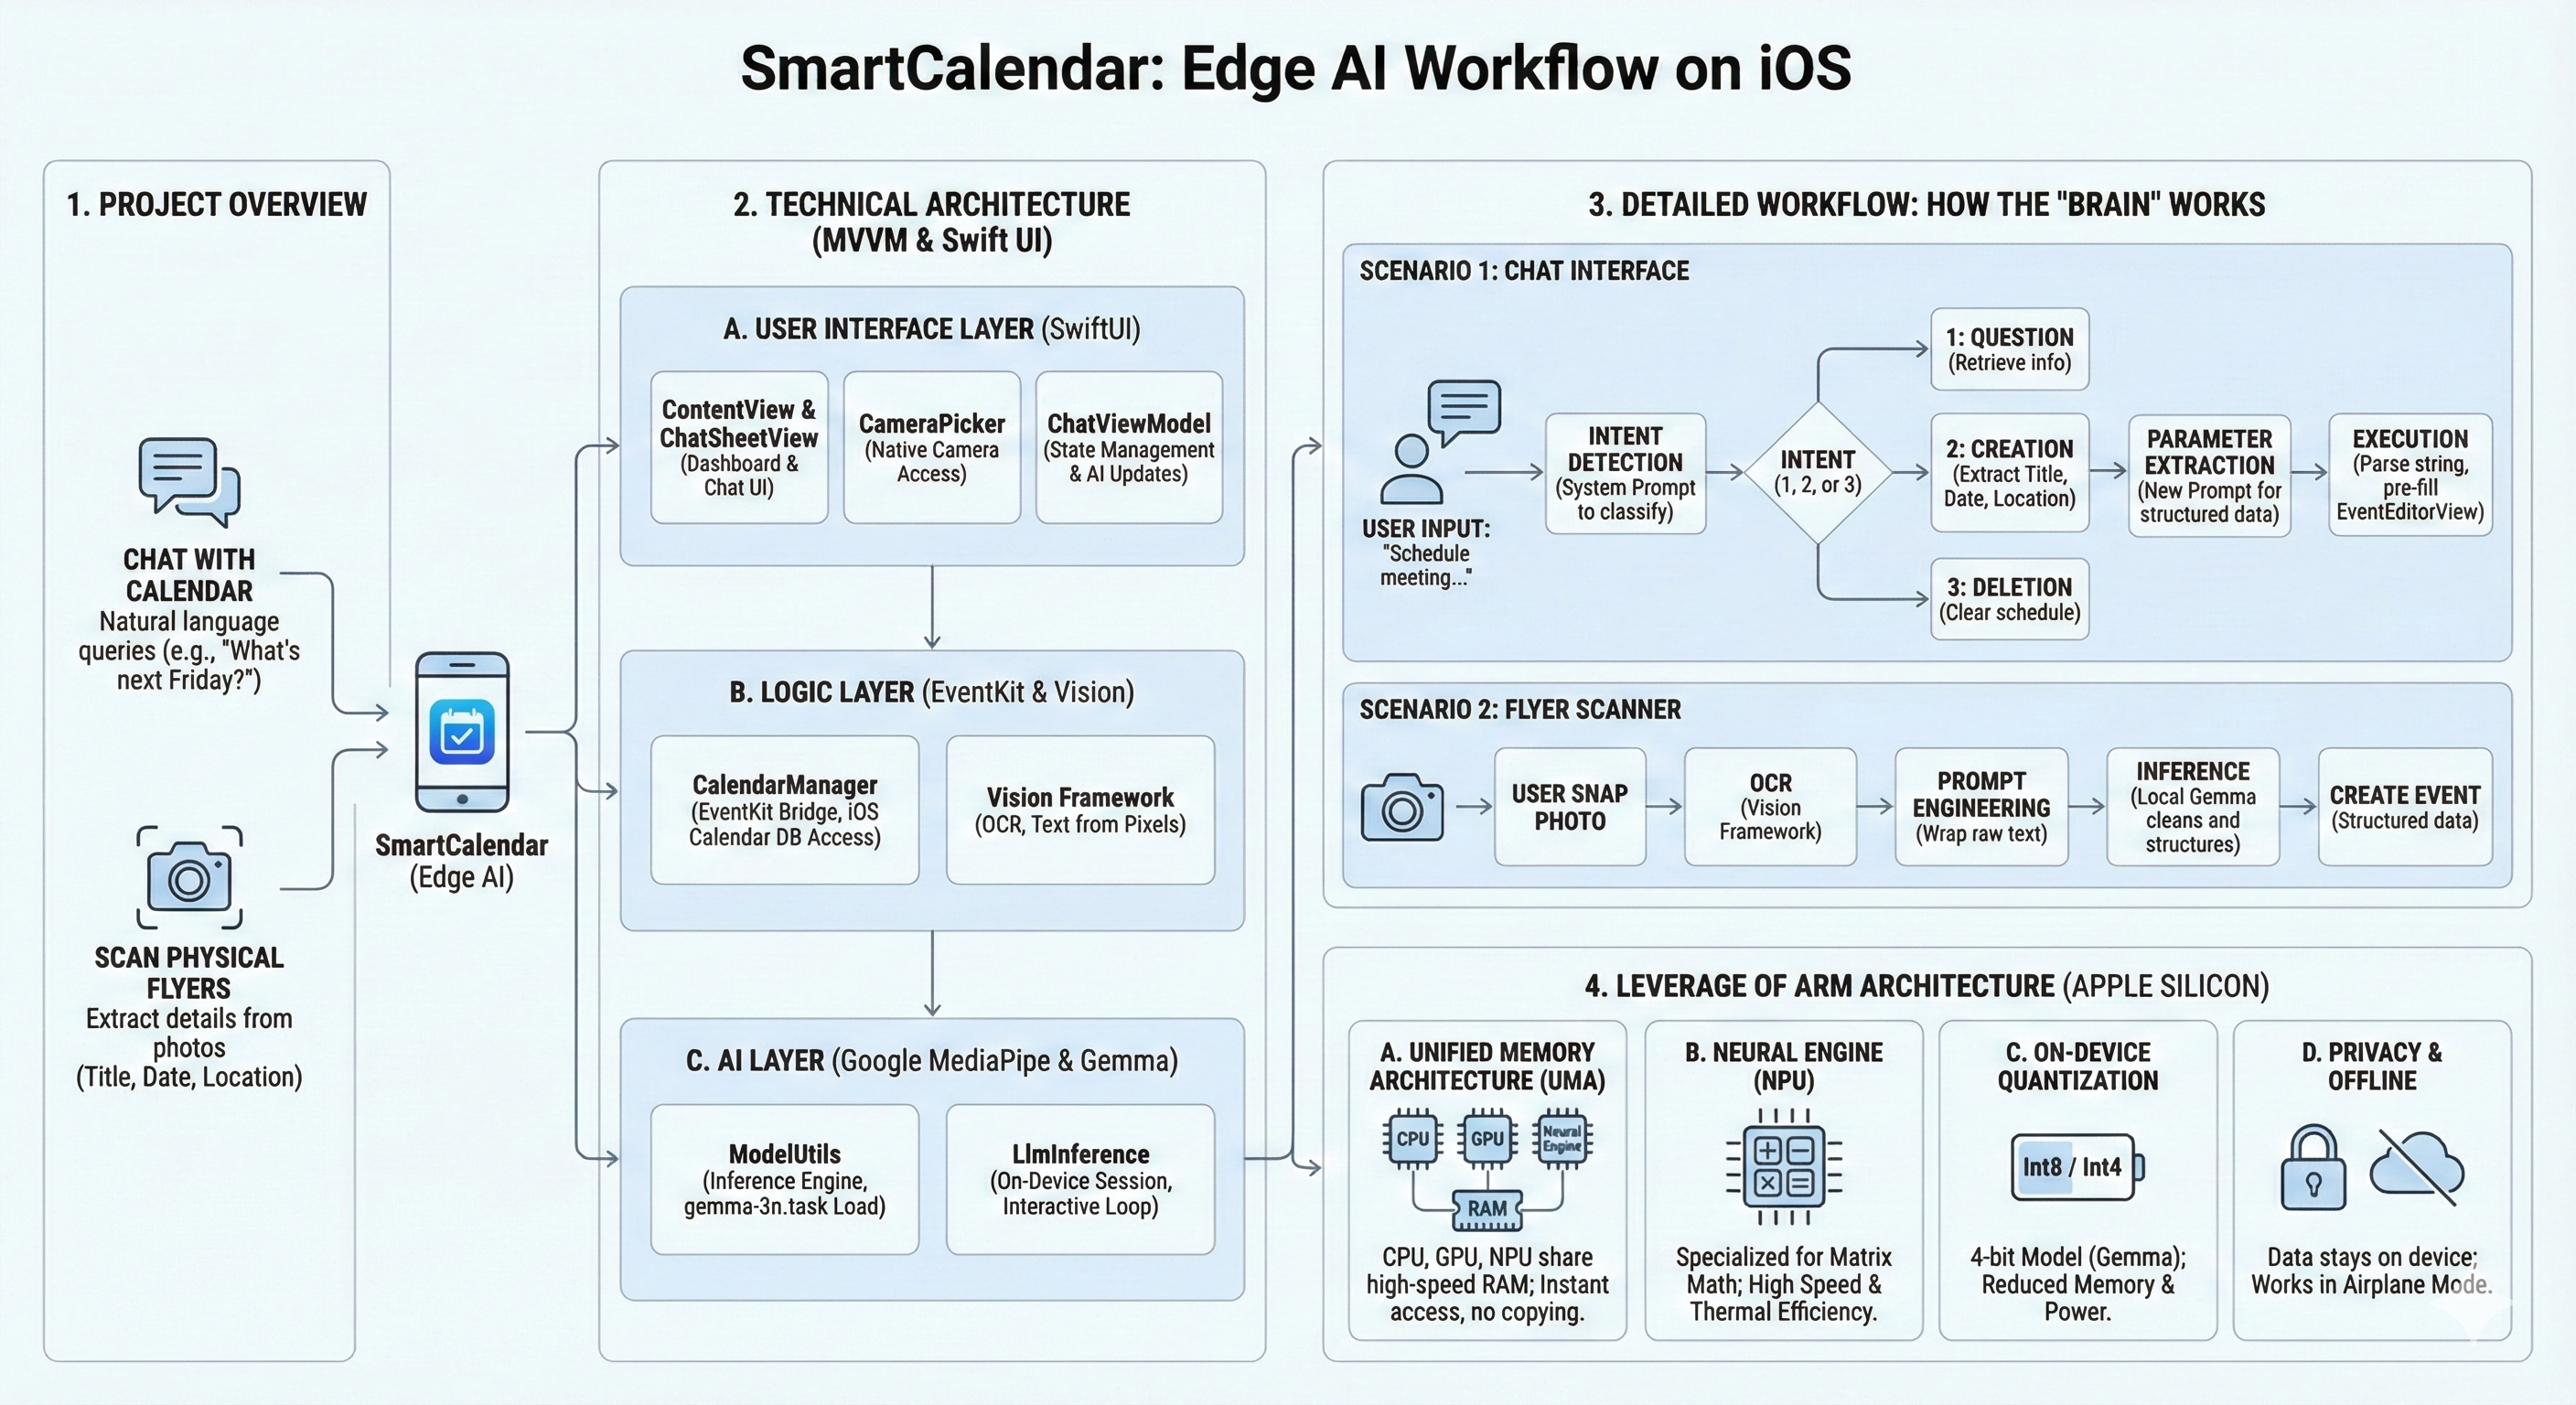
SmartCalendar is an intelligent, privacy-first iOS assistant that reimagines schedule management by bringing the power of Large Language Models (LLMs) directly to the edge. Rather than relying on cloud servers, SmartCalendar runs the Google Gemma model locally on the device, allowing users to interact with their schedule using natural language and manage events through advanced computer vision.
The app allows users to:
- Chat with their Calendar: Ask natural language questions like "What am I doing next Friday?" or "Create an event for a game night tomorrow at 9pm."
- Scan Physical Flyers: Use the camera to snap a photo of an event flyer. The app extracts the text, interprets the details (Title, Date, Location) using AI, and creates a calendar event automatically.
Why This Project Should Win
SmartCalendar represents a significant leap from "Cloud-First" to "Edge-First" development, demonstrating technical mastery over modern mobile hardware. It stands out for three key reasons:
True Privacy & Security: By leveraging on-device inference, personal calendar data and photos of private events never leave the user's phone.
Optimization for Arm Architecture: The project creates a seamless, low-latency user experience by utilizing the Apple Neural Engine (NPU) and Unified Memory Architecture (UMA). This ensures the AI is responsive and thermally efficient, avoiding the battery drain typical of mobile AI.
Complex Reasoning on Mobile: It proves that complex "Chain of Thought" workflows such as intent classification, entity extraction, and multimodal analysis can be executed successfully on a smartphone without internet connectivity.
Functionality
SmartCalendar combines a user-friendly SwiftUI interface with a sophisticated backend logic layer that orchestrates the interaction between the iOS ecosystem and the local AI model.
Key Features
Chat with Your Calendar: Users can query their schedule naturally (e.g., "What am I doing next Friday?") or issue commands (e.g., "Clear my afternoon schedule"). The app understands context and intent without rigid command structures.
Physical Flyer Scanner: Users can snap a photo of a physical event flyer. The app uses Optical Character Recognition (OCR) to read the text and the LLM to intelligently parse messy details, extracting the Title, Date, and Location to create a calendar event automatically.
Offline Capability: Thanks to the local model, the app remains fully functional even in "Airplane Mode."
How It Works
The application operates using a sophisticated "Chain of Thought" workflow managed by the ChatViewModel:
Intent Detection: When a user types a message, the system first acts as a classifier. It sends a prompt to the local Gemma model to categorize the user's intent into specific actions: Question, Creation, or Deletion.
Parameter Extraction:
- For Text: Once an intent (like "Creation") is identified, the app sends a secondary prompt to the LLM to extract structured data (Title, Date, Time) from the conversational text.
- For Images (Flyers): The app utilizes the Vision Framework to perform OCR on the camera input. This raw text is wrapped in a prompt and fed to Gemma, which cleans the noisy data into a structured event format.
Hardware Acceleration:
- Unified Memory: The app loads the
gemma-3nmodel once into the unified memory pool, allowing the CPU, GPU, and NPU to access model weights instantly without data copying. - Neural Engine Execution: Heavy matrix multiplications are offloaded to the NPU via the MediaPipe GenAI library. This ensures high throughput per watt, keeping the interface snappy and the phone cool.
- Unified Memory: The app loads the
Technical Architecture
The project is built using SwiftUI and follows the MVVM (Model-View-ViewModel) design pattern. It integrates three primary distinct technology stacks:
- The User Interface Layer (SwiftUI)
- ContentView & ChatSheetView: These serve as the main UI. The app uses a hybrid interface: a dashboard for viewing upcoming events and a chat sheet for interaction.
- CameraPicker: A UIViewControllerRepresentable wrapper around UIImagePickerController to access the native camera hardware.
- State Management: It relies heavily on
@StateObjectand@Publishedproperties in ChatViewModel to drive UI updates asynchronously as the AI "thinks."
- The Logic Layer (EventKit & Vision)
- CalendarManager (EventKit): This module acts as the bridge to the iOS Calendar database. It requests user permissions (EKEventStore) to fetch, write, and delete events.
- Vision Framework: In ChatViewModel, the app uses Apple's native Vision framework (VNRecognizeTextRequest) to perform Optical Character Recognition (OCR). This converts raw pixels from the camera into a string of text, which is then fed into the LLM.
- The AI Layer (Google MediaPipe & Gemma)
- ModelUtils: This is the core inference engine. It uses the Google MediaPipe GenAI library to load a .task file (specifically
gemma-3n, a version of the Gemma LLM). - LlmInference: The app creates a session directly on the device. It creates an interactive chat loop where context (previous messages) can be maintained, although this specific implementation resets context frequently for stateless tasks (like intent detection).
- ModelUtils: This is the core inference engine. It uses the Google MediaPipe GenAI library to load a .task file (specifically
Leverage of Arm Architecture
This project is an example of how modern apps leverage the specific advantages of Arm-based Apple Silicon (A-series and M-series chips). Here is exactly how the hardware is utilized:
- Unified Memory Architecture (UMA)
- The Bottleneck: In traditional x86/PC architectures, the CPU and GPU have separate memory. To run an LLM on a GPU, you must copy the massive model weights from RAM to VRAM.
- The Arm Advantage: Apple Silicon uses UMA. The CPU, GPU, and Neural Engine share the same pool of high-speed RAM.
- In SmartCalendar: When ModelUtils loads
gemma-3n.task, it loads the model into this unified memory once. The Neural Engine (NPU) can access these weights instantly without data copying. This drastically reduces latency and enables the "instant start" feel of the chatbot.
- The Neural Engine (NPU)
- Matrix Math: LLM inference is essentially billions of matrix multiplications.
- Offloading: The MediaPipe GenAI library (and the underlying Core ML/Metal delegates) targets the Apple Neural Engine (NPU). This specialized silicon is designed specifically for tensor operations.
- Benefit:
- Speed: The NPU executes these operations significantly faster than a general-purpose CPU.
- Thermal Efficiency: Running an LLM on the CPU would cause the phone to overheat and drain the battery in minutes. The NPU provides high throughput per watt, allowing SmartCalendar to run inference without immediately killing the battery.
- Benefit:
- On-Device Quantization
- The
.taskfile extension implies a quantized model. Standard LLMs use 16-bit or 32-bit floating-point numbers (FP16/FP32). - Mobile Arm chips excel at running Int8 or Int4 (8-bit or 4-bit integer) operations.
- This project uses a 4-bit quantized version of Gemma. This reduces the memory footprint (allowing it to fit in the limited RAM of an iPhone) and leverages the NPU's ability to process integer math rapidly.
- Privacy & Offline Capability
- Because the Arm chip is powerful enough to run the model locally:
- Data Security: The user's calendar events and photos of flyers never leave the device. There is no server processing.
- Availability: The app works perfectly in "Airplane Mode."
- The
Installation
Follow these steps to set up the environment, configure the model, and run the application on your iOS device or simulator.
Phase 1: Environment Setup
Before interacting with the project files, ensure your development environment is ready.
- Install CocoaPods CocoaPods is a dependency manager required for this project.
Open your Terminal.
Run the following command:
sudo gem install cocoapods
Note: You may be asked to enter your system password. Characters will not appear on the screen as you type them; simply type the password and press
Enter.
Phase 2: Project Initialization
- Download the Repository
Clone the repository using git or download the ZIP file and unzip it to your desired location.
- Install Dependencies
In your Terminal, navigate to the project folder you just downloaded:
cd path/to/downloaded-repo
Run the installer:
pod install
- Open the Project
Once the installation is complete, open the project folder in Finder.
- Crucial: Locate the file ending in
.xcworkspace(white icon) and open it.
- Crucial: Locate the file ending in
⚠️ Do not open the
.xcodeproj(blue icon) file, or the dependencies will not load correctly.
Phase 3: Model Configuration
The app requires the Gemma-3n model file to function.
- Prepare the Model
Download: Download the gemma 3n model from the provided source link. (https://huggingface.co/google/gemma-3n-E2B-it-litert-preview/tree/main)
Rename: Rename the downloaded file strictly to:
gemma-3n.task
Import to Xcode:
- In Xcode, locate the
SmartCalendar/folder in the project navigator (left sidebar). - Drag and drop the
gemma-3n.taskfile directly into this folder.
- In Xcode, locate the
Set Target Membership:
- When the file options pop-up appears, look for the "Add to targets" section.
- Ensure the checkbox next to the SmartCalendar app target is checked.
- Click Finish.
Phase 4: Build and Run
- Configure Signing
Click on the project name (the very top item) in the left sidebar.
Select the main Target in the center editor.
Go to the "Signing & Capabilities" tab.
Under the Team dropdown, select your personal team (usually your Apple ID).
- Run the Application
Connect your iPhone via cable or select a Simulator. (May need additional installation, do as system message says if so.)
Click the Play button (▶️) in the top-left corner of Xcode to build and run.
- Trust Developer (Physical Device Only)
If you are running on a physical iPhone and see a popup regarding an "Untrusted Developer":
- On your iPhone, go to Settings > General.
- Scroll down to VPN & Device Management (or "Profiles & Device Management").
- Tap the Developer App profile associated with your email.
- Tap Trust.
Phase 5: Using the App
- Grant Permissions
- When the app opens, a prompt will appear asking for access to your Calendar. Tap Allow Full Access.
- Wait for Initialization
Look at the top right corner of the app screen.
- You will see a loading indicator. Wait for this to turn Green.
This may take a few seconds as the Gemma model loads into memory.
- Once green, the app is ready to use!
Troubleshooting
If something goes wrong that's not covered in these instructions, please ask a large language model such as ChatGPT, Gemini, Claude, Grok, etc.
Built With
- gemma
- mediapipe
- swiftui
- vision

Log in or sign up for Devpost to join the conversation.