-
-
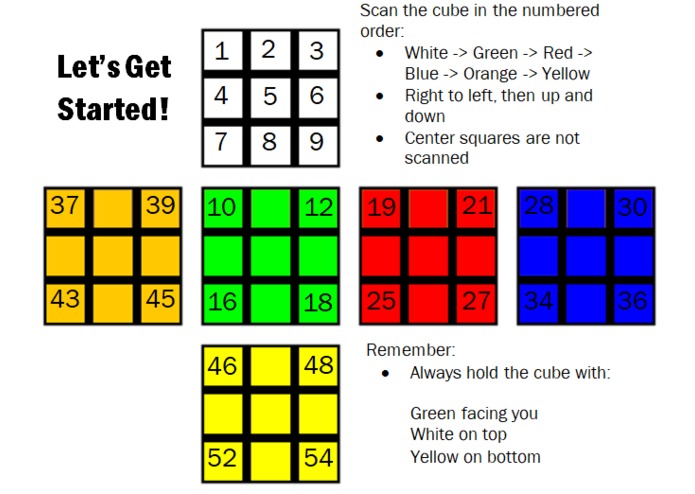
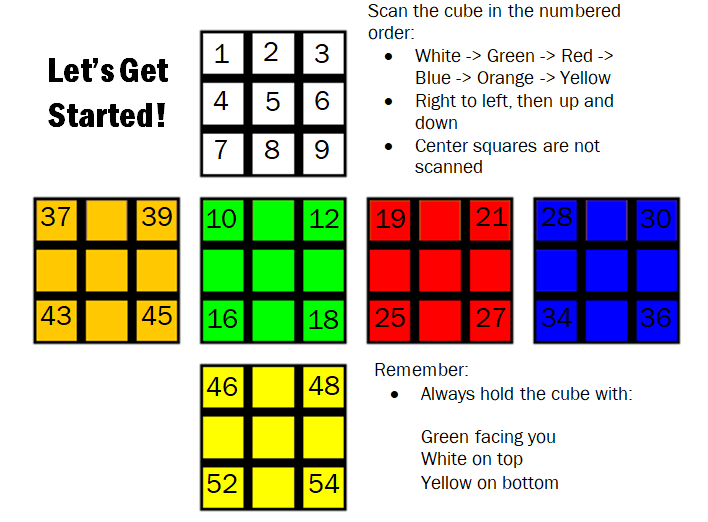
This shows the order in which the stickers on the cube should be scanned.
-

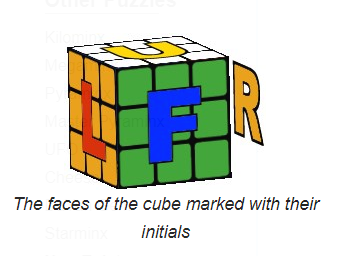
This illustrates the meaning of formal cubing directions. Source: https://ruwix.com/the-rubiks-cube/notation/
-

This shows the proper orientation of the cube when the user is solving it. Source: https://ruwix.com/the-rubiks-cube/notation/

Inspiration
The Rubik’s cube is such a common household item, yet not everyone knows how to solve one. Learning how to do it can take weeks of practice, so to make it easier, we designed Rubik’s Resolver. This machine can analyze any cube and help you solve it.
What it does
Rubik’s Resolver is a machine that can show you how to solve any Rubik’s cube. It receives information about the colors of a scrambled Rubik’s cube and builds an identical virtual cube in Java. Using Java code, the virtual cube is solved and directions are printed out to the user.
To identify the colors, Rubik’s Resolver utilizes an Adafruit TCS34725 RGB color sensor through an Arduino board. The user scans in the stickers of a scrambled cube in a given order. Arduino software determines the color of each sticker. The user interacts with the code through the Arduino serial port using an application called CoolTerm. CoolTerm allows the contents of the serial port to be stored as a text file, which Java can then read to create a virtual cube.
After the colors of the cube are saved, the user should run the Java file called CubeSimulator.java. This loads an image of an identical virtual cube and if the user presses ‘s’ on the keyboard, the virtual cube will solve itself. Once that is completed, Java prints out formal cubing directions that the user can follow. To guarantee that any user can follow the directions, there are instructional images on the box that contains the RGB color sensors. One shows the proper orientation of the cube (Green side facing you, White side facing upwards) and another displays the meaning of formal cubing directions. With these, the user can follow the directions that Java gives to solve the cube layer by layer.
How we built it
We wired the RGB color sensor according to Adafruit’s online tutorial. We adapted code from the Colorview program that Adafruit provides in order to obtain data from the sensor. The sensor returns values for the red, green, and blue components of its input. Through repeated trials, we obtained ranges of RGB values that correspond with the colors of the stickers on the cube. Arduino checks the values of its input to return a cube color (Red, White, Yellow, Blue, Green, or Orange). The user can confirm the program’s output or reject it if it is wrong. In the latter case, the user can manually choose what color the program return. Additionally, the RGB sensor is not extremely reliable. So, if the program is not able to determine the color of the sticker three times in a row, the user can manually input the color. As each sticker is scanned, Arduino stores the color value in an array, which is printed out at the end of the program. CoolTerm saves the output into a text file, which our Java code can utilize.
For the Java portion, we wrote the classes from scratch. We started with a sticker class that notates the color of a single sticker. This is used by the side class which represents a single side of the cube. This then goes into the Cube.java class which virtually represents a cube. The CubeSimulator.java file allows you to use the ‘D’, ‘R’, ‘F’, ‘B’, ‘U’, and ‘L’ keys to turn the faces of the virtual cube. In the Solver.java file, it takes input from the CubeSimulator file and solves the cube the same way a beginner would. It looks for the placement of a piece, and depending on where that piece is, performs an algorithm. It then compiles the series of moves and prints them out for the user to follow.
Challenges we ran into
The RGB color sensor identified red and orange stickers as the same color. In order to bypass this issue, we covered the orange stickers on the Rubik’s Cube using gaff tape, which is black in color. This helped create more a difference between these colors. However, the RGB sensor still did not work perfectly in identifying every sticker’s color. Therefore, we allowed the user to manually adjust color values. Otherwise, if the sticker colors were recorded incorrectly, the virtual cube would unsolvable.
Accomplishments that we're proud of
The Java virtual cube is successful in solving any scrambled 3x3 Rubik’s cube and correctly prints out directions for the user to follow.
What we learned
We learned how to animate a virtual cube using Java and how to build an algorithm to solve a cube. We also learned how to allow users to interact with Arduino code, a technique that we had not learned in class. The CoolTerm application is also extremely beneficial because it allowed us to make the Arduino serial port output accessible to our Java code.
What's next for Rubik's Cube Solver
In the future, we would like to build a small mechanical machine that can physically turn the sides of the cube. This way, we can have the entire process of solving a scrambled cube be automated. We would also like to build a board of RGB sensors that makes scanning in the sticker colors more efficient. We would also like to optimize our Arduino code and Java code so that color detection is nearly perfect and the cube is solved more efficiently.
Try It Out
Be sure to download the CoolTerm application and JCreator in order to run these files. https://drive.google.com/drive/folders/1GxqQWlWhMFrgYs88-zANScAIqXonzVVx?usp=sharing

Log in or sign up for Devpost to join the conversation.