-
-
Title Slide
-
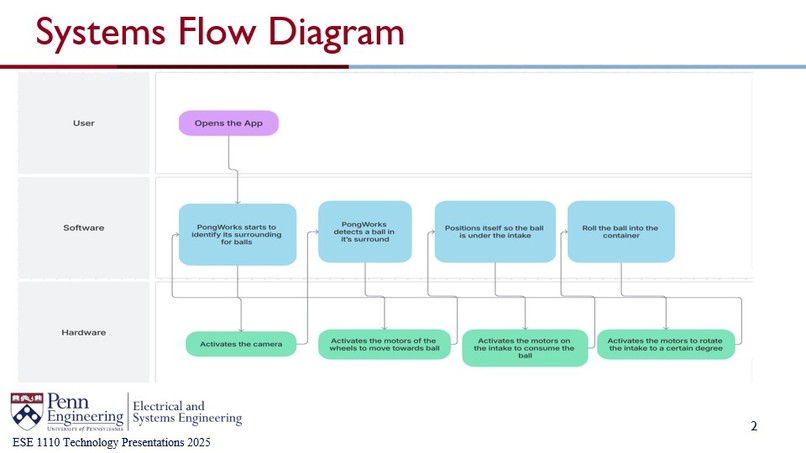
System Overview
-
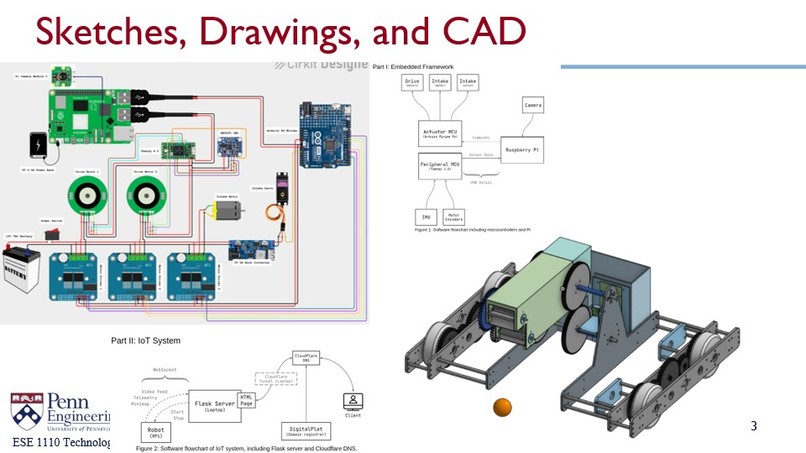
Brainstorming and Design Stage
-
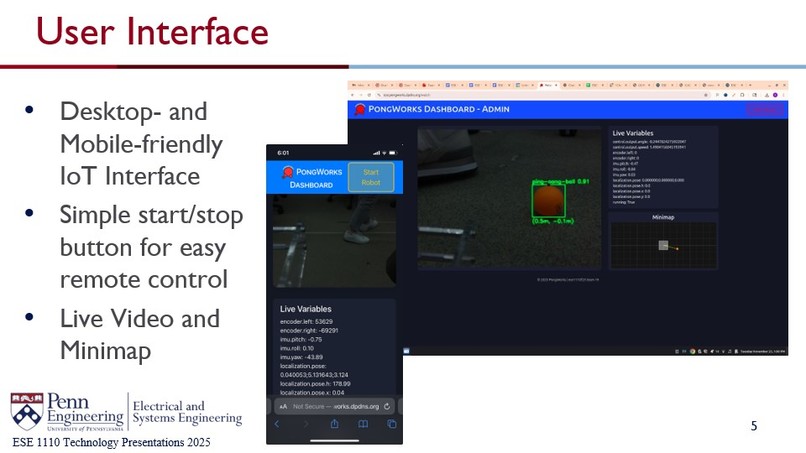
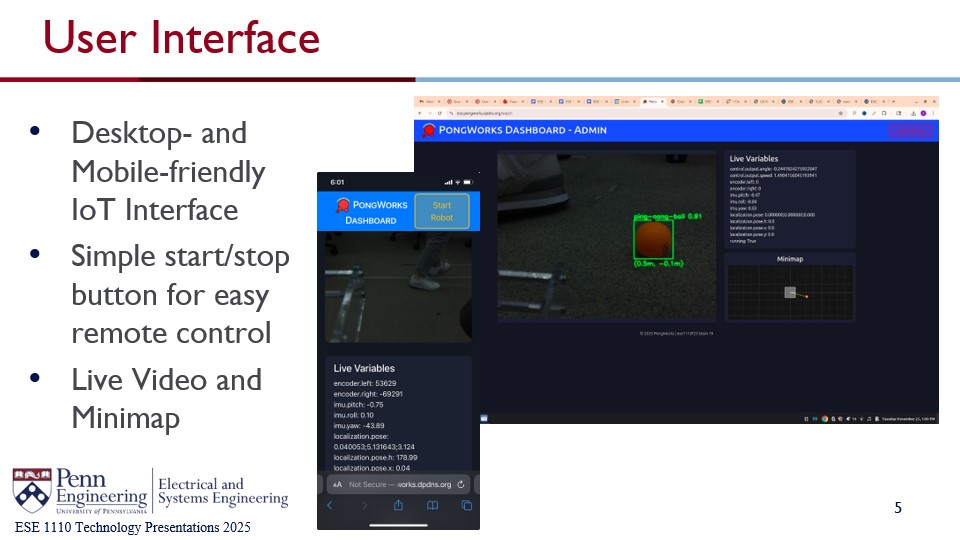
UI Description
-

Features Offered by this Product
-
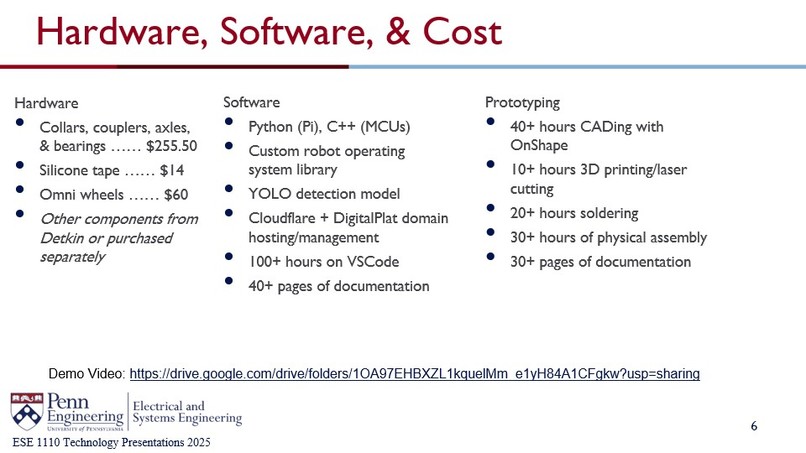
Cost and Time-Distribution Analysis
Inspiration
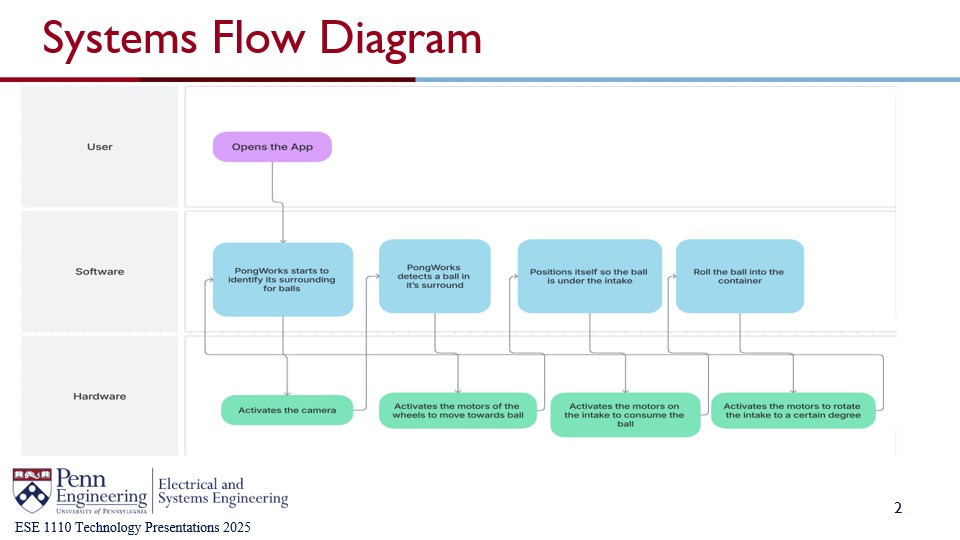
Spending time picking up balls disrupts training. We thus want to maximize the amount of time that a person could spend improving his or her performance in ping pong, not tediously picking up balls. We designed this robot using OnShape and manufactured the robot using laser cutting and 3D printing. We equipped the robot with a YOLO computer vision model operating on a Raspberry Pi camera, allowing smart interactions between the robot and the physical world.
What it does
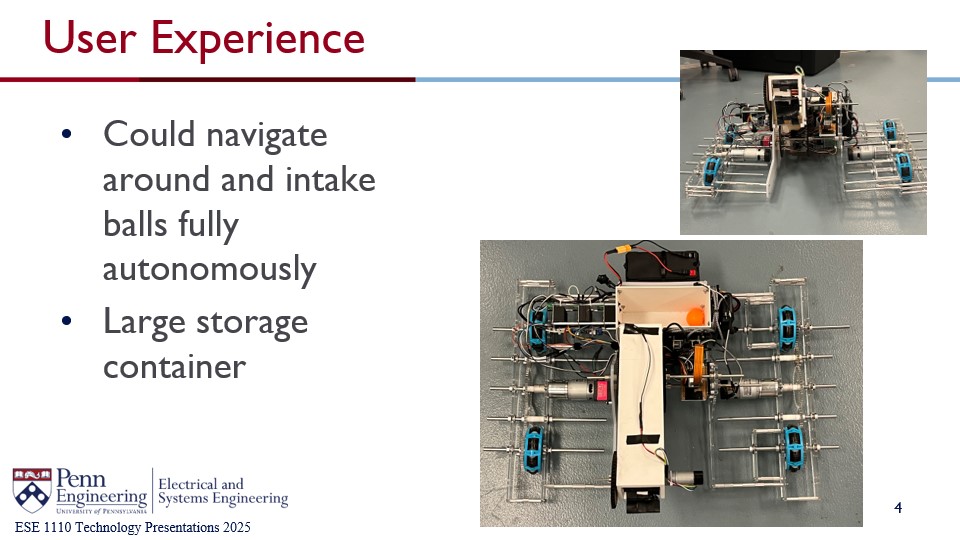
Our robot autonomously searches for ping-pong balls and approaches them, picking them up with a roller and storing balls in its built-in storage container. It is remote-controllable from our IoT website, which can be accessed anytime at anywhere in the world!
How we built it
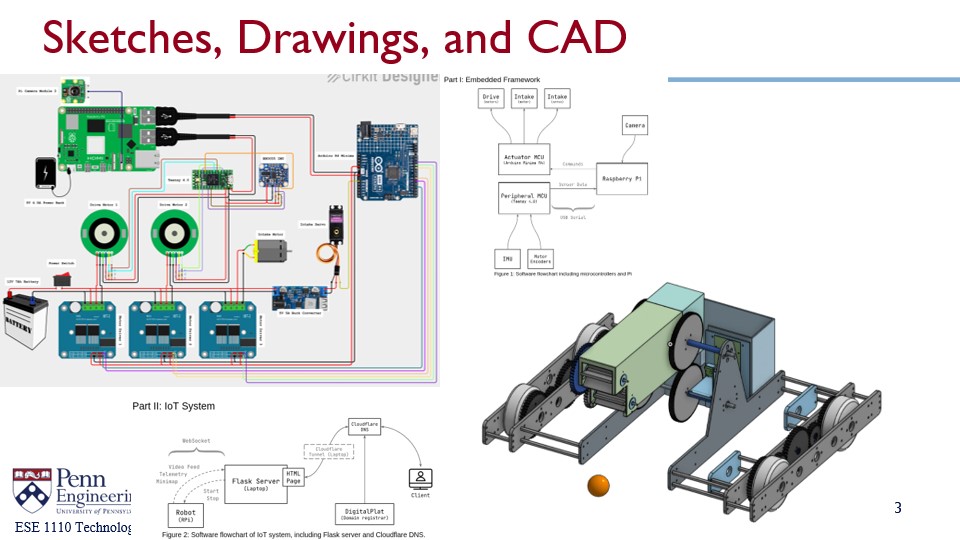
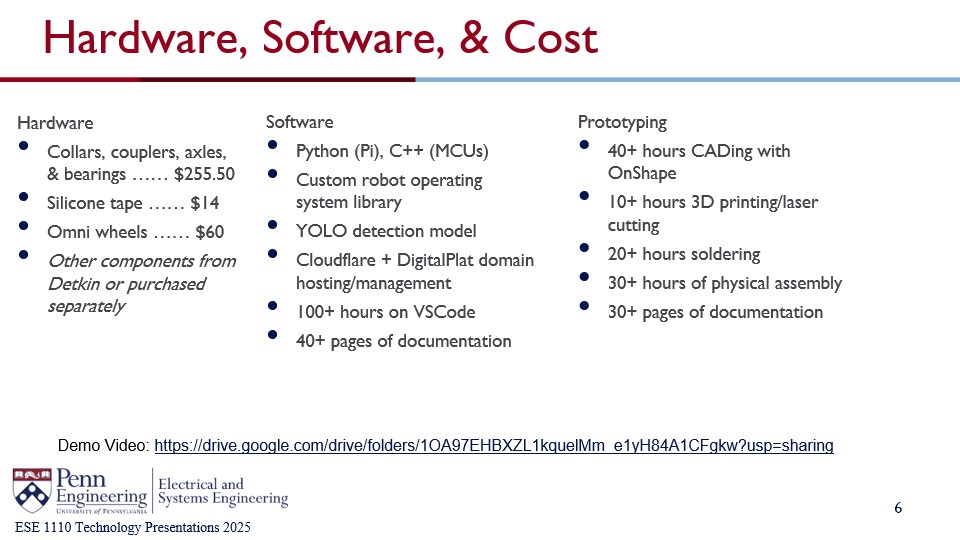
We used Onshape to design the structure of the robot and manufactured the chassis with RPL's lasercutters and 3D printers. Some of our electronic parts were from Detkin, and we ordered mechanical parts (e.g. shafts, collars, couplers, and omniwheels) from Amazon. We assembled the robot in General Motors Lab and M81.
For software, we used a Raspberry Pi 5 microcomputer, and Arduino R4 Minima and Teensy 4.0 microcontrollers (MCUs). The Pi is in charge of performing object detection, gathering data from the MCUs, and sending/receiving data to/from the IoT server. We created a custom robot operating system Python library with an elegant thread creation and data sharing interface for the Pi to use. The Arduino receives commands from the Pi and controls the three motors and one intake servo. Lastly, the Teensy reads orientation from a BNO055 IMU, reads encoder position from both left and right motors, and calculates the position of the robot using a custom sensor fusion algorithm. Our IoT server is run on our own domain, which was registered through DigitalPlat and hosted using Cloudflare.
Challenges we ran into
We faced many challenges. Here is a list of the most difficult ones we tackled.
Hardware:
- The drive motors we chose were larger than anticipated, and we had to increase the width of the robot.
- We borrowed a hand drill from PER to create mounts for the electronics.
- To couple our laser-cut gears with axles, we used a collar with a long set screw sandwiched between two screws protruding out of the gear’s face.
- Our main intake tube was too large to print on RPL’s 3D printers, so we split it into 2 pieces and attached them together using the intake gears.
- Our intake gears got in the way of wires, so we changed the intake gear ratio to leave more space for wires
- Due to the tolerance of RPL’s 3D printers, our small camera mount had to be redesigned to accommodate printing errors.
- Our intake rollers needed more traction to pick up balls, so we coated them with adhesive using a glue stick.
- Our drivetrain axles were too long, and we could not use an angle grinder, so we modified the drivetrain plates to have empty space to fit the axles.
- The omniwheels came with no rubber coating, so we applied electrical tape on their rollers to give them traction against the ground.
- The omniwheels were too large and hit the connector standoffs on the drivetrain plates, so we moved the wheels toward the center and redesigned the gears.
- Having separate motors to power the top and bottom rollers of the intake augumented the potential blind spot of the camera, concentrated the weight in front of the intake tube, and increased the complexity of the wiring, so we leveraged the fact that adjacent gears spin in opposite directions to and implemented a gear system onto the intake, allowing the intake to work with just one motor.
- The screws that fix the pivoting gears onto the rounded shaft through the shaft collar do not have enough good contact with the shaft, causing the gears to slip sometimes. We thus improved this contact by filing the rounded shaft into a D-shaft, creating a flat surface for the screws.
Electrical
- The Pi, Arduino, and Teensy run on 5V, while the motors run on 12V and the servo runs on 6V. Because of this discrepancy, we use two power sources—a 5V4.5A power bank for the Pi and a 12V7A LiFePO4 battery for the motors and servo.
- We needed to connect our 3 motor drivers and 5V buck converter in parallel to the 12V battery, so we soldered two long wires with many T-junctions which is now the electrical “spinal cord” of our robot.
- To prevent our wiring from getting messy, we soldered two perfboards as central “hubs” that connect to the MCUs, sensors, and motor drivers.
- Our original intake motor, a Traxxas Titan 12T 550, drew way too much current (around 10A!), so we switched to a small TS-25GAH370 which draws around 0.25A.
- Our IMU and motor encoders had weak internal pullups and thus inconsistent readings, so we added pullup resistors to our perfboards to maintain stronger electrical signals.
Software
- ROS2 was difficult to set up on the Pi, so we created our own robot operating system library.
- Our initial YOLOv8n detection model ran at <1FPS, so we reduced the input image size from 640px to 256px and now it can run at 20FPS.
- On the AirPennNet wifi, our Pi’s IP address keeps changing and cannot be set to static. This is still an unsolved (albeit inconsequential) issue.
- Our initial IMU was an MPU6050, which kept zeroing out after only a few seconds of runtime and was extremely prone to drift, so we switched to an Adafruit BNO055.
- At times, our code took upwards of 10 seconds to start up. After optimizing imports and our threads’ startup routine, the robot now takes less than a second to start up.
- The IoT server initially used a simple HTTP endpoint to receive images from the Pi. This was inefficient and slow, so we switched to WebSocket which is much faster.
- We originally wanted to use a RAMSETE controller to drive the robot to the ping-pong ball, but that requires creating a heuristic motion profile, which is difficult and overly complex. We settled with a PID controller that balances turning and approach velocity.
- We originally had only one Arduino to get sensor data and control motors, but it is very slow for the Pi to both send commands and receive data on one USB cable, so we split the sensor and actuator functionality into two MCUs (the Arduino and the Teensy).
- Originally, we used an Arduino instead of the Teensy, but we found that the Arduino is too slow to keep accurate encoder measurements. The Teensy has built-in motor encoder pins and runs 100x faster than the Arduino.
- The IMU occasionally crashes and resets, so we wrote a crash detector that switches orientation measurement to only using the motor encoders while the IMU resets.
Accomplishments that we're proud of
We built the robot in one month and it is indeed able to pick up ping-pong balls. Although it is not the most consistent ball-roomba, we are happy that all of this interdisciplinary work has come together to create a single, functioning machine. We are also thrilled to present our over-70-page-long notebooks chronicling all our progress, organization, struggles, and breakthroughs over our month of work:
- Project Roadmap: https://docs.google.com/document/d/1woS1uUOYOopIuYo3a63E3s7T758zJIp2Pufb1Yn4Edk/edit?tab=t.0
- Hardware Notebook: https://docs.google.com/document/d/17PIfd5Np9C15l6sHIzZnFUaF8_snJ3bqXBXkqaYnvyw/edit?tab=t.0#heading=h.cbb3hkyyhpep
- Software Notebook: https://docs.google.com/document/d/1UoXFRvU2iBFJo3adUPSR4mpmCwkDsNYnJPXz1ENoIG4/edit?tab=t.0
What we learned
We honed many skills—hardware and circuit design, manufacturing, soldering, ML, firmware programming, IoT networking, documentation, video editing, and more. This project was a lot of work, but ultimately a fulfilling experience.
What's next for PongWorks
There’s still a lot to be improved in our prototype! For one, the robot is massive, volume- and weight-wise. Much of the wiring could be reorganized by redesigning our perfboards and MCUs as custom PCBs. The Pi software isn’t perfect and contains many bugs that are difficult to fix, and it would be wise to switch to ROS2 instead of our custom library. If we get the chance to iterate on our design further, we would gladly do so—we have so many new ideas to try and there is still so much more to explore!
Built With
- 3dprinting
- lasercutting
- onshape
- python
- yolo


Log in or sign up for Devpost to join the conversation.