-
-

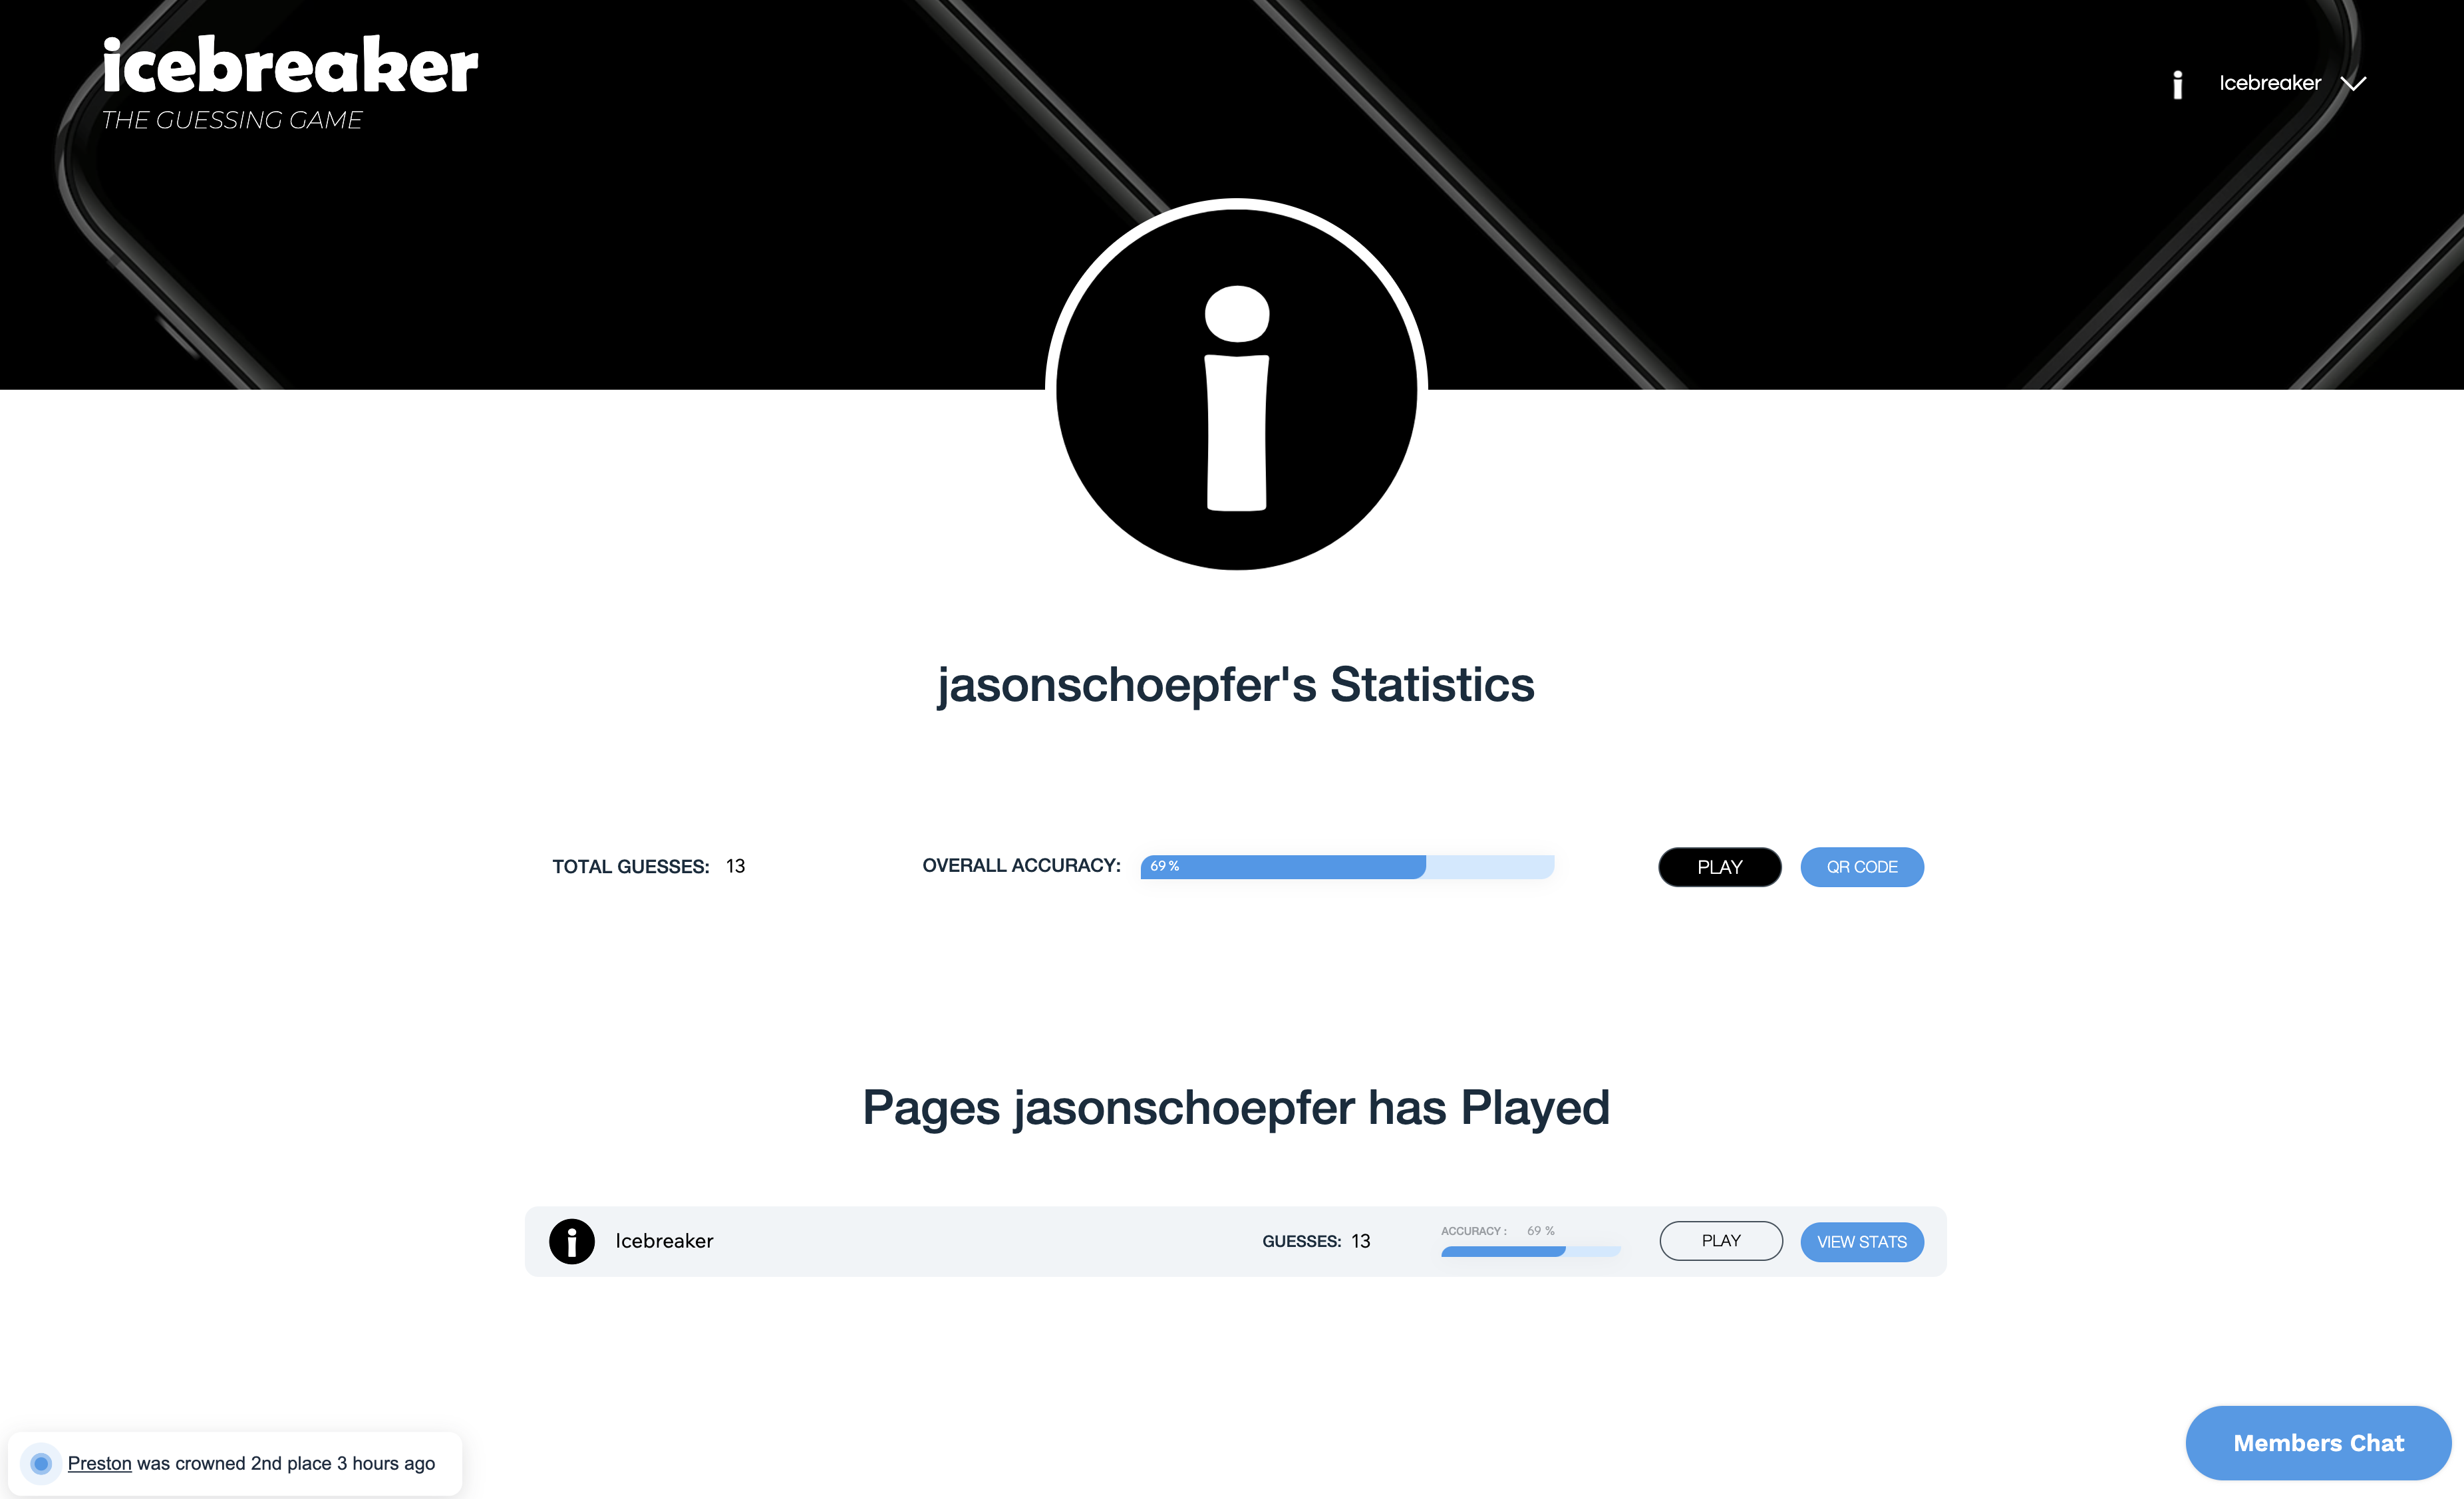
Players Stats page
-

Token Cooler to purchase NFT's
-

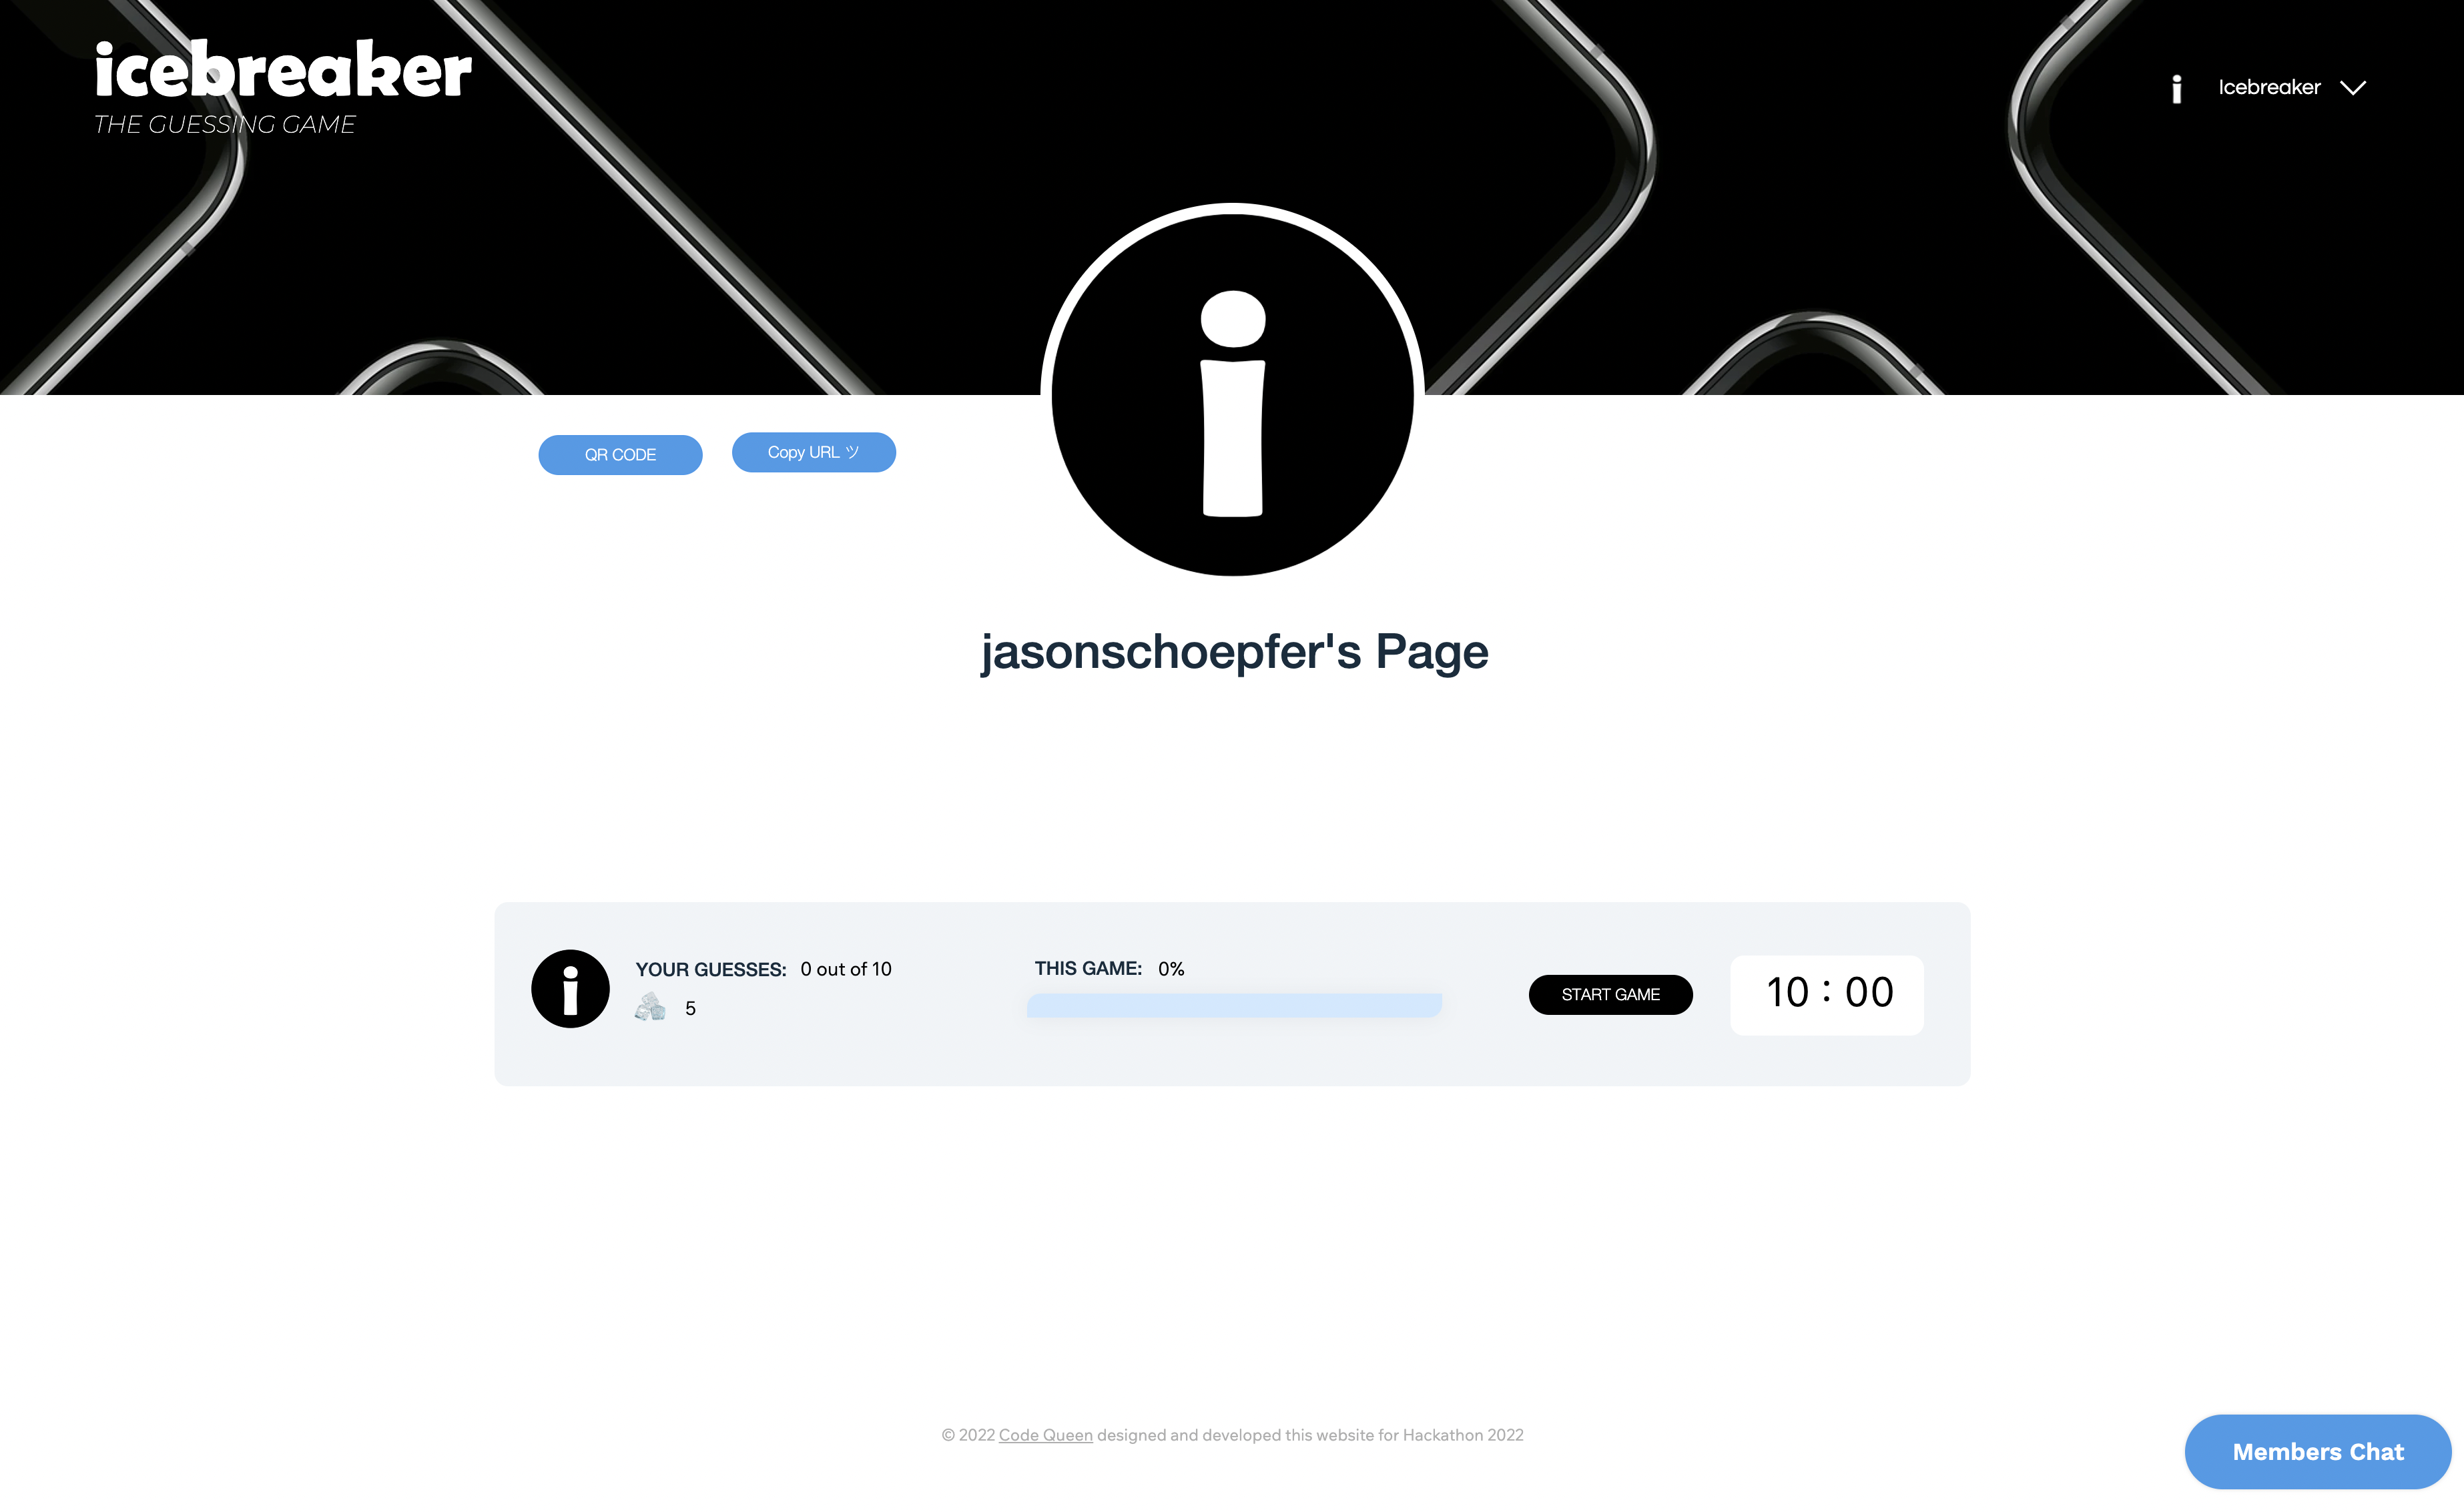
Players Game Page
-

QR Code to Share game page
-

Leaderboard
-

Home Page


Inspiration
Being that this hackathon was specifically aligned with the upcoming WixDev conference I was inspired to create a game that was carefully curated for a conference scenario. It seemed like the perfect pairing to create a game built with Velo to encourage people to actually play it during a Velo conference. I remember my first Wix conference and there were many times that people were very shy and not really interacting with each other. I had the idea to create a game that could bridge a connection between attendees to spark conversations and find people that have shared the same experiences. I also wanted to create something that was casual and entertaining that would hopefully produce a few giggles.
What it does
This game is best played in person because it encourages live conversations and interactions with strangers. But it can also be played apart with family, friends or people you met at a conference. The idea is to go up to someone and ask them if they want to play on your page. If they say yes, you share your QR code so they can use their camera phone to scan it. They will be prompted to create an account if they don’t have one already. Once the page loads, they will see a ‘start game’ button that will start a 10 minute timer. The person will have less than 10 minutes to answer 10 random questions above you. They have to guess whether or not you have ever done ‘something’. A player can ‘setup’ their own by answering as many questions about themselves as they want. Their page can be ‘setup’ before or after they start playing on someone else’s page. If you play this game in person, you can look at the person’s face while you are trying to figure out the answer. It could be that their facial expressions give away the answer or maybe you can try and get them to talk about it to coax it out of them! Either way, by playing the game with someone it creates a way to break the ice and get to know someone new. I envision the game to be introduced by a conference speaker as they announce for an intermission. Perhaps the speaker of the conference can share their QR code for the attendees to start on that page. Then the attendees can be encouraged to create their own pages and invite other people to play on their page. As each player plays the game they begin to earn ice cubes that can be used later to purchase Ice Breaker NFT’s from our Token Cooler. Ice cubes are earned by viewing a player’s page for the first time (5 ice cubes), having someone view your page for the first time (10 ice cubes), guessing a question correctly on another player’s page (3 ice cubes), and by having another player guess any questions (correct or incorrect) on your own page (1 ice cube). Each time a player makes it to 1st place, 2nd place and 3rd place it is announced via notifications that include a hyperlink to the player’s page. To find other people from the same conference we created a Conference page to claim conference badges and the ability to search players by conference. At the same time, this also promotes other conferences as players will begin to look for other interesting conferences to attend and network.
How I built it
Development Design I made sure that every page and section layout was constructed in a way that it could easily be optimized for any screen, especially for mobile in order for the QR scanning function to work seamlessly for in person conferences. The game needed to be portable but usable on desktop and mobile devices.
Basic functionality / features I sketched out a wireframe and the content that would be involved in each section. I then organized all the content in a way that it could be updated efficiently. This meant using reference fields to link data from multiple database collections.
3rd Party API’s I used a 3rd party API to auto generate QR codes for each member immediately when registering for a new account. I used a 3rd party API to create automated notifications to announce a player’s score after playing a game and to announce each time there was a new 1st place, 2nd place and 3rd place winner. The notifications are delayed by a few seconds to avoid too much movement and distraction on the screen. I used the same API to announce how many live visitors are on the website at the same time.
Velo API's Used
Front end code was used to call backend Web Modules. I created backend .jsw and .js files to run a few Wix API’s such as:
wix-members-backend API badges.assignMembers() wix-fetch API to run the fetch() function in order to integrate a 3rd party API that generates QR codes, and another 3rd party API that creates dynamic hyperlinked notifications wix-data API wix-data.insert() wix-data.update() wix-data.query() data.js to run hooks afterInsert() afterUpdate() events.js to detect onMemberCreated() in order to initiate some records in certain database collections.
The API’s used in the page code and masterPage.js are:
wix-window API wixWindow.formFactor
wix-location API wixLocation.to()
$w.Image API src()
wix-data API query() filter() sort()
wix-users API wixUsers.currentuser()
wix-dataset API onReady() getCurrentItem() getTotalCount() setSort() setFilter()
Other functions I used are:
onViewPortEnter() onReady() onItemReady() $w() $item() onClick() show() hide() expand() collapse() onChange() Velo Database Collections / Content Manager
How to Play on Desktop
Since the game is designed to be played in person at a conference setting, the game can be accessed and played on desktop and mobile. Here are the steps for both:
Desktop Step 1 (Create Account) Player #1 creates an account by clicking on the top right corner login button that says ‘Play Now’. Enter an email and password then click ‘Create Account’. If the player is returning, then select ‘login’ on the top right corner of the login window.
Desktop Step 2 (Setup Page) Now Player #1 uses the login bar to navigate to ‘Setup My Page’. Read through each of the statement questions and answer ‘Have’ or ‘Never’. Player #1 can answer as many questions as they want.
Desktop Step 3 (Find a Player / Share Your Page) Now Player #1 has a page that is ready to be played by other players. Player #1 can use the login bar to navigate to ‘QR Code’ to view and share the QR code with other players in person. Other players can navigate to ‘Play Now’ to view all the players on the website. Using the ‘Sort by’ dropdown players can search for the newest players added to the website. Scroll down the list of players and click on ‘Play’ to play the page of that person.
Desktop Step 4 (Play Game) The players page will load. If the player does not have at least 10 questions you can search for that player by using the Member Chat on the bottom right hand corner and convince them to answer more questions or set up their page. If you have already played that page before, you will see a message saying the game is over and you will see the stats of that game. If you have never played this page before and the player has at least 10 questions, you will see a button that says ‘start game’ and a timer set to 10 minutes. When you are ready to start the game click on the ‘start game’ button and answer as many of the 10 random questions before the time limit runs out. You can only play each page once. If you refresh the page or try to play again, the game will be over. The very first time you visit a player’s page you will receive 5 ice cubes. The first time a player visits your own page, you will receive 10 ice cubes. For each question you guess correctly you will receive 3 ice cubes. You receive no ice cubes for incorrect guesses. Repeat playing on other player’s pages as desired.
Desktop Step 5 (Token Cooler) Spend your ice cubes in the Token Cooler page. Using the login bar navigate to ‘Token Cooler’ If you have enough ice cubes you can purchase one of the Ice Breaker NFT Tokens that we have. Each NFT can only be owned by one person. Once an NFT is purchased it can no longer be purchased.
Desktop Step 6 (Leaderboard) Visit the leader board by using the login bar and navigate to ‘Leaderboard’ to see what each player’s ranking is. The page automatically refreshes every few seconds. Any player who achieves 1st place, 2nd place or 3rd place receives the corresponding badge.
Desktop Step 7 (Statistics & Tokens) To view a players statistics, badges they’ve earned, pages they have played and what NFT’s they own you can click on the ‘View Stat’s button located on various pages of the site, such as: Leaderboard Play Now (Members List) Token Cooker (Owned by - Button) To view your own statistics, badges you’ve earned, pages you have played and what NFT’s you own you can use the login bar to navigate to ‘Stats / Tokens’.
Desktop Step 8 (Conference) Use the login bar on the top right corner and click on ‘Conferences’. You can search for a conference and click on ‘Confirm’ to confirm you are attending or did attend that certain conference. You will earn a corresponding conference badge for each conference you confirm. You can also click on any conference badge found on any player’s stats page to navigate to that specific conference page to view the list of players for that conference
How to Play on Mobile
Mobile Step 1 (Create Account) Player #1 creates an account by clicking on the button that says ‘Play Now’ on the navigation bar pinned at the bottom of the screen. Enter an email and password and then click ‘Create Account’. If the player is returning, then select ‘login’ on the top right corner of the login window. If the player was invited by someone else, and arrived to the site by scanning a QR code The player has to either log in or create an account in order to view the players page.
Mobile Step 2 (Setup Page) Now Player #1 uses the login bar located on the top right corner of the page to navigate to ‘Setup My Page’. Read through each of the statement questions and answer ‘Have’ or ‘Never’. Player #1 can answer as many questions as they want. If the player just finished creating an account because they scanned a QR code they should already be on the correct players page and they can skip to Step 4.
Mobile Step 3 (Find a Player / Share Your Page) Now Player #1 has a page that is ready to be played by other players. Player #1 can use the login bar to navigate to ‘QR Code’ to view and share the QR code with other players in person. Or they can also use the navigation bar pinned at the bottom of their screen and click on ‘Share Page’ to view their QR code. Other players can navigate to ‘Play Now’ to view all the players on the website. Using the ‘Sort by’ dropdown players can search for the newest players added to the website.
Mobile Step 4 (Play Game) The players page will load. If the player does not have at least 10 questions you will see a message saying they do not have at least 10 questions answered. If you have already played that page before, you will see a message saying the game is over and you will see the stats of that game. If you have never played this page before and the player has at least 10 questions, you will see a button that says ‘start game’ and a timer set to 10 minutes. When you are ready to start the game click on the ‘start game’ button and answer as many of the 10 random questions before the time limit runs out. You can only play each page once. If you refresh the page or try to play again, the game will be over. The very first time you visit a player’s page you will receive 5 ice cubes. The first time a player visits your own page, you will receive 10 ice cubes. For each question you guess correctly you will receive 3 ice cubes. You receive no ice cubes for incorrect guesses. Repeat playing on other player’s pages as desired. You can search for other players using the ‘Play Now’ button located on the navigation bar pinned at the bottom of your screen.
Mobile Step 5 (Token Cooler) Spend your ice cubes in the Token Cooler page. Using the login bar navigate to ‘Token Cooler’ If you have enough ice cubes you can purchase one of the Ice Breaker NFT Tokens that we have. Each NFT can only be owned by one person. Once an NFT is purchased it can no longer be purchased.
Mobile Step 6 (Leaderboard) Visit the leader board by using the login bar on the top right corner on every page (except the game page) and navigate to ‘Leaderboard’ to see what each player’s ranking is. The page automatically refreshes every few seconds.
Mobile Step 7 (Statistics & Tokens) To view a players statistics, badges they’ve earned, pages they have played and what NFT’s they own you can click on the ‘View Stat’s button located on various pages of the site, such as: Leaderboard Play Now (Members List) Token Cooker (Owned by - Button) To view your own statistics, badges you’ve earned, pages you have played and what NFT’s you own you can use the login bar on the top right corner on every page (except the game page) to navigate to ‘Stats / Tokens’.
Mobile Step 8 (Conference) Use the login bar on the top right corner on every page (except the game page) and click on ‘Conferences’ You can search for a conference and click on ‘Confirm’ to confirm you are attending or did attend that certain conference. You will earn a corresponding conference badge for each conference you confirm. You can also click on any conference badge found on any player’s stats page to navigate to that specific conference page to view the list of players for that conference
Challenges I ran into
1. Element Bugs - Mobile Quick Action Bar I had issues with the floating mobile Quick Bar where it was loading off-screen then jumping to the center of the page to align itself after the page was fully loaded. Wix Customer Support verified it was a bug but they could not assist in fixing the issue at this time. The Solution: I opted for a pinned quick bar instead of the floating quick bar and I removed the Wix Chat app from the home page. The Result: The mobile quick bar navigation was aligned in the center from the first moment the website loaded on mobile. By removing the Wix Chat from the home page the pinned navigation no longer shifted or moved around due to waiting for the Wix Chat app to finish loading.
2. Element Bugs - Pagination Bar I had issues with the pagination bar being jumpy and glitchy before any code / dataset connections were made. The pagination bar would randomly move around the page when scrolling down the page. The Solution: I used a load more button instead and I added a ‘back to top’ button on the mobile screen. The Result: No issues with the button and the ‘back to top’ button on the mobile screen made it really easy to navigate.
3. Backend Discrepancies - Suppress Auth wix-data Insert() I had issues attempting to suppress auth in order to insert data into the database collections while retaining the owner as the person logged in. The problem was that when using the events.js backend I was unable to suppress Auth. The Solution: I moved the code to another backend file and simply called from within the events.js backend. The Result: I was able to suppress Auth successfully and retain the owner of the content as the person logged in.
Accomplishments that I proud of
I am proud that I was able to complete this entire project on my own in such a short amount of time. It is a project that is feasible for actual use in real life and I have already received offers from clients to purchase the site after the hackathon is completed.
What we learned
I learned that it was actually possible to create a game on the Wix platform which is something I did not think was possible before. Not only that, this site really pushed my limits on external API's and I was able to integrate a QR code function which I had never done on any of my projects before.
What's next for Play Icebreaker
I am hoping that this game can be played for the first time at a real conference such as WixDev Con 2022! It would be amazing to hear the feedback from real users to analyze this site's full potential and then enhance the features and functions from there!
(Had trouble uploading video to YouTube, so added a temporary redirect link on the application, thanks)
Built With
- velo
- wix


Log in or sign up for Devpost to join the conversation.