-
-
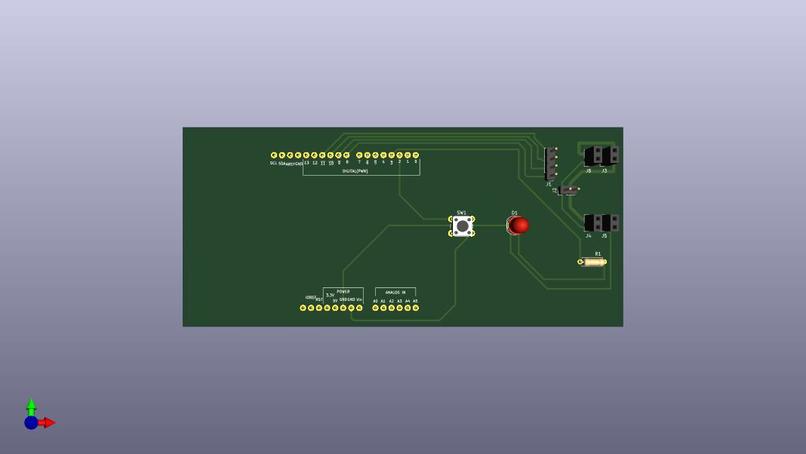
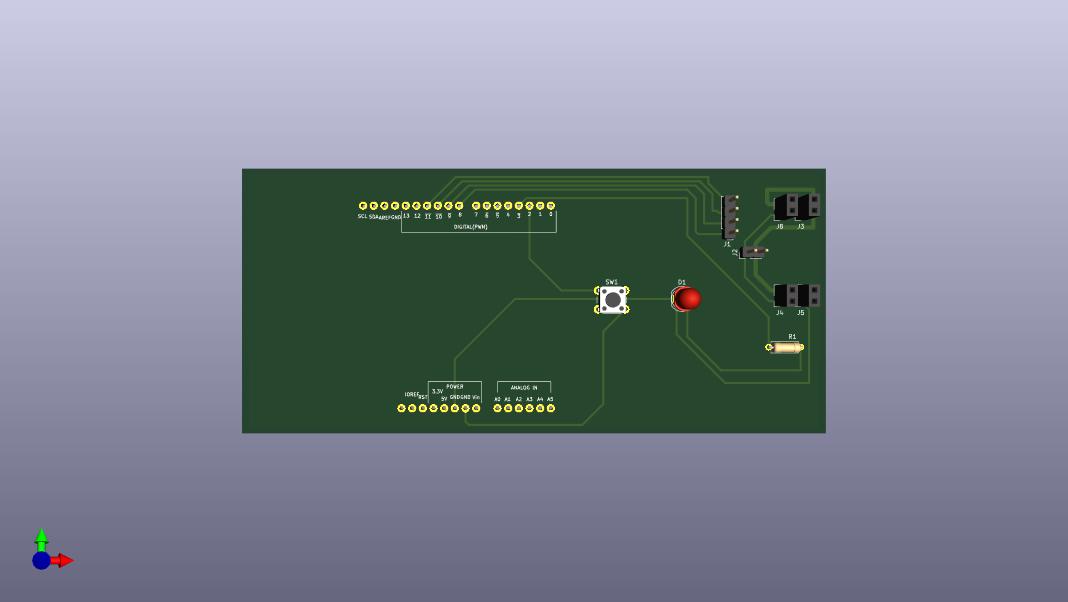
PCB 3D View
-
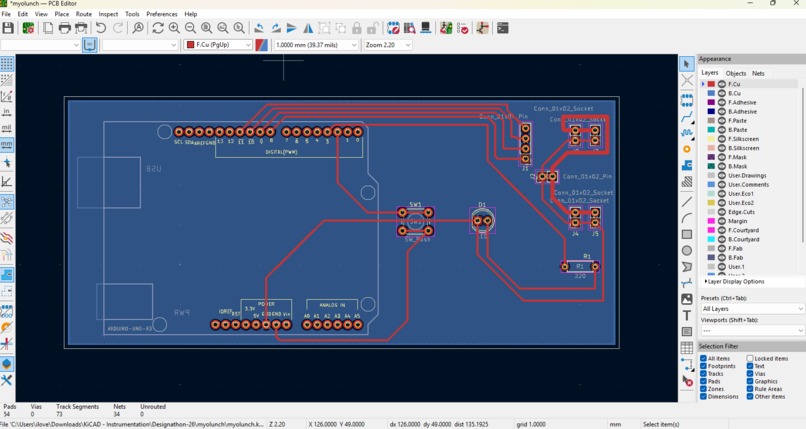
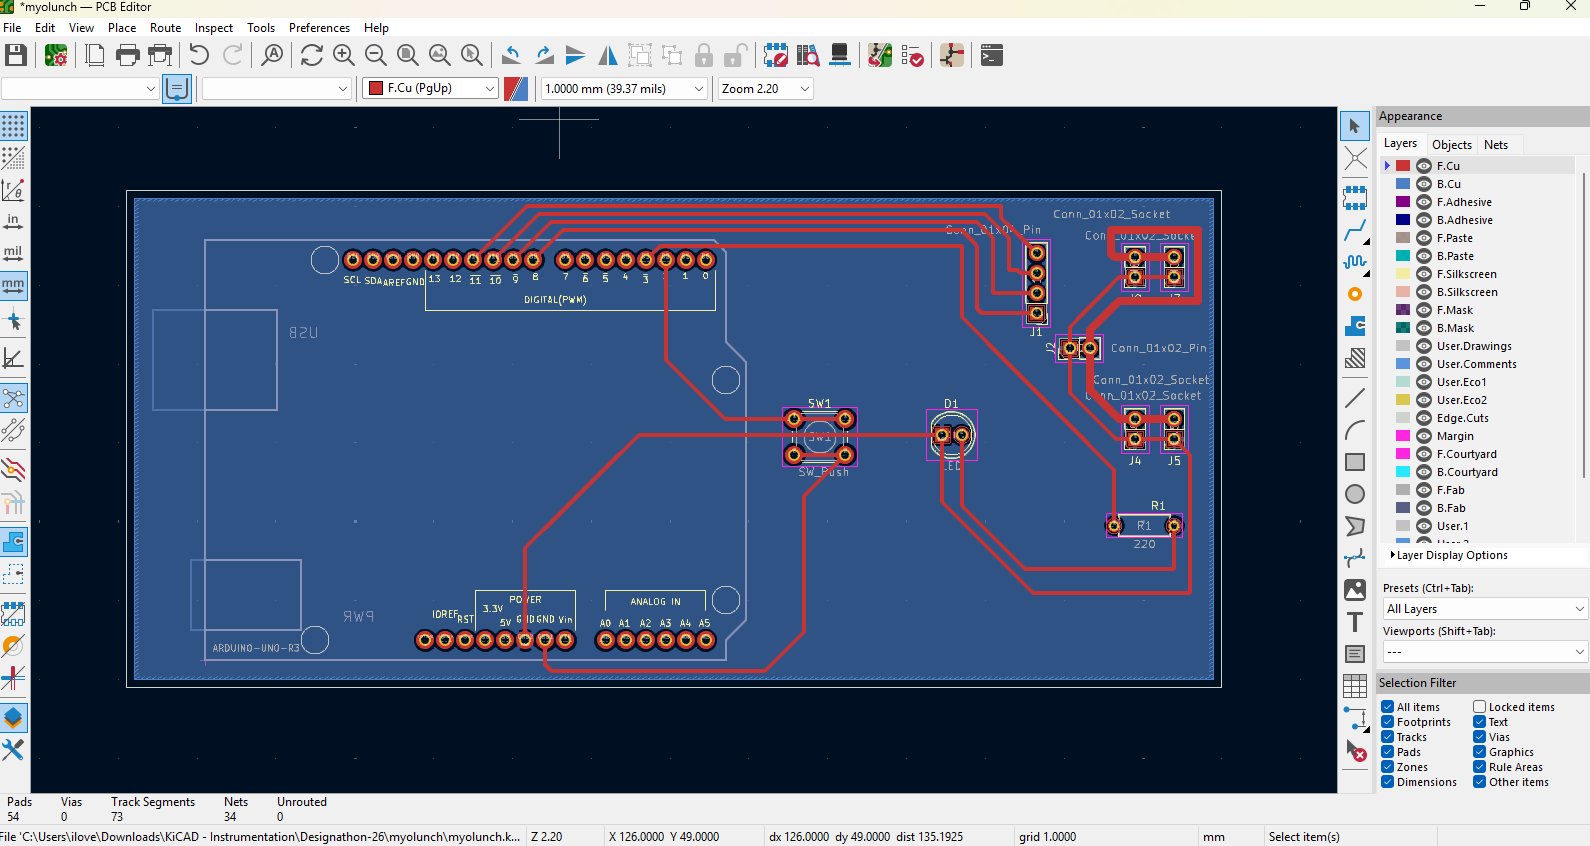
PCB In KiCAD PCB Editor
-
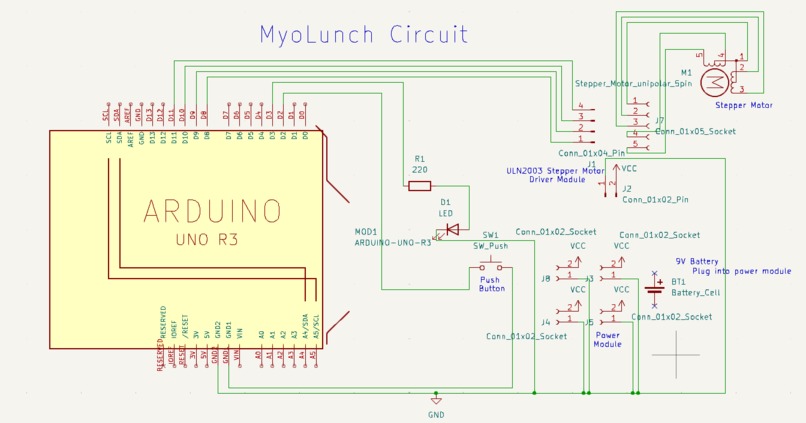
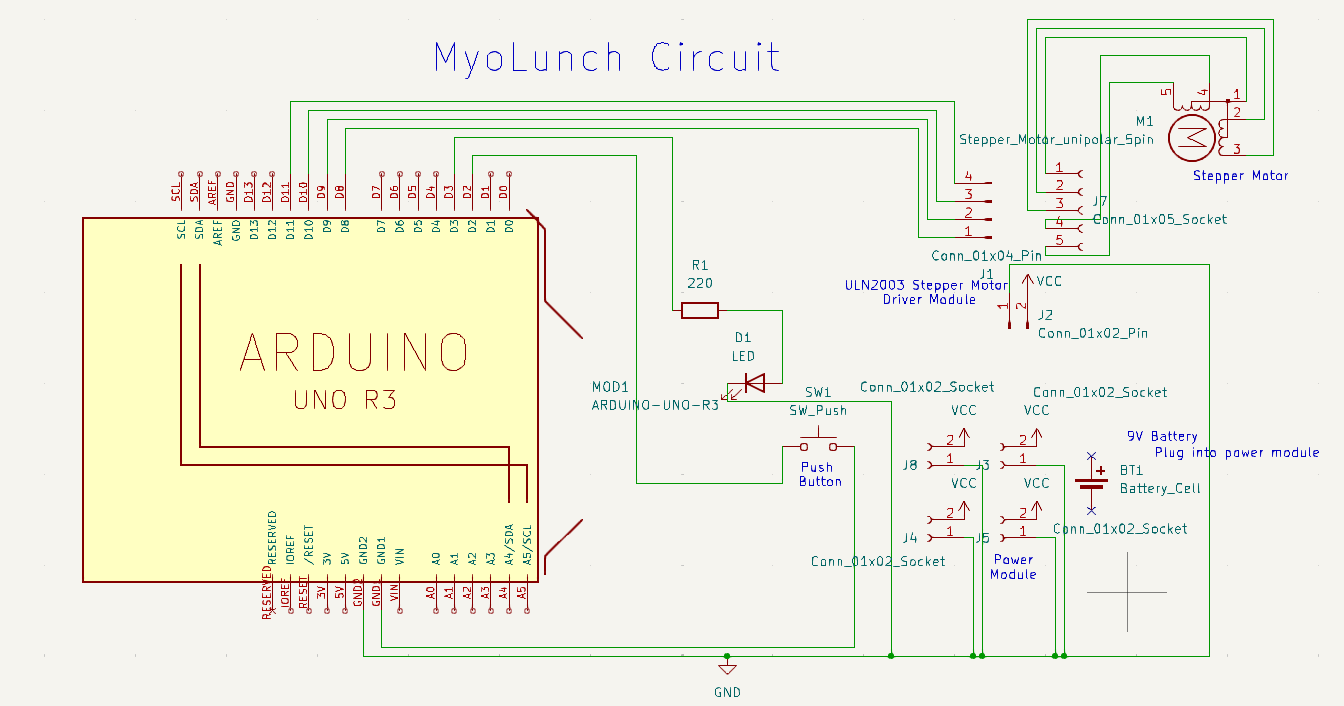
Circuit Schematic in KiCAD
-
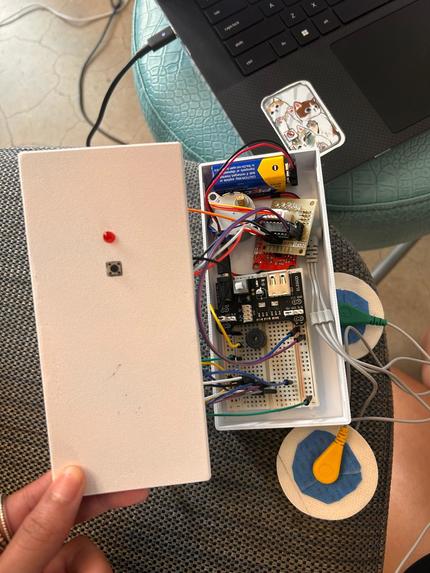
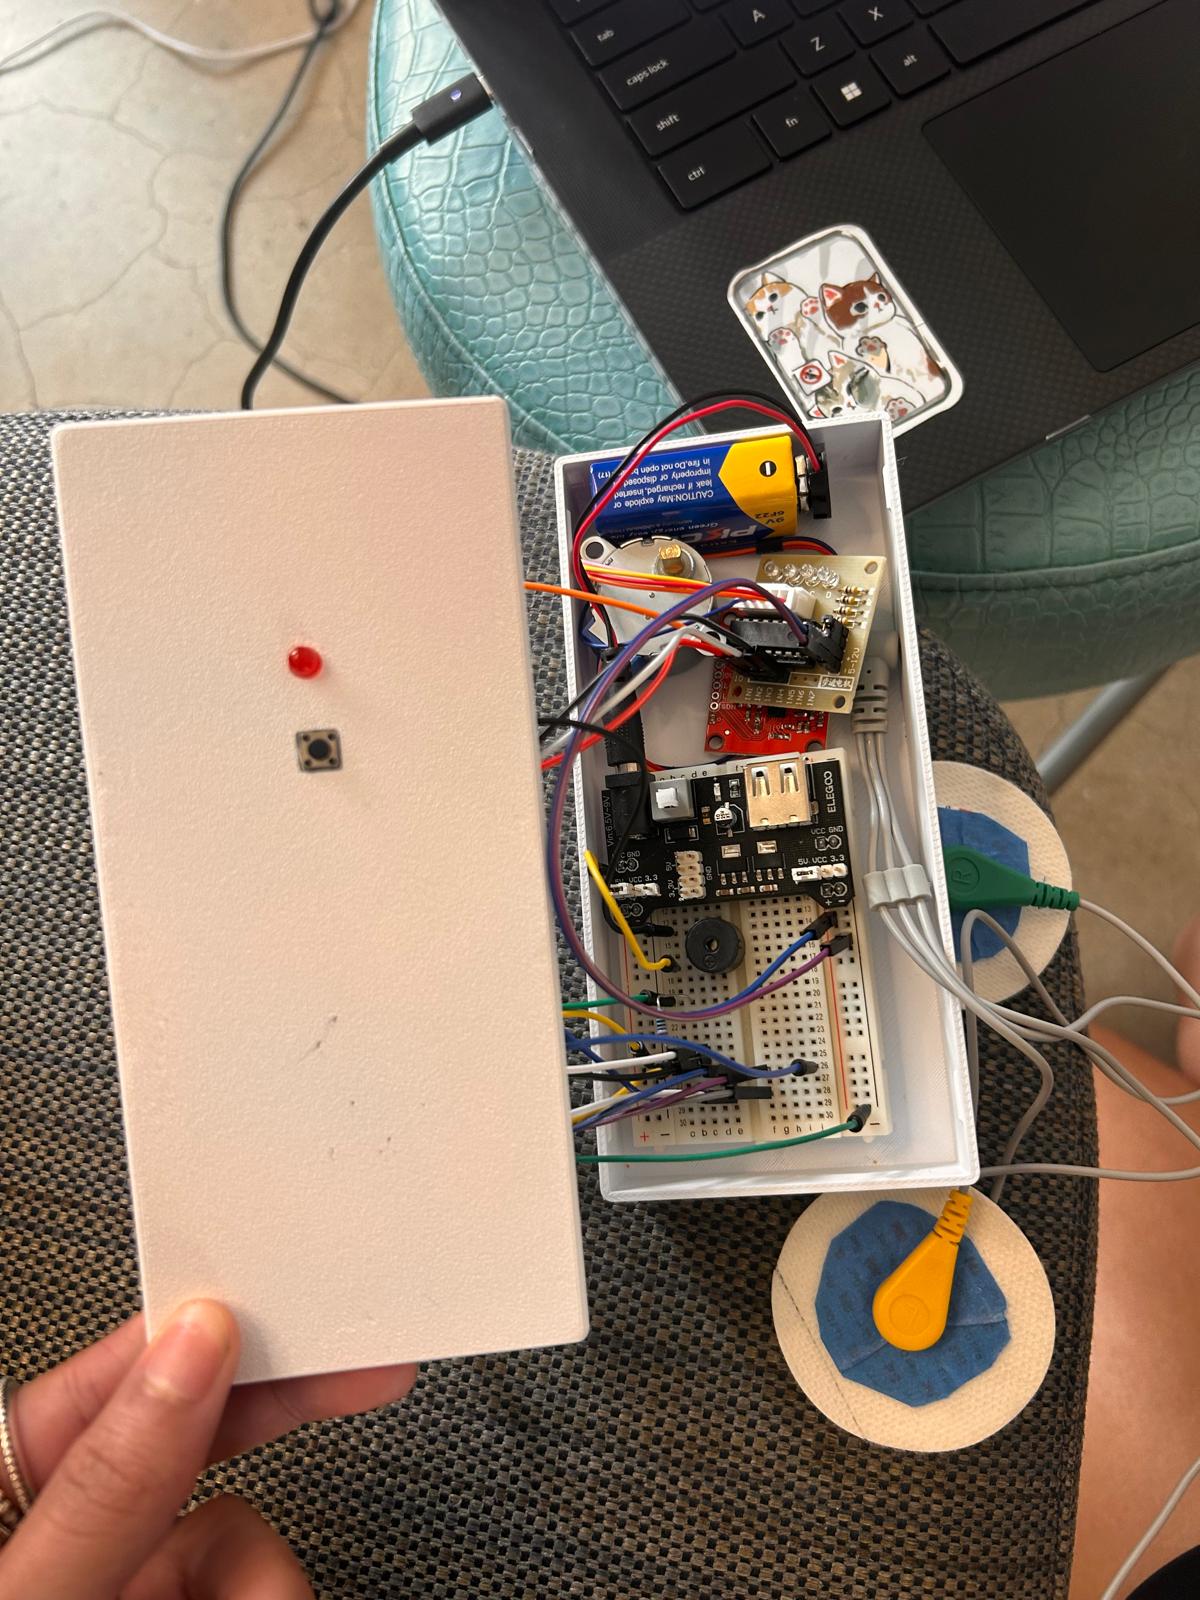
Physical Prototype (Mock PCB Casing)
-
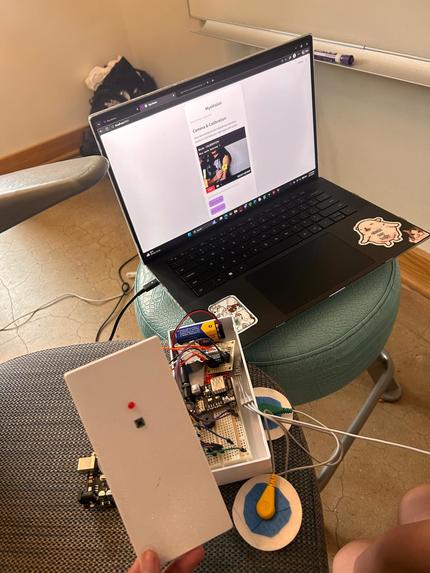
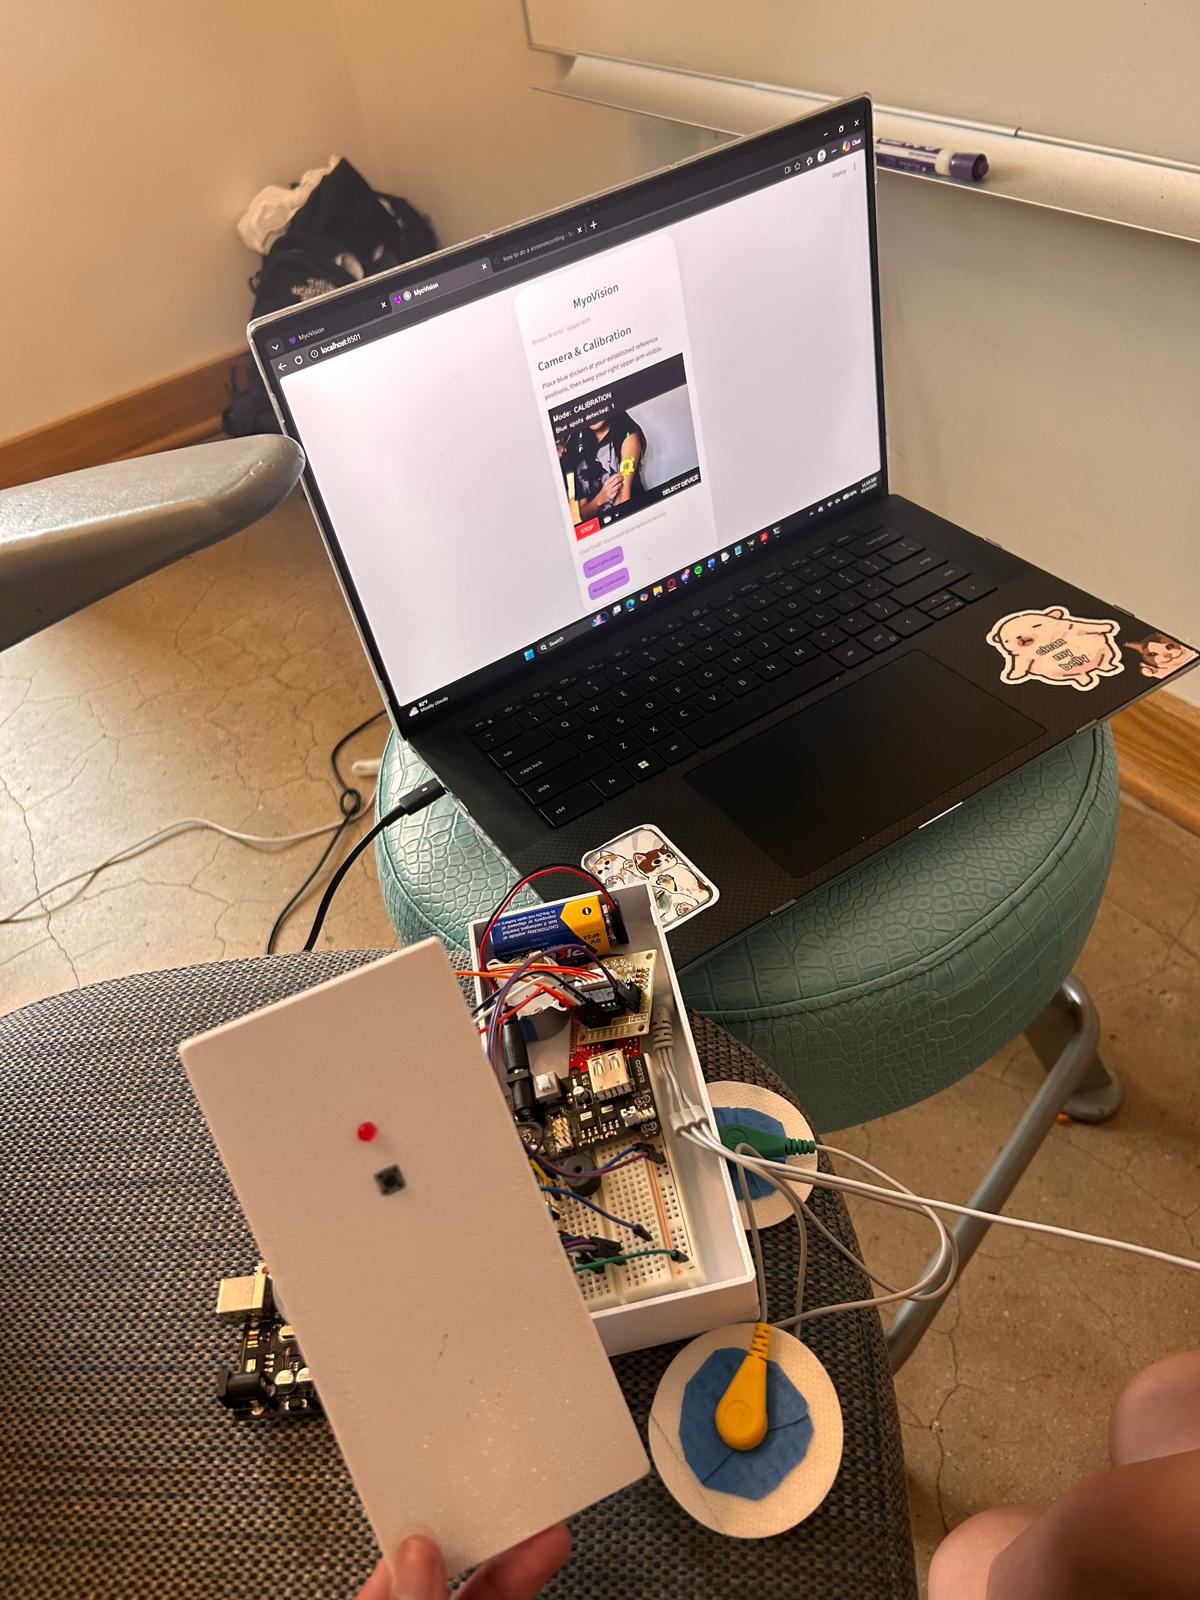
App Facilitated Electrode Placement
-
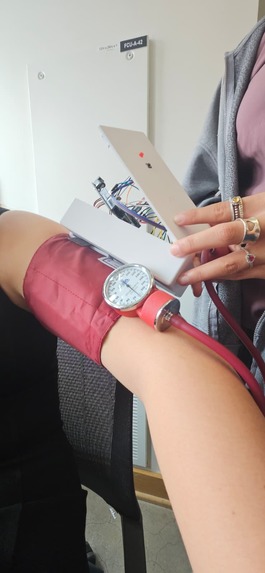
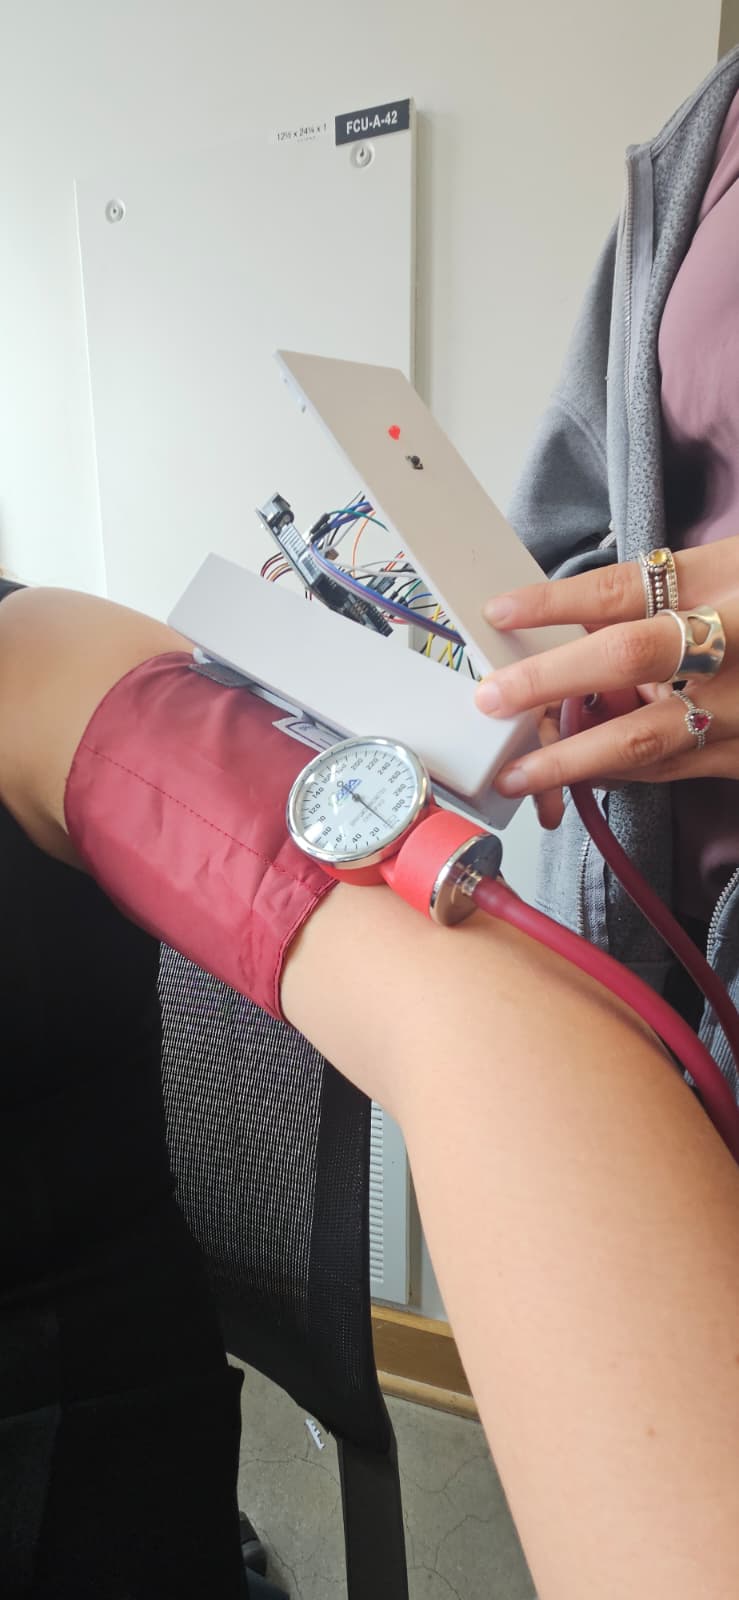
PCB Casing Clipped onto Pressure Cuff
-
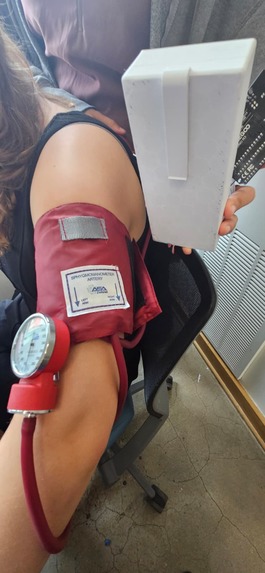
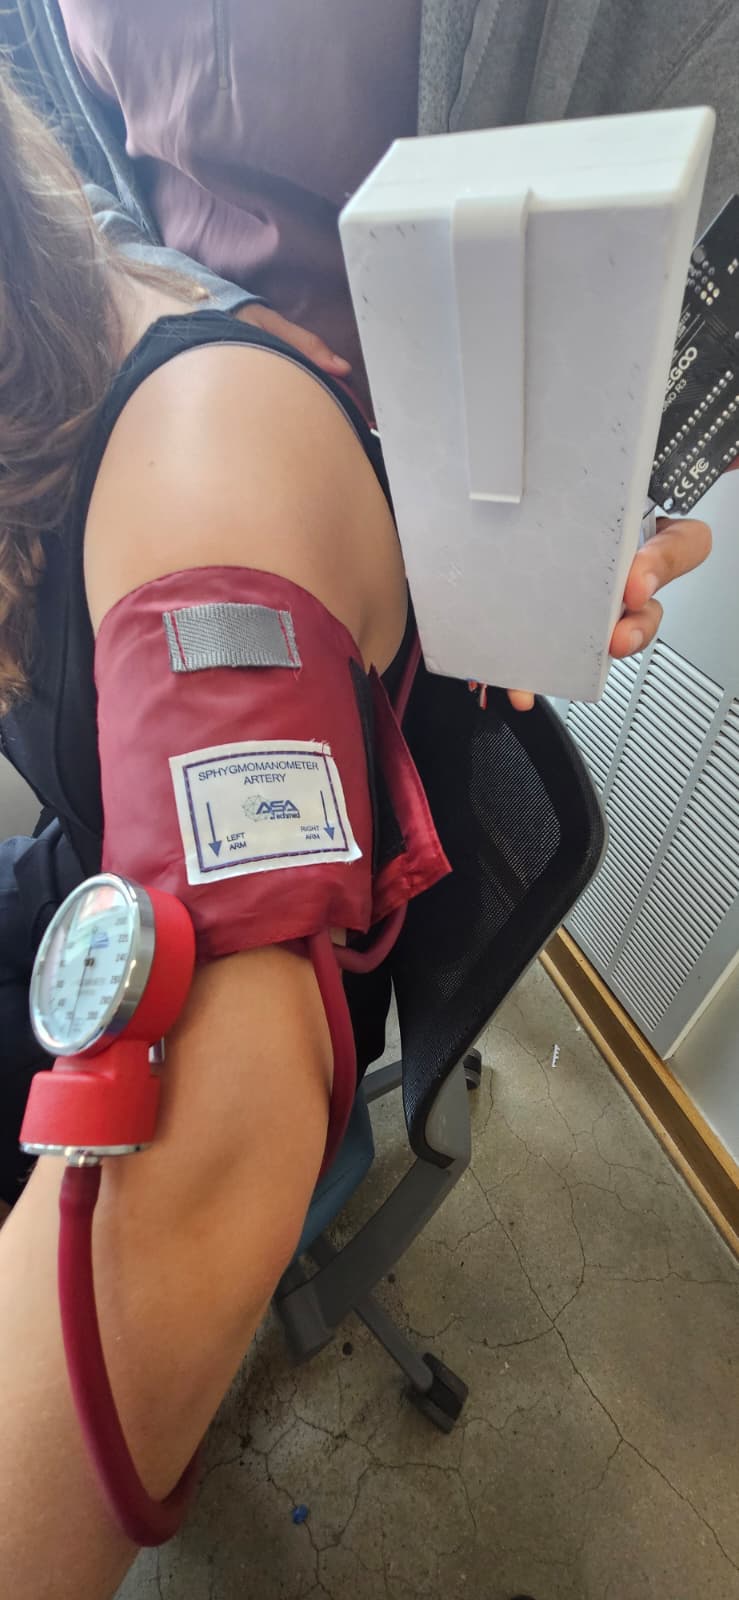
Clip View
Design
Inspiration
People often only try to fix their muscle and tendon discomfort after it already begins, which could sometimes interfere with their future activities. Existing products for electrical simulations, vibration, and compression often come in separate devices. Myolunch aims to provide a more convenient approach to combine all the functions into one, as it has been found to increase healing, improve pain, and decrease rehabilitation period [1]. It makes health and body support routines more accessible and easier to use in everyday life.
What it does
The MyoLunch device has two designs:
To first prime and activate muscles for activity by sending electromagnetic and sound waves to localized muscle, tendon, and bone areas. ESWT delivers high-energy mechanical sound waves to aid in breaking down scar tissue, increase localized blood flow, and promote healing and repair signals. While, uses high-energy electromagnetic pulses to boost cellular metabolism, reduce inflammation, and accelerate bone mineralization. Additionally, they have been found to work incredibly well in tandem decreasing the rehabilitation period needed .
After exercise, the device using its vibration mode triggers rapid, involuntary muscle contraction that can increase blood flow to muscle and improves blood circulation. This can be paired with a compression cuff that can reduce swelling by aiding to clear out lymphatic drainage and also increase blood circulation.
How we built it
Arduino Component: Arduino was used to prototype our design as it is a low-cost, accessible, and reliable tool. But, we only had access to a basic starter kit, so we were limited to certain motors and features.
Stepper Motor: The vibration source The stepper motor provided the highest intensity of vibration among the motors we had access to in the basic Arduino kit. Through the code we made the motor switch directions back and forth rapidly to create a more intense vibration. Unfortunately, the motor was limited to a 5V power supply and the vibration is not the same magnitude as one we would expect from a future device.
Driver Board: The motor coils needed a higher current than the Arduino pins were able safely to provide, as they are limited to around 20 mA. The board acts as a diode to protect against voltage spikes when the device is turned on and off and a transistor by redirecting current flow from the 5V to reach the needed currents (60-100 mA). Button: Initially used to allow the device to be turned on and off, but later allowed different modes to be incorporated by the amount of times the button is pressed. 1 press: vibration 2 presses: ESWT mode (slow and steady blinking): Although it was unsafe to attempt to prototype the Extracorporeal Shockwave Therapy mode through Arduino, we wanted to showcase conceptually how it would work. ESWT delivers high-energy mechanical sound waves to aid in breaking down scar tissue, increase localized blood flow, and promote healing and repair signals. [2] 3 presses: EMTT mode (burst blinking): The Extracorporeal Magnetotransduction Therapy uses high-energy electromagnetic pulses to boost cellular metabolism, reduce inflammation, and accelerate bone mineralization. [3] 4 presses: off Power supply module + 9V battery: We found the power supply the motor was getting from the USB power was not enough to produce the highest vibration intensity possible, therefore we incorporated a separate 5V supply through the power module. The motor only takes 5V so a power module is needed for the 9V battery to be able to provide power. Passive Buzzer: Used to conceptualize the ESWT sound waves.
LED: An LED was used to represent the ESWT (Extracorporeal Shockwave Therapy) and EMTT (Extracorporeal Magnetotransduction Therapy) features. This ensures safety as the Arduino is unable to provide all the safety features needed for a real device. Code: We used the stepper motor library in the Arduino code We tested different step and speed number combinations and found that the 15 rpm speed combined with the 5 step produced the most noticeable vibrations.
Blood Pressure Cuff A blood pressure cuff was used to demonstrate the compression cuff feature of the device. This does limit our prototype design to the arm but we hope in the future to make it a more expendable design that can be used for all parts of the body.
EKG Leads: We used EKG leads as a looks-like prototype for the electrode sticky patches we envision to be part of the final product, as we did not have access to actual electrode leads. Additionally, we used a heart rate monitor component to attach the EKG lead solely to exemplify where the electrode leads would connect in the device. The electrode leads on the final product would ideally send the electromagnetic and sound waves into the skin so they can reach the intended body parts. Leads were included as they can aid in reaching specific areas like tendon joints or multiple muscles that are far apart, that a cuff like device would not be able to.
App Concept: App Resource Justification: Figma was used to create the app due to accessibility and creative freedom. Figma has a Figma for Education program that allows for students to use its core professional plan capabilities for free, which allows unlimited design files/ projects, real-time collaboration, and advanced prototyping. Theme/ Accessibility: The theme for the app was a minimalist type of look with accessible and readable fonts for users of all ages using the app. The app is not complicated to use and straightforward in order to not confuse users, specifically those who are older and may have trouble understanding the app technology. How the App Works: The App has several features including tracking how often the device is used, what days it was used, and how long it was used. The results page summarizes if a certain component has increased or decreased, which consists of muscle mass, fatigue level, consistency tracker, and vibration level. The app is bluetooth paired to the device, which tracks what days the device was used and how long it was used for each session. The app also has an electronic dial that controls the vibration/ electricity current and temperature of the device. The app has a limit on how often the device can be used in both how many sessions can be completed and how long each session can be completed for. App Limitations: Due to our electronics being constrained to an arduino, we were unable to bluetooth pair the device to the app. Due to time constraints, there is unfortunately no limitation to how often a person can use the device. In the future, there needs to be an automatic lock on the device once the limit for the weekly usage has been used up alongside how long a session can go on for. Due to time constraints, there is no page for when the device is currently in use and paired with the app. The App has limitations on how often it can be used as overuse can lead to muscle strain, tear, and deterioration. This is due to overuse being too intense for the body, creating microtears on the muscles. Additionally, also due to time constraints, Myovision( the detection software) is not fully incorporated into the app, instead it’s accessed through a external website.
Myovision: Detection Software for app Myovision is a camera based placement assistance system to address the challenge of consistent electrode placement at a low cost using established computer vision tools rather than developing a custom machine learning model or specialized hardware. Python : Rapid prototyping: Python allows for easy testing and modification. Compatibility with Media Pipe, OpenCv, and Streamlit, which would allow us to use all of the programs in one system No cost and easy accessibility MediaPipe: MediaPipe can identify body landmarks without training a machine learning model or collecting our own data It’s an accessible lightweight program that can work for webcam based applications OpenCV Uses HSV color filtering to identify the blue stickers. Guided markers: green lines estimate the axis for in this case shoulder and elbow, yellow tracking points identify visual differences, and blue virtual markers to mark the pads. Streamlit Displays the live camera, calibration controls, and placement guides. Launches from Command Prompt Because of limited time we could only display MyoVision in a local web application. How they all work together:
CAD Design: We used SolidWorks to model two components: a lunchbox-style enclosure and a PCB casing. The lunchbox form (8 x 6 x 3 in, with a carry handle) ties to our "Feed Your Muscles" concept and keeps the device portable for everyday use. Its print-in-place hinges are designed with 0.2mm clearance for printing. The PCB casing is fitted to the board to minimize size and printed at 5-10% infill to stay lightweight, with a clip that attaches it to the pressure cuff so vibration and compression are delivered together. To save time and material, we printed only the PCB casing as our physical prototype; the enclosure is shown as a CAD model.
PCB Design: KiCAD was used to generate a circuit schematic and PCB design for the Arduino circuit. Since PCB printing and ordering takes much longer than the designated 24-hour timeframe, we could not create a physical circuit board. However, a PCB design allows for a cleaner circuit with much less protruding wiring, allowing for the casing to correctly encapsulate and enclose the full circuit in the conceptualized device. The design itself is exactly modeled off of the Arduino circuit on the breadboard, and the measurements were chosen to allow the PCB to easily fit within the casing.
Challenges we ran into
In a true Hackathon manner, we were limited in terms of time and resources. As our idea involved sending electrical currents/ vibrations into muscles, it was too technical to fully flesh out in 24 hours. This was especially true with the app as there was not enough time to connect the device to the app to make them synchronize in real time.
There were also ethical challenges as the device requires testing and trials to make sure that this device is able to be used on the general public safely. The app also holds challenges as it holds data that is generally considered private and sensitive information of a user, so privacy and app security would be a challenge that would need to be explored further.
Getting the motor to have a strong enough vibration was a struggle due to only being limited to using an Arduino and a small battery. With enough time and resources, the vibration would have been more powerful and intense.
Accomplishments that we're proud of
We were able to create a multi-faceted device with applications in rehabilitation and injury prevention for athletes. We utilized softwares such as Figma and OpenCV for the first time and managed to create a comprehensive app and a functional detection system. On the electrical side, it was our first time working with stepper motors and 9V batteries, but we still put together a functional circuit. It was also our first time fully developing a PCB from scratch based on a physical breadboarded circuit.
What we learned
We learned how to utilize brand new softwares and electrical components while building our skills in areas we had proficiency in already. We also learned much more about muscle activation, tendon healing, and rehabilitation in athletes.
What's next for MyoLunch | Feed your Muscles
What’s next for the app? The app is not currently paired to the device and in the future needs to have a Bluetooth connection that is able to be synchronized to the device in real time and is able to do this offline. The app in the future will also have the sensor fully built into the device, rather than the app directing the user to an external website. There will also be an electronic dial that is fully connected to the device.
What’s next for the device? The device in the future will have a stronger motor and battery as the prototype uses an Arduino and a 9V battery, which is insufficient for the technicality of the device. A PCB will replace the current breadboarded circuit. Alongside this, the device will use reusable silicone electrode pads unlike the prototype, which uses EKG electrode stickers. Also, the device will be modified to generate the necessary electrical impulses for muscle stimulation and utilize EMG leads instead of EKG leads.
Built With
- 3dprinting
- arduino
- figma
- kicad
- python
- solidworks


Log in or sign up for Devpost to join the conversation.