Lily AI - Multimodal Autonomous AI English Tutor
Designed and developed entirely by a solo builder, Lily AI is a next-generation Autonomous Multimodal AI Partner designed to help non-native English learners practice, debug, and master English in professional and real-world scenarios.
🎯 Dual-Mode Architecture
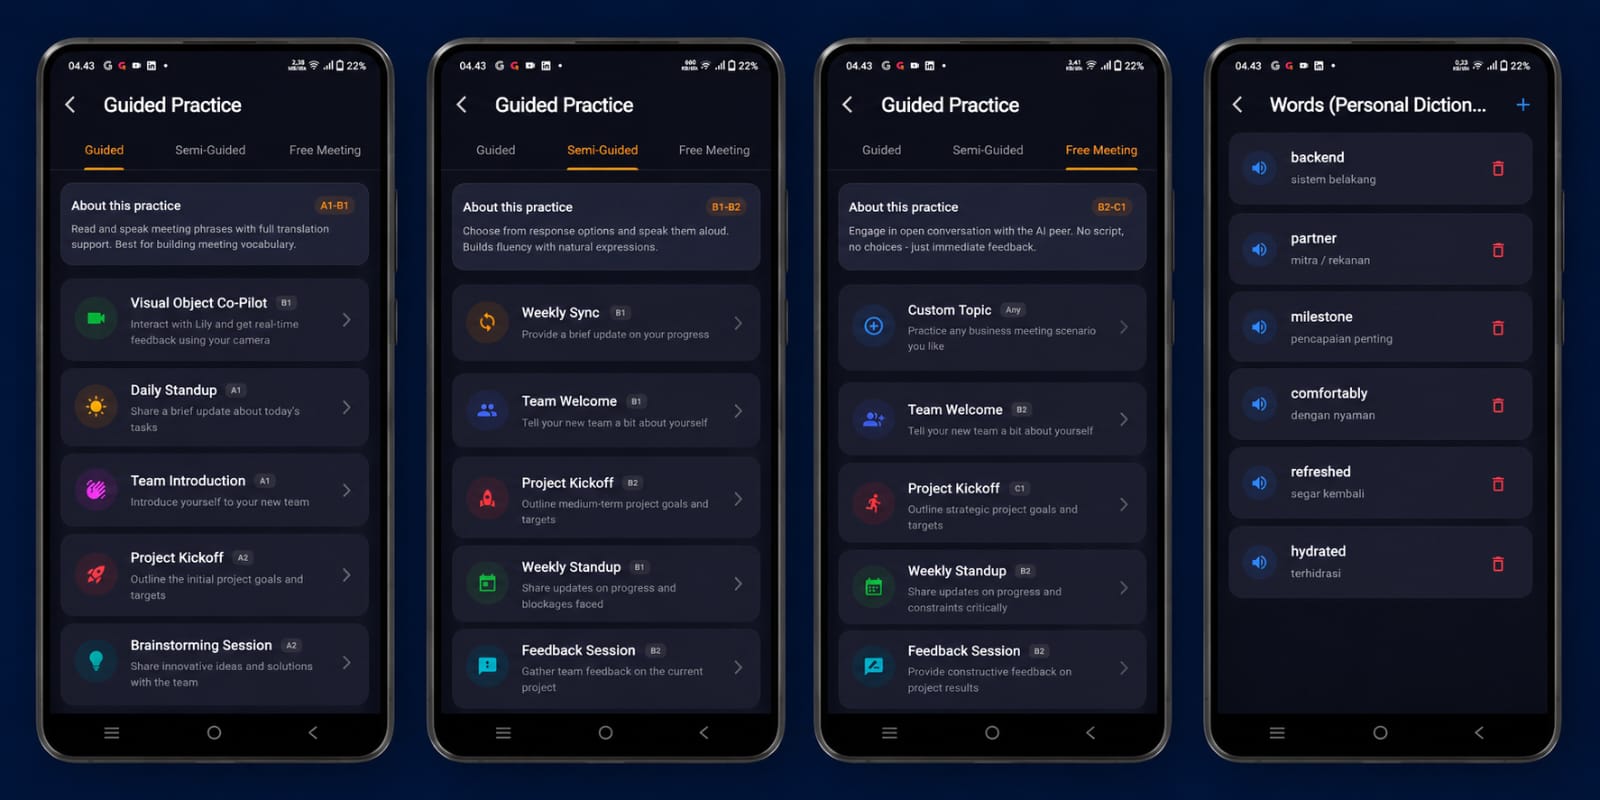
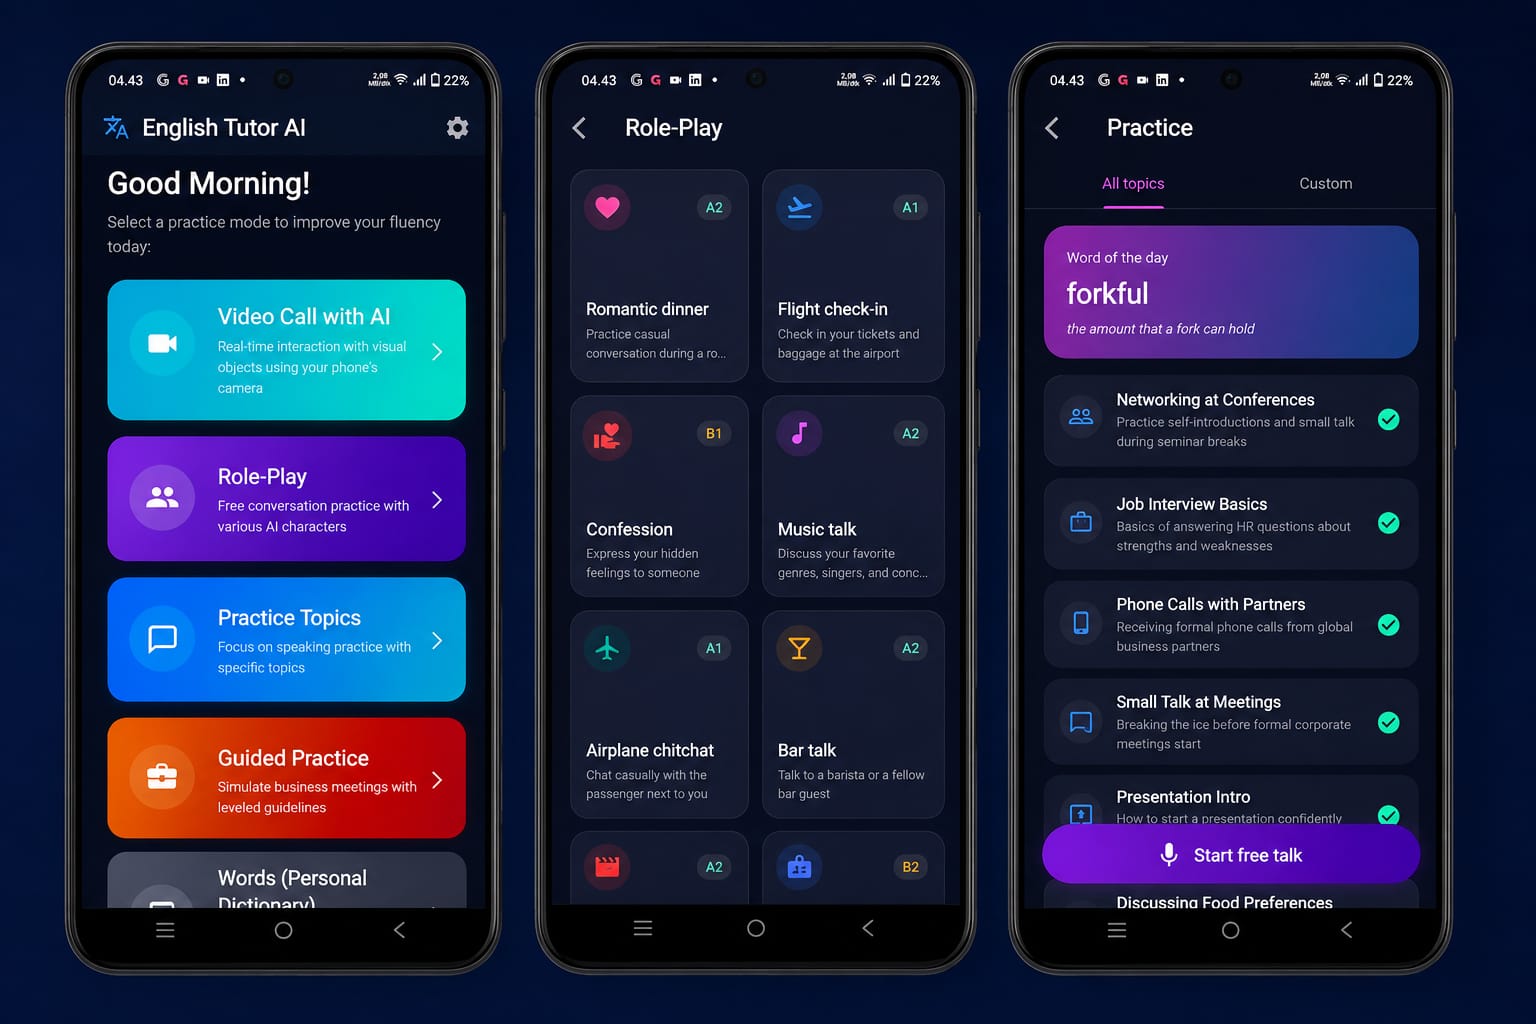
Lily AI is uniquely engineered to serve two completely different educational functions:
- Structured Lessons (Situational Conversational Practice):
- Focus: Topic-based academic speaking.
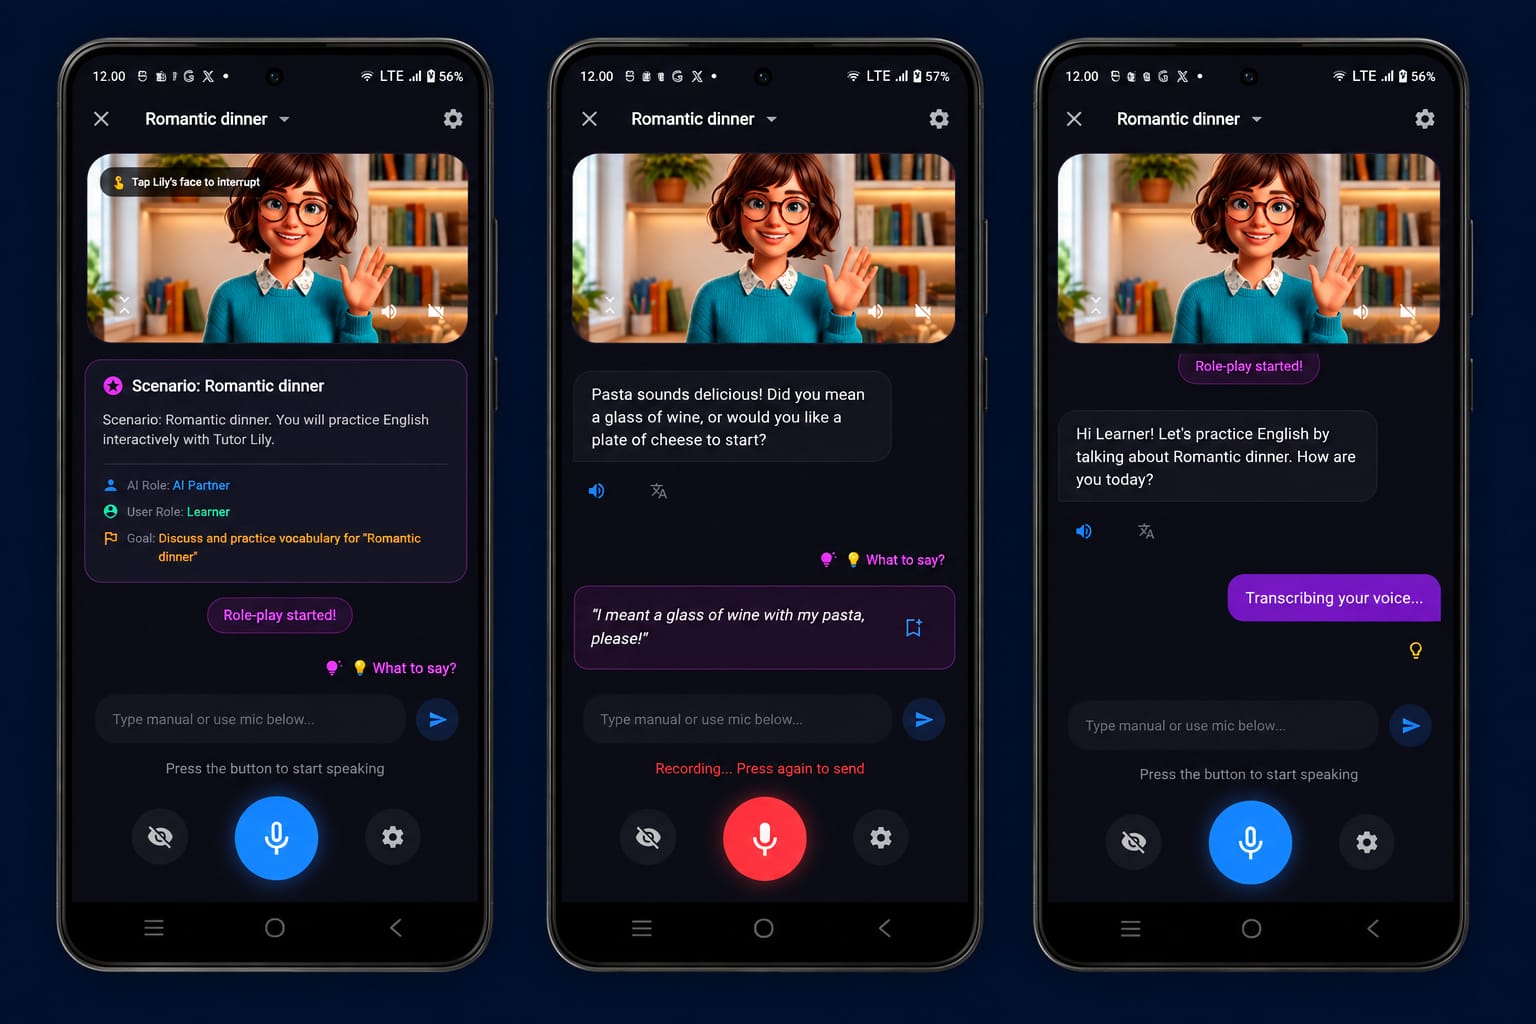
- How it works: Provides structured lesson packages (e.g. Job Interview simulation, Restaurant Order, Flight Check-In, romantic dinner, daily standup, etc.). The system tracks your exchange turns (requiring 15 turns for completion), evaluates grammar/vocabulary, and saves your progress.
- Video Call Co-Pilot (Immersive Daily Assistance):
- Focus: Unstructured real-time daily assistance and hands-free speaking.
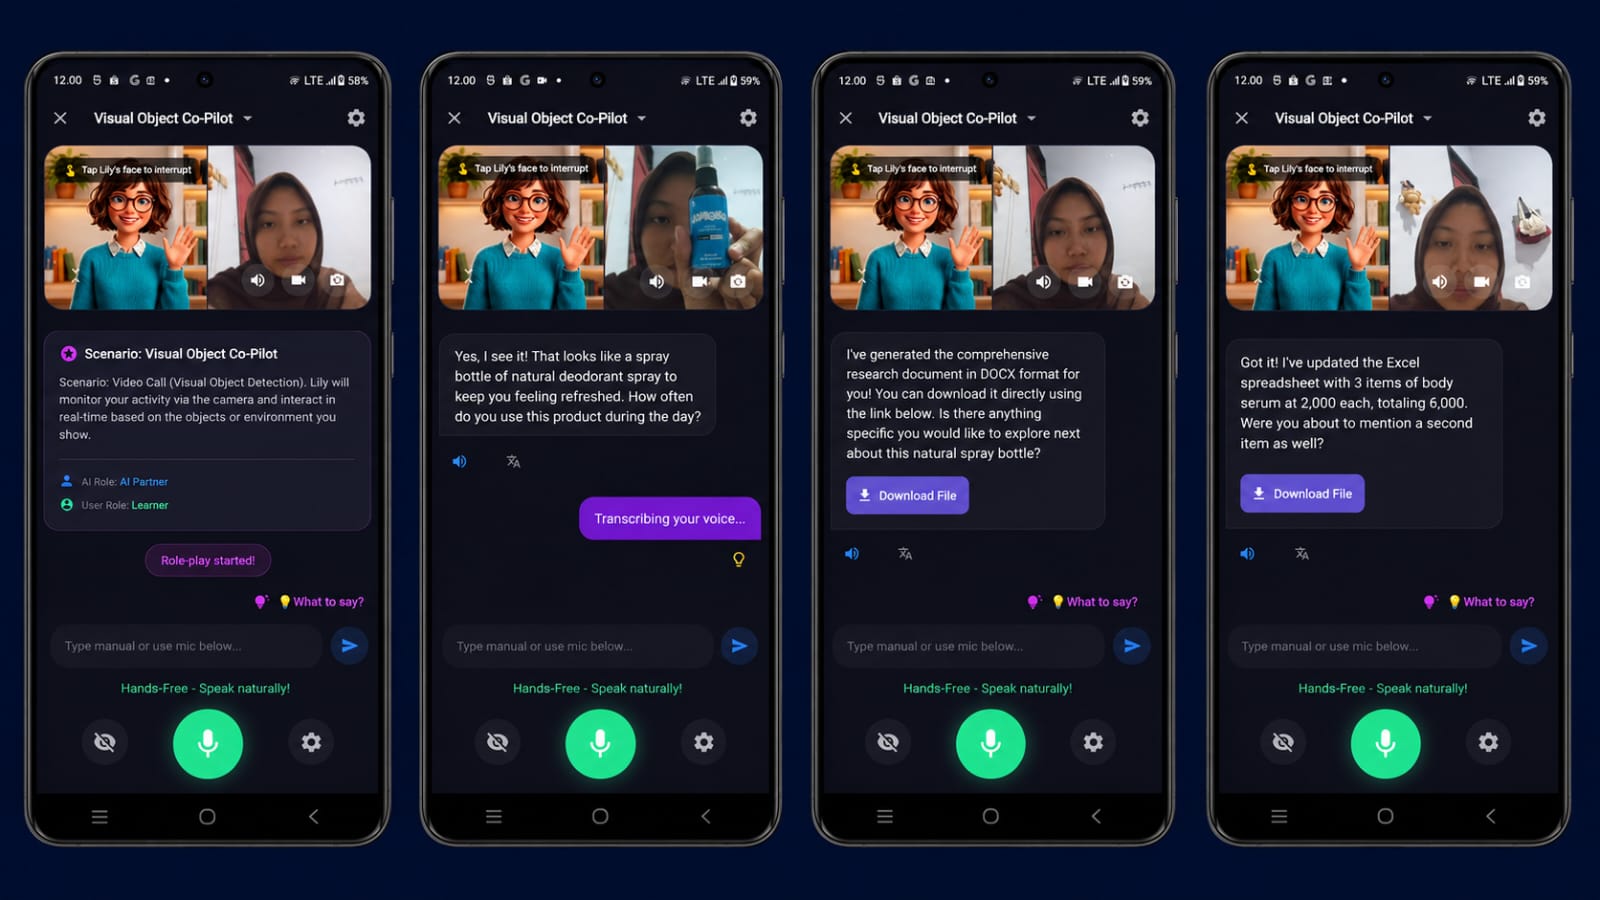
- How it works: Immersive video call using live camera feed (Visual Object Co-Pilot). Lily watches your camera frame (observing physical objects or tasks) and proactively speaks to guide you or teach vocabulary in context.
⚠️ IMPORTANT NOTICE FOR EVALUATION (LATENCY DISCLAIMER): When testing the application, you may experience a latency of 2 to 5 seconds between speaking and receiving Lily's response. Please understand that this delay occurs because the backend is running on a local server network connection (processing heavy WAV audio files and image frame payloads locally) rather than a production-grade high-speed cloud environment.
🌟 Lily AI Features & Strengths (The Collaborative Partner Track)
Lily is not a generic, static chatbot. She is a highly interactive, context-aware visual tutor:
- Proactive Visual Diagnosis (Real-Time Video Call):
- Unlike chat interfaces, Lily monitors your surroundings in real-time. If you are doing a physical task (e.g. fixing a device or holding an object), Lily automatically analyzes your camera stream (using a smart 3-second traffic light interval that respects microphone bounds) to identify objects, teach relevant vocabulary, and guide you proactively in English.
- State-of-the-Art Pronunciation Feedback (ELSA Speak UI):
- Every voice response you send is analyzed at a phoneme level. Clicking the Pronunciation Badge in the chat bubble opens a detailed feedback card that highlights exactly which letters or sounds were correct (green) or mispronounced (red), helping you correct your pronunciation instantly.
- Adaptive Memory Bank (Firebase Firestore):
- Lily keeps track of your vocabulary weaknesses and grammatical mistakes across sessions. When a new lesson begins, Lily queries Firestore and proactively tests you on your previous mistakes, reinforcing long-term learning.
- Autonomous Tool Orchestration (Google Genkit - Active in Video Call):
-
searchWeb: If you hold up a complex device or ask how to fix a specific model, Lily autonomously calls Tavily/Google to search for manuals/recipes online and replies based on real-time web facts. -
generateReport: Compiles deep research about the observed object and creates a structured document in both .pdf and .doc (Word) formats. -
generateExcelReport: Automatically gathers vocabulary weaknesses and grammar corrections from the user's spoken words and generates a detailed progress sheet in .excel format.
-
- Polished Gamified Experience (Confetti Celebration):
- If you exit a Lesson chat before 15 dialogue turns, Lily warns you that progress will be lost. Once you complete 15 turns, exiting triggers a highly animated, celebratory confetti and fireworks screen to reward your milestone!
🏗️ System Architecture
graph TD
    subgraph Frontend ["Frontend Client (Flutter Mobile App - Android Only)"]
        UI[Neon Pastell Dashboard]
        Webcam[CameraPreview - On-Demand & 3s Interval]
        Recorder[record package - High Quality Audio WAV]
        VAD[One-Time Stream VAD - Silence Auto-Send]
        ELSA[Phoneme Pronunciation Feedback Screen]
    end

    subgraph Backend ["Backend Agent (Google Cloud Run)"]
        API[Express API Service]
        Genkit[Google Genkit Framework]
        SearchTool[searchWeb Tool]
        ReportTool[generateReport Tool - PDF/Doc]
        ExcelTool[generateExcelReport Tool - Excel]
        TTS[Text-to-Speech Engine]
    end

    subgraph GCP ["Firebase / Google Cloud Portal"]
        Firestore[(Firestore: Memory Bank)]
        VertexAI[Google Vertex AI: Gemini 3.5/3.6 Flash]
    end

    Webcam -->|Base64 Image Frame| API
    Recorder -->|Audio WAV File| API
    API --> Genkit
    Genkit <-->|Retrieve/Save User profile & session history| Firestore
    Genkit -->|Multimodal prompt + image| VertexAI
    VertexAI -->|Decision JSON + Tool Calls| Genkit

    Genkit --> SearchTool
    Genkit --> ReportTool
    Genkit --> ExcelTool

    Genkit -->|Tutor reply text| TTS
    TTS -->|Tutor voice Base64| API
    API -->|Synchronized Voice + Text + Scoring Data| UI
    UI --> ELSA
🛠️ Google Tech Stack & Models
This project was built for the All Things Agentic Hackathon by Google & Devpost, utilizing a cutting-edge Google developer stack:
- Google Vertex AI / Gemini API: Leverages Gemini 3.5/3.6 Flash for fast, low-latency multimodal (video/image + text) reasoning.
- Google Genkit: The central developer agent framework used to orchestrate system prompts, Firestore memory bank retrieval, and autonomous tool calling.
- Firebase Firestore: Acts as our secure Memory Bank database, storing user profiles, vocab weaknesses, and chat histories.
🚦 Local Network Setup & Running Instructions
⚠️ HARDWARE REQUIREMENT (ANDROID ONLY): This application is built strictly for Android. Due to specific hardware microphone stream locking and camera frame acquisition boundaries, you must run this on a physical Android device connected via USB debugging. Using emulators (AVD) or other platforms will cause audio stream collisions and microphone initialization errors.
📶 Network Configuration (CRITICAL STEP)
For the mobile application to communicate with your PC backend, both devices must be connected to the exact same Wi-Fi network.
- Find your PC's local IP address:
- Windows: Open Command Prompt/PowerShell, type
ipconfig, and find your IPv4 Address (typically looks like192.168.1.Xor192.168.100.X). - macOS/Linux: Open Terminal, type
ifconfigorip a, and locate your local IP.
- Windows: Open Command Prompt/PowerShell, type
- Note down this IP address (e.g.,
192.168.100.27).
📦 1. Setting Up the Backend Server
- Navigate to the
backend/directory:bash cd backend - Install all backend dependencies:
bash npm install - Configure API Keys (
.env):- Since this repository is Public on GitHub, the
.envfile has been excluded for security. - For Judges: We have securely attached the active
.envconfiguration (containing temporary API keys for Gemini, Groq, and Tavily) inside the Devpost Submission Form under the "Testing Instructions" / "Notes for Judges" field (which is private and only visible to judges). - Please copy the provided
.envcontents and save them as.envinside thebackend/directory. Alternatively, copy.env.exampleto.envand fill in your own keys:env PORT=8000 GEMINI_API_KEY=your_gemini_api_key_here GROQ_API_KEY=your_groq_api_key_here TAVILY_API_KEY=your_tavily_api_key_here_for_web_search (optional) GEMINI_MODEL=googleai/gemini-3.6-flash
- Since this repository is Public on GitHub, the
- Firebase Credentials (Memory Bank -
serviceAccountKey.json):- Similar to the
.env, the activeserviceAccountKey.jsonfile is also securely attached to the Devpost Submission Form's private "Testing Instructions" field. - Please download the private key file and place it inside the
backend/root directory. This saves you from having to set up a new Firebase project and Firestore database from scratch!
- Similar to the
- Start the backend server:
bash
npm run dev
The server will start running athttp://localhost:8000(and will be accessible to your phone viahttp://<your-pc-ip>:8000).
📱 2. Setting Up the Flutter Mobile App
- Open a new terminal and navigate to the
frontend/directory:bash cd frontend - Download and cache all Flutter packages:
bash flutter pub get - Connect your physical Android device (with USB debugging enabled) and launch:
bash
flutter run
⚙️ 3. Linking the App to the Server
Once the app boots up:
- Tap the Settings (Gear Icon) in the top right corner of the dashboard screen.
- In the API URL text field, replace
localhostwith your PC's local IP address, for example:- Input:
http://192.168.100.27:8000
- Input:
- Tap Save.
- The app uses persistent local storage (
shared_preferences) so you only need to enter this IP once; it will stay configured across app restarts!
- The app uses persistent local storage (
- Select a lesson or video call scenario and start learning! Lily will connect instantly and greet you over the local network.
Built With
- dart
- express.js
- firebase
- firestore
- flutter
- gemini-3.5-flash
- gemini-3.6-flash
- google-cloud
- google-genkit
- groq
- node.js
- tavily
- whisper-api

Log in or sign up for Devpost to join the conversation.