Inspiration
L.A.B. Rat tracks eating, exercise, activity, and sleep behavior of small pet animals.
My brother has two pet red-footed tortoises named Worm and Tuna. Recently, he went away on a long weekend and had to leave Worm and Tuna home alone. While away, he worried constantly about the health and wellbeing of his tortoises as he wasn’t there to monitor them. He told me after this experience that he wasn’t able to fully enjoy skiing with his friends because his mind was partially back home with Worm and Tuna.
This got me wondering if there was a way to give him peace of mind and help keep his pets healthy and happy. I soon realized the solution to enabling future globe-trotting for him and happy tortoises lies with the ATMega328P paired with a suite of sensors.
The intended purpose of this project is to get a complete wellness picture of a pet in an enclosure. Because these animals are small and we don’t want to harm them, the sensors should be external and not worn by the animal.
What it does and how it was built
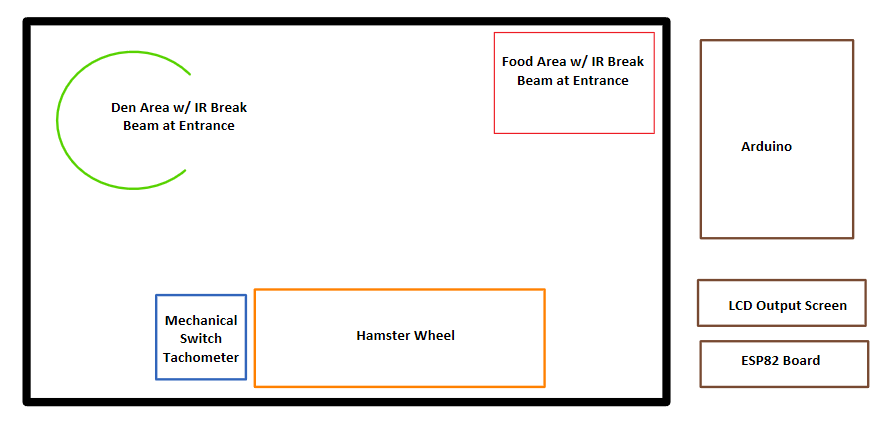
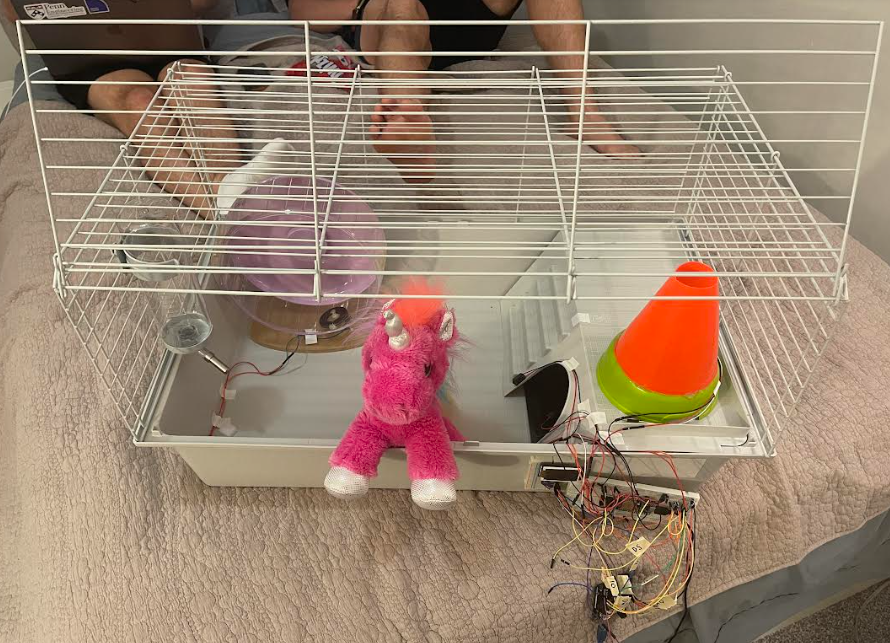
The final design consisted of 2 IR break beams, a resistive pressure sensor, a mechanical switch tachometer, a 328P chip and an ESP82 board.
One of the IR beams is placed across the entrance to the food bowl. A cone is used to create a single entrance to the bowl so the rat must break the beam to eat. The other LED break beam is placed at the entrance to the den of the rat. This allows us to know when the rat is entering and leaving its sleeping quarters.
A snap action limit switch was used to create the rotation counter for the hamster wheel. I attached a raised piece of plastic to a portion of the circumference of the wheel. Then when this spins around the button becomes clicked each time the wheel revolves. The break beams and switch are all connected to pins that are pulled down. When the switch actuates or the beam is broken, the signal goes high and this is recognized by the board.
A resistive pressure sensor is in the middle of the rat’s den. On top of this sensor a laser cut piece of plexiglass is placed that is the same size as the den itself. Therefore, when the rat goes into the den to sleep, the weight placed on the sensor increases and this is able to be recognized by the 328P. The 328P measures the pressure on the 328P using the ADC.
After this information is compiled by the 328P it is then outputted on the LCD screen. Additionally, this information is transferred over to the ESP82 board, so it can be sent out over the internet. Serial communication was used between the two boards. Then the Blynk app used virtual pins to output the information on my iPhone.
As a result of this, I was able to track the health and behavior of a theoretical pet in the habitat.
Challenges we ran into
I hoped to program a load cell to measure the weight of the food in the dish. This led to me spending two days attempting to program this load cell to measure weights. I had no luck in doing this and had to abandon this portion of the project. I was able to complete the project without this component. I learned an important lesson here in planning the scope of my project. I should have left programming the scale until after I had a MVP. By attempting this before I had a working project, the amount of time left to build the essential items was reduced.
I attempted to get a time component established to the data I was collecting. My plan was to use interrupts to count the number of clock overflows similar to the way time was calculated in the morse code lab. This proved to be too difficult because for some reason whenever I turned on interrupts with the sei() function the program restarted. I was not able to trace down the root of this issue but I believe it may have been my hardware triggering the interrupt. With more time, I would have fully diagnosed this issue. Another idea would be to pull time stamps from the ESP82 board which is connected to the internet. This would then allow the data to be given within the context of a period of time.
Accomplishments that we're proud of
I’m proud of the mechanical system I made to measure the revolutions of the wheel. Though it is overcomplicated, I think it is a pretty cool system and it was fun to make.
The program executes very quickly despite there being so many sensors, an LCD screen to update, and serial communication. This is something which works well, and I’m proud of.
What we learned
A lesson I learned throughout ESE 350 is that your project may be working at one point, but then when you look at it again it doesn't work after thinking you didn't change anything. Maybe there are ghosts in Detkin who mess with our electronics at night? This ghost made its presence shown the day of the final demo. I came to the lab at 7:00a to set up and leave time for any final debugging. When I showed up neither of the LED break beams were working like they had been for the week before this. After testing and going through my code the issue didn’t resolve itself. I went back to the data sheet to check my circuit and they matched. Then, I found a blog that used these sensors, and I saw they had an alternative circuit configuration. They were using pull up resistors connected to the data line of the break beams. I implemented this change and the sensors started working just in time for final demos. This was a great example of how difficult hardware can be at times. It’s important to remain patient and complete a root cause analysis. Google came in handy once again.
What's next for L.A.B. Rat
A next step for this project would be to get this load cell up and running. Then the weight of the food consumed by the rat could be measured. Another improvement would be to attach a time component to all the data that is collected.
Further down the road:
With some adjusting to animal size and enclosure, this device could be used to track the activity of all types of animals. I can imagine not just pet owners using this, but also people who are conducting research on animals. Pet stores could use this system to understand the wellbeing of their animals and when they need to feed them.
Built With
- atmega328p
- c
- esp82
- myhands

Log in or sign up for Devpost to join the conversation.