


Detailed Report on Flask Web Application
.png)
Image Garden
Cultivate Your Visual Imagination
Created by Team Indicus
Creators: Adarsh Gupta & Prajjawal Sah
Introduction
This report provides an in-depth analysis of a Flask web application designed to facilitate the generation and management of images and videos based on user prompts. The application leverages a robust technology stack to ensure security, performance, and user experience.
Flask, a micro web framework written in Python, serves as the backbone of this application. Known for its simplicity and flexibility, Flask allows for rapid development and prototyping, making it an ideal choice for building web applications. The application is designed to handle complex tasks such as user authentication, content generation, and API management, all while maintaining a high level of security and performance.
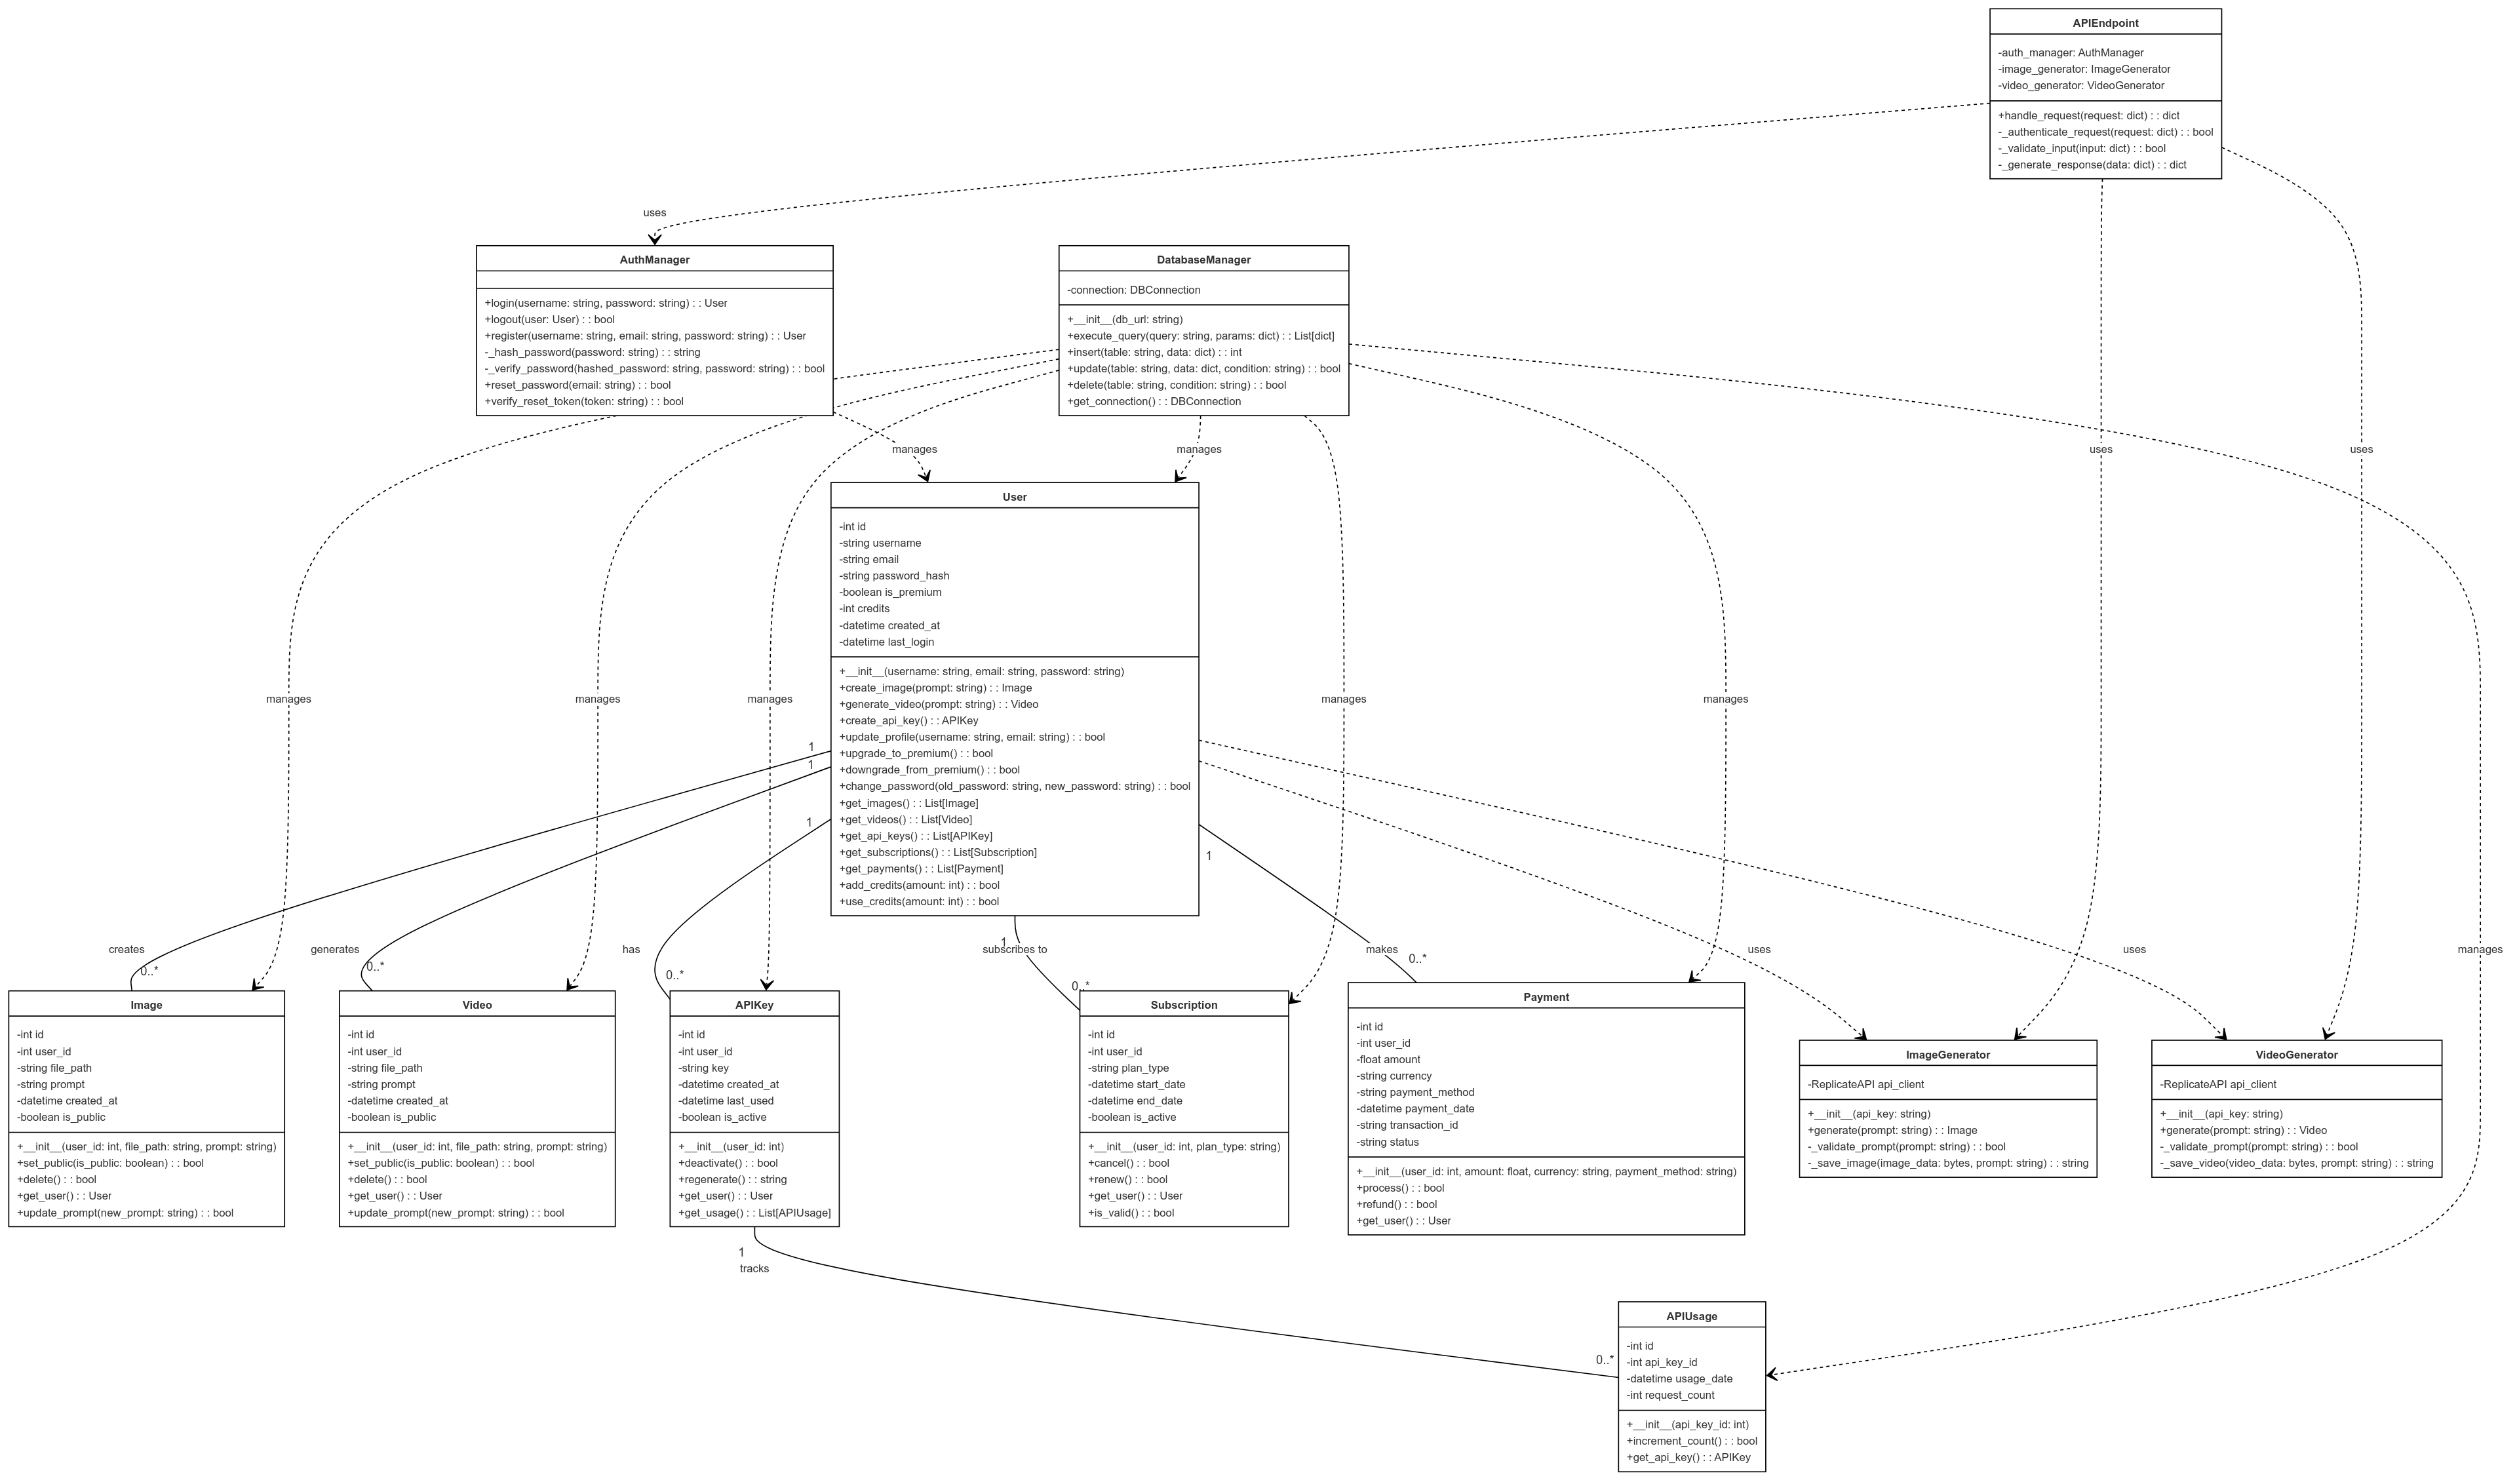
The application architecture is modular, with distinct components for user management, image and video generation, database operations, payment integration, and administrative functions. Each component is designed to be scalable and maintainable, ensuring that the application can grow and adapt to changing requirements.
To provide a seamless user experience, the application integrates with several external services, including Replicate for AI-driven content generation and Razorpay for secure payment processing. Additionally, Redis is used for caching and session management, enhancing the application's performance and responsiveness.
Security is a top priority in this application. User passwords are securely hashed using Werkzeug, and OTP verification is implemented during signup to ensure that only legitimate users can create accounts. Rate limiting is enforced using Redis to prevent abuse and ensure fair usage of the application's resources.
The application also includes a comprehensive administrative dashboard, allowing administrators to manage user accounts, monitor API usage, and oversee content generation. This ensures that the application remains efficient and compliant with usage policies.
In terms of deployment, the application is containerized using Docker, making it easy to deploy and scale across different environments. Continuous Integration/Continuous Deployment (CI/CD) is set up using GitHub Actions, ensuring that updates can be deployed quickly and reliably.
Overall, this report aims to provide a detailed overview of the application's architecture, features, and technology stack, highlighting the key components and their interactions. The following sections will delve deeper into each aspect of the application, providing insights into its design and implementation.
Application Architecture Mindmap
The following mind map illustrates the overall architecture and key components of the application:
This mind map provides a comprehensive overview of the application's structure, highlighting the main modules, services, and their interconnections. It serves as a visual guide to understanding the complex ecosystem of the Flask web application.
Sequence Diagram
To better understand the flow of operations within the application, particularly for the image generation process, we have created a sequence diagram:
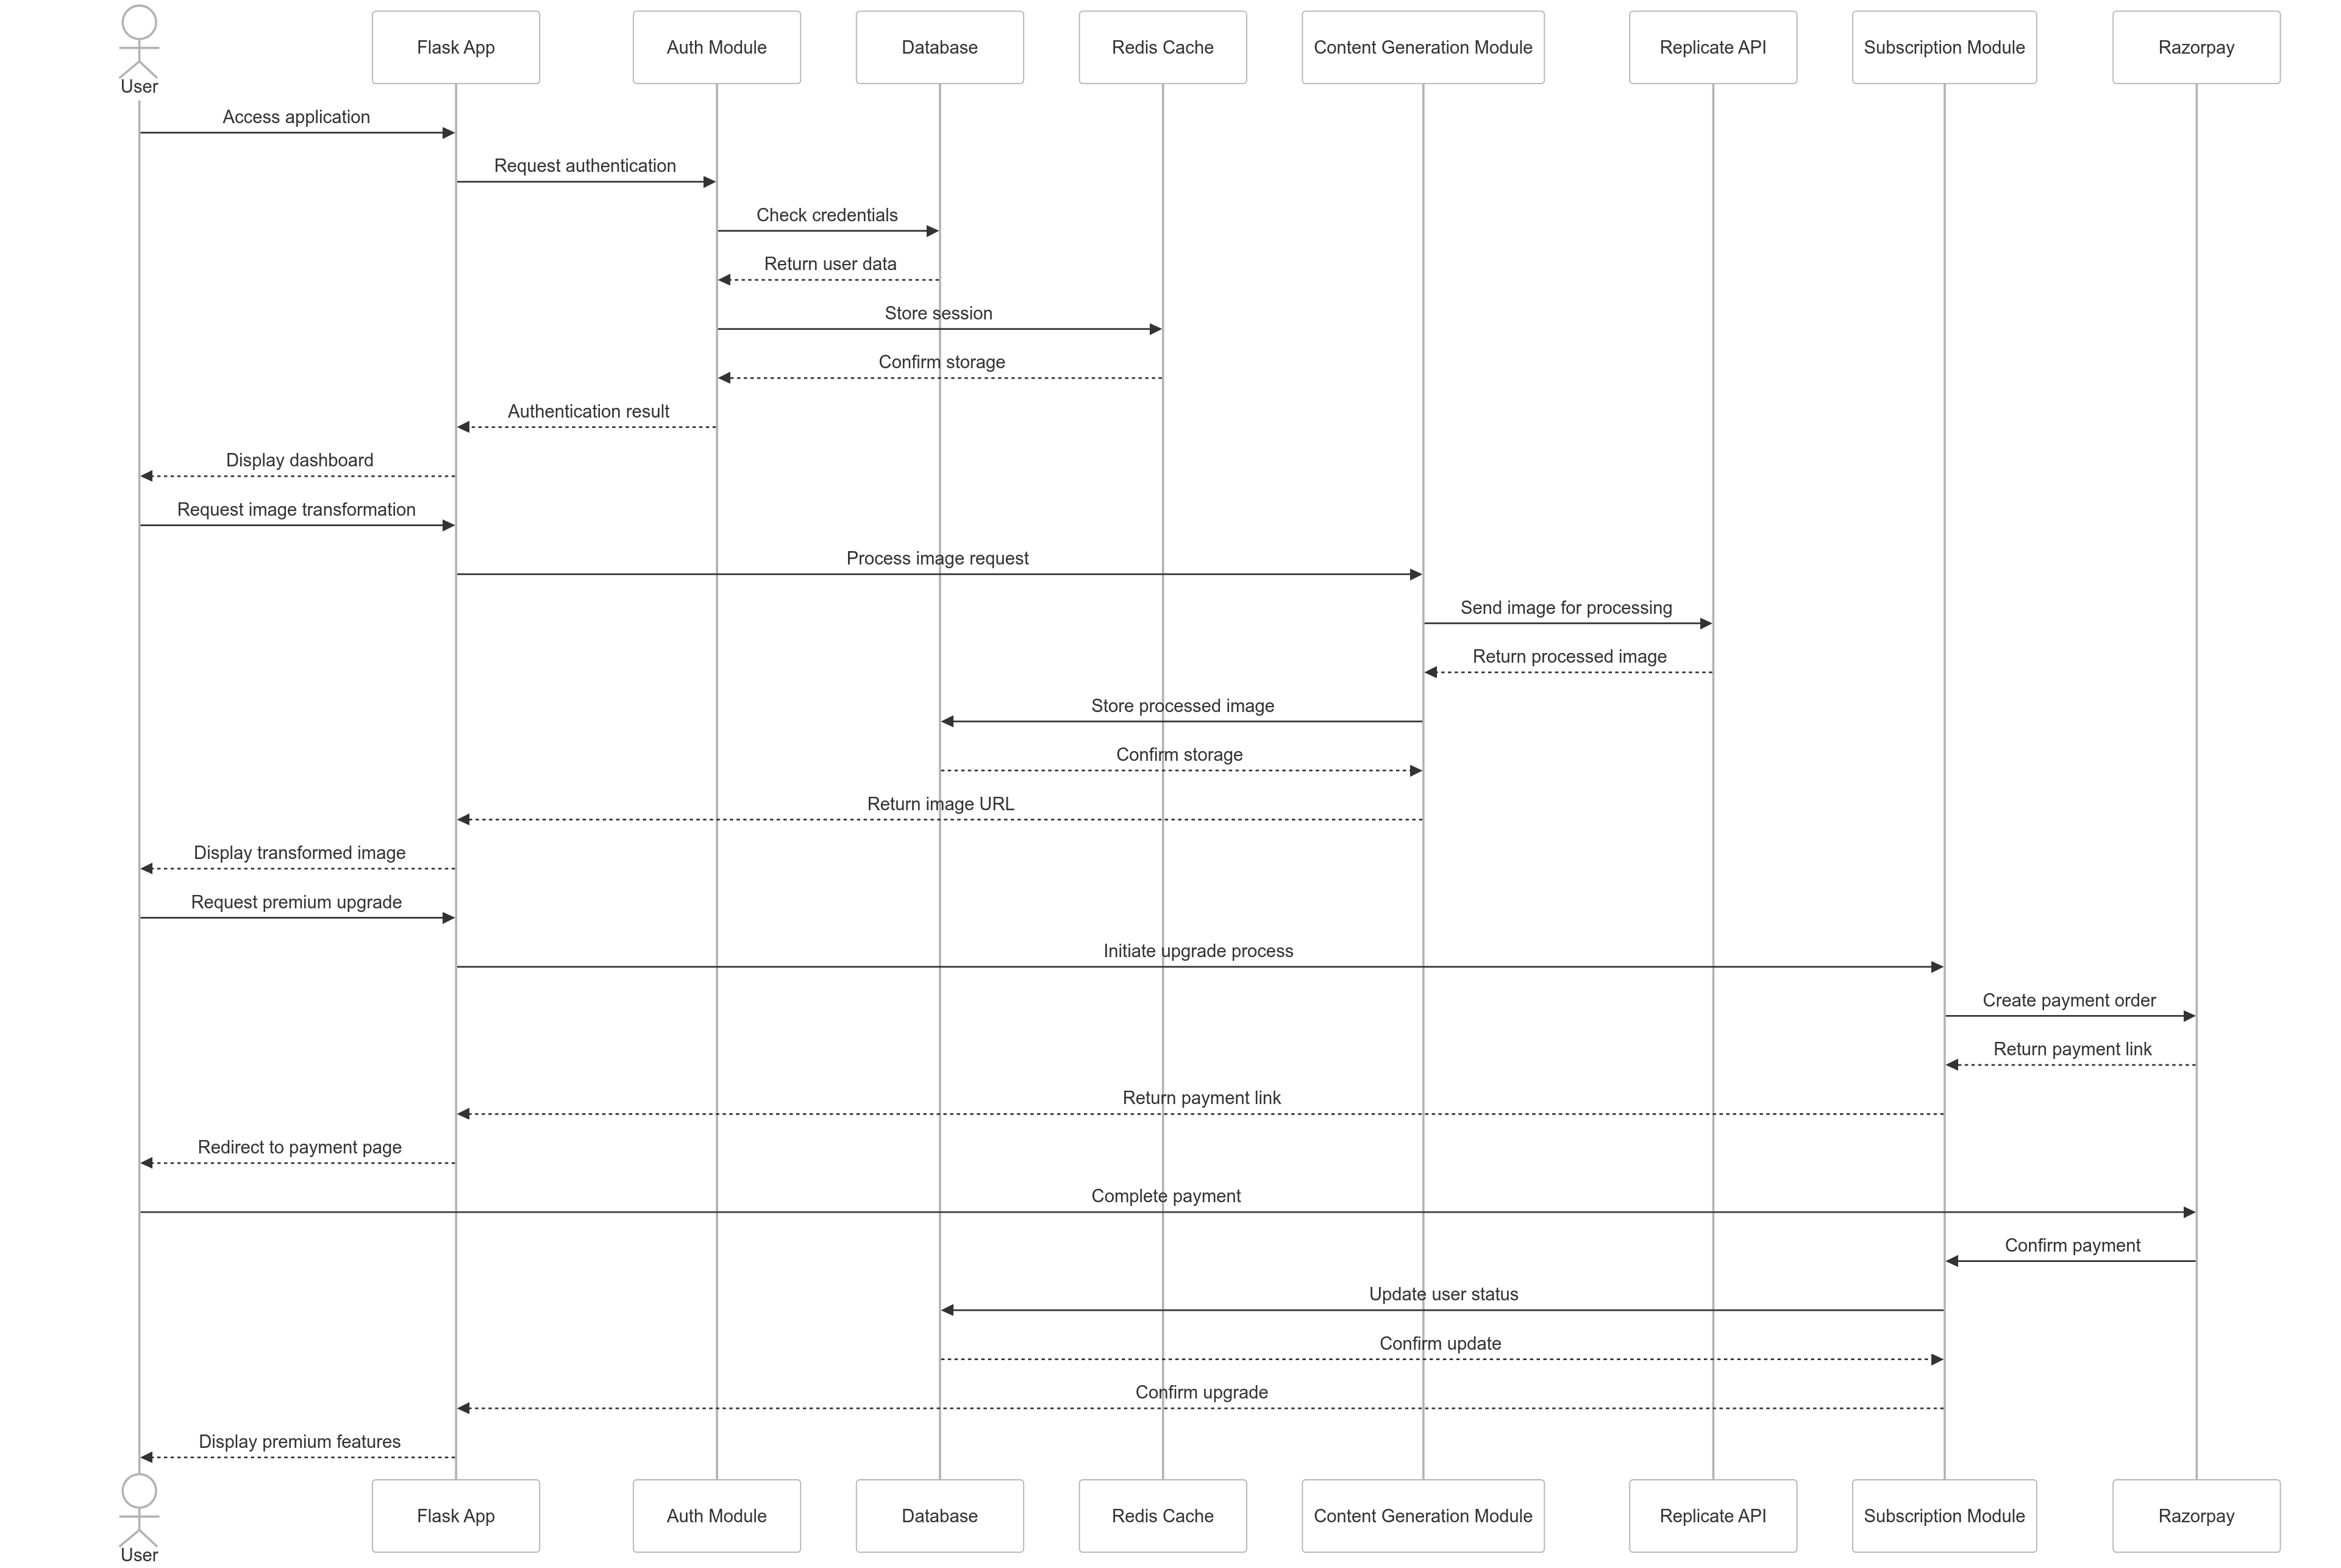
This sequence diagram illustrates the step-by-step process of how a user interacts with the application to generate an image, including:
- User authentication
- Prompt submission
- Quota checking
- Interaction with the Replicate API for image generation
- Storing the generated image
- Returning the result to the user
The diagram provides a clear visual representation of the application's workflow, highlighting the interactions between different components and services. This helps in understanding the system's behavior and can be valuable for both development and debugging purposes.
Application Structure
The following flowchart illustrates the high-level flow of the application:

This flowchart provides a visual representation of the main processes and user interactions within the application, from user authentication to image generation and management.
Configuration and Initialization
- Environment Variables: The application uses environment variables loaded via
python-dotenvfor configuration settings, ensuring that sensitive information is not hard-coded into the application. - Flask App Initialization: The Flask app is initialized with specific configurations such as the secret key, upload folder, maximum content length, and database URLs.
- Database Initialization: The application includes functions to initialize the PostgreSQL database with necessary tables and columns for users, images, videos, and API usage.
User Authentication
- User Model: A
Userclass is defined to represent user profiles, including attributes like email, password, username, and subscription details. - Login Manager: The
LoginManagerfrom Flask-Login is used to manage user sessions, handling tasks like loading users and managing login views. - OTP Verification: During signup, users receive an OTP via email for verification, enhancing the security of the account creation process.
Image and Video Generation
- Prompt-Based Generation: Users can generate images and videos by submitting text prompts. The application uses Replicate's AI models to process these prompts and generate corresponding content.
- Enhancement and Editing: Features are provided for enhancing user prompts and editing generated images, improving the quality and relevance of the generated content.
- Quota Management: Users have quotas for generating content, with premium users enjoying higher limits and additional features.
API Management
- API Keys: Users can generate and revoke API keys for programmatic access to the application's features.
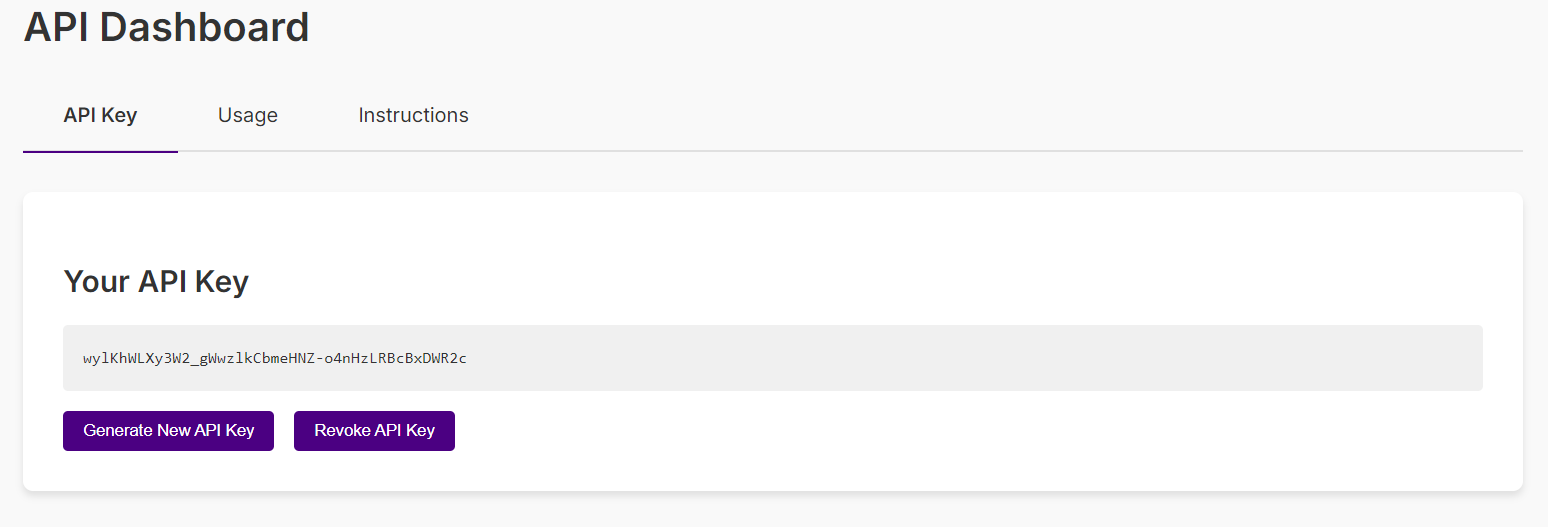
- Usage Statistics: Users can view their API usage statistics, helping them monitor their activity and plan their usage.
Premium Features
- Subscription Management: Users can subscribe to premium features using Razorpay, gaining access to higher generation quotas and other benefits.
- Quota Reset: Premium users have their quotas reset monthly, ensuring a consistent experience throughout their subscription period.
Administrative Functions
- User Management: Admins have access to manage user details, including promoting users to admin roles and adjusting user quotas.
- Content Management: Admins can view user-generated content and manage user quotas, ensuring that the application remains efficient and compliant with usage policies.
Security and Performance
- Password Hashing: User passwords are securely hashed using
werkzeug.security, preventing plain-text storage of sensitive information. - Rate Limiting: Rate limiting is implemented using Redis to prevent abuse and ensure fair usage of the application's resources.
- Environment Variables: Sensitive information is stored in environment variables and accessed securely, reducing the risk of exposure.
Deployment and Maintenance
- Database Initialization: The database is initialized with necessary tables and columns at startup, ensuring that the application has the required structure to function correctly.
- Background Scheduler: The application uses a background scheduler for periodic tasks like quota resets, managed by APScheduler.
- Logging: The application includes logging for debugging and error tracking, providing a way to monitor and diagnose issues during runtime.
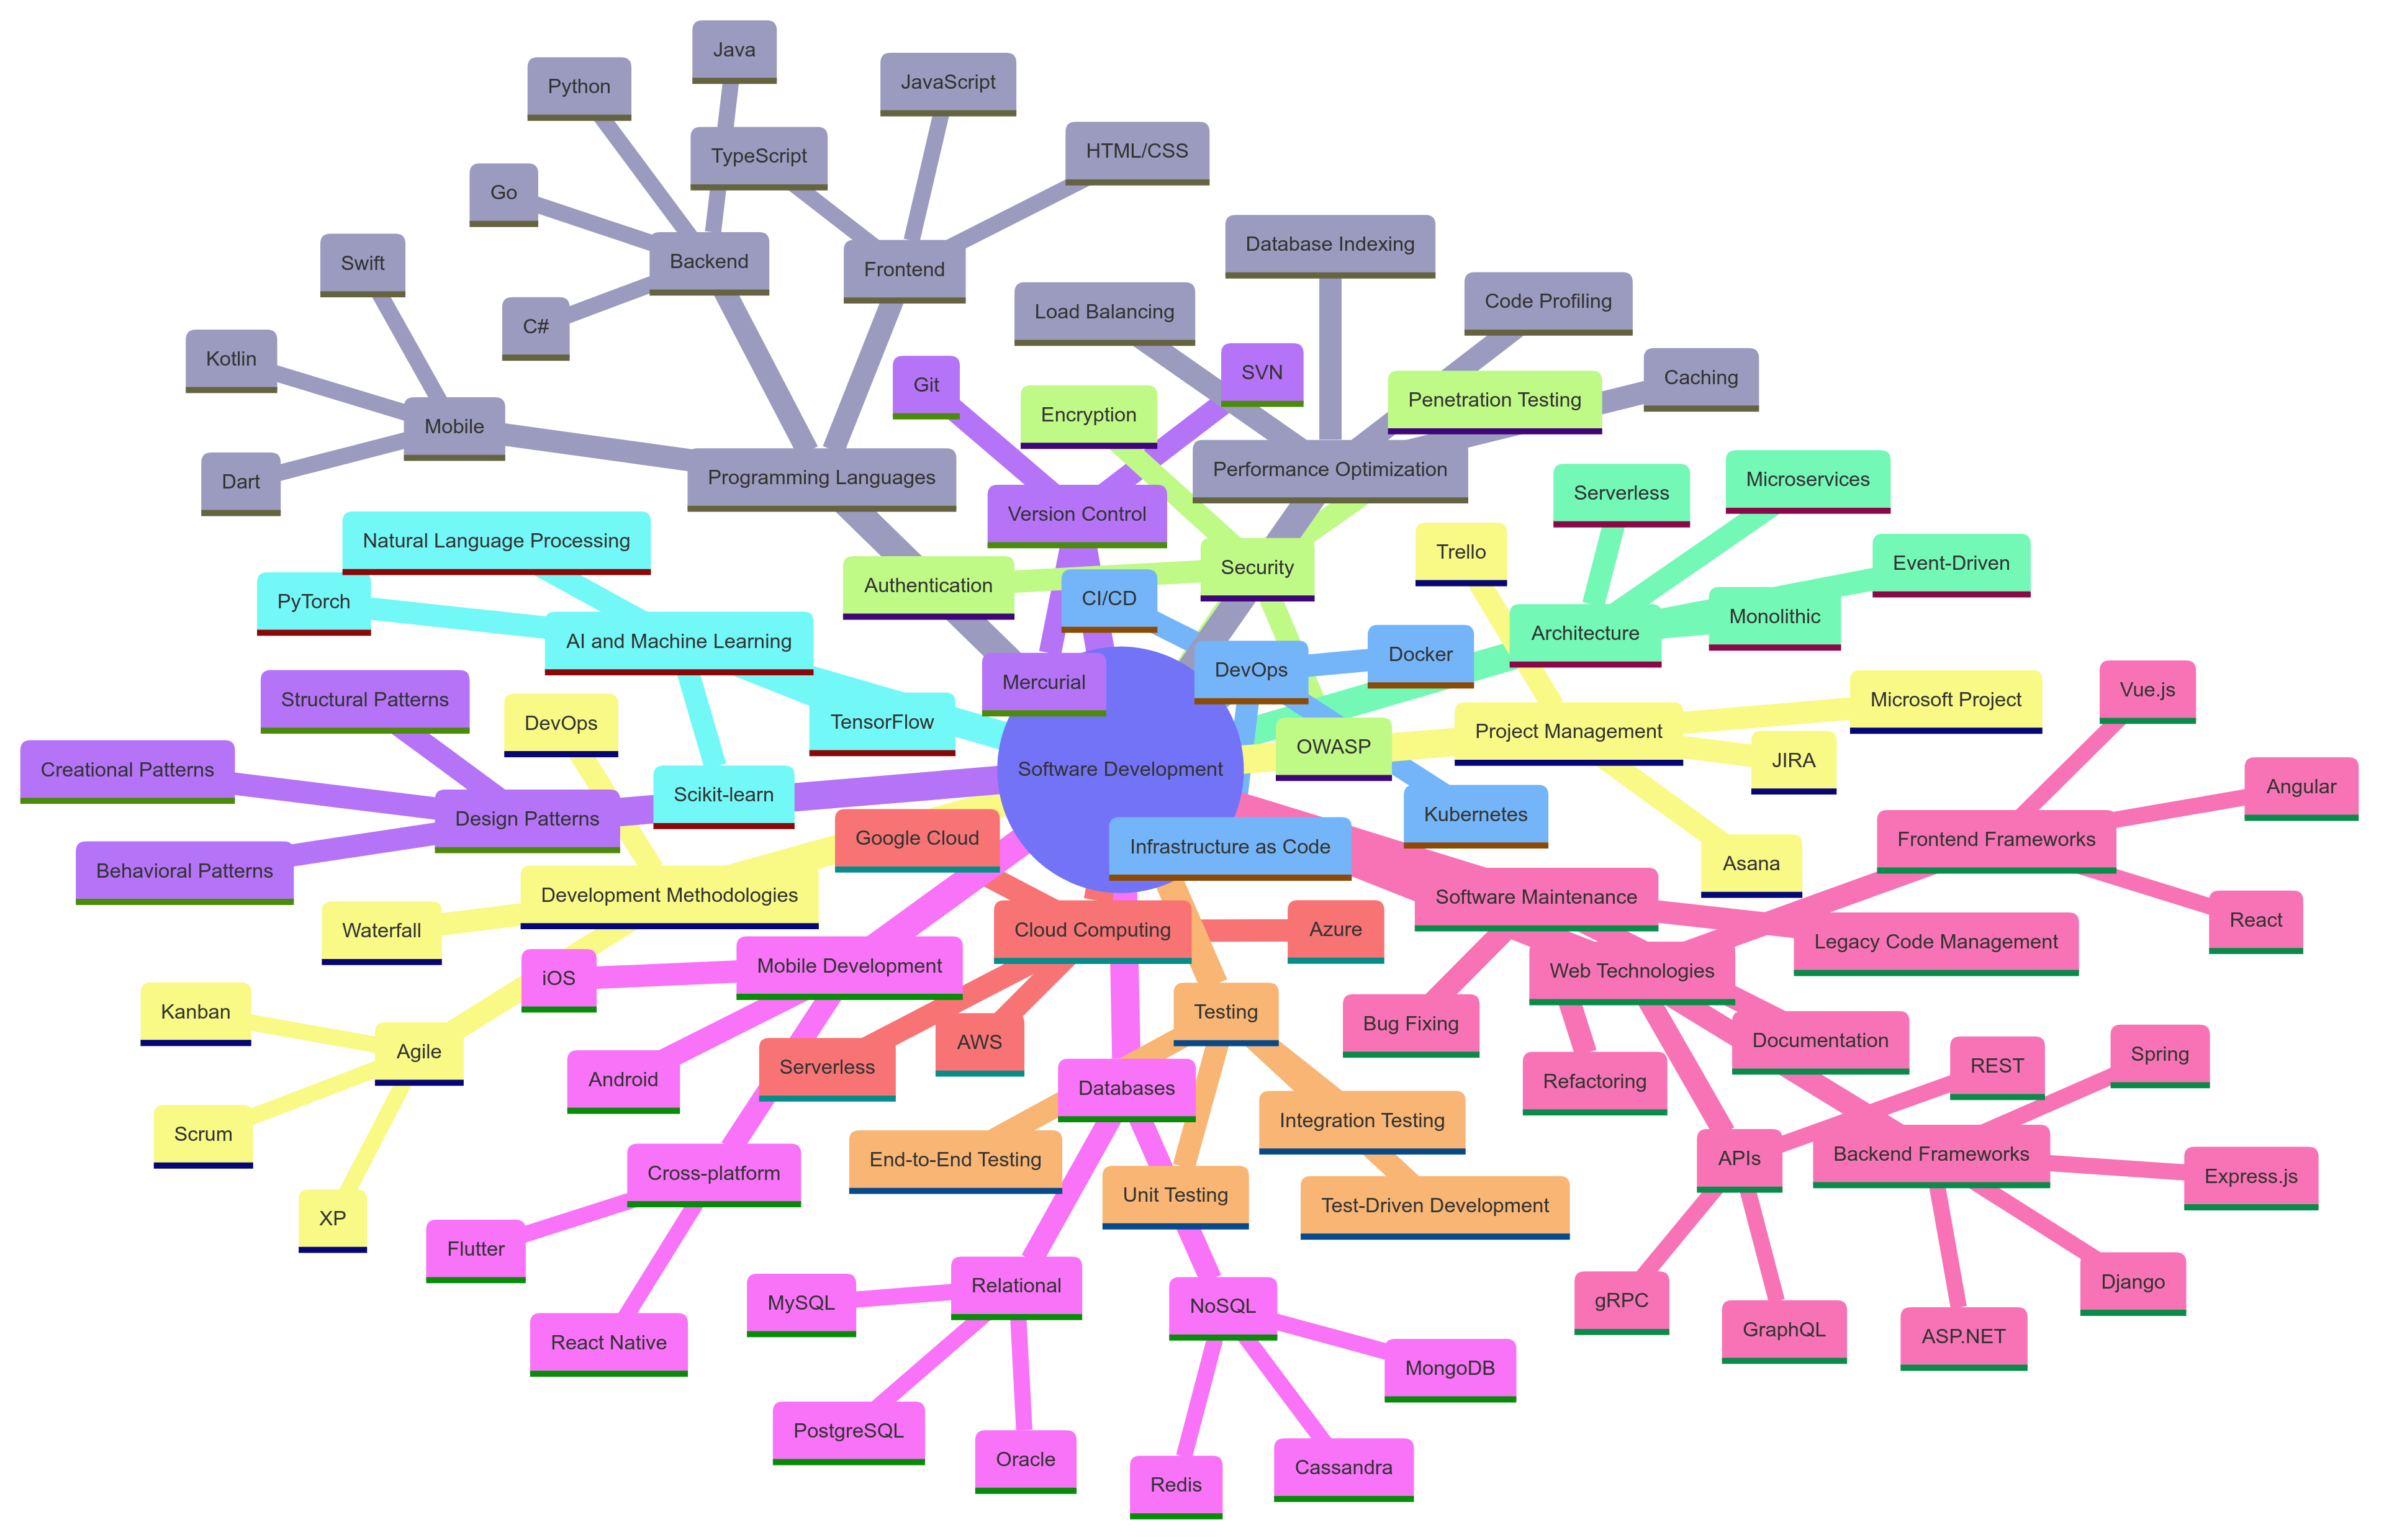
Technology Stack
Backend Framework
- Flask: A micro web framework written in Python. Flask is known for its simplicity, flexibility, and lightweight nature, making it ideal for rapid development and prototyping. It follows the WSGI (Web Server Gateway Interface) standard and is designed to be easily extensible.
Database
- PostgreSQL: A powerful, open-source object-relational database system. PostgreSQL is renowned for its reliability, robustness, and performance. It supports advanced features like complex queries, foreign keys, triggers, and views, making it suitable for handling complex data structures. In this application, PostgreSQL is used to store user profiles, generated images, videos, and API usage data.
- Redis: An in-memory data structure store used as a database, cache, and message broker. Redis is particularly useful for its speed and ability to handle high-volume, low-latency data access requirements. In this application, Redis is used for caching user data and managing session information, ensuring fast data retrieval and session persistence.
Database Schema
The following diagram illustrates the database schema used in the application:

This schema provides a visual representation of the database structure, showing the relationships between different tables and the key attributes stored for users, images, videos, and API usage.
Authentication and Session Management
- Flask-Login: A Flask extension that provides user session management. It handles the common tasks of logging users in and out and managing their sessions. Flask-Login is integrated with Flask's built-in session management to provide a secure and seamless authentication process.
- Flask-Session: An extension for Flask that adds support for server-side sessions. Unlike client-side cookies, server-side sessions are stored on the server, providing better security and the ability to store more data. Flask-Session is configured to use Redis for session storage, leveraging Redis's speed and persistence.
- Werkzeug: A comprehensive WSGI web application library. Werkzeug provides utilities for secure password hashing and cookie handling, ensuring that user credentials are stored and transmitted securely.
External APIs and Services
- Replicate: A platform for running machine learning models in the cloud. Replicate allows developers to easily integrate advanced AI models into their applications without the need for extensive machine learning expertise. In this application, Replicate is used to run models for generating images and videos based on user prompts.
- Razorpay: A popular payment gateway in India that supports online money transfers. Razorpay is used to handle payments for premium subscriptions, providing a secure and user-friendly payment processing solution.
Task Scheduling
- APScheduler: A lightweight in-process task scheduler that allows you to schedule functions to be called at specific times or intervals. APScheduler is used in this application to manage periodic tasks such as resetting monthly user quotas for premium subscribers.
Email Services
- smtplib: A built-in Python library for sending emails using the Simple Mail Transfer Protocol (SMTP). smtplib is used in conjunction with the
emailmodule to send OTP (One-Time Password) emails for user signup verification, enhancing the security of the account creation process.
Environment Configuration
- python-dotenv: A library that allows loading environment variables from a
.envfile intoos.environ. This is crucial for managing configuration settings and sensitive information such as database URLs, API keys, and secret keys securely.
Utilities
- base64: A module in Python for encoding binary data to ASCII characters and decoding it back. This is used for handling image data in a text format, facilitating the transmission and storage of images in a compact form.
- requests: A popular HTTP library in Python for making HTTP requests. It is used for downloading images, interacting with external APIs, and fetching data from web services.
- io.BytesIO: A class in Python's
iomodule that provides a way to handle byte data in memory. This is particularly useful for processing image data without the need for temporary file storage. - secrets: A module in Python for generating secure random numbers. It is used for generating secure API keys, ensuring that each user's API key is unique and difficult to predict.
Development and Debugging
- logging: A built-in Python module for logging. It is used for debugging and error tracking, providing a way to record errors and other information during the application's runtime.
Deployment
- Gunicorn: A Python WSGI HTTP Server for UNIX. Gunicorn is often used for deploying Flask applications in production environments due to its robustness and performance.
- Nginx: A high-performance web server that can also be used as a reverse proxy, load balancer, mail proxy, and HTTP cache. Nginx is commonly used in conjunction with Gunicorn to serve Flask applications, providing additional layers of security and performance optimization.
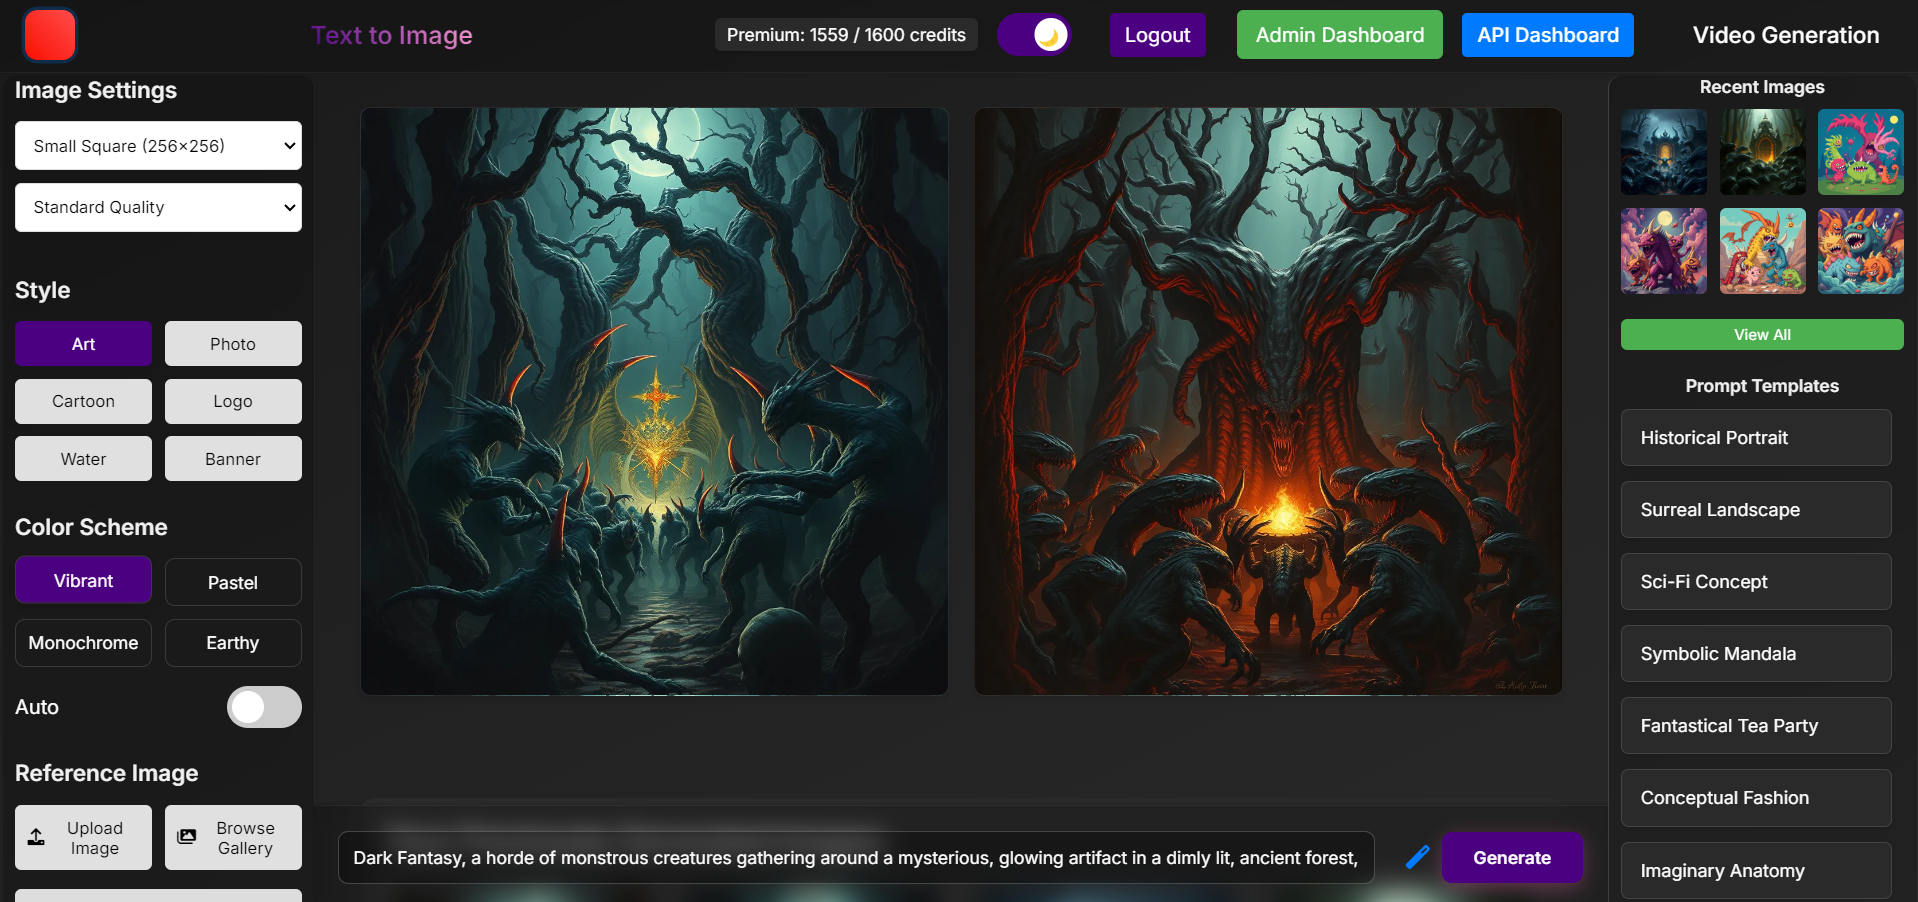
Admin Dashboard
The admin dashboard provides a comprehensive overview of the application's performance and user activities. It offers various metrics and management tools to help administrators monitor and control the system effectively.
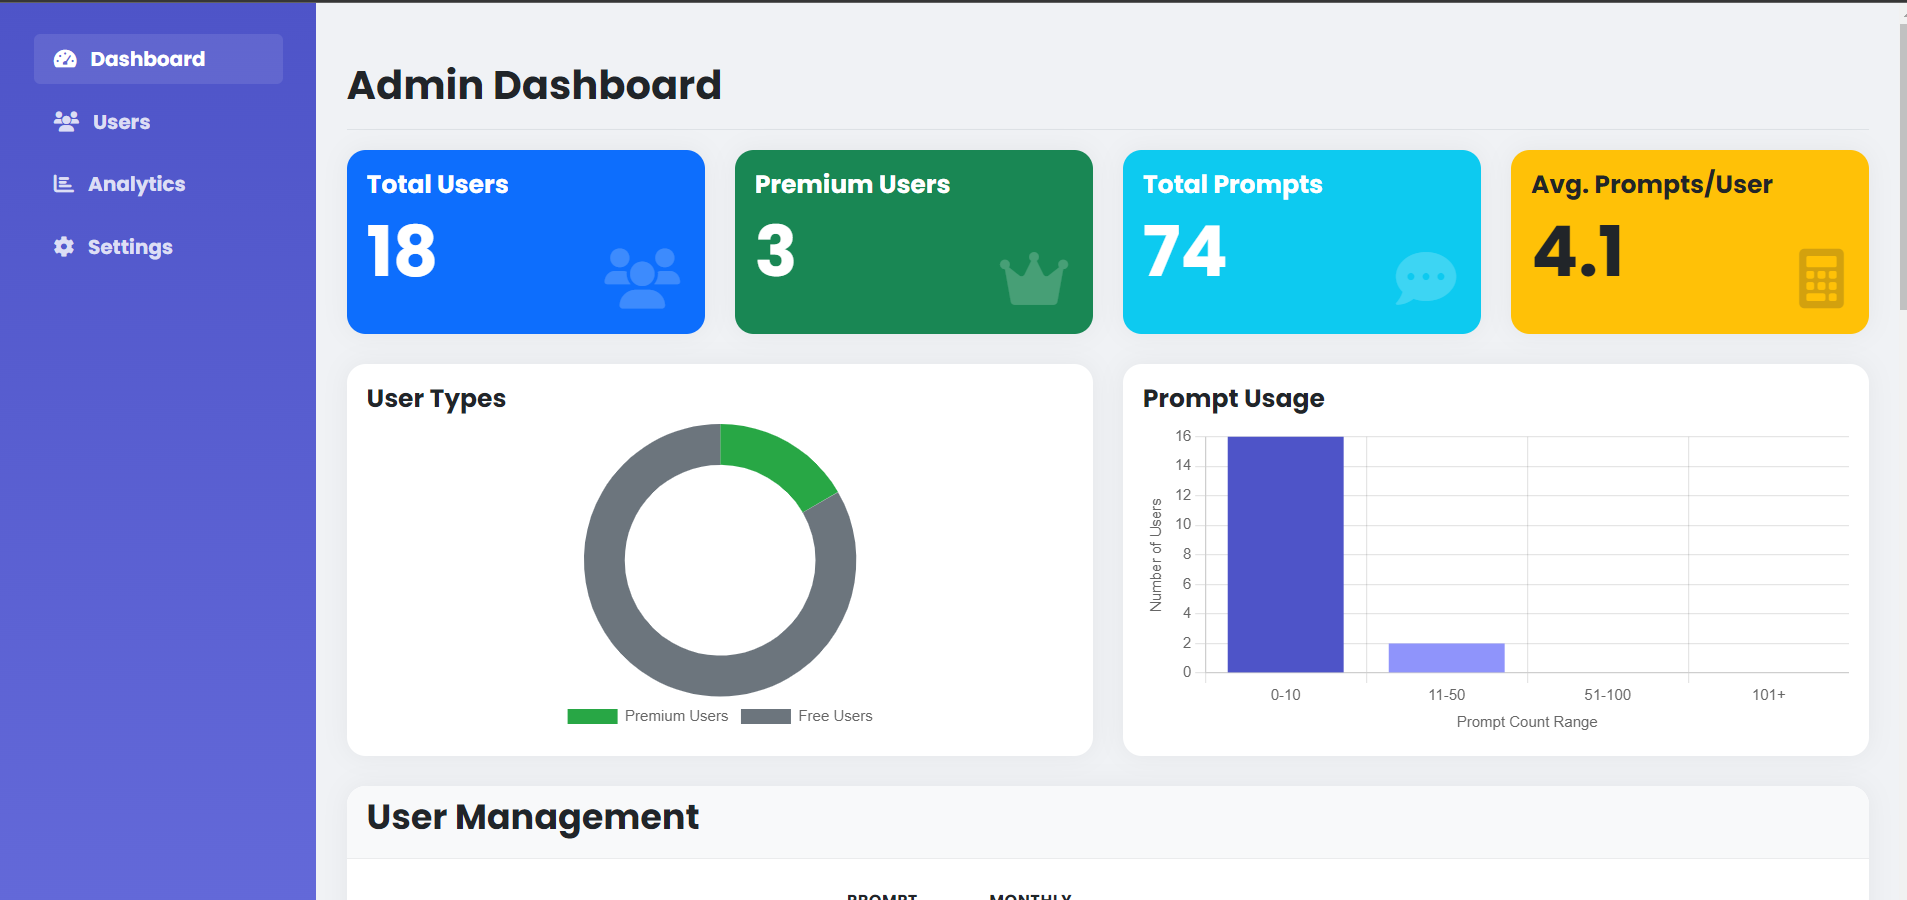
This dashboard includes features such as:
- User statistics and growth trends
- API usage metrics
- Revenue analytics
- System health monitoring
- User management tools
- Content moderation capabilities
The admin dashboard is designed to be intuitive and responsive, allowing administrators to quickly access important information and take necessary actions to maintain the smooth operation of the application.
Docker and GitHub Integration Instructions for Flask Web Application
Docker Integration
1. Install Docker
Ensure Docker is installed on your machine. You can download it from the official Docker website.
2. Create a Dockerfile
Create a Dockerfile in the root directory of your project with the following content:
# Use an official Python runtime as a parent image
FROM python:3.9-slim

# Set the working directory in the container
WORKDIR /app

# Copy the current directory contents into the container at /app
COPY . /app

# Install any needed packages specified in requirements.txt
RUN pip install --no-cache-dir -r requirements.txt

# Make port 5000 available to the world outside this container
EXPOSE 5000

# Define environment variable
ENV FLASK_ENV=production

# Run the application
CMD ["flask", "run", "--host=0.0.0.0"]
3. Create a Docker Compose File
Create a docker-compose.yml file in the root directory of your project with the following content:
version: '3.8'

services:
  web:
    build: .
    ports:
      - "5000:5000"
    environment:
      - SECRET_KEY=your_secret_key
      - DATABASE_URL=postgresql://username:password@db/dbname
      - REDIS_URL=redis://redis:6379/0
      - REPLICATE_API_TOKEN=your_replicate_api_token
      - RAZORPAY_KEY_ID=your_razorpay_key_id
      - RAZORPAY_KEY_SECRET=your_razorpay_key_secret
      - SMTP_SERVER=your_smtp_server
      - SMTP_PORT=your_smtp_port
      - SMTP_USERNAME=your_smtp_username
      - SMTP_PASSWORD=your_smtp_password
    depends_on:
      - db
      - redis

  db:
    image: postgres:13
    environment:
      - POSTGRES_USER=username
      - POSTGRES_PASSWORD=password
      - POSTGRES_DB=dbname
    volumes:
      - postgres_data:/var/lib/postgresql/data

  redis:
    image: redis:6

volumes:
  postgres_data:
4. Build and Run the Docker Containers
Build and run the Docker containers using Docker Compose:
docker-compose up --build
The application should now be running at http://localhost:5000/.
GitHub Integration
1. Create a GitHub Repository
Create a new repository on GitHub. You can do this by visiting GitHub and following the prompts to create a new repository.
2. Initialize Git and Push to GitHub
Initialize a Git repository in your project directory and push it to GitHub:
git init
git add .
git commit -m "Initial commit"
git remote add origin https://github.com/your-username/your-repo.git
git push -u origin master
3. Continuous Integration/Continuous Deployment (CI/CD)
Set up a CI/CD pipeline using GitHub Actions. Create a .github/workflows/main.yml file with the following content:
name: CI/CD Pipeline

on:
  push:
    branches:
      - master
  pull_request:
    branches:
      - master

jobs:
  build:
    runs-on: ubuntu-latest

    steps:
    - name: Checkout code
      uses: actions/checkout@v2

    - name: Set up Python
      uses: actions/setup-python@v2
      with:
        python-version: '3.9'

    - name: Install dependencies
      run: |
        python -m pip install --upgrade pip
        pip install -r requirements.txt

    - name: Run tests
      run: |
        pytest

  deploy:
    needs: build
    runs-on: ubuntu-latest

    steps:
    - name: Checkout code
      uses: actions/checkout@v2

    - name: Set up Docker
      uses: docker/setup-buildx-action@v1

    - name: Login to Docker Hub
      uses: docker/login-action@v1
      with:
        username: ${{ secrets.DOCKER_USERNAME }}
        password: ${{ secrets.DOCKER_PASSWORD }}

    - name: Build and push Docker image
      uses: docker/build-push-action@v2
      with:
        context: .
        push: true
        tags: your-dockerhub-username/your-repo:latest
4. Add Secrets to GitHub
Add the necessary secrets to your GitHub repository:
- Go to your repository on GitHub.
- Click on "Settings" > "Secrets" > "New repository secret".
- Add the following secrets:
DOCKER_USERNAME: Your Docker Hub username.DOCKER_PASSWORD: Your Docker Hub password.
5. Trigger the CI/CD Pipeline
Push changes to the master branch to trigger the CI/CD pipeline:
git add .
git commit -m "Update CI/CD pipeline"
git push
Conclusion
By following these instructions, you can set up a development environment, containerize your application using Docker, and integrate it with GitHub for version control and CI/CD. This setup ensures that your Flask web application is scalable, secure, and easy to deploy.
Code Explanation
User Authentication and Management
- User Registration: Users can create accounts by providing an email and password. The registration process includes OTP (One-Time Password) verification sent to the user's email for enhanced security.
@app.route('/signup', methods=['GET', 'POST'])
def signup():
    if current_user.is_authenticated:
        return redirect(url_for('index'))

    if request.method == 'POST':
        if 'otp' in request.form:
            email = session.get('signup_email')
            otp = request.form['otp']

            if otp != session.get('signup_otp'):
                flash('Invalid OTP')
                return render_template('signup.html', email=email, show_otp=True)

            password = session.get('signup_password')
            hashed_password = generate_password_hash(password)

            conn = get_db_connection()
            cur = conn.cursor()
            cur.execute("INSERT INTO users (email, password) VALUES (%s, %s)", (email, hashed_password))
            conn.commit()
            cur.close()
            conn.close()

            session.pop('signup_otp', None)
            session.pop('signup_email', None)
            session.pop('signup_password', None)

            flash('Account created successfully')
            return redirect(url_for('login'))
        else:
            email = request.form['email']
            password = request.form['password']

            conn = get_db_connection()
            cur = conn.cursor()
            cur.execute("SELECT * FROM users WHERE email = %s", (email,))
            if cur.fetchone():
                flash('Email already exists')
                cur.close()
                conn.close()
                return redirect(url_for('signup'))
            cur.close()
            conn.close()

            otp = str(random.randint(100000, 999999))

            session['signup_otp'] = otp
            session['signup_email'] = email
            session['signup_password'] = password

            send_otp_email(email, otp)

            flash('OTP sent to your email. Please enter it to complete signup. check Spam')
            return render_template('signup.html', email=email, show_otp=True)

    return render_template('signup.html', show_otp=False)
Explanation: This code handles the user signup process. It first checks if the user is already authenticated and redirects them if they are. If the request method is POST, it checks if the OTP is provided. If the OTP is valid, it hashes the password and inserts the user data into the database. If the OTP is not provided, it generates an OTP, stores it in the session, and sends it to the user's email for verification.
- User Login and Logout: Secure login and logout functionalities are provided using Flask-Login, which manages user sessions and ensures that user data is protected.
@app.route('/login', methods=['GET', 'POST'])
def login():
    if current_user.is_authenticated:
        return redirect(url_for('index'))

    if request.method == 'POST':
        email = request.form['email']
        password = request.form['password']
        conn = get_db_connection()
        cur = conn.cursor()
        cur.execute("SELECT * FROM users WHERE email = %s", (email,))
        user = cur.fetchone()
        cur.close()
        conn.close()
        if user and check_password_hash(user[2], password):
            user_obj = User(user[0], user[1], user[2], user[3], user[4], user[5], user[6], user[7], user[8])
            login_user(user_obj)
            return redirect(url_for('index'))
        flash('Invalid email or password')
    return render_template('login.html')

@app.route('/logout')
@login_required
def logout():
    logout_user()
    flash('You have been logged out successfully.', 'info')
    return redirect(url_for('login'))
Explanation: The login route handles user authentication. It checks if the user is already authenticated and redirects them if they are. If the request method is POST, it retrieves the user's credentials, checks them against the database, and logs the user in if the credentials are valid. The logout route uses Flask-Login's logout_user function to log the user out and redirect them to the login page.
Content Generation
- Image Generation: Users can generate images by submitting text prompts. The application uses AI models from Replicate to process these prompts and create high-quality images.
@app.route('/transform', methods=['POST'])
@login_required
def transform_image():
    rate_limit_key = f'rate_limit:{current_user.id}'
    current_count = redis_client.get(rate_limit_key)

    if current_count is None:
        redis_client.setex(rate_limit_key, 3600, 1)
    elif int(current_count) >= 10:
        return jsonify({'error': 'Rate limit exceeded. Please try again later.'}), 429
    else:
        redis_client.incr(rate_limit_key)

    conn = get_db_connection()
    cur = conn.cursor()
    cur.execute("SELECT is_premium, prompt_count, monthly_quota, subscription_start FROM users WHERE id = %s", (current_user.id,))
    user_data = cur.fetchone()
    is_premium, prompt_count, monthly_quota, subscription_start = user_data

    if is_premium:
        if subscription_start and datetime.now() - subscription_start > timedelta(days=30):
            cur.execute("""
                UPDATE users
                SET is_premium = FALSE,
                    subscription_start = NULL,
                    monthly_quota = 0
                WHERE id = %s
            """, (current_user.id,))
            conn.commit()
            is_premium = False
            monthly_quota = 0
        elif monthly_quota <= 0:
            cur.close()
            conn.close()
            return jsonify({
                'quota_exceeded': True,
                'is_premium': True
            }), 403
    else:
        if prompt_count >= 5:
            cur.close()
            conn.close()
            return jsonify({
                'quota_exceeded': True,
                'is_premium': False
            }), 403

    prompt = request.form.get('prompt')
    if not prompt:
        return jsonify({'error': 'No prompt provided'}), 400

    image_size = int(request.form.get('image_size', 512))
    style = request.form.get('style', 'art style')
    color = request.form.get('color', 'vibrant colors')
    prompt = request.form.get('prompt', '')

    input_data = {
        "detect_resolution": image_size,
        "image_resolution": image_size,
        "return_width": image_size,
        "return_height": image_size,
        "prompt": f"{prompt}, {style}, {color}",
        "num_samples": 1,
        "num_inference_steps": 20,
        "guidance_scale": 9,
        "nsfw": True
    }

    try:
        image_urls = []
        for _ in range(2):
            output = replicate.run(
                "stability-ai/stable-diffusion:db21e45d3f7023abc2a46ee38a23973f6dce16bb082a930b0c49861f96d1e5bf",
                input=input_data
            )
            app.logger.info(f"API Output: {output}")

            if isinstance(output, str):
                image_urls.append(output)
            elif isinstance(output, list) and len(output) > 0:
                image_urls.append(output[0])

            if len(image_urls) == 4:
                break

            time.sleep(1)

        image_urls = image_urls + [None] * (2 - len(image_urls))

        for url in image_urls:
            if url:
                cur.execute("""
                    INSERT INTO images (user_id, url, prompt, style, color, created_at)
                    VALUES (%s, %s, %s, %s, %s, %s)
                """, (current_user.id, url, prompt, style, color, datetime.now()))

        if is_premium:
            cur.execute("UPDATE users SET monthly_quota = monthly_quota - 1 WHERE id = %s", (current_user.id,))
        else:
            cur.execute("UPDATE users SET prompt_count = prompt_count + 1 WHERE id = %s", (current_user.id,))

        conn.commit()
        cur.close()
        conn.close()

        return jsonify({
            "image_urls": image_urls,
            "generated_count": len([url for url in image_urls if url is not None]),
            "quota_exceeded": False,
            "is_premium": is_premium
        })
    except Exception as e:
        cur.close()
        conn.close()
        app.logger.error(f"API Error: {str(e)}")
        return jsonify({"error": str(e)}), 500

    return jsonify({"error": "Image generation failed"}), 500
Explanation: This route handles the generation of images based on user prompts. It first checks the user's rate limit using Redis. It then checks the user's quota and subscription status. If the user has sufficient quota, it processes the prompt using an AI model from Replicate and generates images. The generated images are saved in the database, and the user's quota is updated accordingly.
- Video Generation: Similar to image generation, users can generate videos based on text prompts. The application leverages AI models to create dynamic and engaging video content.
@app.route('/generate_video', methods=['POST'])
@login_required
def generate_video():
    prompt = request.json.get('prompt')
    if not prompt:
        return jsonify({'error': 'No prompt provided'}), 400

    try:
        output = replicate.run(
            "lucataco/animate-diff:beecf59c4aee8d81bf04f0381033dfa10dc16e845b4ae00d281e2fa377e48a9f",
            input={
                "prompt": prompt,
                "num_frames": 16,
                "num_inference_steps": 50,
                "guidance_scale": 7.5
            }
        )

        video_url = output['output']

        conn = get_db_connection()
        cur = conn.cursor()
        cur.execute("""
            INSERT INTO videos (user_id, url, prompt, created_at)
            VALUES (%s, %s, %s, NOW())
        """, (current_user.id, video_url, prompt))
        conn.commit()
        cur.close()
        conn.close()

        return jsonify({"video_url": video_url})
    except Exception as e:
        app.logger.error(f"Video generation error: {str(e)}")
        return jsonify({"error": str(e)}), 500
Explanation: This route handles the generation of videos based on user prompts. It uses an AI model from Replicate to process the prompt and create a video. The generated video URL is saved in the database, associating it with the user who requested it.
Quota and Subscription Management
- Quota System: A quota system is implemented to limit the number of content generations per user. Free users have a basic quota, while premium users enjoy higher limits.
def check_user_quota(user):
    if not user.is_premium:
        return user.prompt_count < 5
    else:
        if user.subscription_start and datetime.now() - user.subscription_start > timedelta(days=30):
            conn = get_db_connection()
            cur = conn.cursor()
            cur.execute("""
                UPDATE users
                SET is_premium = FALSE,
                    subscription_start = NULL,
                    monthly_quota = 0
                WHERE id = %s
            """, (user.id,))
            conn.commit()
            cur.close()
            conn.close()
            return False
        return user.monthly_quota > 0
Explanation: This function checks the user's quota based on their subscription status. If the user is not premium, it checks if they have used less than 5 prompts. If the user is premium, it checks if their subscription has expired and updates their status if necessary. It then checks if they have remaining quota.
- Premium Subscriptions: Users can subscribe to premium features using Razorpay, gaining access to higher generation quotas, priority support, and ad-free experience.
@app.route('/premium')
@login_required
def premium():
    return render_template('premium.html', razorpay_key_id=app.config['RAZORPAY_KEY_ID'])

@app.route('/create-checkout-session', methods=['POST'])
@login_required
def create_checkout_session():
    try:
        checkout_session = razorpay_client.order.create({
            'amount': 50000,
            'currency': 'INR',
            'payment_capture': 1,
            'notes': {
                'user_id': current_user.id
            }
        })
        return jsonify({'id': checkout_session['id']})
    except Exception as e:
        return jsonify(error=str(e)), 403

@app.route('/premium-success', methods=['POST'])
@login_required
def premium_success():
    try:
        params_dict = {
            'razorpay_order_id': request.json.get('razorpay_order_id'),
            'razorpay_payment_id': request.json.get('razorpay_payment_id'),
            'razorpay_signature': request.json.get('razorpay_signature')
        }
        razorpay_client.utility.verify_payment_signature(params_dict)

        conn = get_db_connection()
        cur = conn.cursor()
        subscription_start = datetime.now()
        cur.execute("""
            UPDATE users
            SET is_premium = TRUE,
                subscription_start = %s,
                monthly_quota = 1600
            WHERE id = %s
        """, (subscription_start, current_user.id))
        conn.commit()
        cur.close()
        conn.close()
        return jsonify({'success': True})
    except Exception as e:
        app.logger.error(f"Payment verification failed: {str(e)}")
        return jsonify({'success': False, 'error': str(e)}), 400
Explanation: The premium route renders the premium subscription page. The create_checkout_session route creates a Razorpay checkout session for the user to complete the payment. The premium_success route verifies the payment and updates the user's subscription status in the database.
API Management
- API Key Generation: Users can generate API keys for programmatic access to the application's features. These keys are securely managed and can be revoked if necessary.
@app.route('/generate_api_key', methods=['POST'])
@login_required
def generate_api_key():
    new_api_key = secrets.token_urlsafe(32)
    conn = get_db_connection()
    cur = conn.cursor()
    cur.execute("UPDATE users SET api_key = %s WHERE id = %s", (new_api_key, current_user.id))
    conn.commit()
    cur.close()
    conn.close()
    return jsonify({"api_key": new_api_key})

@app.route('/revoke_api_key', methods=['POST'])
@login_required
def revoke_api_key():
    conn = get_db_connection()
    cur = conn.cursor()
    cur.execute("UPDATE users SET api_key = NULL WHERE id = %s", (current_user.id,))
    conn.commit()
    cur.close()
    conn.close()
    return jsonify({"message": "API key revoked successfully"})
Explanation: The generate_api_key route generates a new API key for the user and stores it in the database. The revoke_api_key route revokes the user's API key by setting it to NULL in the database.
- API Usage Statistics: Detailed API usage statistics are provided, allowing users to monitor their activity and plan their usage effectively.
@app.route('/api_usage_stats')
@login_required
def api_usage_stats():
    conn = get_db_connection()
    cur = conn.cursor()

    cur.execute("""
        SELECT usage_date, count
        FROM api_usage
        WHERE user_id = %s AND usage_date >= CURRENT_DATE - INTERVAL '30 days'
        ORDER BY usage_date
    """, (current_user.id,))

    usage_stats = cur.fetchall()

    cur.close()
    conn.close()

    return jsonify(usage_stats)
Explanation: This route fetches the user's API usage statistics for the last 30 days from the database and returns them in JSON format.
Administrative Functions
- User Management: Administrators have access to manage user accounts, including promoting users to admin roles, adjusting user quotas, and viewing user details.
@app.route('/admin')
@login_required
def admin_dashboard():
    if current_user.email == 'gptadarsh1@gmail.com' or current_user.is_admin:
        if current_user.email == 'gptadarsh1@gmail.com':
            conn = get_db_connection()
            cur = conn.cursor()
            cur.execute("UPDATE users SET is_admin = TRUE WHERE email = %s", (current_user.email,))
            conn.commit()
            cur.close()
            conn.close()
            current_user.is_admin = True
            flash('Admin access granted.', 'success')

        conn = get_db_connection()
        cur = conn.cursor()
        cur.execute("SELECT id, email, is_premium, prompt_count, monthly_quota FROM users")
        users = cur.fetchall()
        cur.close()
        conn.close()

        users = [
            {
                'id': user[0],
                'email': user[1],
                'is_premium': user[2],
                'prompt_count': user[3],
                'monthly_quota': user[4]
            } for user in users
        ]

        return render_template('admin_dashboard.html', users=users)
    else:
        flash('You do not have permission to access the admin dashboard.', 'error')
        return redirect(url_for('index'))

@app.route('/promote_to_admin/<email>')
@login_required
def promote_to_admin(email):
    if not current_user.is_admin:
        flash('You do not have permission to perform this action.', 'error')
        return redirect(url_for('index'))

    conn = get_db_connection()
    cur = conn.cursor()
    cur.execute("UPDATE users SET is_admin = TRUE WHERE email = %s", (email,))
    affected_rows = cur.rowcount
    conn.commit()
    cur.close()
    conn.close()

    if affected_rows > 0:
        flash(f'User {email} has been promoted to admin.', 'success')
    else:
        flash(f'User {email} not found or already an admin.', 'error')

    return redirect(url_for('admin_dashboard'))
Explanation: The admin_dashboard route allows administrators to view a list of users and their details. The promote_to_admin route promotes a user to an admin role by updating their is_admin status in the database.
- Content Management: Admins can view and manage user-generated content, ensuring that the application remains efficient and compliant with usage policies.
@app.route('/admin/user_prompts/<int:user_id>')
@login_required
def get_user_prompts(user_id):
    if not current_user.is_admin:
        return jsonify({'error': 'Unauthorized'}), 403

    conn = get_db_connection()
    cur = conn.cursor()
    cur.execute("SELECT prompt, created_at FROM images WHERE user_id = %s ORDER BY created_at DESC", (user_id,))
    prompts = cur.fetchall()
    cur.close()
    conn.close()

    return jsonify({
        'prompts': [
            {'prompt': prompt[0], 'created_at': prompt[1].isoformat()}
            for prompt in prompts
        ]
    })

@app.route('/admin/update_credits/<int:user_id>', methods=['PUT'])
@login_required
def update_user_credits(user_id):
    if not current_user.is_admin:
        return jsonify({'error': 'Unauthorized'}), 403

    try:
        data = request.json
        new_credits = data.get('monthly_quota')

        if new_credits is None:
            return jsonify({'error': 'Invalid data: monthly_quota is missing'}), 400

        new_credits = int(new_credits)

        conn = get_db_connection()
        cur = conn.cursor()
        cur.execute(
            "UPDATE users SET monthly_quota = %s WHERE id = %s",
            (new_credits, user_id)
        )
        affected_rows = cur.rowcount
        conn.commit()
        cur.close()
        conn.close()

        if affected_rows == 0:
            return jsonify({'error': 'User not found or no changes made'}), 404

        return jsonify({'message': 'User credits updated successfully'})
    except Exception as e:
        app.logger.error(f"Error updating credits: {str(e)}")
        return jsonify({'error': f'Server error: {str(e)}'}), 500
Explanation: The get_user_prompts route allows admins to view the prompts generated by a specific user. The update_user_credits route allows admins to update a user's monthly quota by sending a PUT request with the new quota value.
Advanced Features
Security and Privacy
- OTP Verification: OTP verification during signup enhances account security by ensuring that the email provided is valid and actively used by the account owner.
- Session Management: Flask-Session and Redis are used for secure and efficient session management, ensuring that user sessions are persistent and protected.
- Rate Limiting: Rate limiting is implemented to prevent abuse and ensure fair usage of the application's resources.
Performance Optimization
- Caching: Redis is used for caching frequently accessed data, reducing database load and improving response times.
- Background Tasks: APScheduler is used for managing periodic tasks, such as quota resets, ensuring that these tasks do not interfere with the application's real-time performance.
Integration and Extensibility
- External API Integration: The application integrates with Replicate for AI-driven content generation and Razorpay for secure payment processing.
Built With
- apscheduler
- base64
- flask
- flask-login
- flask-session
- gunicorn
- io.bytesio
- logging
- nginx
- postgresql
- python-dotenv
- razorpay
- redis
- replicate
- requests
- secrets
- smtplib
- werkzeug

Log in or sign up for Devpost to join the conversation.