Importing Custom Assets into Worlds Desktop Editor
Introduction
In my opinion, the Desktop Editor is the best way to create worlds in Horizon Worlds. It’s the tool that Meta is continuing to support and develop the most, and it offers creators a powerful way to build unique and engaging experiences.
Importing custom assets is a critical skill for Horizon creators, because it lets your worlds feel more personal and distinctive—something that can help draw in and keep players coming back.
In this tutorial, you’ll learn how to confidently import your own models into Worlds Desktop Editor. We’ll start by showing how to export from Blender, then we’ll also cover how to export from Unity, for those who may be more comfortable using Unity as their modeling pipeline. By the end, you’ll have the knowledge to bring your own creations into Horizon Worlds with ease.
Prerequisites
Before you begin, make sure you have the following:
Modeling software:
- Blender (recommended), or
- Unity Game Engine if you prefer working in Unity.
- Blender (recommended), or
Image editing software:
- GIMP (used in this tutorial), or Photoshop.
- GIMP (used in this tutorial), or Photoshop.
Files prepared:
- An FBX file of your 3D model.
- PNG textures for your model’s materials (color, normal, etc.).
- An FBX file of your 3D model.
💡 Tip: Keep filenames short and simple to avoid errors during import.
Naming Conventions
Proper naming is essential for smooth imports into Horizon Worlds. Poorly named files or materials can cause issues later.
General Rules
- ❌ Avoid using these characters in filenames:
- . , / * $ & - ❌ Avoid underscores
_in material or texture names (except when designating special tags). - ✅ Use CamelCase instead, e.g.:
- Bad:
Dont_Name_Like_This_BR.png - Good:
NameLikeThisInstead_BR.png
- Bad:
Material Naming
Even though materials are embedded in the FBX, their names matter. Horizon Worlds recognizes special tags when materials are named correctly.
Here are the supported suffixes and their meanings (with official documentation links):
Metallic materials →
_Metal
Meta Docs: Single Texture Metal PBRUnlit materials →
_Unlit
Meta Docs: Unlit MaterialsBlended materials →
_Blend
Meta Docs: Unlit Blend MaterialsTransparent materials →
_Transparent
Meta Docs: Transparent MaterialsMasked materials →
_Masked
Meta Docs: Masked MaterialsVertex PBR materials →
_VXC
Meta Docs: Vertex Color PBRVertex Single Texture materials →
_VXM
Meta Docs: Vertex Color Single Texture PBRUI Optimized materials →
_UIO
Meta Docs: UI Optimized Materials
Step 1: Prepare Your Textures
⚠️ If you are using Vertex PBR materials, you can skip this step.
Worlds materials only support a maximum of two textures per material.
We’ll call these TextureA and TextureB.
TextureA
- RGB channels (Red, Green, Blue): BaseColor values
- Alpha channel:
- Roughness, or
- Roughness + Metalness, or
- Alpha (opacity)
- Roughness, or
👉 Which one you use depends on your chosen material type. See the Meta documentation for details.
TextureB
TextureB allows you to control additional PBR properties:
- Red (R): Metalness
- Green (G): Emissive
- Blue (B): Ambient Occlusion
- Alpha (A): Alpha (only for Transparent materials)
For Transparent materials:
- Blue (B) is used for Specular instead of Ambient Occlusion.
Notes on TextureB Naming
- TextureB in Double-Texture PBR Materials → use the _MEO tag
- TextureB in Transparent Materials → use the _MESA tag
- TextureB in Vertex Color Double-Texture PBR Materials → use the _MEO tag
Edit Color Channels in GIMP
In this tutorial we’ll be using GIMP, a free and open-source image editor, to prepare textures.
The same steps can be followed in other image editing programs such as Photoshop or Krita, but the menus and shortcuts may look slightly different.
Open a texture in GIMP.
Click Channels.
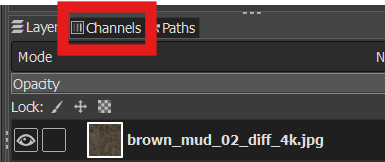
You should see your Red, Green, and Blue channels.
- If you need an Alpha channel but don’t see one:
- Click Layers to return to the layer selection.
- Right-click the layer you need to modify, and choose Add Alpha Channel.
- Click Layers to return to the layer selection.
- If you need an Alpha channel but don’t see one:
In this example, let’s assume we’re adding Roughness values to support our material.
- By default, all color channels are selected.
- Each color channel row will be highlighted black.
- If you click on a channel, it will be deselected (turn grey).
- Deselect Red, Green, and Blue by clicking on them.
- Your Channels should look like the image displayed below.

- By default, all color channels are selected.
Now you can define values for the Alpha channel:
- Fill with white → Roughness = 1 (fully rough).
- Fill with black → Roughness = 0 (fully smooth).
- Fill with grey → A value in between.
- Or paint custom values.
- If you already have a roughness texture, copy it into the base texture using these steps:
- Fill with white → Roughness = 1 (fully rough).
a. Open your roughness texture as a new layer, or as a new GIMP file.
b. If the roughness texture is not already greyscale:
- Go to Colors > Desaturate.
- Select all (Ctrl+A) and copy (Ctrl+C).
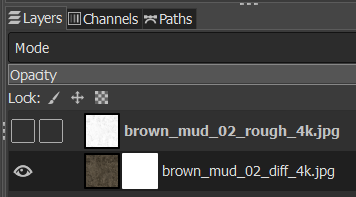
c. If you opened your roughness texture as a new layer:
- Delete or hide it by clicking the eye icon in the Layers window.
- Right-click your base texture and choose Add Layer Mask.
- Click Add on the popup (default settings are fine).
d. Your layer now has two preview icons. The mask layer should be selected by default.
- Click between the icons if unsure—it should be clear which is active.
e. Paste (Ctrl+V) the roughness texture.
- It will appear as a floating layer.
- Click the green anchor icon at the bottom of the Layers window to anchor it in place.
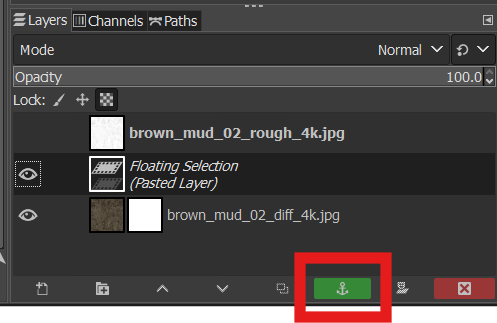
f. That’s it! If you look at the Alpha Channel, you’ll see the values match your roughness texture.
- Save this file as your TextureA.
- See the next section for how to properly name your textures.
- See the next section for how to properly name your textures.
--
✅ Texture Naming Rules
Base name comes from the material name.
- Use the exact name of the material, but strip underscores or suffix identifiers that were added for organizational purposes.
- Example:
- Material name:
MyMarvelousMaterial - Texture prefix:
MyMarvelousMaterial
- Material name:
- Use the exact name of the material, but strip underscores or suffix identifiers that were added for organizational purposes.
Textures must always include an underscore and a type identifier.
- This tells you what kind of PBR data the texture holds.
- Always use the identifiers consistently.
- This tells you what kind of PBR data the texture holds.
File extension should be standard (e.g.
.png).
🔑 Identifier Keys
TextureA
- B = Base Color (RGB channels = color)
- R = Roughness (Alpha channel often used for roughness if packed with Base Color)
- A = Alpha (opacity, when applicable)
📌 Example:
MyMarvelousMaterial_BR.png → BaseColor (RGB) + Roughness (A)
TextureB
- M = Metalness
- E = Emissive
- S = Specular
- A = Ambient Occlusion
📌 Example:
MyMarvelousMaterial_MESA.png → Metalness (R), Emissive (G), Specular (B), Ambient Occlusion (A)
⚡ Final Examples
WoodPlank_BR.png→ Base Color + RoughnessWoodPlank_MESA.png→ Metalness, Emissive, Specular, AOGlassPane_BA.png→ Base Color + Alpha (opacity)
--
Step 2: Preparing Your Asset (Blender)
⚠️ If you want to use Unity to Export your FBX (i.e. you have Unity Asset Store Assets) , you can skip this step.
When opening your model in Blender, it’s a good idea to apply scales, rotations, and positions before export.
Although not strictly required, this helps ensure your model behaves predictably once it’s inside Horizon Worlds.
👉 *Tip: In Blender, you can do this quickly by selecting your model and applying transforms. 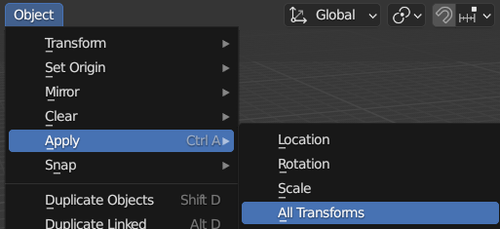 ]
]
Verifying Material Names in Blender
Before exporting, double-check that your material names inside Blender follow the correct conventions.
Even if you named your textures properly, Blender may assign materials with different names when saving to FBX.
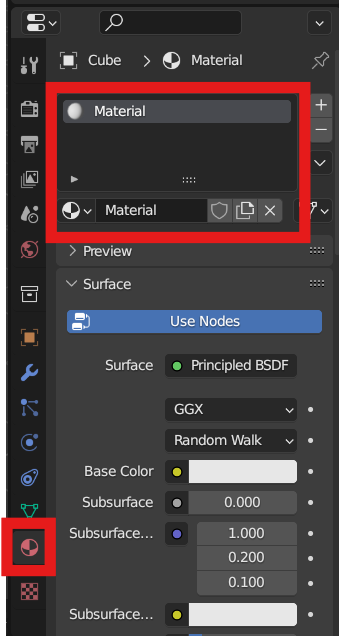
- Select your model.
- In the Properties panel, go to the Material tab.
- Verify each material name:
- ✅ Ends with the correct tag (e.g.,
_Metal,_Unlit,_Transparent, etc.). - ❌ Avoids special characters like
- . , / * $ &. - ❌ Avoids unnecessary underscores
_(except for tags).
- ✅ Ends with the correct tag (e.g.,
- Rename materials if needed before exporting.
👉 Tip: This step ensures the FBX will carry the correct material names into Horizon Worlds. Skipping it can cause materials to import incorrectly.
Step 2: Preparing Your Asset (Unity)
⚠️ If you are using Blender to export your FBX, you can skip this section and move on to Step 3.
If you’re more comfortable working in Unity, you can also export your assets directly from the Unity Editor instead of Blender.
This is useful if you created models with ProBuilder, or if you’re working with assets from the Unity Asset Store.
Installing the Unity FBX Exporter
Unity doesn’t ship with FBX Exporter by default—you’ll need to install the package first.
- In the Unity Editor, open the Package Manager (
Window > Package Manager). - In the top-left dropdown, select Unity Registry.
- Search for FBX Exporter.
- Click Install.
[Insert screenshot: Unity Package Manager showing FBX Exporter]
Exporting Assets to FBX
- In the Project window, locate the asset you want to export.
- This could be a ProBuilder mesh or a model imported from the Asset Store.
- This could be a ProBuilder mesh or a model imported from the Asset Store.
- Right-click the asset and choose:
Export > FBX… - In the export dialog:
- Format: Set to Binary.
- Export Path: Choose a folder on your computer.
- It does not have to be inside your Unity project.
- It does not have to be inside your Unity project.
- Leave the other settings at their defaults (they are fine for Horizon Worlds).
- Format: Set to Binary.
- Click Export.
[Insert screenshot: Unity FBX Export dialog]
Verifying Materials in Unity
Before exporting, double-check your material names in the Inspector:
- ✅ End with the correct tag (e.g.,
_Metal,_Unlit,_Transparent, etc.). - ❌ No special characters (
- . , / * $ &). - ❌ No underscores
_except for the valid suffix tags.
👉 This ensures your FBX comes out clean and ready for import into Horizon Worlds.
Step 3: Importing Into Worlds Desktop Editor
Now that your asset has been exported from Blender or Unity, it’s time to bring it into Horizon Worlds Desktop Editor.
Open Your World
- Launch the Worlds Desktop Editor.
- Open the world where you want to use the asset.
- ⚠️ Tip: Always import into the world where the asset will actually be used, so it’s available right away.
- ⚠️ Tip: Always import into the world where the asset will actually be used, so it’s available right away.
Import the FBX and Textures
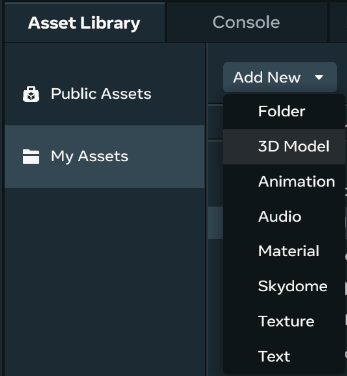
- In the Asset Library, click the Add New dropdown menu.
- Choose 3D Model.
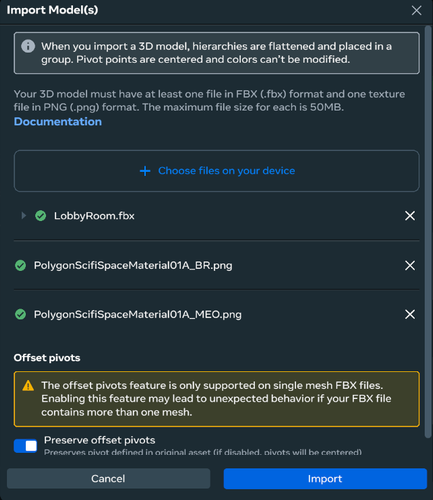
- In the Import window, click Choose Files on Your Device.
- Select your FBX file and all the necessary textures.
- If the files are in different folders, you can add them one by one.
- ⚠️ Don’t click Import until all files (FBX + textures) are listed in the Import Model(s) window.
- If the files are in different folders, you can add them one by one.
- Once everything is listed, click the blue Import button.
Accessing Your Imported Asset
- After import, your model will appear under My Assets in the Asset Library.
- Drag it from My Assets into your world to place it.
- ✅ If your materials and textures were named correctly, they will already be applied automatically.
- No extra setup is required.
[Insert screenshot: Asset visible in My Assets folder]

Log in or sign up for Devpost to join the conversation.