-
-
3 Uploading Firmware
-

1 While Uploading
-
Firmware block
-
2-1 Step 7
-
2-2 Step 7
-
step 3
-
2 After Completing
-
Block Diagram
-

1-2 step 7
-
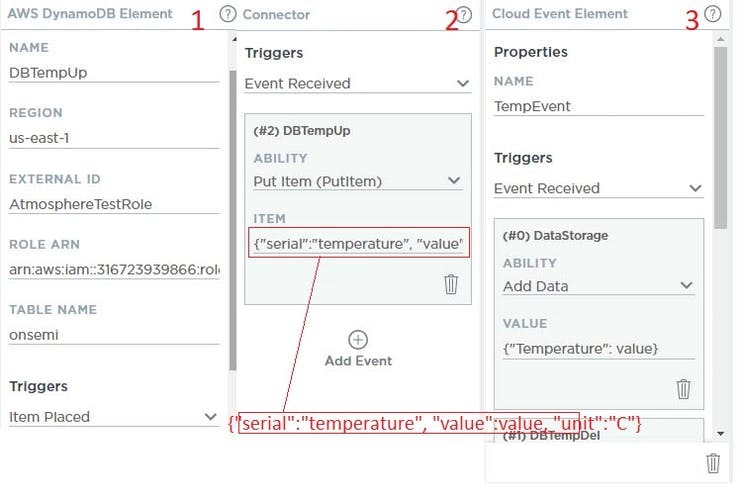
DynamoDB Table
-

cloud properties
-

2-2 Step 6
-

2-2 Properties Aplication Events
-
elements properties
-
2-2 Properties Of The Elements
-
1-2 Properties Aplication Events
-
1-2 Application Tab
-
1-2 Properties Of The Elements
-
2-2 Aplication Tab
-
step 4
-
1-2 step 6
-
step 5
-
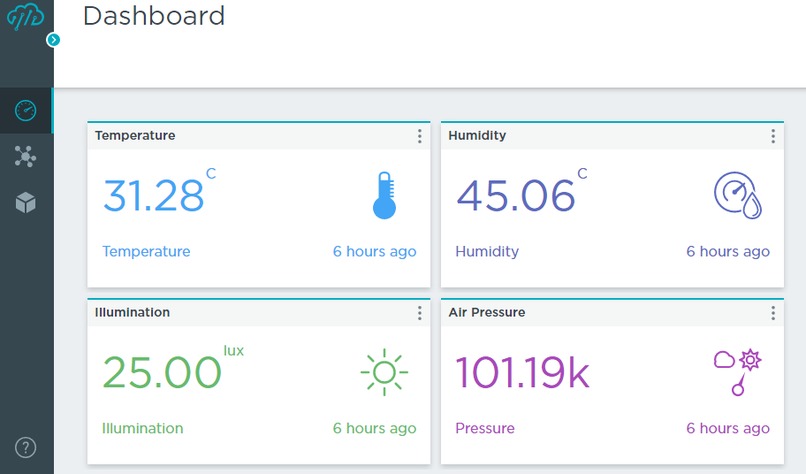
cloud_dashboard_fVkXRX5apk
-

connection_diagram_B6qrLAtEV8
-
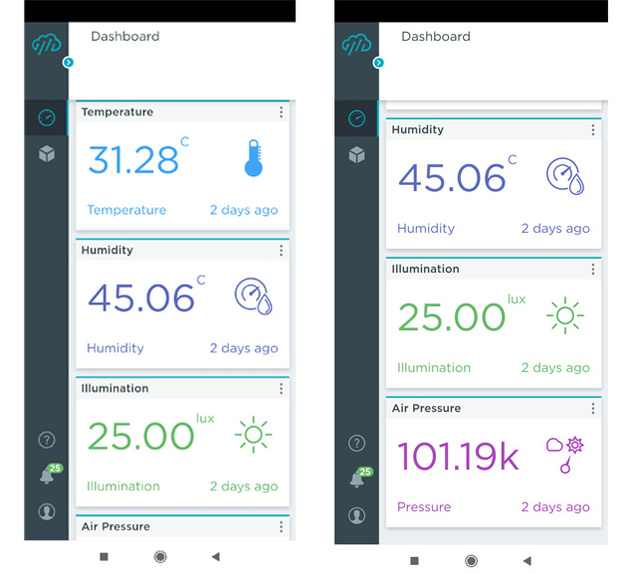
mobile_dashboard_1HxiUq28J7
-

screenshot_2020-03-17-14-01-11-134_com_atmosphere_atmosphereiot_huZSMjj3fG


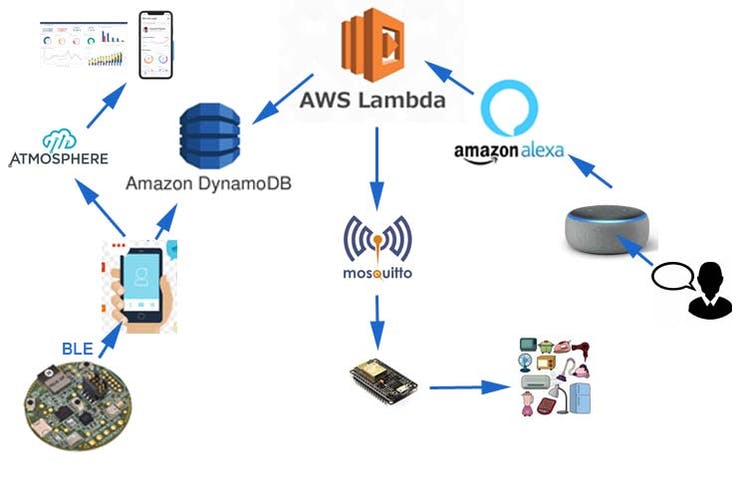


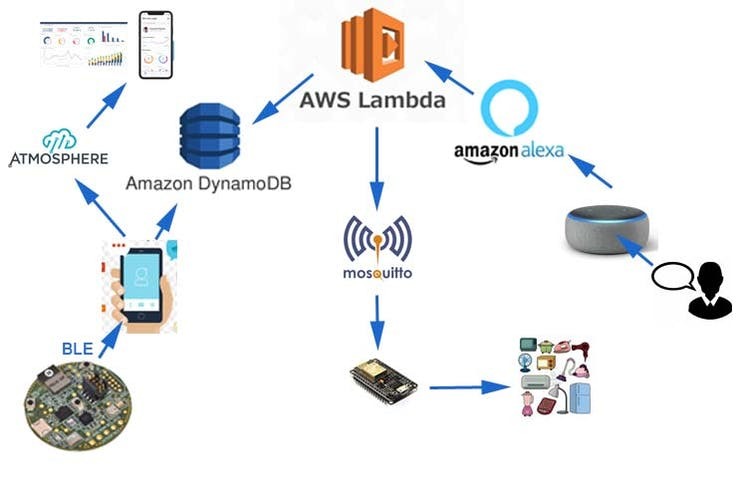
Story Introduction In this project, I am going to show how I made Alexa enabled home monitoring and controlling system using RSL10 Sense Development Board from ON Semiconductor. RSL10 is used to sense the environmental parameters (temperature, humidity, air pressure, and light intensity) of a room. An Alexa Skill was developed to remotely access these parameters and give commands to control those parameters. ESP8266 based Node MCU is used to receive MQTT message and turn on/off the light, fan according to the voice command.
Features Temperature, Humidity, Air Pressure, Light Intensity, and Air Quality can be monitored remotely by using Alexa, Android App, and Web Dashboard. Temperature, Humidity and Light Intensity can be controlled by turning on/off the fan, humidifier, and light respectively through voice command. Above mentioned appliances can also be controlled automatically based on a preset threshold value. How does the System Work? i. The RSL10 Sense DB is used to sense the environmental parameters (e.g. temperature, humidity, air pressure, air quality, and light intensity). ii. RSL10 sends this data to an Android app using BLE (Bluetooth Low Energy). iii. The Android application uploads this data to the AWS DynamoDB table and Atmosphere Cloud. The Android app also used to visualize the data from the phone. iv. An AWS Lambda function reads the data from the DynamoDB table and provides to Alexa Skill Kit. v. Using a custom Alexa skill user can know any of the mentioned parameters and can request Alexa to turn on or off the light, fan. vi. According to the user request, Alexa Skill sends an MQTT message to the Broker. vii. A Node MCU is used to subscribe to the broker. After receiving the MQTT message it sends the control signal to the light/fan according to the received message. Let's Make It Step 1: Developing Firmware for RSL10 RSL10-SENSE-DB is an ultra-low power consumption BLE enabled microcontroller board from ON semiconductor and can be used in low power IoT applications. The firmware for the board can be developed by ON Semiconductor IDE and Atmosphere IoT Platform. I used the Atmosphere IoT Platform for developing the firmware for my project. The atmosphere offers IoT solution builders the fastest and simplest way to build, connect, and manage complete sensor-to-cloud solutions including Android Application.
I used the Atmosphere Platform to develop firmware and smartphone application. To start working with the Atmosphere platform you need to create an account from the following link: https://platform.atmosphereiot.com/.
To start with RSL10 you can read this guide (Getting Started with RSL10-SENSE-GEVK) from Atmosphere.
You can also watch the following video before getting started. https://youtu.be/RFBLQFmuWNw
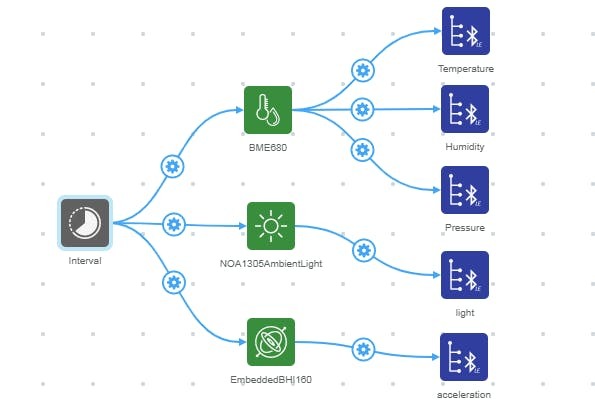
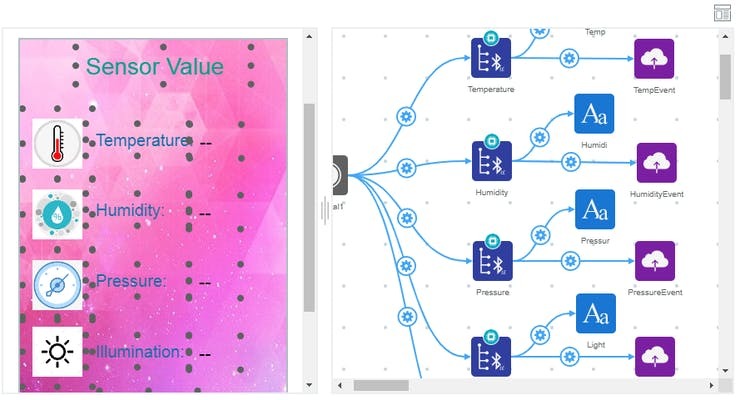
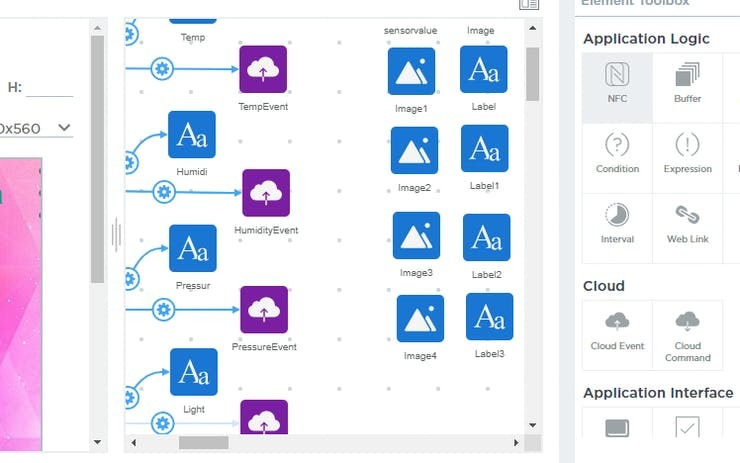
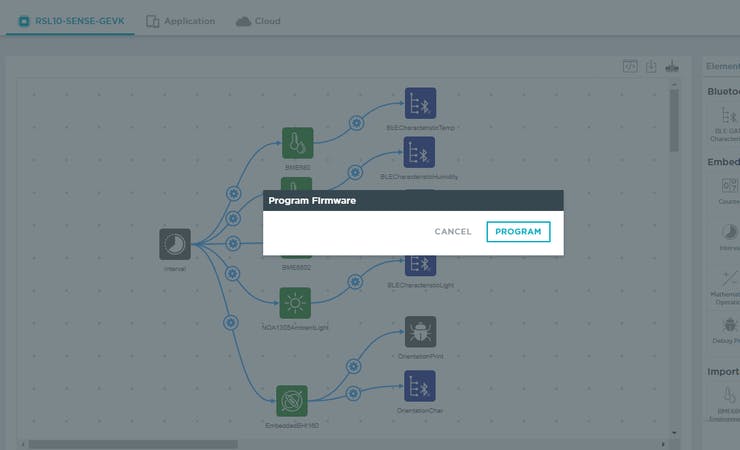
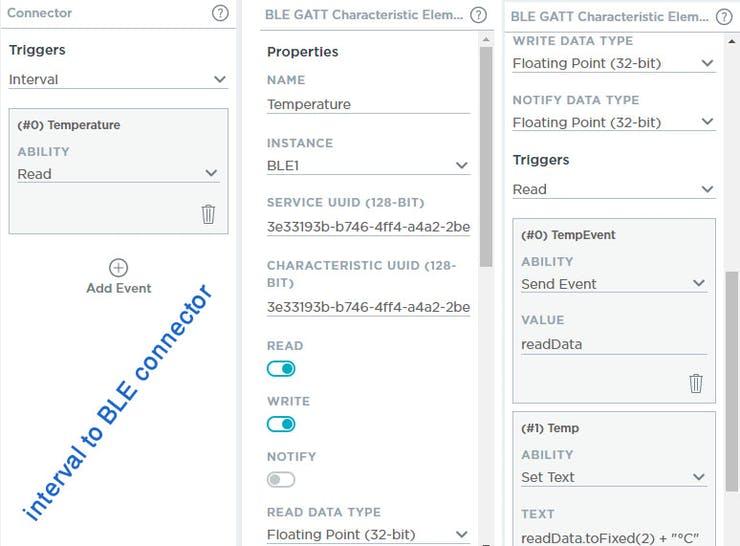
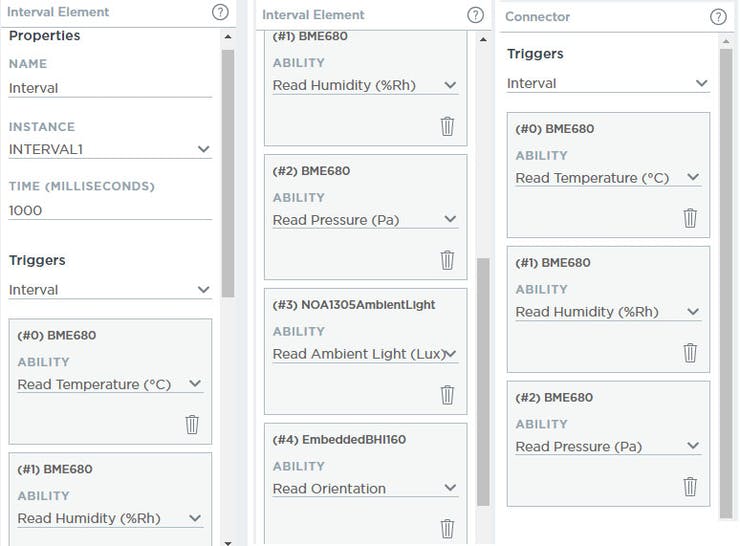
First, you need to work in the firmware tab. The following image shows the visual design of the firmware for my project.
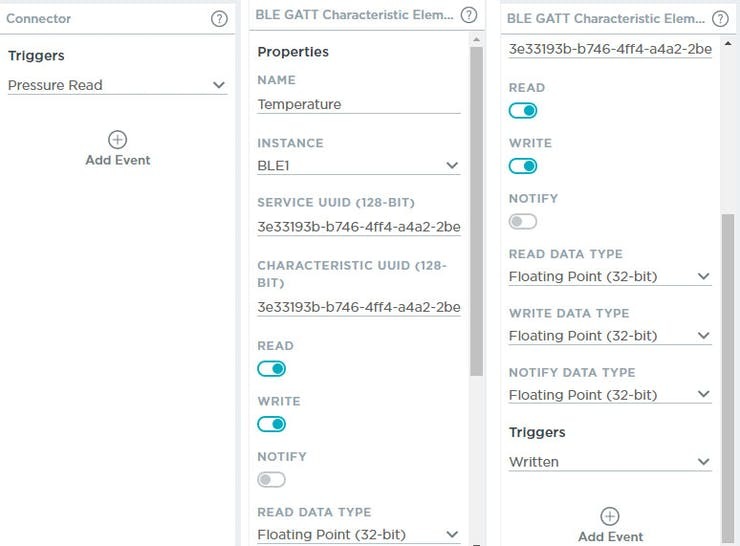
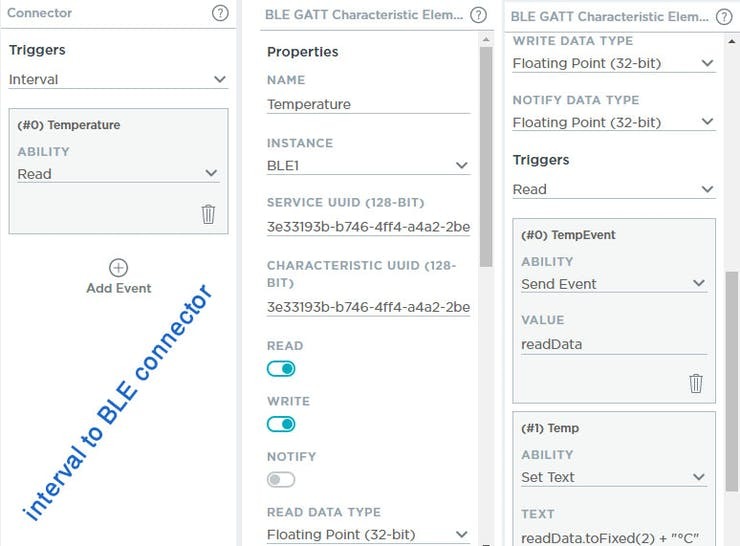
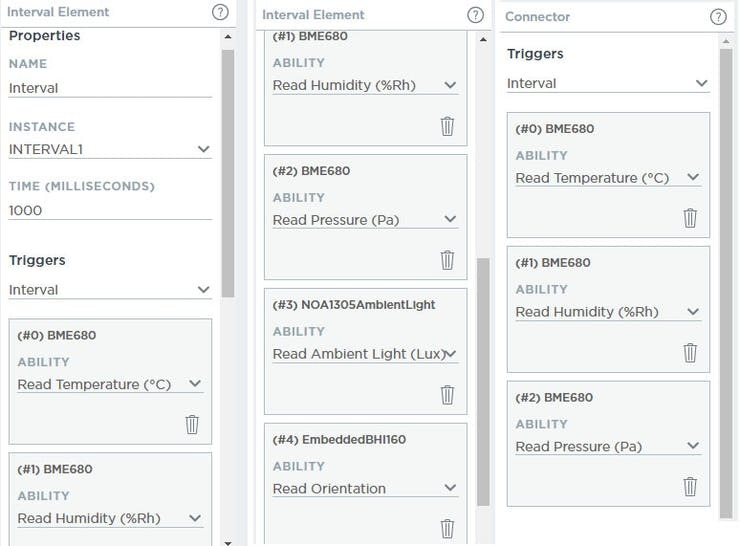
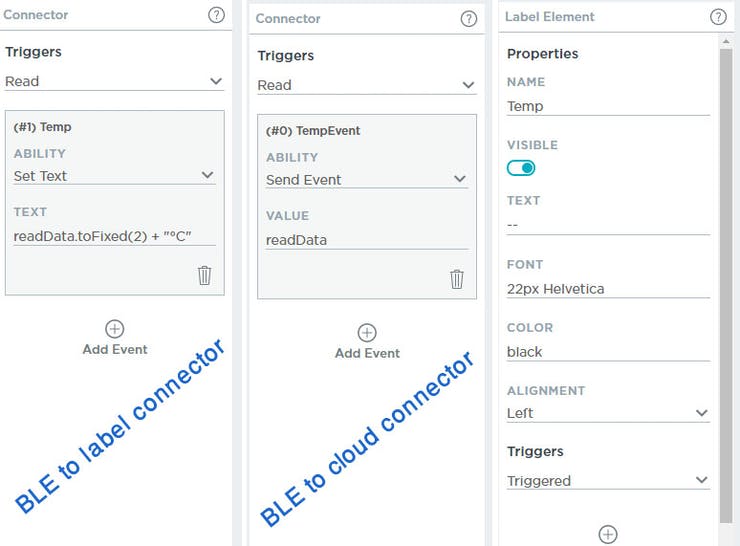
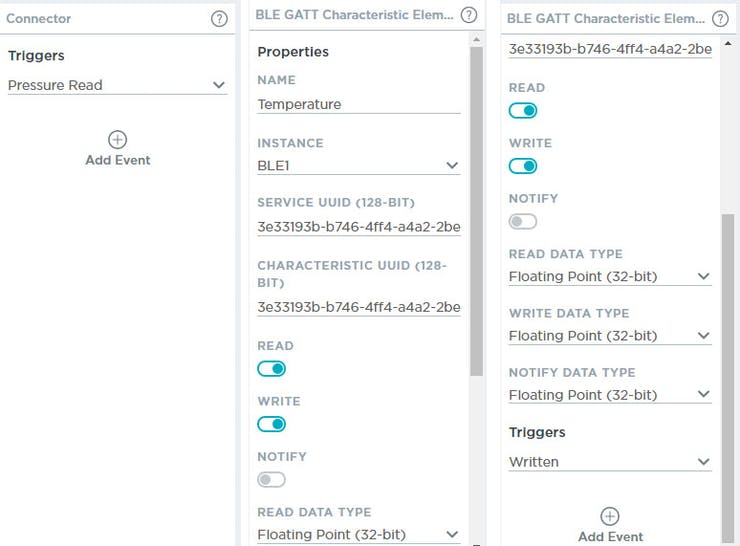
show the properties for every element from left to right sequentially. The first connector is between interval element to sensor block. Then the BLE GATT characteristics. Finally, the connector properties between sensor to BLE are shown.
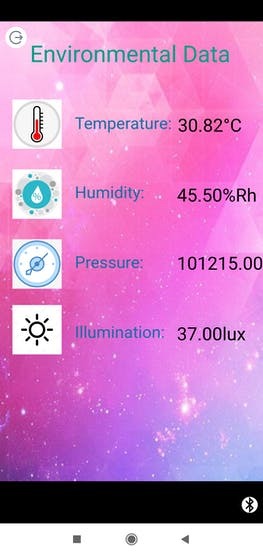
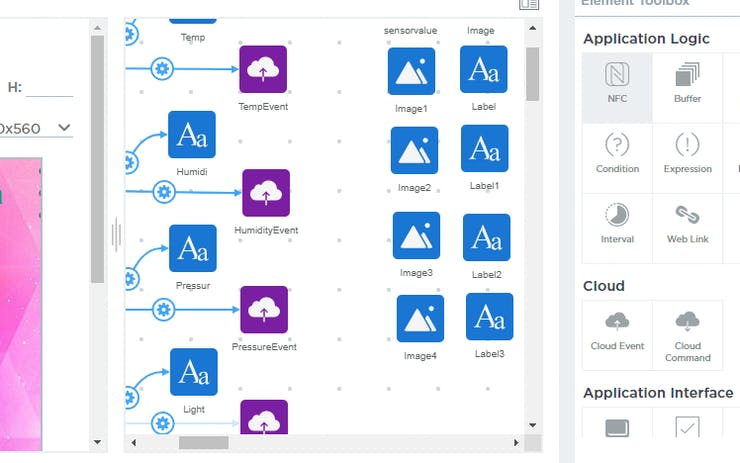
Then, you need to design the Application layout from the application tab. You can upload picture for background and image labels. In this stage, you need to add cloud event to upload the data to cloud.
The properties for every element is shown in the following images. The sequence is from left to right.
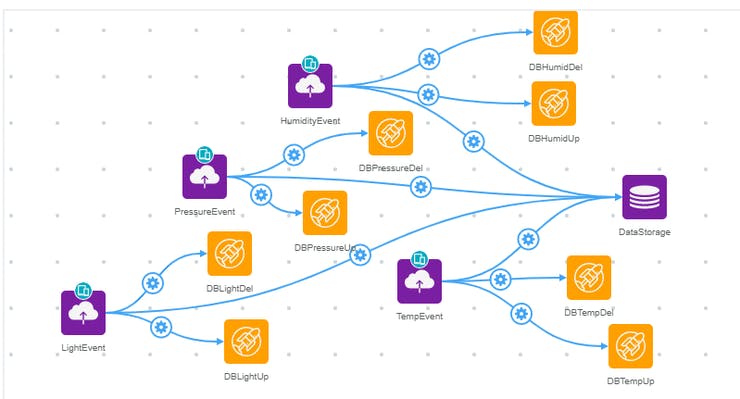
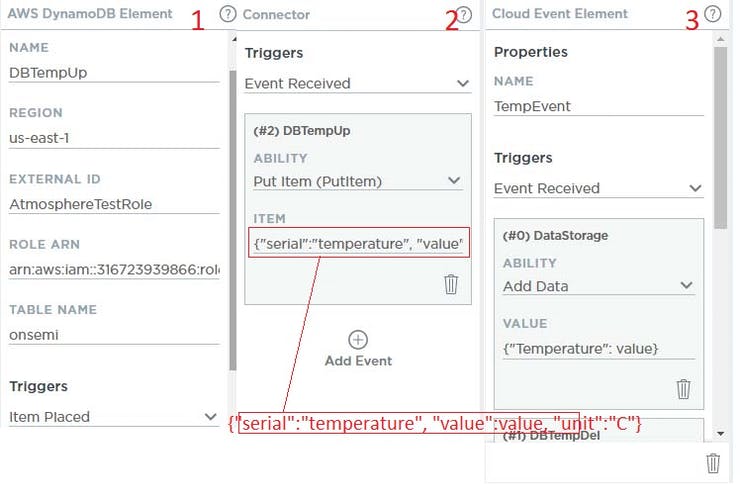
Finally, you need to work with Cloud events. Atmosphere cloud events and AWS DynamoDB elements are chosen from the elements toolbox. DynamoDB data will be used for Alexa Skill and Data Storage elements will be used to monitor from Atmosphere dashboard.
shows the properties for DynamoDB elements and connectors properties.
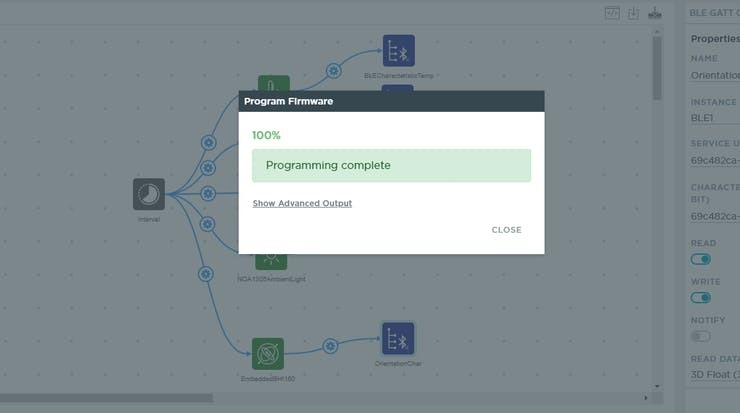
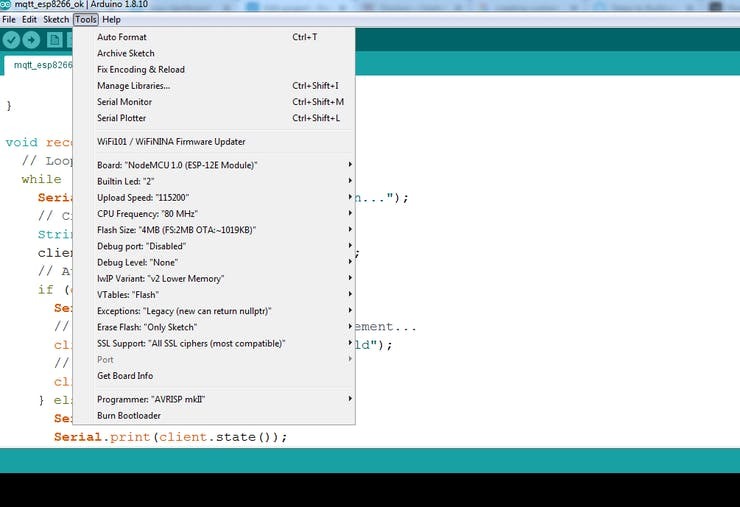
We completed the firmware and smartphone app design. Now we need to upload the firmware to RSL10 Sense development board..
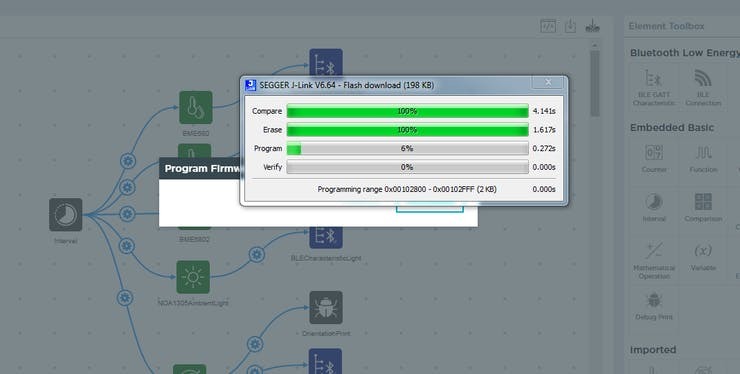
While uploading the program you will get the following message.
After completing the firmware uploading you will get the following confirmation message.
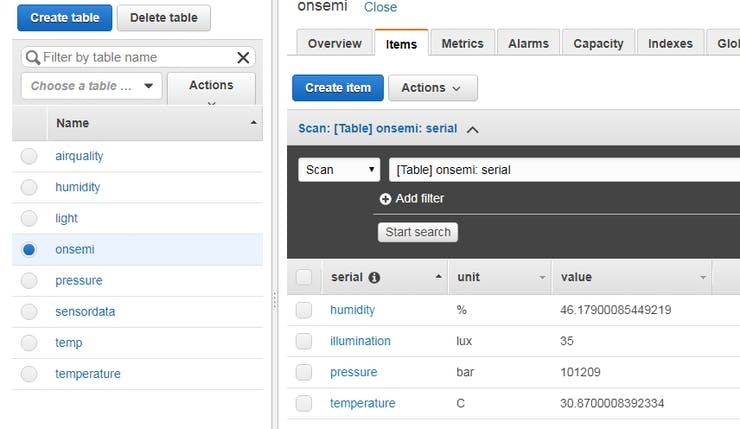
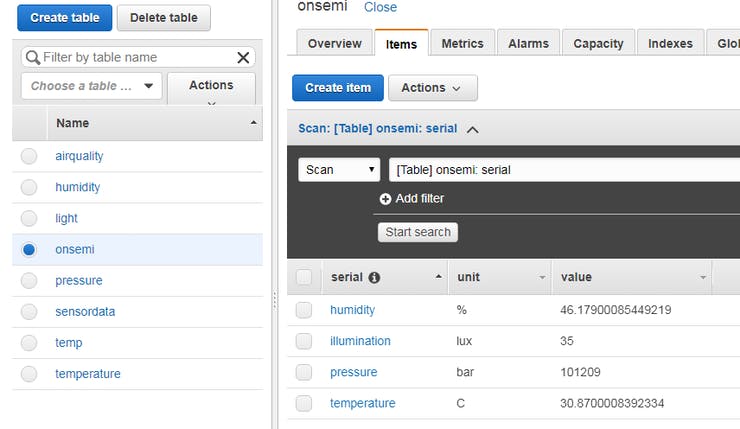
Step 2: Creating AWS DynamoDB Table Before creating AWS DynamoDB table you should read this excellent guide (AWS Integration Setup Guide) (https://developer.atmosphereiot.com/documents/guides/awsintegrationsetupguide.html)
I created a table named onsemi for storing the data from the RSL10. The table has 4 rows for storing humidity, temperature, pressure, and illumination. This row will be created automatically.
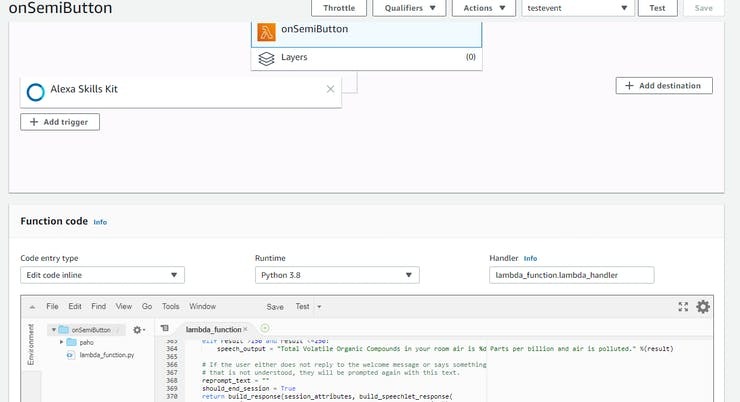
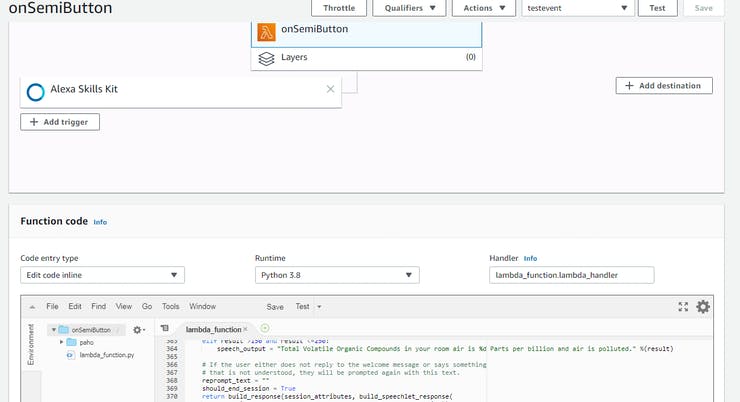
Step 3: Creating a Lambda Function Alexa Skill can trigger Lambda function. The Lambda function used in this project contains python code for accessing DynamoDB table and sending MQTT messege to MQTT Broker.
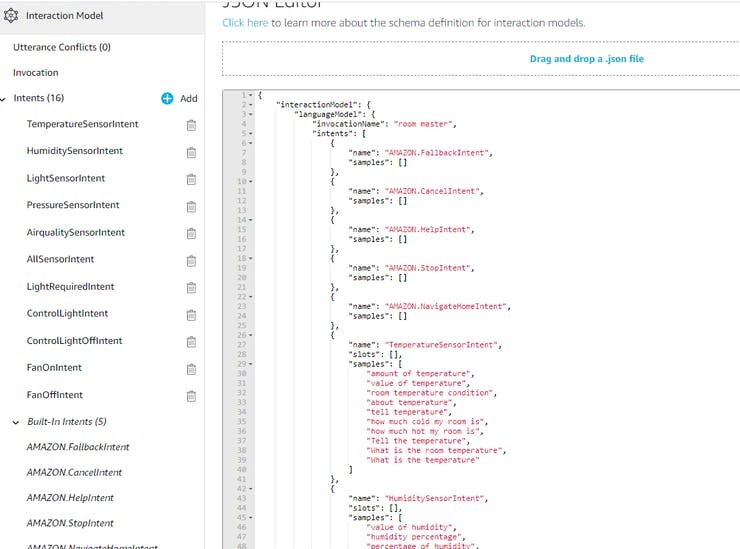
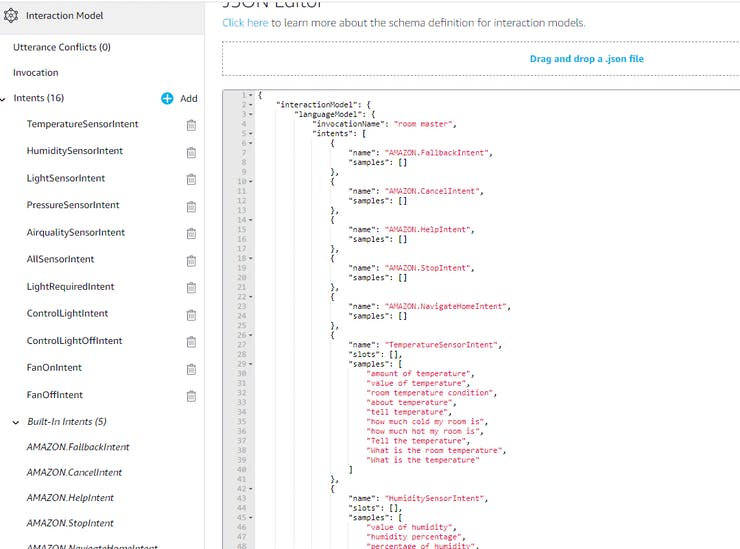
Step 4: Creating a Custom Alexa Skill In this stage, I created a custom Alexa Skill for accessing environmental data from RSL10 and sending command for controlling room appliances according to the environmental parameters. The JSON code for the skill is attached in the code section.
If you want to know how to make a custom Alexa Skill read the tutorial: https://medium.com/crowdbotics/how-to-build-a-custom-amazon-alexa-skill-step-by-step-my-favorite-chess-player-dcc0edae53fb
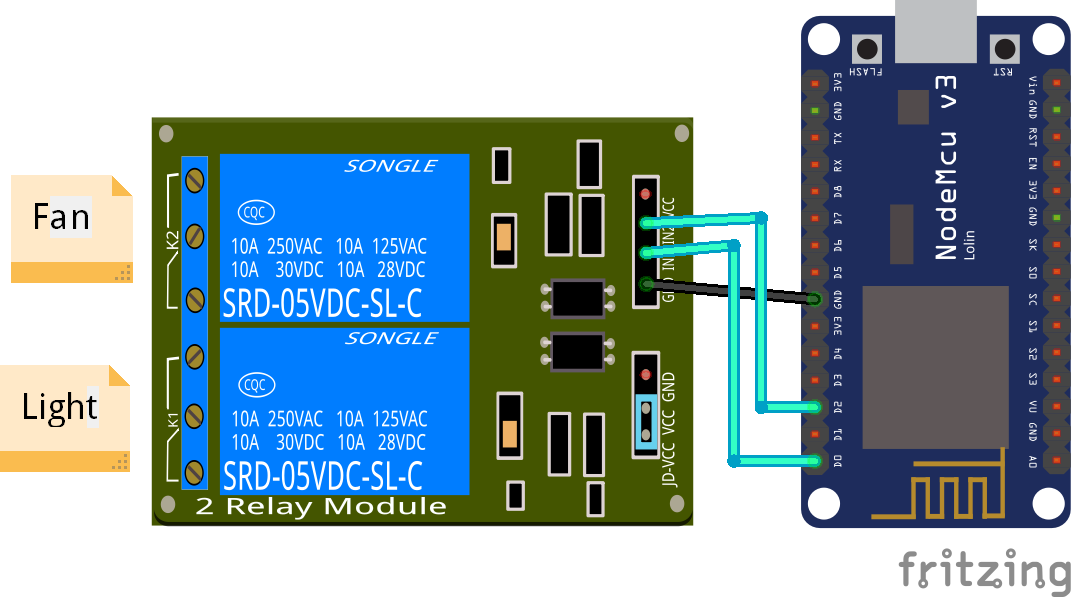
Step 5: Writing Code for NODE MCU For controlling the light/fan on receiving the MQTT message I used Node MCU as the main controller. Node MCU receives MQTT message from the broker and sends the control signal to the relay board according to the received message. Arduino development environment was used for developing the code for Node MCU. The source code is attached to the code section.
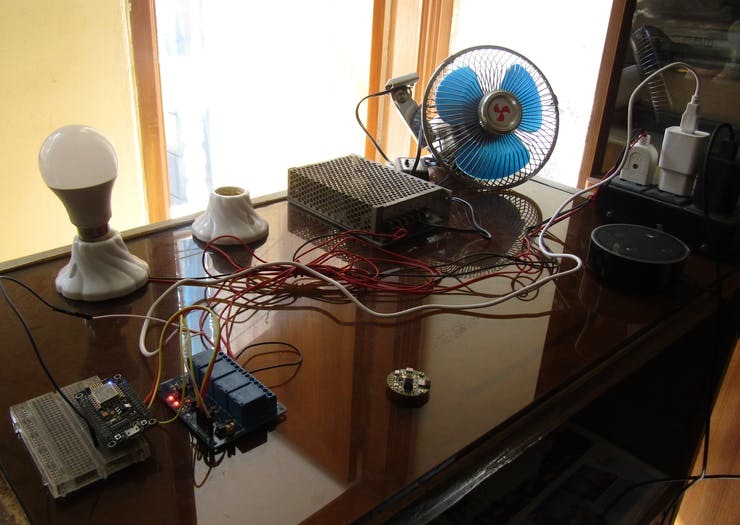
Step 6: Hardware Connection and Testing
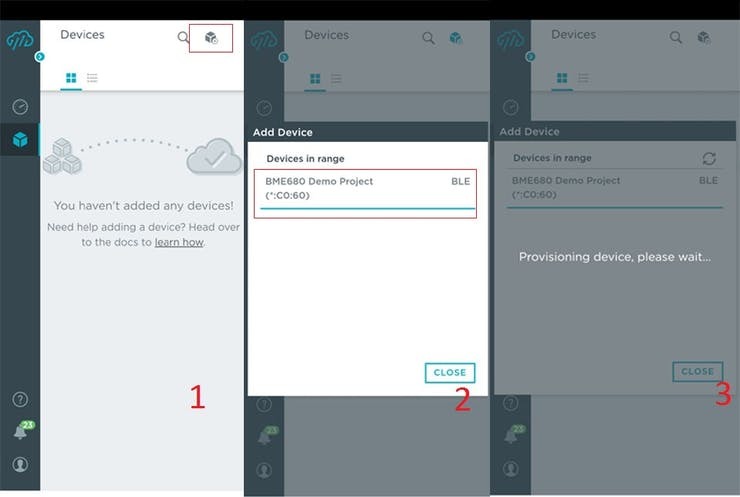
Step 7: Connecting with the Apps We have completed all of our design work. It is the perfect time to connect RSL10 Sense board to the smartphone application. To do that you need to install Atmosphere IoT Android/IOS apps in your device.
If you use Android download and install Atmosphere IoT from Google Play Store. Log in with your Atmosphere account and click to add new device icon. You will find the device you designed. Click on the device and it will be connected.
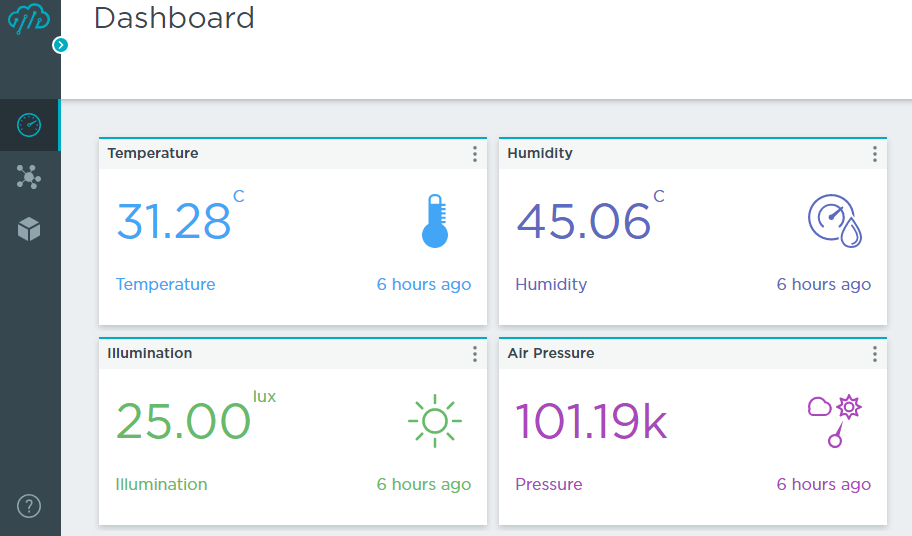
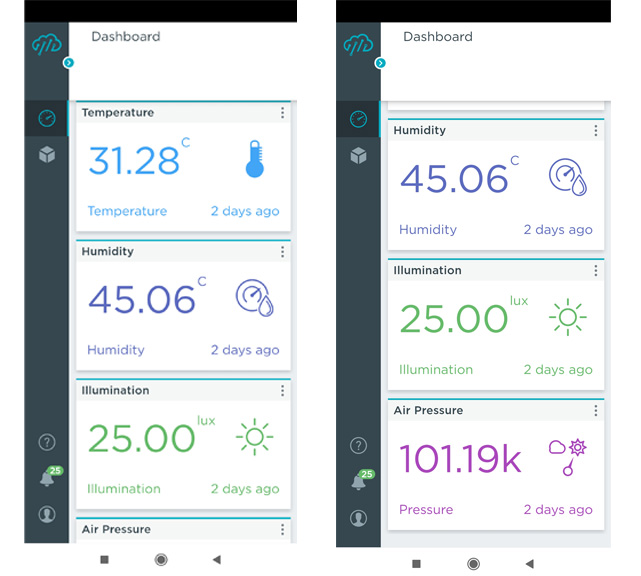
After connecting successfully you will see the apps you designed earlier from Atmosphere cloud. You will also get the data from the RSL10 board.
If you get the data then Congratulation! You Made It. Enjoy!!!


Log in or sign up for Devpost to join the conversation.