-
-
 GIF
GIF
A hackasticker generated sticker for this hackathon.
-
 GIF
GIF
Now that's a hackathon I want to attend!
-
 GIF
GIF
The stickers don't even have to make sense...
-
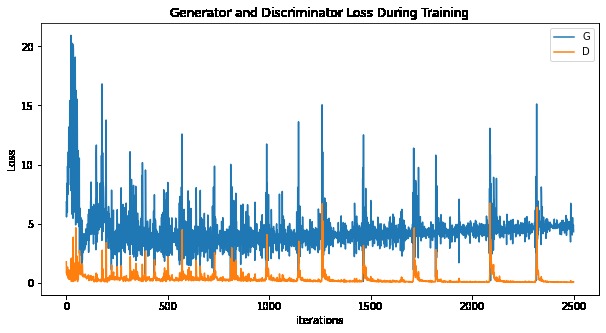
The loss created by the generator and discriminator during training.
-

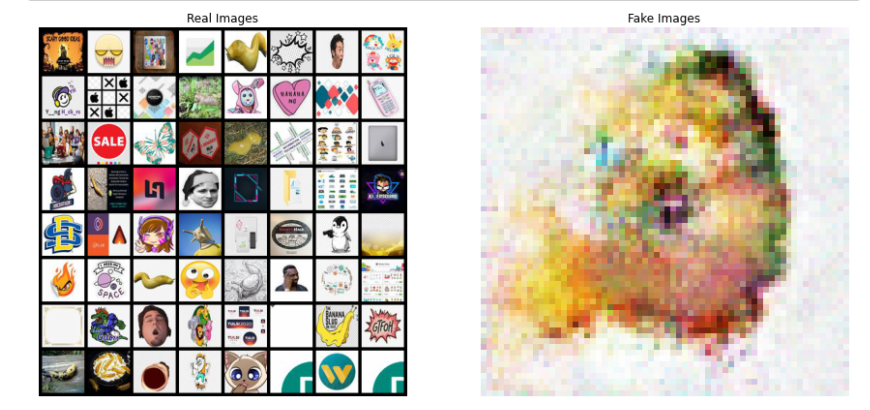
A before and after of some of the images we fed the GAN and an output image.
-

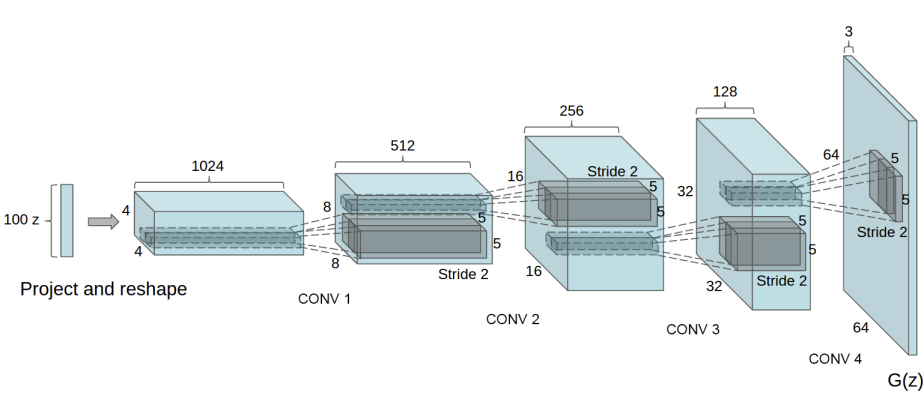
This is the generator architecture we used in the DCGAN.


MAKE YOUR OWN STICKERS AT hackasticker.space which is also our domain.com submission! The project is live!
Inspiration
One of our favorite parts about participating in MLH hackathons is the 'I demoed' stickers you receive for participating (I even have a budding collection on my water bottle). So we thought to ourselves, what if instead of participating in a bunch of hackathons just for the stickers, that we just had machine learning, and a GAN (generative adversarial network) do it for us? Using some of the hottest new tech in machine learning, we are proud to introduce you to hackasticker, generate your own 'I demoed' stickers with a single click!
What it does
hackasticker pulls from a large library of images we generated using a GAN (generative adversarial network) that we built to generate new hackathon logos, having fed it with as many stickers and hacker-related images as we could. When you go to the website, all you need to do is enter the name of the event you wish to generate a sticker for, and a randomly selected image paired with a random background and font will be selected and your sticker will be assembled and returned to you to keep forever.
How we built it
Our first step in building hackasticker was to create a GAN (generative adversarial network) using some starter code from PyTorch and a optimized Google Colab notebook. This kind of machine learning algorithm trains off of the hundreds of images we fed it and uses a 'generator' and a 'discriminator' function to produce better images as the training epochs go on. Once the model was trained, we could generate as many new and unique images as we wanted to, which we stored and used in sticker creation. The Colab notebook we used can be found in the Github repo in the notebook folder.
The type of GAN we're using is called a DCGAN. DCGAN stands for Deep Convolutional Generative Adversarial Network. This is a variation of GAN which is known to perform pretty well. We first take random noise and feed it into the Generator. The generator then produces a 64x64 image. The discriminator then takes this image and checks how good the images are from the database. The discriminator helps tune the weights to the generator so it will eventually generate good images. Essentially, it's like a game of tug war but the goal is to establish a balance where the discriminator starts seeing images it think it has seen from the dataset.
After we generated our images, we up-scaled them using the Super Resolution API on deepai.org and stored them locally. Then, we created a Flask-based Python web server hosted on Heroku to act as a front end to our sticker assembling algorithm that gets called when you use the site. The front end was built in html/css and handles user text input to generate a sticker.
Challenges we ran into
-We initially tried to use Google Storage or Firebase to house our images, but it was too complicated, and we couldn't get Heroku's modified file system to handle the local storage required for the project.
-The first GAN model we used sucked up too much RAM as the number of epochs increased which crashed our instance of Google Colab, so we had to redo the entire machine learning component of the project.
Accomplishments that we're proud of
-Implementing machine learning into a hackathon project for the first time!
-Dealing with the large volume (thousands) of images we had to handle in the creation of the machine learning generated images
What we learned
-Tensorflow and PyTorch is really scary
-Making a GAN in one night is somewhat doable!
What's next for hackasticker
-Creating other hackathon related items with machine learning, and improving the quality of generated images by feeding it more images and increasing the amount of epochs it trains for.

Log in or sign up for Devpost to join the conversation.