-
-
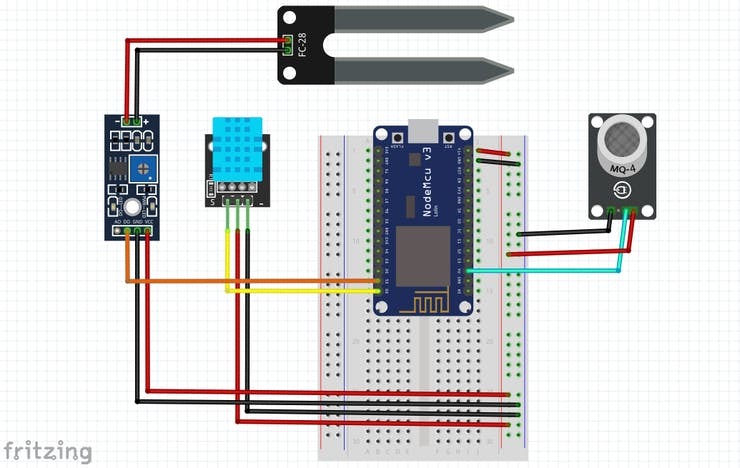
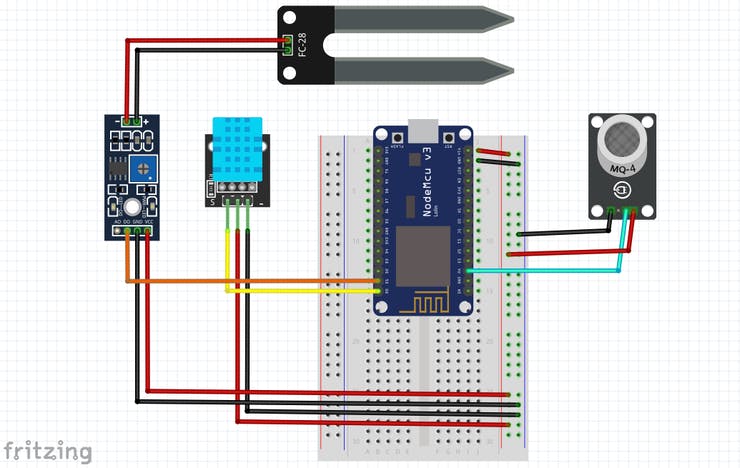
1/2 Scheme Connect NodeMCU & Sensor
-
2/2 Scheme Connect NodeMCU & Sensor
-

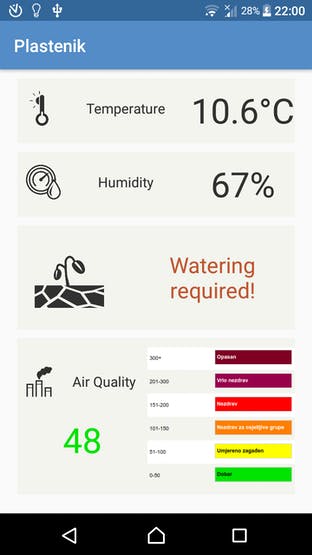
1/2 Application
-
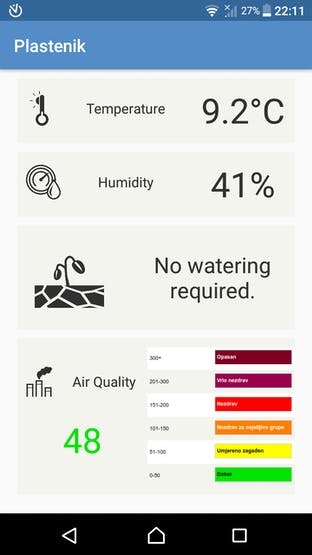
2/2 Application
-
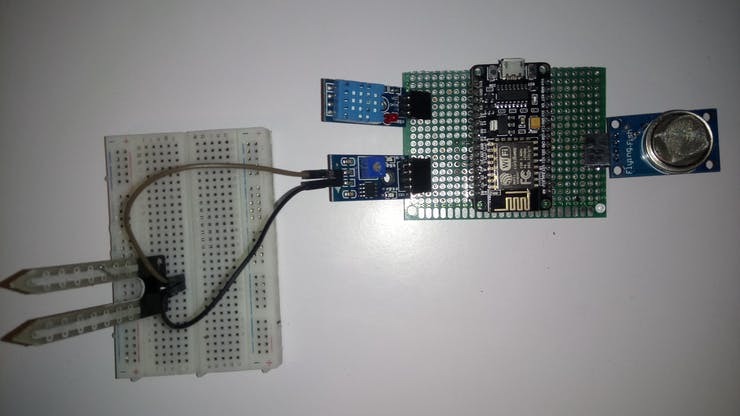
1-3 box
-
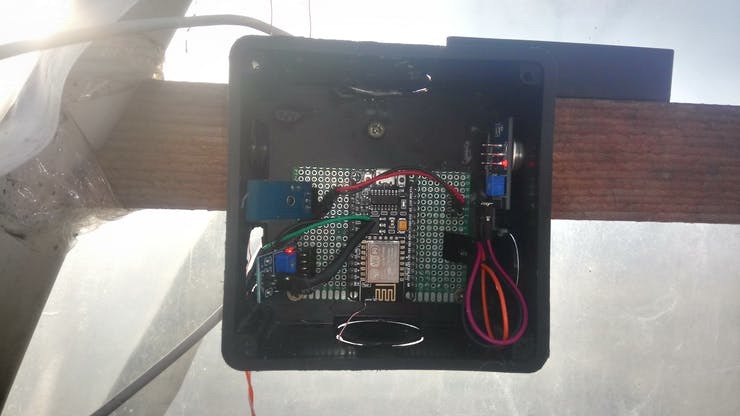
2-3 box
-
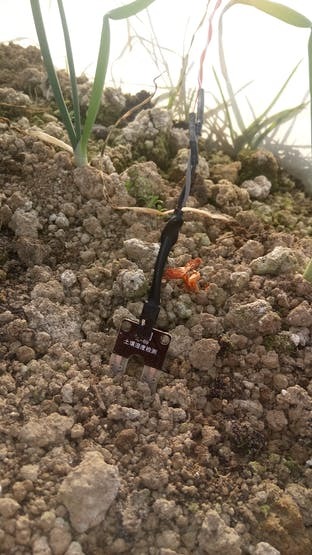
3-3 Soil Moisture Sensors


Inspiration
I was inspired to make this project because I would like to contribute a very useful project to the environment of all of us and my contribution to the planet that we occupy today namely our Earth. Soil Moisture.
What it does
Description: This project helps you to look at your greenhouse. It consists of sensors:
- DHT11 (temperature and humidity),
- MQ-135 (Air Quality),
- Soil Moisture. ## How I built it ## Step 1: Scheme
- DHT11 sensor data pin is connected to NodeMCU via D0 pin. -Soil Moisture sensor data pin is connected to NodeMCU via D1 pin.
- MQ-135 sensor data pin is connected to NodeMCU via A0 pin.
- VCC pin on sensors is connect to VIN pin on NodeMCU and GND pin is connect to GND pin on NodeMCU.
Step 2: Arduino IDE libraries
The required libraries are:
- FirebaseArduino.h
- dhtnew.h
- ESP8266WiFi.h
- ArduinoJson.h
Step 3: Google Firebase
Google Firebase serves to store data collected on the NodeMCU. These datas can be further used on websites, mobile applications and anywhere they can access the Internet. Sign in using your Google Account and follow the steps below.
After login follow the next steps:
- Click on "+ Add project"
- Fill information and click "Create"
- After loading, click "Develop" in left navigation bar. Then click "Database"
- Click "Create database" then check "Start in test mode" and click "Enable"
- Next to "Database" title in the drop-down menu, select "Realtime Database"
- Click on "Roles" tab. In code delete "false" and add "true".
- Back to "Data" tab. Copy link of your database and insert in Arduino code.
- Click on icon gear (left navigation bar) choose "Projects settings" and click on "Service accounts" choose "Database secrets".
- On right copy "Secret" code and insert in Arduino code. Now, we've connected NodeMCU and Google Firebase.
Step 4: NodeMCU
NodeMCU is a board that has the ability to connect to the Internet. In addition, there are several digital pins and one analog pin. It is excellent for projects that need to connect to the Internet.
The code required to connect to the Internet and connect to Google Firebase is shown below:
include
include
include
include
define FIREBASE_HOST "firebase_link"
define FIREBASE_AUTH "firebase_secretcode"
define WIFI_SSID "wifi_name"
define WIFI_PASSWORD "wifi_password"
void setup() { Serial.begin(9600); WiFi.begin (WIFI_SSID, WIFI_PASSWORD); while (WiFi.status() != WL_CONNECTED) { delay(500); Serial.print("."); } Serial.println (""); Serial.println ("WiFi Connected!"); Serial.println(WiFi.localIP()); Firebase.begin(FIREBASE_HOST, FIREBASE_AUTH); } void loop() {
}
Step 5: DHT11 sensor
- Connecting the dhtnew.h library and pin to which the data pin of the sensor is connected is done using the following command:
int dhtPin = 0; DHTNEW dhtsensor(dhtPin);
- Reading the temperature and humidity is done using this command:
dhtsensor.read(); float t = dhtsensor.temperature; float h = dhtsensor.humidity;
- Finally sending data to Google Firebase is done with using this command:
Firebase.setFloat("t", t); Firebase.setFloat("h", h);
Step 6: Soil moisture sensor
- The intialization of the pin for read value of soil moisture data is done with using this command:
int soilPin = 1; Reading data and sending to Google Firebase is done with using this commands:
int soilData = digitalRead(soilPin); Firebase.setInt("soilData", soilData);
Step 7: MQ-135 sensor
- The intialization of the pin for read value of air quality data is done with using this command:
int airPin = A0;
- Reading data and sending to Google Firebase is done with using this commands:
int airData = analogRead(airPin); Firebase.setInt("airData", airData);
Step 8: Android application
The application was created in the android studio. The part that connects the app from Google Firebase from where the sensor data is taken from is shown below. For Temperature, Humidity and Air Quality:
dref = FirebaseDatabase.getInstance().getReference(); dref.addValueEventListener(new ValueEventListener() { @Override public void onDataChange(@NonNull DataSnapshot dataSnapshot) { temp = dataSnapshot.child("t").getValue().toString(); text_temperature.setText(temp + "°C"); } @Override public void onCancelled(@NonNull DatabaseError databaseError) { } }); dref = FirebaseDatabase.getInstance().getReference(); dref.addValueEventListener(new ValueEventListener() { @Override public void onDataChange(@NonNull DataSnapshot dataSnapshot) { hum = dataSnapshot.child("h").getValue().toString(); text_humidity.setText(hum + "%"); } @Override public void onCancelled(@NonNull DatabaseError databaseError) { } }); dref = FirebaseDatabase.getInstance().getReference(); dref.addValueEventListener(new ValueEventListener() { @Override public void onDataChange(@NonNull DataSnapshot dataSnapshot) { air = dataSnapshot.child("airData").getValue().toString(); text_airquality.setText(air); } @Override public void onCancelled(@NonNull DatabaseError databaseError) { } });
- For Soil Moisture(if-else is used to decides whether watering is necessary or not):
dref = FirebaseDatabase.getInstance().getReference(); dref.addValueEventListener(new ValueEventListener() { @Override public void onDataChange(@NonNull DataSnapshot dataSnapshot) { soilmoisture = dataSnapshot.child("soilData").getValue().toString(); int soilData = Integer.parseInt(soilmoisture); if (soilData == 0) { text_soilmoisture.setText("No watering required."); text_soilmoisture.setTextColor(col2); } else { text_soilmoisture.setText("Watering required!"); text_soilmoisture.setTextColor(col1); } } @Override public void onCancelled(@NonNull DatabaseError databaseError) { } });
- Part of the code for linking text that is written in activity_main.xml (displayed in the application) and Google Firebase is in attachments with name MainActivity.java. Also the xml file is in attachments.
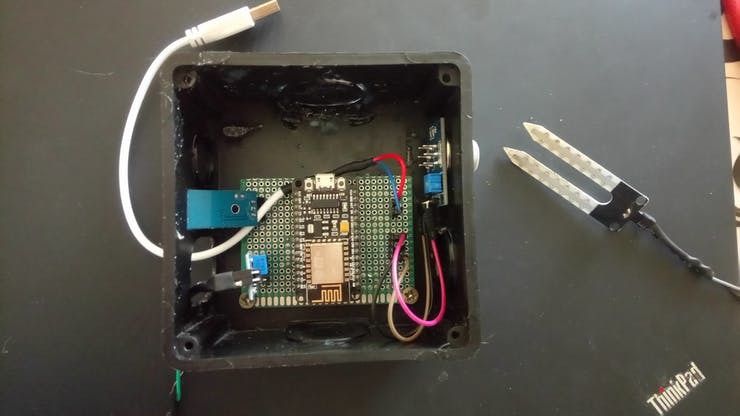
My GreenHouse Monitoring System
Power for my system is power bank. Power bank + is connect to VIN on NodeMCU and - is connect to GND on NodeMCU.
Challenges I ran into
There is no difficulty for us if we are indeed serious and trying to create our own project.
Accomplishments that I'm proud of
I am proud of my success to be able to contribute to making this project for the environment and for this hackathon event.
What I learned
- DHT11 (temperature and humidity),
- MQ-135 (Air Quality),
- Soil Moisture.
What's next for GreenHouse Monitoring System
I hope my work can win as the best Google Cloud usage and in the future I hope this project is useful so that I can provide new features in the results of this work in the future.
Built With
- android-studio
- arduino
- c
- c++
- google-firebase

Log in or sign up for Devpost to join the conversation.