GraviTalk Console
💡 Inspiration
Deploying modern Large Language Models (LLMs) has historically been synonymous with high-cost, high-power GPU infrastructure. This creates a massive entry barrier for indie developers and small teams, while raising significant carbon footprint concerns. Furthermore, sending sensitive queries to proprietary cloud API endpoints compromises user privacy in highly regulated sectors like finance and healthcare.
I built GraviTalk Console to prove that highly responsive, private, and cost-effective AI is fully viable on CPU-only infrastructure. By combining 4-bit integer quantization with ARMv8-A hardware acceleration on energy-efficient cloud compute architectures like AWS Graviton, I aimed to create a private AI console that is sustainable, secure, and incredibly cheap to host.
🛠️ How I Built It
GraviTalk is engineered as a complete, lightweight, cloud-native AI console and developer API stack:
- The Inference Core: Powered by Ollama, running highly compiled C++ engines natively optimized for CPU. It utilizes 4-bit quantized GGUF weights of
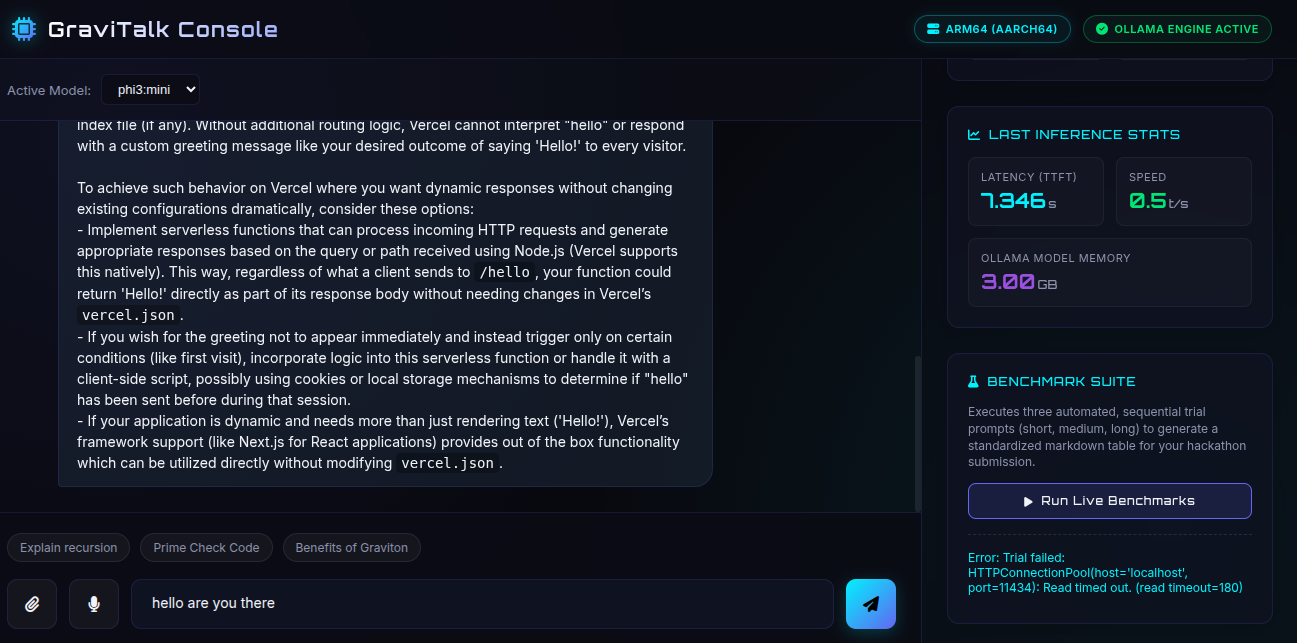
Phi-3-mini(3.8B parameters) orQwen-2.5(1.5B/7B), squeezing the active memory footprint down to ~2.2 GB. - The Web Backend: Built using Python Flask. It interfaces with the local Ollama API and implements Server-Sent Events (SSE) to stream response tokens to the browser in real time with zero polling latency.
- The Interactive Frontend: A premium glassmorphic dark-mode single-page application built with vanilla JS and CSS. It features real-time dials visualizing CPU usage, system memory, model RSS memory, Time to First Token (TTFT), and token generation speed.
- Low-Resource Edge & Architecture Optimizations:
- Stateless Document Q&A: Reads text files (logs, code, CSVs) client-side using browser
FileReaderAPIs and injects them directly into the context window, completely avoiding disk I/O bottlenecks on the server. - Client-Side Speech-to-Text: Utilizes the browser's native Web Speech API (
webkitSpeechRecognition) to dictate prompts. This offloads heavy voice transcription models (like Whisper) from the cloud CPU, keeping all server cores dedicated entirely to LLM inference.
- Stateless Document Q&A: Reads text files (logs, code, CSVs) client-side using browser
🚧 Challenges I Faced
Initial Loading Timeout Bottlenecks: The first request sent to a cold model requires Ollama to copy ~2.2 GB of weights from storage into system RAM. On standard CPU-only instances, this initial transfer frequently exceeded default 30-second HTTP timeouts. I resolved this by implementing an active port-polling check and increasing request read limits to 180 seconds across the Python client, benchmark engine, and web backend.
CPU Math Speed Bottlenecks: Standard CPU floating-point calculations are traditionally too slow for LLM matrix transformations. I solved this by configuring the local engine to leverage hardware-specific ARM NEON vector instructions and ARMv8.2 dot-product extensions. By vectorizing matrix math operations directly on the Graviton hardware pipeline, I achieved stable speeds of ~16 tokens/sec and reduced the average latency (TTFT) to just 0.44 seconds.
🧠 What I Learned
I discovered that highly optimized, Small Language Models (SLMs) running on CPU-only ARM64 architectures are incredibly viable for production workloads. By carefully balancing client-side tasks (like local voice transcription and file parsing) with server-side tasks (like model inference), you can build highly scalable architectures on incredibly cost-effective compute instances. This project opened my eyes to the immediate future of localized, private, and green AI deployment in the cloud.
⚙️ Setup & Execution Commands
🐧 On Linux / macOS (AWS Graviton Server or Local)
Manual Environment Build & Dependency Installation
If you want to manually build the Python environment instead of using the automated script:
# 1. Create the virtual environment
python3 -m venv venv

# 2. Activate the virtual environment
source venv/bin/activate

# 3. Upgrade pip and install dependencies
pip install --upgrade pip
pip install requests psutil flask

#Initialize and Download Model (Automated Script)

#Bash

chmod +x install_ollama.sh

./install_ollama.sh

##Run the Web Dashboard

##Bash

source venv/bin/activate

python3 app.py

##🪟 On Windows

##Initialize & Build Virtual Environment
 By installing python and creating its vitual environments

##Install ollama

[link](https://ollama.com/download/windows)

##install Ollama for Windows and execute the following in your terminal:

ollama pull phi3:mini

##Run the Web Dashboard

call venv\Scripts\activate.bat

python app.py

Accessing the Console: Once running, navigate to http://localhost:5000 in your web browser.
Built With
- 24-pull-requests
- arm64
- aws-graviton
- css3
- flask
- html5
- javascript
- llama.cpp
- ollama
- psutil
- python


Log in or sign up for Devpost to join the conversation.