-
-

IoT Fridge Saver
-

IoT Fridge Saver
-

Temperature Sensor Cables
-

Arduino 101 chase
-

LCD Screen
-

Fan
-

System
-

Consumption sensor
-

Arduino 101


Inspiration
The idea comes from one of the team members, when one day he discovered that his electric bill was too high. This led him to research to find some way to measure the electrical consumption of his house.
Found the Open Energy Monitor website. It is a system that allows to measure the electrical consumption using Arduino. This changed everything because he did not depend on third parties to do an analysis of his appliances.
Suddenly he looked at the refrigerator, what was happening? This appliance was the most consuming per day in the whole house by far.
Investigating more in depth he discovered several interesting matters about refrigerators. But perhaps, the most important was that due to the heat that concentrates behind these devices, their electricity consumption increases between 15% and 25%.
This was the seed of this project.
How a refrigerator works
The operation of a refrigerator consists of transferring the heat from the interior to the exterior. This allows the temperature inside the fridge to be much lower than the ambient temperature of the room.
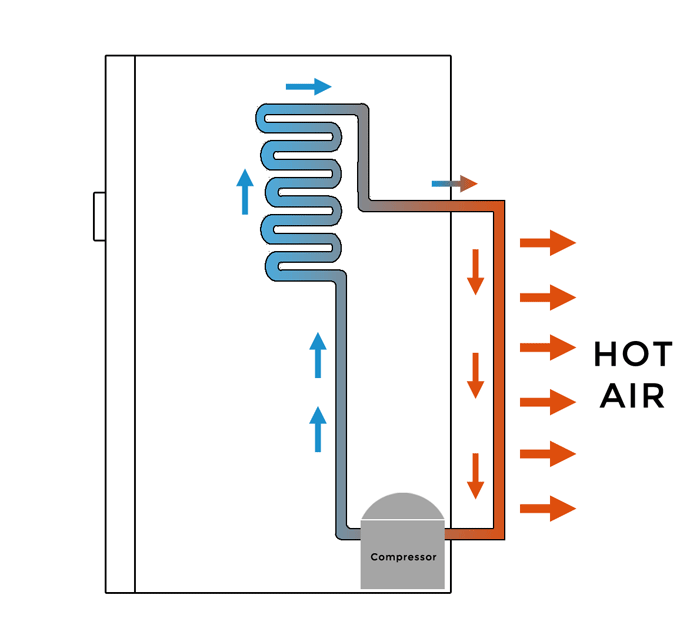
If there is not enough place to be exhausted, the hot air that expels the appliance itself condenses in the back, affecting compressor efficiency. This causes a longer time needed to cool and as a consequence, an increase in the electric consumption.
What it does
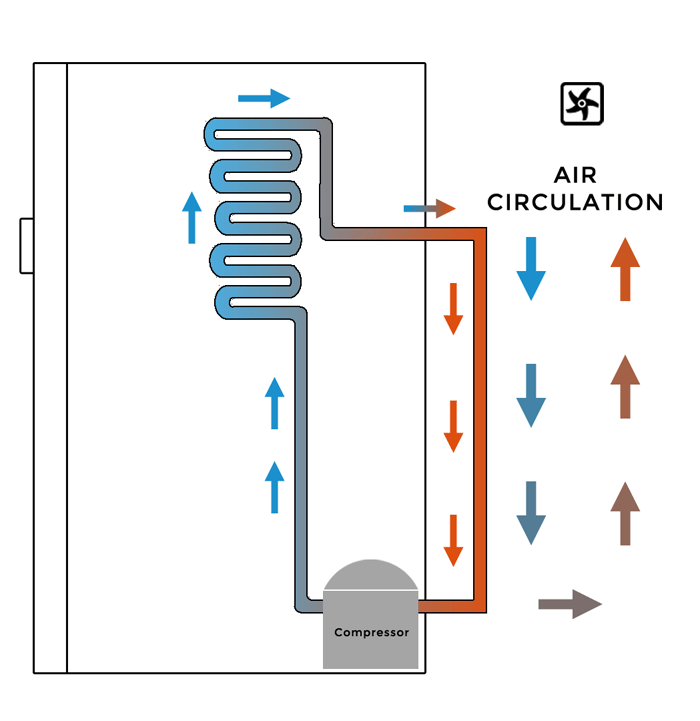
A possible solution is to ventilate the rear through a fresh air flow. This can be achieved in several ways, giving more space in the back or moving the air with fans.
But of course, all this makes no sense if we do not have consumption data and temperatures. This is where Arduino comes into play, where we will connect the temperature and power consumption sensors to transmit them to a database in the cloud.
Posed the problem and a possible solution, we already had where to start the project.
Background
Before I get fully involved in explaining what the project is and how we are developing it, I will put you in a position.
There are more than 7 billion people in the world. One in five has a refrigerator in their house. That's more than 1.5 billion refrigerators.
This appliance is one of the few that is on 24 hours a day and 365 days a year. This means that each refrigerator consumes an average of 450 KWh per year. If we multiply the number of refrigerators around the world (1,5 billion) and the annual consumption of each, the total leaves 649 million MWh of annual consumption.
If we look at it from another perspective, we can state that all home refrigerators in the world consume more than a country like Germany.

Therefore, supposing we could reduce the consumption of all the refrigerators in the world by 10%, we would be saving a total of 64.9 million MWh per year. If a KWh equals 0.62 kg of CO2, we would avoid pouring 42,185,000,000 kg of CO2 into the atmosphere.
The mere fact of having consumption data of household appliances, makes your electric bill to be reduced by 10%. As we will see throughout this project, this device can be used for other appliances. This implies that we may have considerable electric bill savings .
How we built it
The central axis of this project is the Arduino 101. This board takes the Intel Curie microcontroller.
It is a small but complete chip. Among its features it has a built-in IMU or Inertial Measurement Unit that has an accelerometer and gyroscope and Bluetooth connectivity through BLE or Bluetooth Low Energy technology.

One important thing to keep in mind with this prototype board is that you have to have the most current Firmware possible. This is because what you are actually doing is emulating an Arduino.
To update the Firmware follow these instructions.
Going back to the initial approach of the project, we must do several things with the Arduino 101. Measure various temperatures, power consumption and control the fans to generate that fresh air flow in the back of the refrigerator.
Particularly, we made the decision to measure back side temperature, front temperature, freezer and refrigerator. This gives us 4 temperature sensors and a sensor to measure the electrical consumption.

For data collection, we used the DS18B20 temperature sensor and the SCT-013 sensor that measures the electrical consumption.
It is not mandatory to use these models, any other similar sensor can be used to obtain the temperature and consumption information.
DS18B20 Temperature Sensor
The Maxim Integrated DS18B20 temperature sensor offers a temperature range between -55 ° C and 155 ° C, with an accuracy of ± 0.5 ° C.
The model we use is the commercialized as a waterproof probe avoiding any problem inside the refrigerator or freezer. This sensor uses Maxim Integrated's 1-Wire communication protocol allowing the simultaneous connection of more than 100 sensors through a single pin.

Electric consumption sensor SCT-013
To measure consumption, we use a non-invasive current sensor. So we do not worry about having to alter the refrigerator power cord too much. The only thing we have to do is peel the cable and embrace only one of the two power cables, live or ground.
This type of sensors are known as Current Transformers and one of the most common is the SCT-013. They operate under the principle of electromagnetic induction. The output of these sensors is an intensity proportional to that which passes through a cable or electric circuit.
There are two types of sensors, which provide either a current or a voltage. The same thing you use, but the simplest is the one that offers us a voltage.

Fans
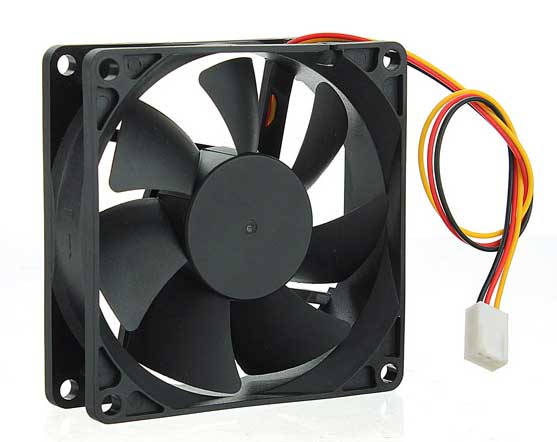
Finally we connect the fans. Taking into account the consumption, dimensions and noise they can generate. We can use any model, but we must keep a close eye on these components since there are different models for different uses and not all are worth.
The idea is to be able to adapt the project to use the typical fans of the computers since they consume very little and are very economic. Those who are testing José Manuel and Germán are Boxer Fan type.
Connecting Arduino 101 to the Internet
Although, as I said, it is a very robust and very useful plate, the big drawback is that it does not have an Internet connection. This forced us to look for solutions to send all the information acquired to a platform in the cloud.
There are different options like using Bluetooth to connect to another device that has an Internet connection. But perhaps the simplest and cheapest we found was to use a NodeMCU.
This development kit is based on the ESP8266 and is very easy to use (it is compatible with the Arduino IDE) and comes at a very economical price and have a library to configure WiFi like WiFiManager
All logic of the project resides in the Arduino 101 and NodeMCU only makes bridge between the plate and Internet.

Send information to the platform in the cloud
The data must be visible in real time at all times. Only then will we verify if the project is viable and we can make the right decisions.
As a cloud platform we choose Firebase, then we will detail its features.
One of its advantages is that it is very easy to use thanks to the REST API that incorporates. With only one HTTP call we can store the data obtained from temperature, consumption and use of the fans.
All of this is sent in JSON format. Therefore, the integration between Firebase and NodeMCU is instantaneous.
The Firebase database
The features we seek to integrate a cloud service into this project are ease and cost. At present there are many services that we can get to use like Thingspeak, ThingerIO or the Arduino Cloud itself. All may be a good choice.
But perhaps because of our experience in web development, we chose Firebase. The first thing to note is that you have APIs for many programming languages among which JavaScript is found.
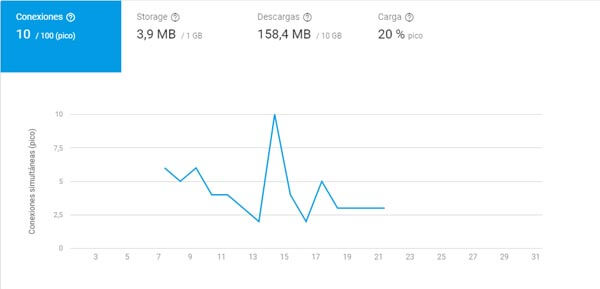
The database has limitations as it is a free account.
- It does not allow more than 100 simultaneous connections.
- You have a limit of 1 GB of storage.
- You have a limit of 10GB of download.
With all this, our project after a month of data collection every minute of two refrigerators, we have a storage consumption of 3.9 MB and 158.4 MB of download.
Web application for data visualization
With everything previously mounted, there is nothing left to see the information in a friendly way on any device.
If we want to monitor the data in real time, from anywhere in the world and any device, one of the faster options is to create a web application.
Firebase has a Javascript API that makes it very easy to integrate a database from this platform into a web page.
In addition we added the Bootstrap framework for it to be responsive. We have used an open template for this framework, SB Admin 2.
All this has resulted in a website that can be viewed at www.iotfridgesaver.com. It consists of two screens.
The initial screen shows a map of Google where we will be locating the different refrigerators that are used.

Once you find the one you want to consult, just give the icon and click on info. From here you can access the historical temperature, consumption and use of fan.

Challenges we ran into
There have been many challenges we have faced in this project. First the integration of a board without an Internet connection.
We solved this by using a board based on the ESP8266 as NodeMCU. Perhaps there is a much better solution but the simplest and fastest was this.
At the time of performing rear ventilation, the problem that we have found is mainly how to make a fresh air flow to lower the temperature.
We have followed different phases to decide when to turn on the fans.
In a first phase we have done a data collection to analyze the information.
They are then manually activated to check what happens in certain situations. This led us to think that the temperature difference between the back and the front was a good indicator of high consumption.
 .
.
However, as we were collecting data we realized one thing. The best time is when the compressor is activated and at the same time the rear temperature increases. It is much easier in terms of programming to control this situation.
Undoubtedly, the back temperature is closely linked to the compressor activity.
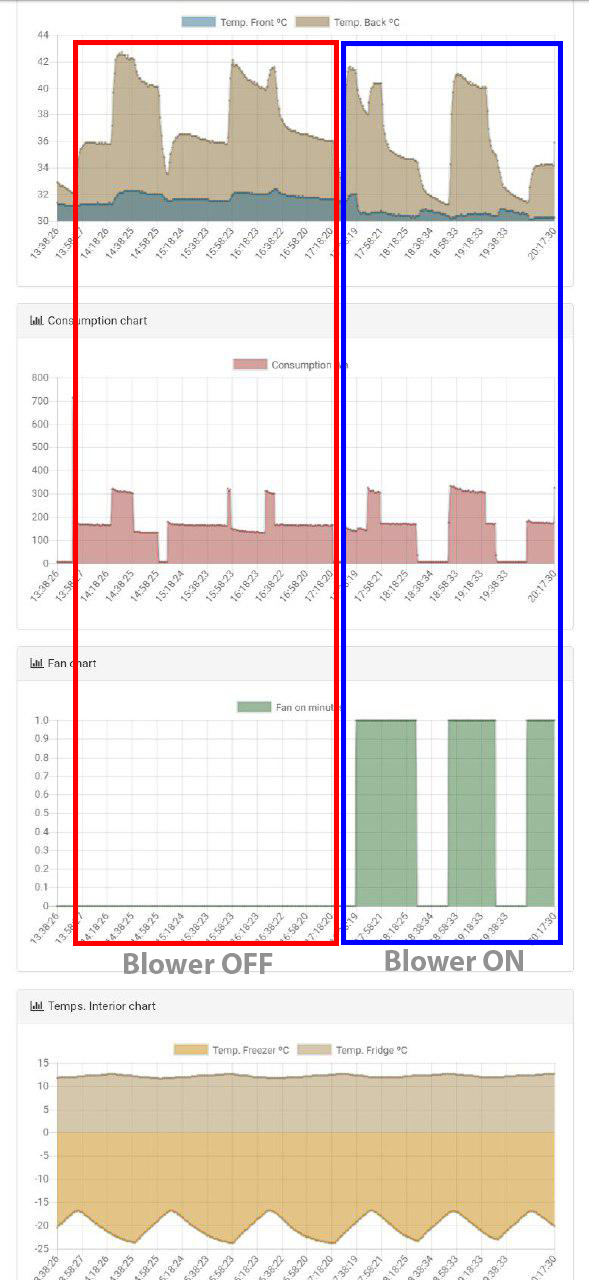
We need to do further investigation, but first tests show that there may be about 20% energy efficiency improvement activating air flow.
We checked that, when blower moves air behind refrigerator, compressor activity and inner temperature reduction speed are significantly reduced.
Accomplishments that we are proud of
We are very proud to have achieved a system that is capable of two tasks. On the one hand control hidden parameters of the refrigerators to the users.
On the other hand have been able to minimize electricity consumption in certain conditions.
At a first stage, asigning temperature sensors to each point of measurement was difficult. We had to check their hardware addresses to identify them and write it into source code. Now, we use temperature differences to identify sensors automatically. This makes easier to setup the system.
There is no doubt that there is still a long way to go in this project, but with the mere fact of having all this information we can help people reduce the consumption of their appliances.
What we have learned
Above all we have learned one thing, how refrigerators work. We have detected that in many occasions it is made an abuse of them.
Just by applying a few modifications to the installation, we can reduce its consumption. But all this is not possible if we do not have analytical data to corroborate it.
This is where open technologies come into play. They give us the possibility to create devices that adapt to our requirements. Without these technologies none of this would be possible.
We have also found that there may be huge differences in the consumption of different refrigerators. This project can help identify the most efficient models.

Only if we know the world around us, can we change it.
What's next for IoT Fridge Saver
The following steps we have planned are as follows:
- Improve data storage through Firebase. One database per user.
- Make summaries of the histories to show them in the home.
- Make historical data private for each device.
- Change the device settings on the web through a form.
- Activate or deactivate fans remotely.
- Conduct a socio-economic study in different countries.


Log in or sign up for Devpost to join the conversation.