-

Our project is a smart timer for food containers so that you know when they've been out of the fridge for too long.
-
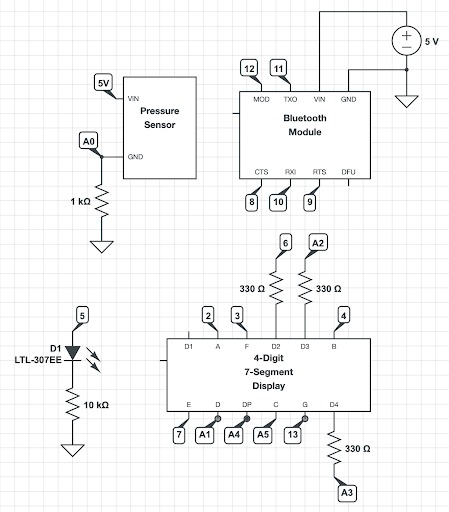
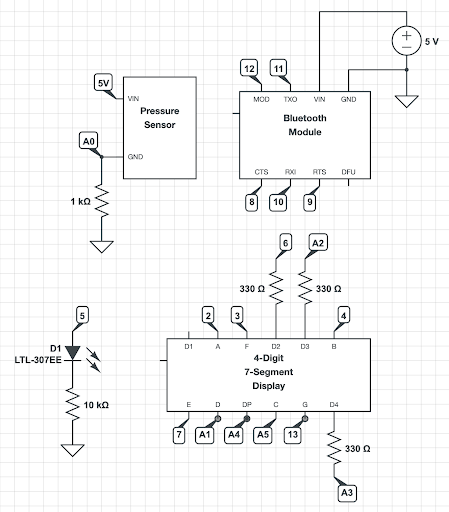
Circuit
-

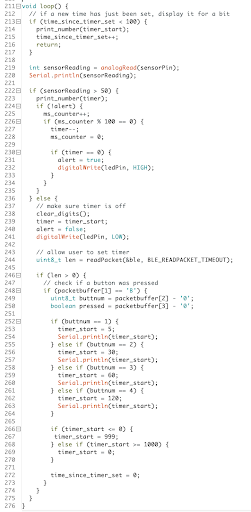
Main code

What it does
Our project is a smart timer for food containers that get taken out of the refrigerator. The timer starts automatically as soon as you put a food container on a countertop pressure sensor.
Bluetooth is used to set a timer duration from the phone, which determines how long a food container can stay out of the refrigerator. When the container is placed on a pressure sensor, the timer automatically starts and is displayed on a 7-segment display. When the timer counts down to 0, a red LED will turn on to alert the user. When the container is taken off the pressure sensor, the LED will turn back off.
Video: https://drive.google.com/file/d/17fZkYIt94IX3__jQ5IN-a0Wi2eHoY5zq/view?usp=sharing
(circuit and code in gallery above)
Our Design Process, Iterations, and Challenges We Faced
We began by first getting the 4-digit 7-segment display to work. Then, we completed our MVP by using a simple button to start the timer and an LED to indicate when the timer should alert the user.
We then moved on to integrating the bluetooth. At first, we intended to integrate the Bluetooth module by having the system send a text based alert to the BlueFruit app when the timer ran out, but we found it very difficult to code. We were able to get the Arduino to send data to the bluetooth app’s UART, but it was gibberish. After reconsidering this idea, we decided that using the phone to set the timer durations would be more useful. So, we programmed 4 buttons, which set the timer duration.
Additionally, when we moved on to integrating the pressure sensor for starting the timer, we found that it responded well to items with small surface areas like a finger, but it was not sensitive to larger, flat objects like a food container, even once weighed down.
Lastly, we found that the Arduino did not have many pins to implement our features. We ended up using all available pins, and had to sacrifice displaying the 1st digit of the timer. We would have liked to use PWM and generate a buzz alert sound, but did not have the pins available to do so.
Technology Description (parts used, etc)
- Pressure sensor: Adafruit force sensitive resistor
- 4-digit 7-segment display to display the timer
- LED: indicate when the timer hits 0
- Bluetooth module: connects with the phone so that the user can program the timer duration
What We Learned
We learned that one step of the design process we did not initially consider was the circuit diagram and pins of the Arduino. Had we known that this would present a challenge, we could have tried to use another microcontroller with more pins.
Another thing we learned was that when designing interactive circuits, we need to consider when and how the user can input data. Because the timer display had to constantly have signals sent to each digit and each segment in order to keep a number displayed, this presented a challenge when figuring out where to poll for inputs in the code.
Next Steps
If we were to take this project further, we would invest in a better pressure sensor that is more sensitive to larger and flat objects. We would additionally invest in a bigger board with more pins, so that we can add the buzzer and have additional input controls.
We would also like to add a text alert system so that you can see from your phone if your food has been left out too long.
Log in or sign up for Devpost to join the conversation.