-
-

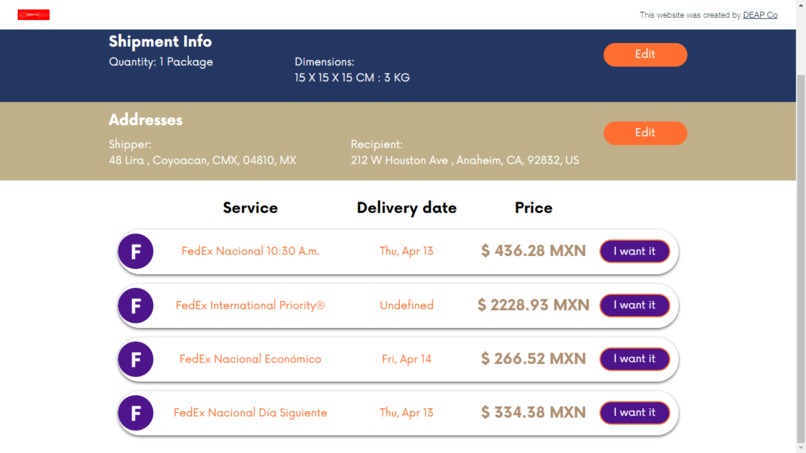
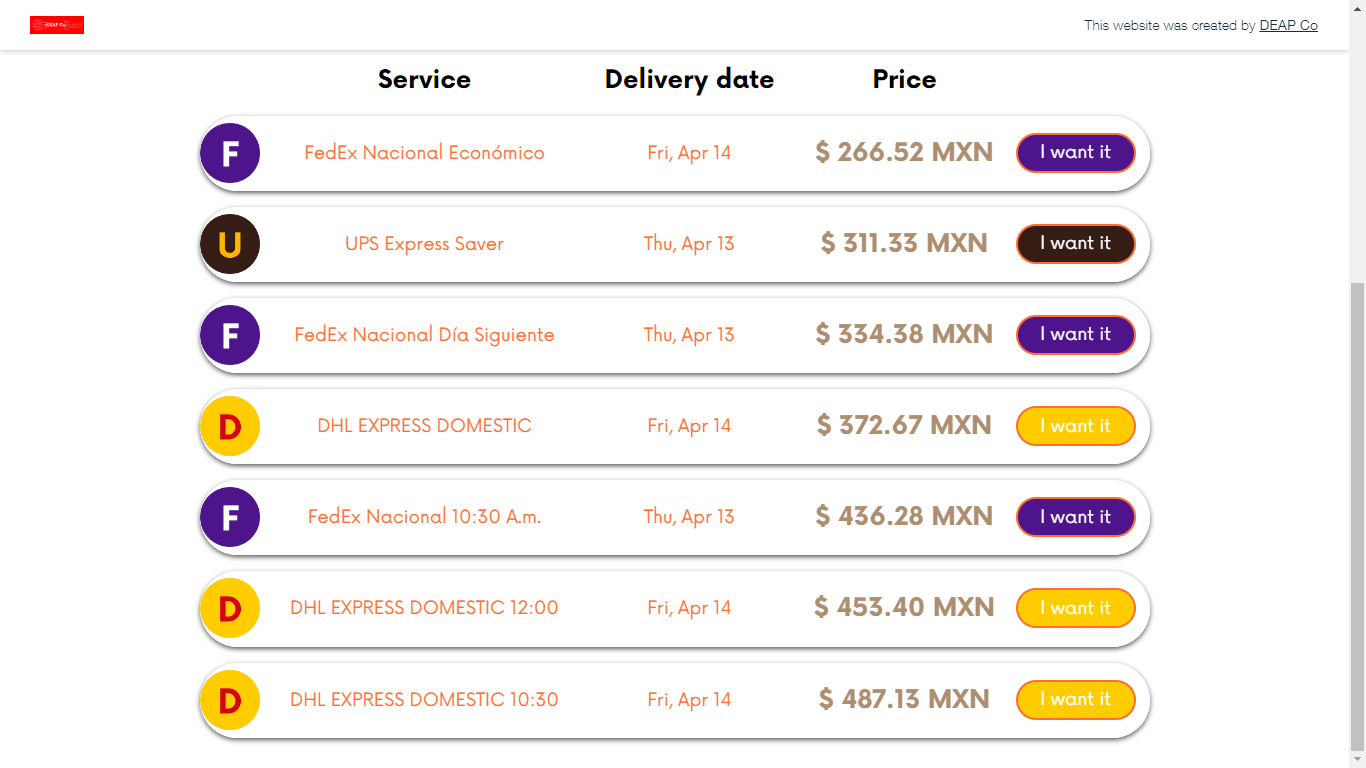
National shipment services
-
International shipment services

About me
Hi, I'm Diego. I'm from Mexico and this is the second Wix Hackathon I'm participating in.
Since 2018 I've done Wix websites thinking that I would never know how to code on Velo but it was until 2020 that I started to learn JavaScript with Youtube videos and in 2022 I became part of the Wix Certificated Velo Developers.

I created DEAP Co Shipments for the hackathon, starting the website in March 29, 2023 finishing it in April 08, 2023.
Inspiration
Here in Mexico, we have courier service resellers such as Empack, Packmail, Mailboxes, among others, that quote services but need to open one window per parcel to get rates of the packages their clients want to send; this makes their logistic a bit slow because first they need to introduce the package’s dimension in the first courier’s system, then write it again in the second parcel’s system, and so on until they get the service price of all couriers they offer.
This process may cause:
1) To lose the client because of the waiting time or
2) That the client doesn’t choose the correct service he or she wants because they may be in a hurry and take the first option they quote.
Imagine you want your package to be delivered tomorrow, but the first option to be shown isn’t the fastest one, or maybe you want the cheapest service but it’s until the fourth service they quote.
This isn’t the best way to offer this kind of services, but it’s the cheapest way to do it, because implementing a SAAS that could quote and make the shipment label, all in one, is a hard work and may be expensive if you hire a developer.
What it does
With DEAP Co Shipments you can quote and create a shipment label, all in one place. First you'll need to create an account and then you are ready to use our system.
Quoting a service
First, you'll need to specify the package dimensions such as weight, length, heigth and width, then write the shipper's and recipient's addresses.
Finally, the system will start to search the available services.
DEAP Co Shipments couriers accounts were activated in Mexico, this means that all shipments must include as origin a Mexican Address and can be deliver to:
| Parcel | Destination |
|---|---|
| FEDEX | Mexico or United States |
| DHL | Mexico |
| UPS | Mexico |
Create a shipment
After quoting a service, select the one of your preference. Write the contact information for the shipment to be redirected to the checkout payment.
Payment
You'll be redirected to OpenPay website for the payment. Since this is made in a sandbox environment, here you can find the credit cards that can be used in this mode.
All cards have as values:
Cardholder's name: DEAP Co Shipments
Expiration date: November, 2025
Security code:
- Visa and MasterCard cards: 123
- American Express cards: 1234
Valid credit cards
| Card number | Type |
|---|---|
| 4111111111111111 | Visa |
| 5555555555554444 | MasterCard |
| 345678000000007 | American Express |
Invalid credit cards
| Card number | Type | Reason |
|---|---|---|
| 4222222222222220 | Visa | The card was declined. |
| 4000000000000069 | MasterCard | The card has expired. |
| 4444444444444448 | American Express | The card does not have sufficient funds. |
After the payment
You'll come back to DEAP Co Shipments to create the label. After the label is created successfully, you'll see all the shipment information and the printing label.
How I built it
It wasn't an easy task because of time. I saw the hackathon in March 29 and I had 19 days to deliver it, so I really had to put an effort to it; but here I am.
First, I started with the front-end, thinking of the color range and typography. Then, obviously, I created the website on Wix.
I'm definitely not a creative person so I tried to do my best on the design and I think I did well. As I went on creating the front-end, I started with the back-end, which is the interesting part of the project.
DEAP Co Shipments connects to each of the couriers API to get available services and its price. The website makes a HTTPS Request sending information in the body such as:
- Shipper's address
- Recipient's address
- Package dimensions
And the HTTPS Response are the available services with their price.
API Integrations
So as we all know, this hackathon was intended to create a SAAS website using different APIs from Velo and external to Velo APIs, so here I included the different APIs I used for this project.
FEDEX, DHL and UPS
For the hackathon, I included three of the main couriers from all the world, FEDEX, DHL and UPS.
I developed all the API couriers in Wix Blocks because if I need to create another website like this one, it's easy to instal the package and use it, instead of copying and pasting all the code and later changing some information in all websites rather than only in one.
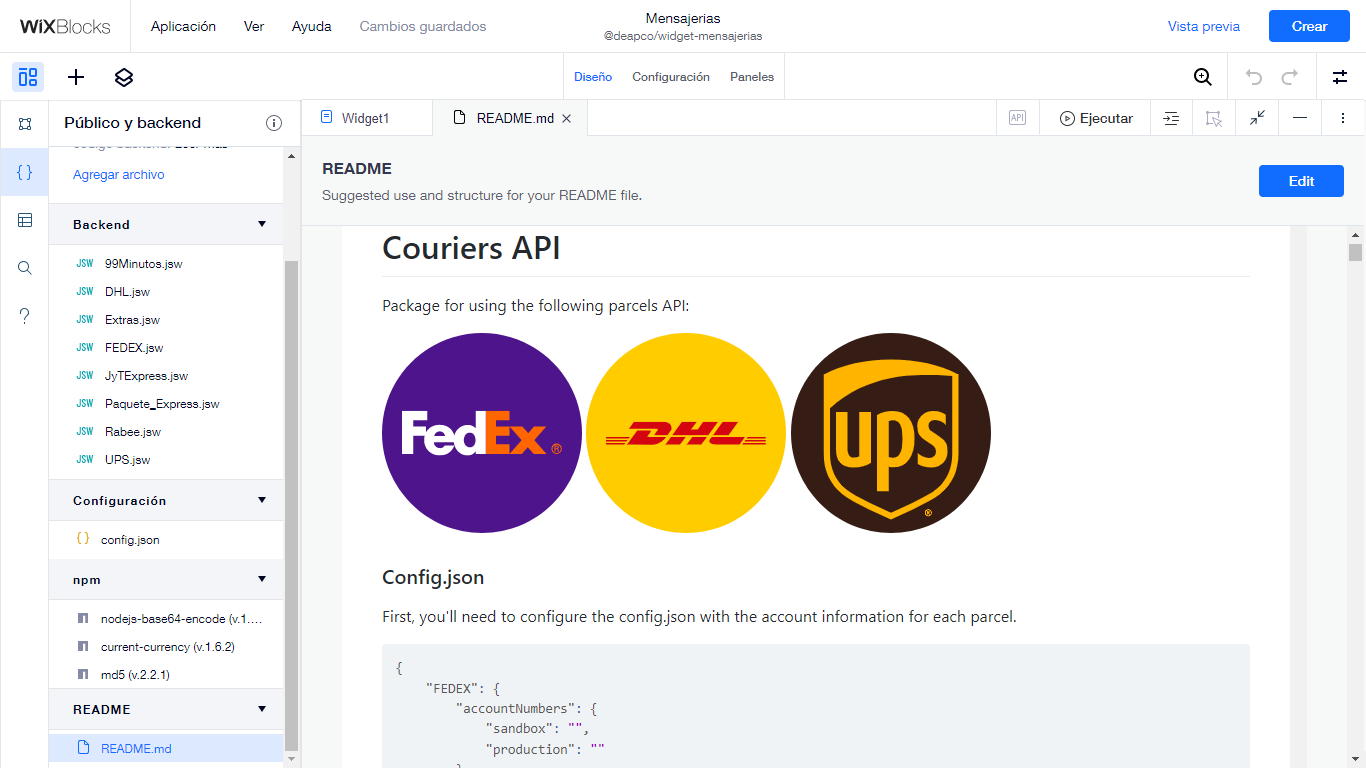
I named all the functions the same so it was easy for me when I called them.
export async function FEDEX_getRates();
export async function DHL_getRates();
export async function UPS_getRates();

export async function FEDEX_sendShipment();
export async function DHL_sendShipment();
export async function UPS_sendShipment();
All the services are connected via HTTPS Request, so all funcitons look like
const fetchResponse = await fetch("https://apis-sandbox.fedex.com/ship/v1/shipments", {
            "method": "post",
            "headers": {
            },
            "body": JSON.stringify(bodyToSend)
        });

const fetchJSON = await fetchResponse.json();
console.log("FEDEX_TestShipment", fetchJSON);

return { "estatus": fetchResponse.ok, "JSON": fetchJSON };
OpenPay
For the checkout payment, I integrated OpenPay API. This system was created by BBVA Mexico, one of the most important banks in the country. I use it because:
- It accepts all credit and debit cards.
- The service is available in all around the world.
- It even lets you make your payment in cash in any store near you or by bank transfer.
The two functions I created with this API were:
export async function createCharge();
This function creates a payment and the response is a URL where the user will be redirected to introduce his or her card information.
export async function getPayment();
The other function I made was the getPayment() to get the payment information when then user comes back to DEAP Co Shipments website and check the payment status.
Microsoft Graph
Even though Wix has the actionable emails, you can't include attached files or dynamically change the source of an image. That's why I used the Microsoft Graph API to send mails from my Microsoft Account.
export async function registrationEmail(name, email) {
    return await sendMail("Hi, welcome to DEAP Co Shipments", {
        "contentType": "HTML",
        "content": `<h2 style="text-align: center;"><span style="color: #243763;">Thanks for joining DEAP Co Shipments</span></h2>
<p style="text-align: center;">Hi <strong><span style="color: #ff6e31;">${name}</span></strong>, your account was created successfully!</p>
<p style="text-align: center;">Thank you for using</p>
<p><img style="display: block; margin-left: auto; margin-right: auto;" src="https://static.wixstatic.com/media/4c0a11_a6f0f3e56b344bf38ec8a654c8543c80~mv2.png" alt="DEAP Co Shipments" width="209" height="64" /></p>`
    }, [{
        "emailAddress": {
            "address": email
        }
    }])
}

export async function confirmationShipment(name, logo, servicio, trackingID, email, label) {
    return await sendMailWithAttachment("New Shipment Created!", {
        "contentType": "HTML",
        "content": `<h2 style="text-align: center;"><span style="color: #243763;">New Shipment created!</span></h2>
                    <p style="text-align: center;">Hi <strong><span style="color: #ff6e31;">${name}</span></strong>, your shipment was created successfully and here is the information:</p>
                    <p style="text-align: center;">Thank you for using</p>
                    <p><img style="display: block; margin-left: auto; margin-right: auto;" src="https://static.wixstatic.com/media/4c0a11_a6f0f3e56b344bf38ec8a654c8543c80~mv2.png" alt="DEAP Co Shipments" width="209" height="64" /></p>`
    }, [{
        "emailAddress": {
            "address": email
        }
    }], label);
}
Both of the functions send an email with HTML content, the first one sends only the text and the second one attaches the encoded label.
Google Maps Platform
The last external integration is Google Maps Platform. This one I use to show the courier’s location near you so you can take your package and leave it there.
The only thing you need to include in the URL path and parameters, are:
- Couriers name
- Longitude and latitude of the location
And you'll be shown the nearest stores in the location passed in the URL. If you are viewing the site in a mobile, you'll be redirected to the Google Maps App.
npm packages
- jsonwebtoken: For creating the Bearer Token for the OAuth API and reading the Bearer Token in the other requests.
const jwt = require('jsonwebtoken');

const userInfo = await jwt.verify(token, await getSecret("Secret_Password"));

const token = await jwt.sign({
                                "clientID": clientID,
                                "email":user[0].loginEmail,
                                "name":user[0].name
              }, await getSecret("Secret_Password"), { "expiresIn": "24h" });
- current-currency: Sometimes the services price comes in a different currency; with this package I convert it into Mexican Peso.
import { convert } from "current-currency"

export async function currencyExchange(currency, amount) {
    if (currency !== "MXN") {
            return Math.ceil((await convert(currency, amount, "MXN")).amount);
    } else {
            return amount;
    }
}
- country-state-city: This package helped me to bring all the countries and all the states of the selected country in the New Shipment tab.
export async function getAllCountries() {
    var toReturn = [];
    const states = await require('country-state-city').Country.getAllCountries();

    for (let i = 0; i < states.length; i++) {
            toReturn.push({ "label": states[i].name, "value": states[i].isoCode });
    }

    return toReturn;
}

export async function getStatesOfCountry(country) {
    var toReturn = [];
    const states = await require('country-state-city').State.getStatesOfCountry(country);

    for (let i = 0; i < states.length; i++) {
        toReturn.push({ "label": states[i].name, "value": states[i].isoCode });
    }

    return toReturn;
}
Velo Integration
Obviously I can't do such a big Wix website without Velo APIs, so here I list the ones I used:
Wix Data
Insert, save, get and query shipments in the database.
await wixData.get("EnviosOnline", id, { "suppressAuth": true });

await wixData.save("EnviosOnline", objectToSave, { "suppressAuth": true });

(await wixData.query("EnviosOnline").eq("_owner", (await currentMember.getMember({ fieldsets: ["FULL"] }))._id).find()).items

await wixData.insert("EnviosOnline", toSave);
Wix Fetch
There are two main Velo APIs used for this kind of SAAS projects, the Fetch function is the main one because it's the only way to communicate from one server to another, so obviously, this is the one I used the most.
const fetchResponse = await fetch("https://login.microsoftonline.com/4b103a7b6c5b43eca74bc4b4702486bc/oauth2/v2.0/token", {
        "method": "post",
        "headers": {
                "Content-Type": "application/x-www-form-urlencoded"
        },
        "body": await wixSecretsBackend.getSecret("MicrosoftKey")
})
Wix Http Functions
This one is very useful to create your own API inside the website instead of paying for a server in another platform and Wix Http Function Responses even help you more to only pass the data in the body response and it will automatically send the status code.
import { ok, badRequest, serverError, response, created } from 'wix-http-functions';

export async function post_shipment(request) {}

export async function post_rates(request) {}

export async function post_OAuth(request) {}

export async function get_label(request) {}
Wix Location
The basic API to navigate into different tabs and sites, and bring URL parameters.
wixLocation.to("/");

if(wixLocation.query.section === "register"){
    ShowRegister();
}

wixLocation.queryParams.remove(["section"]);

wixLocation.queryParams.add({ "section": "register" });
Wix Members and Wix Members Backend
Since all people who wants to make a shipment needs to sign in or sign up, this API helped me to get the current user's information.
export async function register(email, password, firstName, lastName, phone){
    try {
            const token = (await authentication.register(email, password, {contactInfo:{firstName:firstName, lastName:lastName, phones:[phone]}})).sessionToken
            await registrationEmail(firstName, email);
            return [true, token];
    } catch (error) {
            const errCode = error.details.applicationError.code;
            if(errCode === "-19995"){
                    return [false, "User already exists."]
            } else {
                    return [false, "Error on signing in. Please try again."]
            }
    }
}

export async function signIn(email, password) {
    try {
            return [true, await authentication.login(email, password)];
    } catch (err) {
            const errCode = err.details.applicationError.code;
            if(errCode === "-19976"){
                    return [false, "Wrong email or password."]
            } else if(errCode === "-19999"){
                    return [false, "Email not found."]
            } else {
                    return [false, "Error on signing in. Please try again."]
            }
    }
}

if (authentication.loggedIn()) {}else{}

authentication.onLogout(() => {
        wixLocation.to("/");
});

await authentication.applySessionToken(message);

await authentication.promptForgotPassword();
I gave a different usage to one of the methods of this API as I wanted to know if the member had enabled or disabled the DevMode by checking whether he had the badge activated or not.
export async function devmodeActiveorDesactiveByUserID(userID){
    const list = await badges.listMemberBadges([userID]);
    return list[0].badgeIds.length ? true : false;
}

export async function devmodeActiveorDesactive(){
    const list = await badges.listMemberBadges([(await currentMember.getMember())._id]);
    return list[0].badgeIds.length ? true : false;
}

export async function devmodeOFF(){
    return await badges.removeMembers("95ff20bf98fe4b9db154860a377c86cd",[(await currentMember.getMember())._id])
}

export async function devmodeON(){
    return await badges.assignMembers("95ff20bf98fe4b9db154860a377c86cd",[(await currentMember.getMember())._id])
}
Wix Router
I have done other projects were the Wix Router is essential, however, in this one I used it to have the "/shipment" prefix reserved and depending on the first path, it redirects to the adequate tab bringing useful information.
import { ok, notFound, WixRouterSitemapEntry, forbidden } from "wix-router";

export async function shipment_Router(request) {
    const path = request.path[0];
    if (path === "new") {   // /shipment/new
        return ok("new-shipment", undefined, { title: "New Shipment | DEAP Co Shipments" })
    } else if (path === "payment") {    // /shipment/payment
        try {
            const paymentInfo = await getPayment(request.query.id);
            if (paymentInfo[0]) {
                return ok("successful-payment", paymentInfo[1], { title: "Payment Successful | DEAP Co Shipments" })
            } else {
                return notFound();
            }
        } catch (err) {
            return notFound()
        }
    } else if (path === "information") {    // /shipment/information
        try {
            const shipmentInfo = await wixData.get("EnviosOnline",request.path[1],{suppressAuth:true});
            const paymentInfo = await getPayment(shipmentInfo.folioDePago);
            if (shipmentInfo) {
                if(shipmentInfo._owner){
                    return ok("info-shipment", {...shipmentInfo, "paymentInfo":paymentInfo[1]}, { title: "Shipment Information | DEAP Co Shipments" })
                } else {
                    return forbidden();
                }
            } else {
                return notFound();
            }
        } catch (err) {
            return notFound()
        }
    } else {
        return notFound();
    }
}
Wix Secrets Backend
This is the second most important API for a SAAS project. We all know that our secret keys cointain sensitive information so we must keep them secure. Using them on the front-end is something you must never do, using them on the back-end is acceptable, but saving them on the Wix Secrets Manager is the best way to use your secret keys.
await fetch("https://login.microsoftonline.com/4b103a7b-6c5b-43ec-a74b-c4b4702486bc/oauth2/v2.0/token", {
        "method": "post",
        "headers": {
                "Content-Type": "application/x-www-form-urlencoded"
        },
        "body": await wixSecretsBackend.getSecret("MicrosoftKey")
})

await jwt.sign({
    "ID": ID,
    "email":user[0].email,
    "fullName":user[0].name
}, await getSecret("Secret_Password"), { "expiresIn": "24h" });

await fetch(`https://sandbox-api.openpay.mx/v1/myfweuj/charges`, {
    method: "POST",
    headers: {
            "Authorization": "Basic " + await getSecret("OpenPay_Auth"),
            "Content-type": "application/json"
    },
    body: JSON.stringify({})
});
Wix Storage
When I learned JS, somebody told me that declaring global variables wasn't the best way to declare them; so I use the Wix Storage to save information that may be used more that once in the page.
wixStorage.session.setItem("save", JSON.stringify({ "totalPesoMexicano": itemData.totalPesoMexicano, "descuentos": 0, "totalAPagar": itemData.totalPesoMexicano, "puntos": 0, "infoServicio": itemData, "cupones": {} }));
Wix Window
The Wix Window is another API that has many usages within the page. In this project I used it for keeping track of the user's location and the router data.
import wixWindow from 'wix-window';

const location = await wixWindow.getCurrentGeolocation();

const shipmentInfo = wixWindow.getRouterData();
Challenges I ran into
Making a SAAS website is a big issue because if one of the services isn't working, it may bring the processes down. Another issue I see is that you need to be aware of all the errors that each service may bring.
I think FEDEX was the easy API to connect because of the documentation. This project helped me to understand that if you are creating an API, you must have an understandable documentation so that people who read it, are capable to understand what you are asking for.
The last problem was time. This is the second time that this happens to me because I got to know that there was a Wix Hackathon to participate in, so I needed to hurry to first imagine what I was going to do and then implementing the idea.
Accomplishments that I'm proud of
I think that having the ability to know what tools you are going to use for a project you have on your mind and know if it's possible to do it or not, is a prestigious capacity when implementing a project.
What I learned
As I said before, having a good API documentation is always the best thing from having a good structure of what you are requiring and sending as the body request and response, to let the users have an easy experience of using your API.
Another thing that I learned is implementing the best security method with this kind of projects. I know that the back-end is a secure environment but using the Wix Secrets Manager is better because it adds another security layer to your API keys.
What's next for DEAP Co Shipments
I would like that this project continues to grow by accepting other countries as origin and more courier services added in the site so that not only 3 options are available but clients have more alternatives to send their packages.
Built With
- dhl
- fedex
- google-maps
- microsoft
- openpay
- ups
- velo
- wix

Log in or sign up for Devpost to join the conversation.