-
-
System Architecture
-
-
-
-

-

-
-
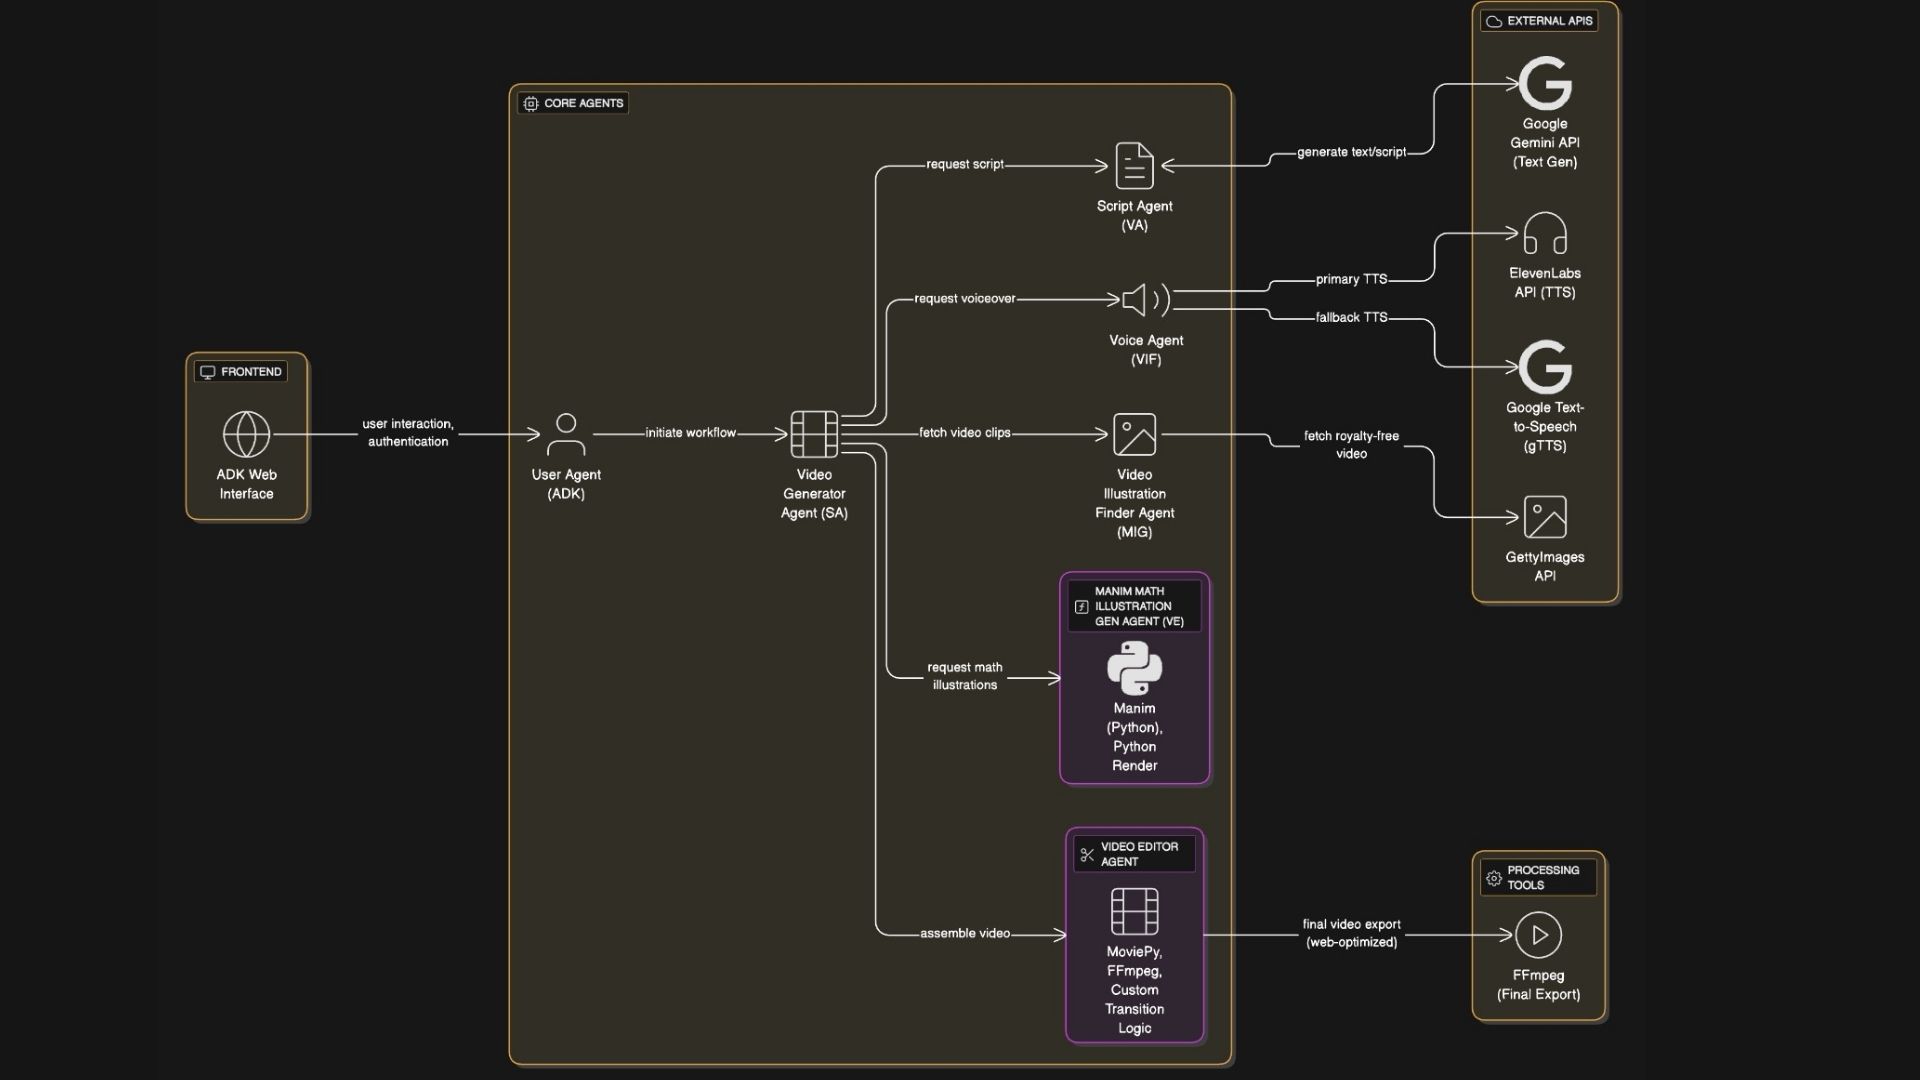


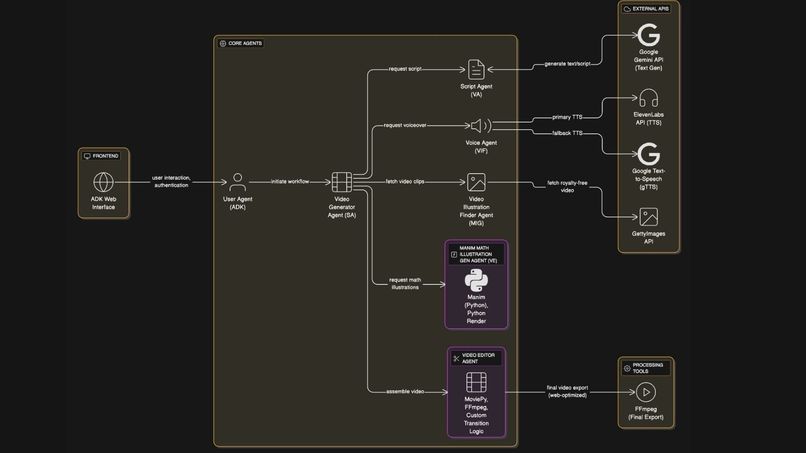
Video Generation Agent System
A multi-agent AI system that automatically generates educational videos with intelligent transition effects using ADK (Agent Development Kit). The system uses 5 specialized agents to create professional videos from topic to final output with dynamic scene transitions.
🎬 Overview
This system creates 2-minute educational videos automatically through a pipeline of AI agents:
- Video Script Agent - Generates engaging scripts using Google Gemini
- Audio Generation Agent - Creates voiceovers using ElevenLabs/gTTS
- Video Illustration Agent - Finds relevant video clips from Getty Images
- Manim Illustration Agent - Creates mathematical/graphical animations
- Video Compiler Agent - Combines everything using MoviePy with intelligent transition effects
✨ Key Features
🎭 Dynamic Transition Effects
Our AI agent automatically adds professional transition effects between video scenes:
- Intelligent Selection: Analyzes scene content to choose appropriate transitions
- Content-Aware Matching:
- Action/movement keywords → zoom transitions
- Dramatic/emotional content → fade effects
- Time-related content → quick transitions
- Scale/size references → zoom in/out effects
- 5 Transition Types: Crossfade, fade to black, zoom in, zoom out, and quick fade
- Automatic Application: No manual intervention required - the AI selects the best transition for each scene pair
- Professional Quality: Creates smooth, engaging transitions that enhance video flow
🚀 Quick Start
Prerequisites
- Python 3.8 or higher
- Git
- FFmpeg (for video processing)
Installation
Clone the repository
git clone <repository-url>
cd VideoAgent
Create a virtual environment (recommended)
python3 -m venv venv
source venv/bin/activate  # On Windows: venv\Scripts\activate
Install dependencies
pip install -r requirements.txtSet up environment variables
# Copy the sample environment file
cp env.sample .env
# Edit .env with your actual API keys
nano .env  # or use your preferred editor
Required API Keys You'll need to obtain the following API keys:
- Google Gemini API Key (REQUIRED)
- Go to Google AI Studio
- Create a new API key
- Add to
.envfile:GEMINI_API_KEY=your_key_here
2. ElevenLabs API Key (Optional but recommended)
- Go to ElevenLabs
- Sign up and get your API key
- Add to
.envfile:ELEVEN_LABS_API=your_key_here - If not provided, system falls back to Google Text-to-Speech
Note: The system uses sensible defaults for all other settings (video quality, audio formats, etc.). No additional configuration is required.
System Dependencies Install FFmpeg for video processing:
macOS:
brew install ffmpeg
Ubuntu/Debian:
sudo apt update
sudo apt install ffmpeg
Windows:
- Download from FFmpeg official site
- Add to system PATH
Verify Installation
Run the test suite to ensure everything is working:
python3 test_system.py
Basic Usage
Using the main interface:
python3 main.pyUsing the orchestrator directly:
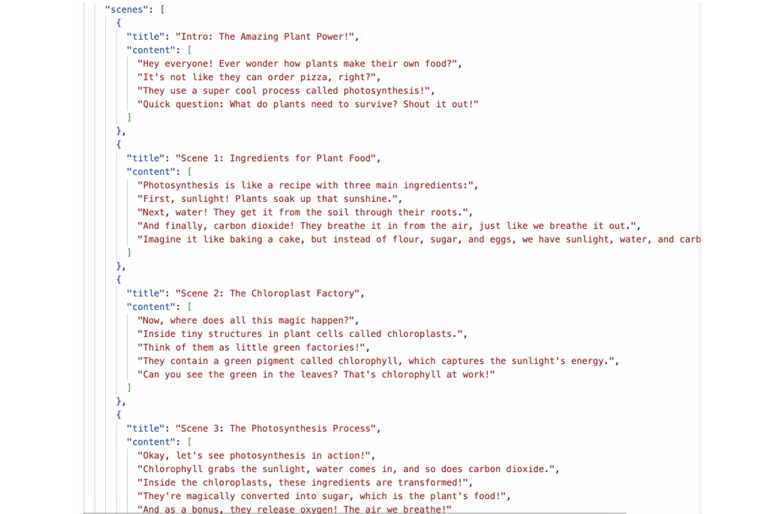
python3 video_generation_orchestrator.py "photosynthesis"Testing individual agents:
python3 demo.py
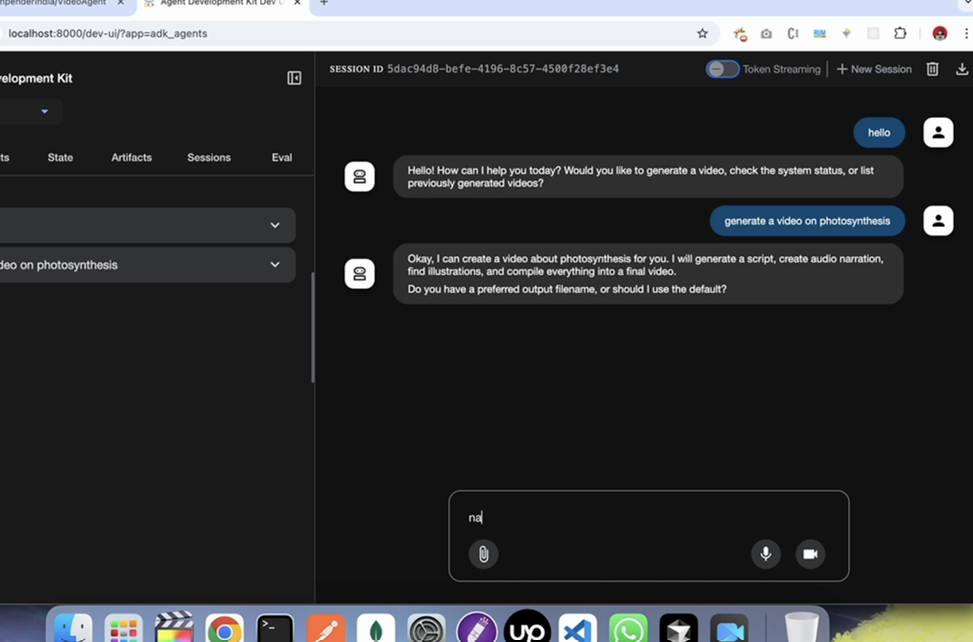
Running ADK Web Interface
The VideoAgent project is integrated with Google's Agent Development Kit (ADK), providing a sophisticated web-based development interface for testing, debugging, and showcasing your video generation agents.
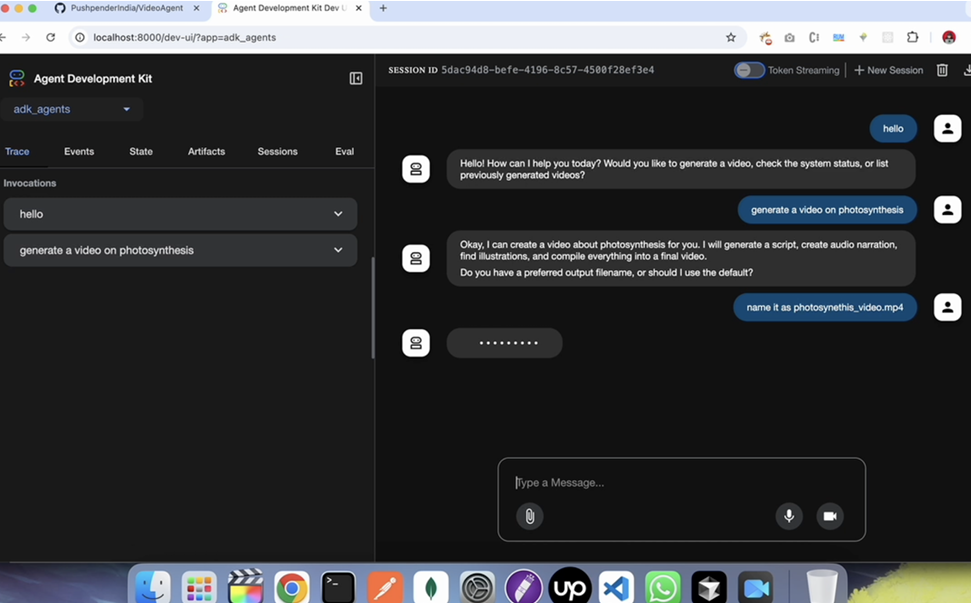
🌟 What is ADK?
The Google Agent Development Kit (ADK) is a powerful framework that provides:
- Interactive Web UI for testing agents
- Visual debugging with function call inspection
- Real-time monitoring and event tracing
- Session management for conversation context
- Audio/voice interaction support
🚀 Quick Setup
Run the setup script:
python3 setup_adk.pyActivate virtual environment and start ADK:
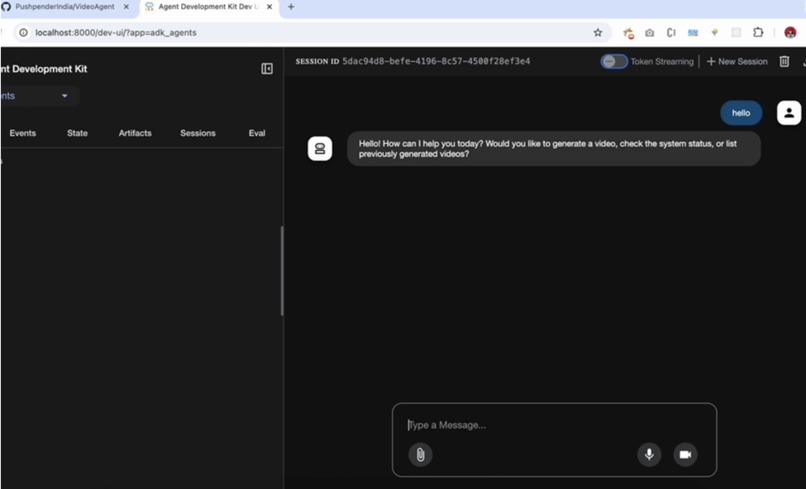
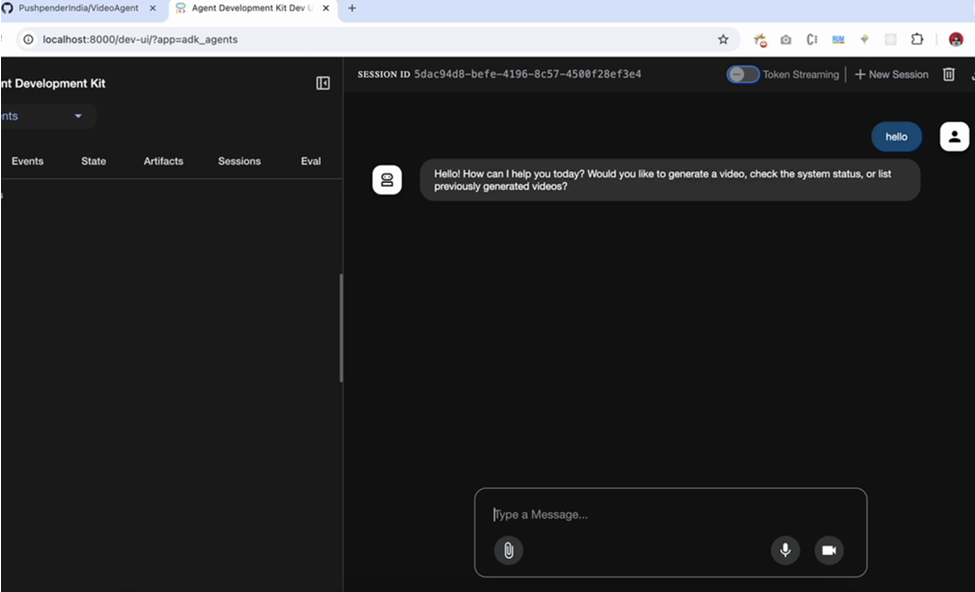
source venv/bin/activate  # On Windows: venv\Scripts\activate
python3 run_adk_web.py
Open your browser:
- Navigate to: http://localhost:8000
- Select
video_generation_agentfrom the dropdown - Start chatting with your agent!
💬 Example Prompts
Try these prompts in the ADK web interface:
Generate a video about "machine learning basics"
Check the system status
List all generated videos
Create a video about "photosynthesis" with filename "biology_lesson.mp4"
🔧 ADK Agent Capabilities
Your ADK-integrated video agent provides three main functions:
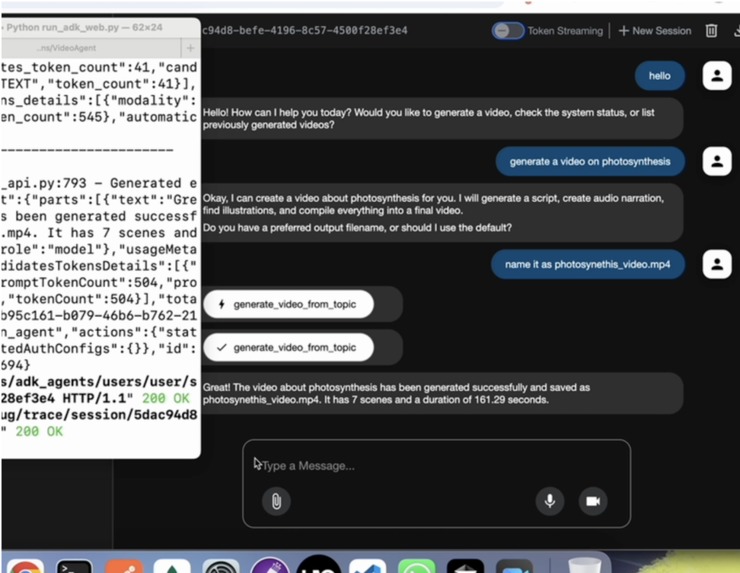
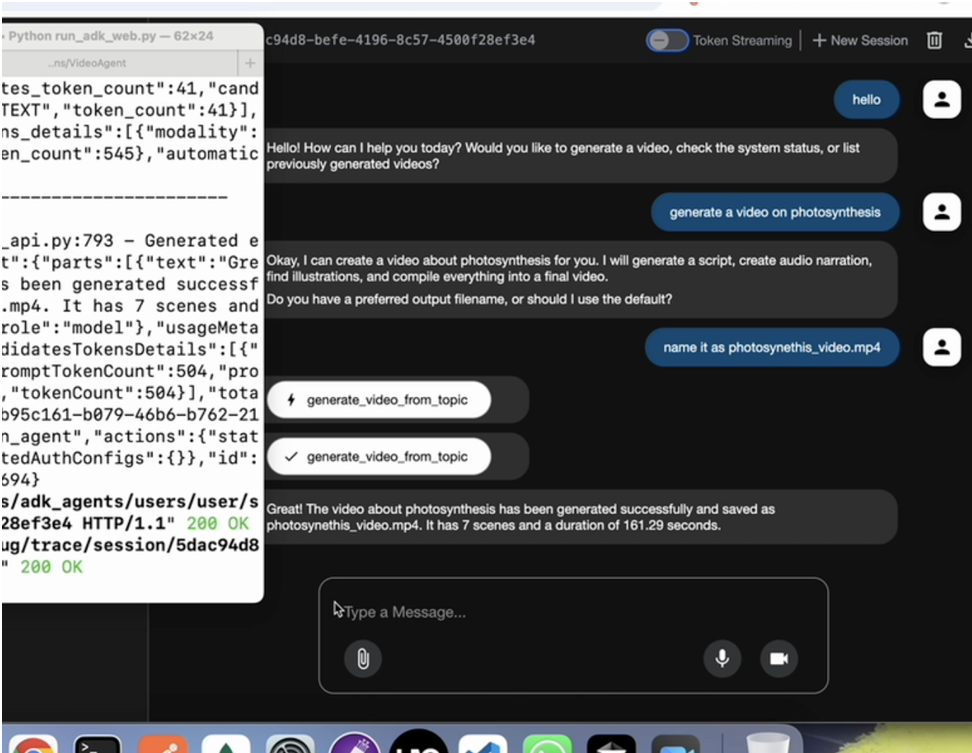
🎬 Video Generation (generate_video_from_topic)
- Creates complete videos from any topic
- Handles script generation, audio, illustrations, and compilation
- Supports custom output filenames
📊 System Status (get_project_status)
- Checks API key configuration
- Verifies directory structure
- Reports system health
📁 Video Management (list_generated_videos)
- Lists all previously generated videos
- Shows file sizes and creation dates
- Provides file paths for access
🐛 Debugging Features
The ADK interface provides powerful debugging tools:
- Events Tab: Inspect individual function calls and responses
- Trace Logs: Monitor latency and performance metrics
- Error Handling: Clear error messages and troubleshooting
- Real-time Feedback: Watch video generation progress live
🔄 Alternative Interfaces
Terminal Interface:
python3 run_adk_terminal.py
API Server (for cURL testing):
source venv/bin/activate
adk api_server

🎯 Benefits of ADK Integration
- Rapid Prototyping: Test video generation ideas quickly
- Visual Debugging: See exactly what your agents are doing
- Performance Monitoring: Track function call latency and success rates
- Easy Sharing: Demonstrate capabilities to stakeholders
- Production Ready: Scale to production with multiple deployment options
📋 Troubleshooting
Agent not found in dropdown:
- Ensure you're running from the project root directory
- Check that
adk_agents/__init__.pyexists - Verify the virtual environment is activated
API key errors:
- Update
adk_agents/.envwith your actual API keys - Ensure keys are valid and have proper permissions
Module import errors:
- Activate virtual environment:
source venv/bin/activate - Install dependencies:
pip install -r requirements.txt
Output Locations
Generated videos will be saved in:
static/compiled_videos/- Final video outputsstatic/manim_outputs/- Mathematical animations
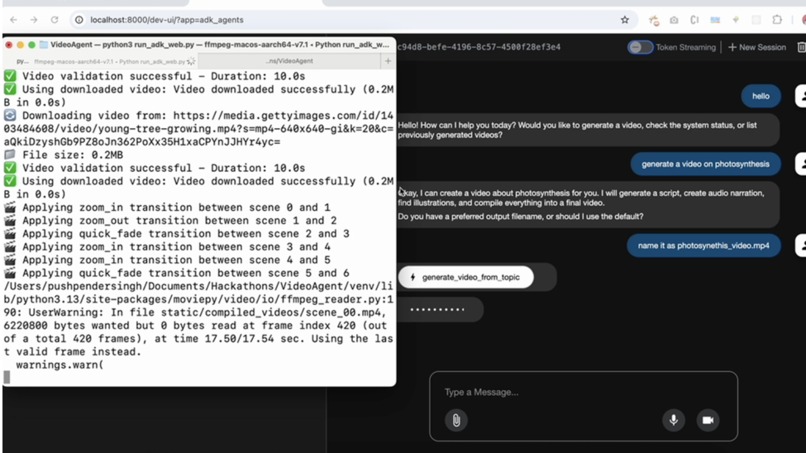
🎬 Transition Effects in Action
When you run the system, you'll see logs like:
🎬 Applying zoom_in transition between scene 0 and 1
🎬 Applying quick_fade transition between scene 1 and 2
🎬 Applying fade_to_black transition between scene 2 and 3
The AI automatically:
- Analyzes each scene's content for keywords
- Selects the most appropriate transition type
- Applies professional transition effects
- Logs the chosen transitions for transparency
Example: A scene about "dramatic cellular changes" followed by "then the process begins" would automatically get a fade_to_black transition, creating a professional cinematic effect!
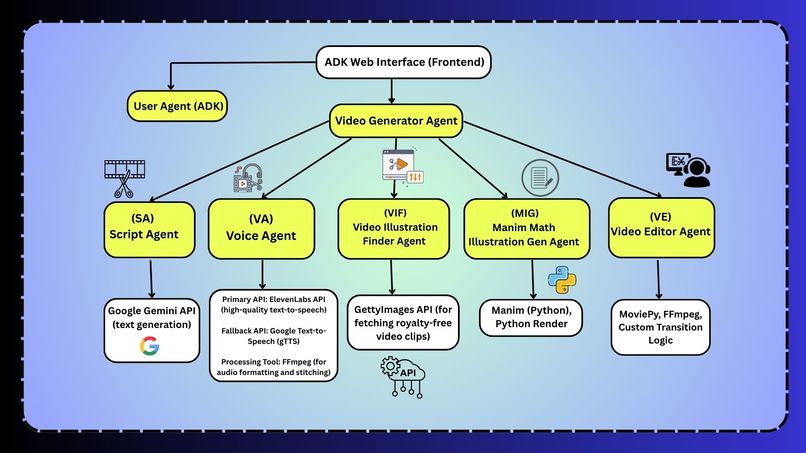
🤖 Agent Architecture
1. Video Script Agent
- Generates structured video scripts in JSON format
- Uses Google Gemini for content creation
2. Audio Generation Agent
- Converts text to speech using ElevenLabs API
- Falls back to gTTS if ElevenLabs fails
3. Video Illustration Agent
- Finds relevant video clips from Getty Images
- Uses Gemini AI to generate search keywords
4. Manim Illustration Agent
- Creates mathematical/scientific animations
- Uses Gemini AI to detect mathematical content
5. Video Compiler Agent
- Combines all elements using MoviePy
- Intelligently applies dynamic transition effects between scenes
- Analyzes scene content to select appropriate transitions automatically
- Adds intro/outro and handles final compilation
- Supports 5 professional transition types: crossfade, fade to black, zoom in/out, quick fade
⚙️ Configuration
The system is designed to work out-of-the-box with minimal configuration. All settings use sensible defaults:
- Video Quality: Medium quality (1280x720, 24fps)
- Audio Quality: 128kbps MP3
- Manim Animations: Medium quality rendering
- Output Formats: MP4 for videos, MP3 for audio
- Transition Effects: Automatically selected based on content analysis
🎬 Transition Effects Configuration
The AI agent automatically selects transitions based on content keywords, but you can customize the behavior:
Content-Based Selection Rules:
- Action Keywords (
move,run,travel,journey, etc.) → Zoom transitions - Dramatic Keywords (
dramatic,emotional,surprise, etc.) → Fade effects - Time Keywords (
then,after,meanwhile, etc.) → Quick fade - Scale Keywords (
big,small,grow,shrink, etc.) → Zoom in/out
Available Transition Types:
crossfade- Smooth cross-fade between scenesfade_to_black- Fade out → black screen → fade inzoom_in- Dynamic zoom in effect at scene endzoom_out- Dynamic zoom out effect at scene endquick_fade- Fast fade transition for dynamic content
If you need to customize these settings, you can modify the values directly in the agent files:
- Video settings:
agents/video_compiler_agent.py - Audio settings:
agents/audio_generation_agent.py - Manim settings:
agents/manim_illustration_agent.py - Transition settings:
agents/video_compiler_agent.py(keyword lists and transition effects)
🛠️ Troubleshooting
Common Issues
ModuleNotFoundError: google.adk
pip install google-adkFFmpeg not found
- Install FFmpeg as described in setup instructions
- Ensure it's added to your system PATH
API Key errors
- Check that your
.envfile exists - Verify API keys are valid and properly formatted
- Ensure no extra spaces around the
=sign
- Check that your
Manim rendering issues
# Install additional dependencies
pip install manim[gui]
MoviePy video compilation errors
- Check that all input files exist
- Verify FFmpeg installation
- Check file permissions in output directories
Transition effects not working
- Verify MoviePy version is 2.x:
pip show moviepy - Check console output for transition selection logs
- Ensure scene content contains analyzable text
- Fallback to crossfade if specific transitions fail
- Verify MoviePy version is 2.x:
Getting Help
- Run the test suite:
python3 test_system.py - Check the logs for specific error messages
- Ensure all API keys are valid and have sufficient credits/quota
📝 License
This project is open source and available under the MIT License.

Log in or sign up for Devpost to join the conversation.