-
-
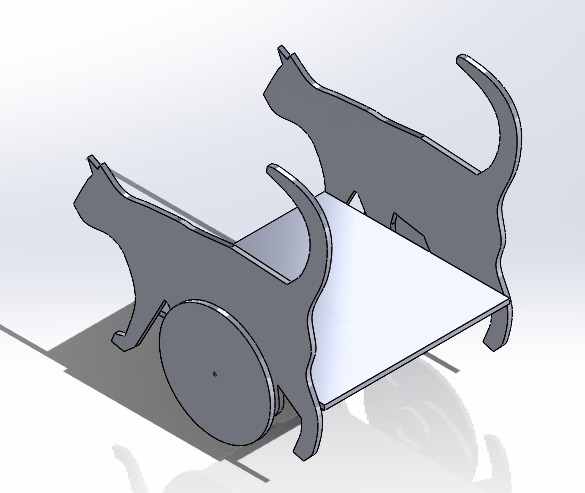
CAD of CatBot
-
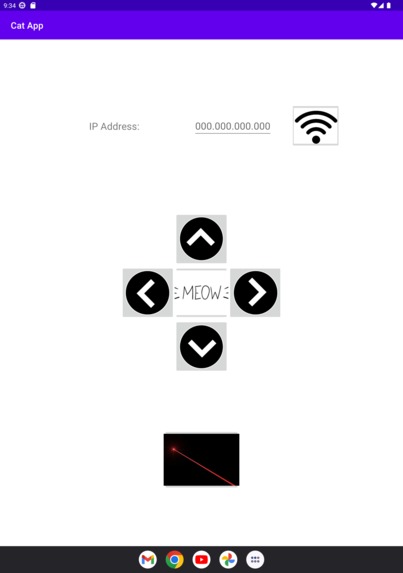
app layout
-
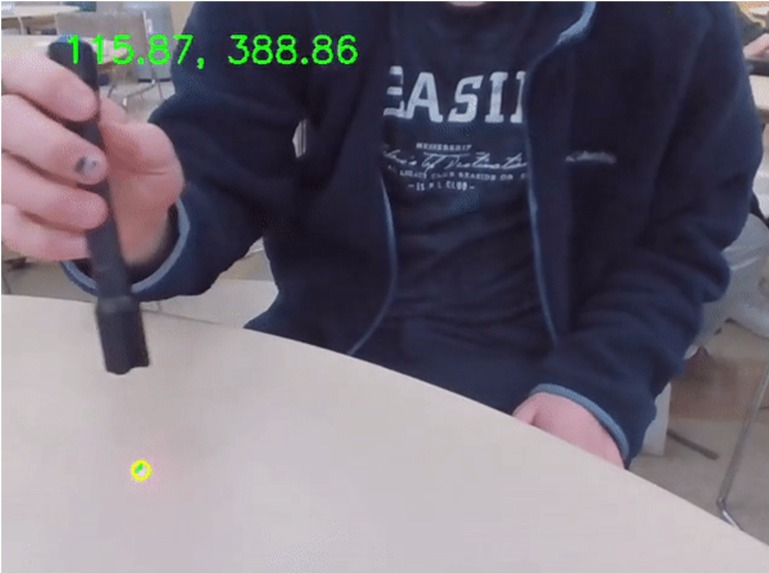
laser pointer computer vision tracking
-
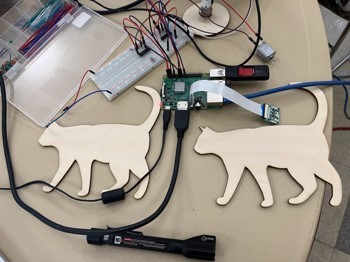
laser cut pieces
-
data sending from mobile app to raspberry pi
-
Version of wiring


Inspiration
Our inspiration for this project came from therapy dogs that visit schools and workplaces to help with mental health. These dogs are cute and fun, but we thought: what about cat people? And what about those with allergies? And what about when the dog gets too overwhelmed by people? What if the dog runs away, or attacks someone? What if the dog gets tired and isn’t able to play anymore? CatBot solves all these issues and more.
We were also inspired by a scene from The Mockingjay (Hunger Games 3) where the protagonists are waiting out an air raid on their base by hiding out in an underground bunker. Tensions were high, but there was a cat in the shelter. Someone pulled out a flashlight and began playing with the cat. Everyone became entranced with the cat trying to catch the flashlight beam and distracted them for the rest of the raid.
What it Does
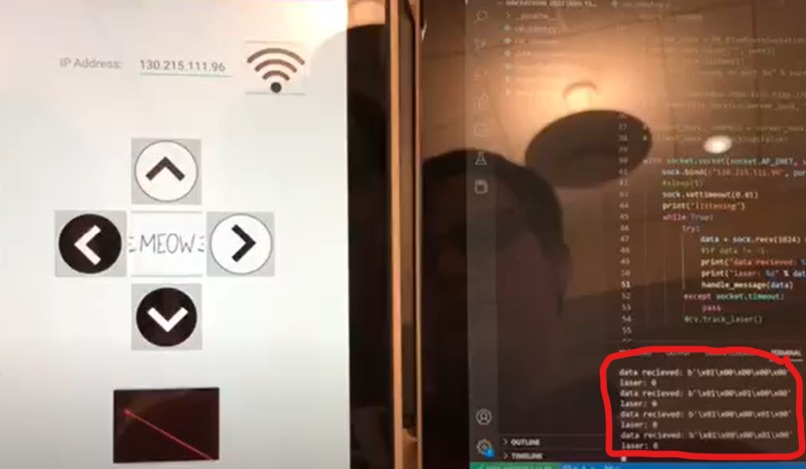
The CatBot has 2 modes, laser pointer following mode and direct control mode.
laser pointer mode
In laser pointer mode the CatBot locates the laser pointer’s dot and drives towards it, keeping the laser in the center of its vision. In this mode, the CatBot appears to be chasing the laser pointer.
Direct Control Mode
When the CatBot is in direct control mode the user controls the CatBot via an app on their mobile device. From here they are able to tell the CatBot to go forwards, backwards, left, or right. They are also able to take CatBot in and out of laser pointer mode from here. The app also plays a meow sound when the meow button is pressed.
How we built it
App
We built the app in Android Studio using Java and xml. It has one Main Activity with all of the buttons visible upon opening the app. We had to adjust the UI a few times to account for the change between Bluetooth connectivity and Network communication. For example, originally we had a bluetooth connect button at the bottom, but we swapped that out for an IP address input bar at the top to input the Raspberry Pi’s varying IP address.
Communication
We sent data from the app to the Raspberry Pi using a connectionless UDP transmission. We initially tried using Bluetooth but there was very little documentation for both Android and PyBlueZ which is the python implementation of the BlueZ Bluetooth API for Linux.
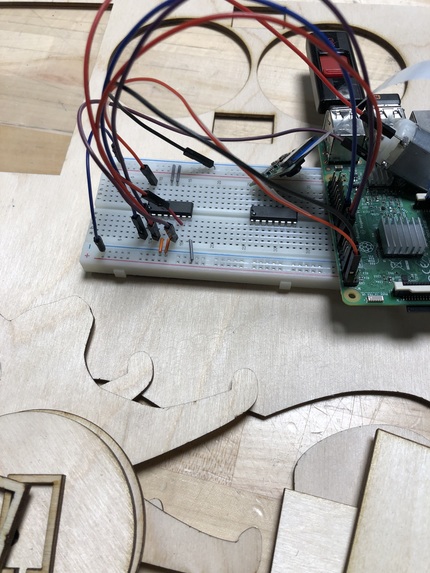
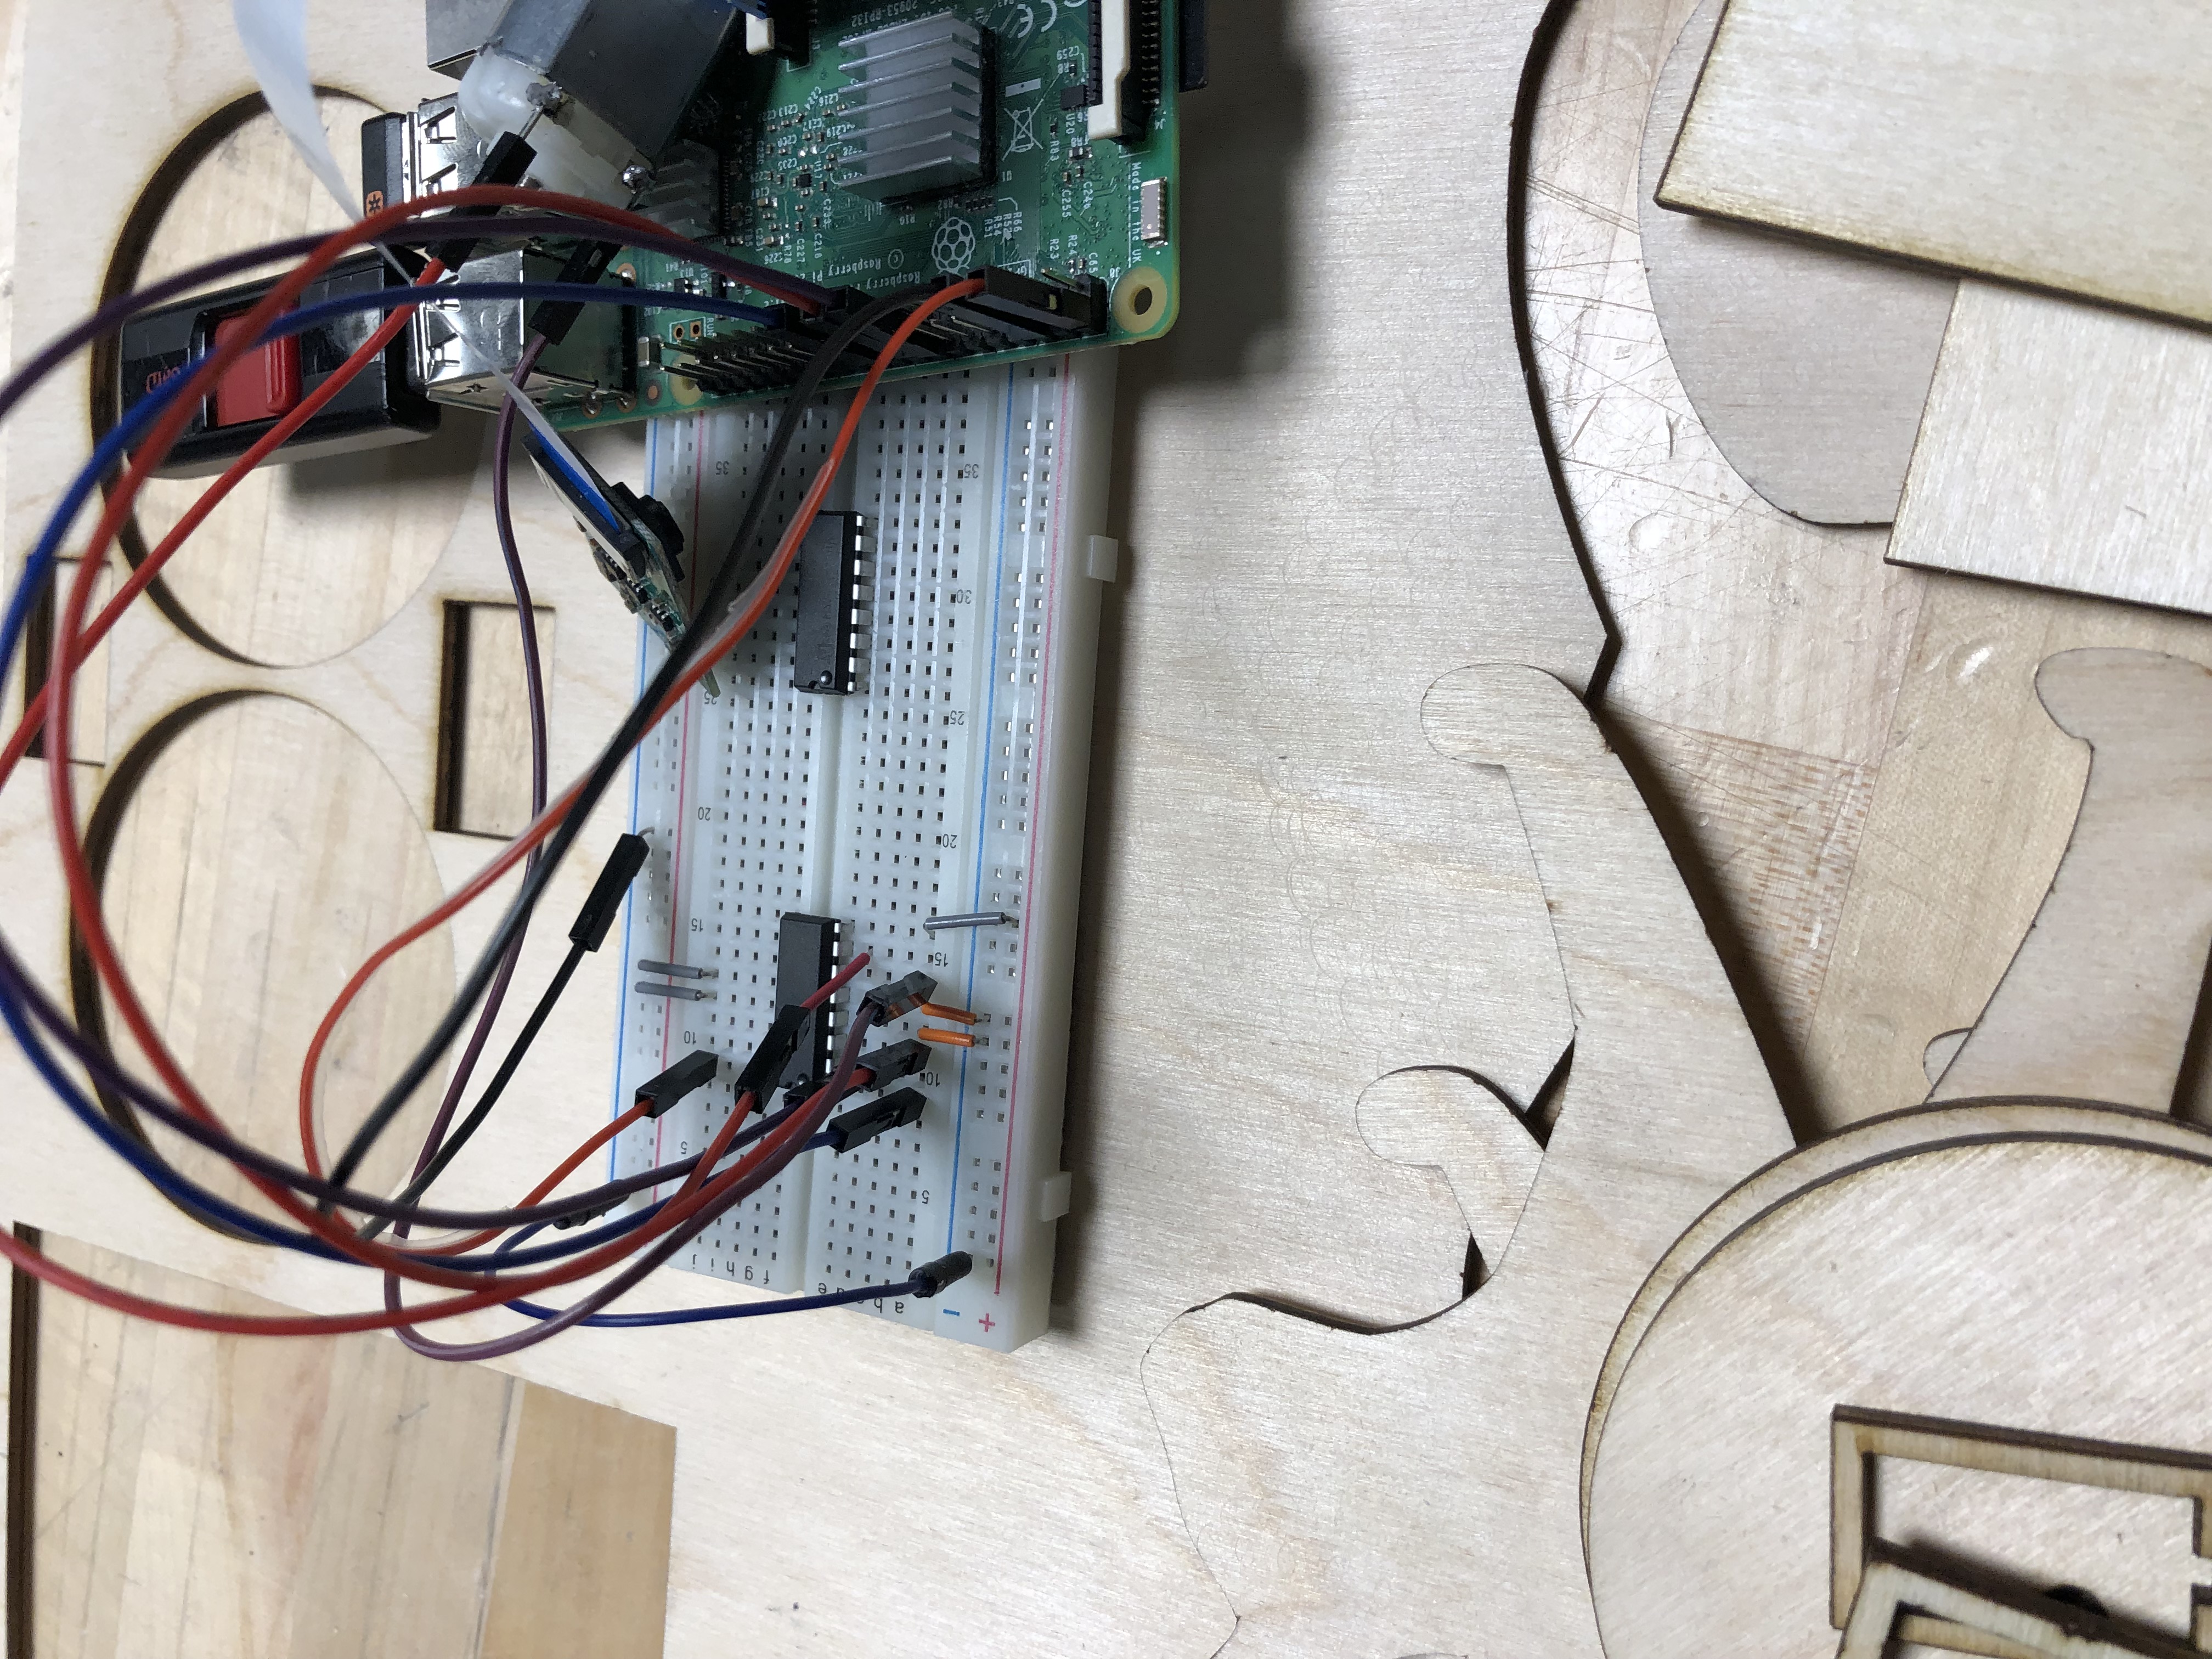
Raspberry Pi
We used a Raspberry Pi to communicate with the app and run the vision program. It then uses this data to control the wheels through the GPIO pins.
Robot
We used CAD software to design our robot’s chassis and then laser cut the pieces. We scavenged from several group member’s robotics and electronics class kits to find the pieces required for the motors and electronics. The robot uses proportional control to follow the laser pointer in accordance with the cv coordinates and turns the wheels to keep it in the center.
Challenges we ran into
Bluetooth
In the beginning we tried using bluetooth to communicate, but despite hours of searching, we could find very little documentation on both low-level android communication and the python API for bluetooth on the Raspberry Pi, called PyBlueZ.
Power Supply
Trying to determine the best way to power the motors has been a significant challenge. The largest issue has been gathering the necessary components. Using a power supply from the lab, we were able to get the motors connected to and controllable by the Raspberry Pi. For mobile use, we were unable to get a suitable mobile battery pack to power the motors which caused significant delays in the construction of our chassis. We explored many alternatives including using servo motors instead of DC motors, powering the DC motor directly from the Raspberry Pi, and using a battery pack from a romi and soldering wires to the DC output, but ultimately decided against all of these options because of various drawbacks or components we did not have.
Speaker
We had planned to have the CatBot itself meow, but we did not have any external speakers small enough and light enough to fit on the chassis so this idea was scrapped. Instead we decided to play the meow through the speakers on the device with the app.
Accomplishments that we're proud of
Wireless control
We were proud of getting wireless control to work because we had a hard time trying to set up Bluetooth, so when the data from the app finally came through on the Raspberry pi we were relieved.
Powering a motor from a microcontroller
Although we could not get a mobile power supply, with the lab power supply we were able to get both motors operational with speed control. This involved using a L293D quadrature H-bridge to sync a power supply output with directions from the raspberry pi. The H-bridge also is connected to a PWM signal allowing the speed of the motor to be controlled by the repeated on-off motion of the duty cycle. This protects the raspberry pi from damage due to backwards electromagnetic field from the DC motor and should allow for simple proportional control when searching for the laser.
Live tracking a laser pointer
We were able to use a raspberry pi camera to live track a laser dot and get its coordinates for use in navigation. These coordinates in combination with the center of the camera allow for the proportional control of the motors to be created.
What we learned
The biggest thing holding us back during development was a lack of components. The clearest lesson is the importance of planning ahead and gathering appropriate supplies when starting a hardware project. Although we found many of the supplies in our lab kits, we could have found an electronics hobby store if we’d done better research and were aware that the type of battery we were originally using would not allow for powering a motor.
What's next for CatBot
A Chassis A power supply for the motors Testing proportional control with the laser dot and the motor
Built With
- android-studio
- java
- laser-cutter
- opencv
- python
- raspberry-pi
- solidworks


Log in or sign up for Devpost to join the conversation.