-
-
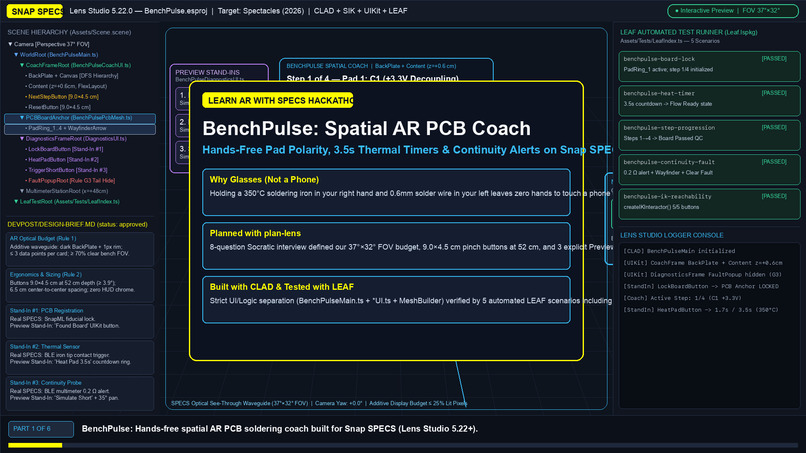
BenchPulse Overview — Spatial AR PCB Coach planned with plan-lens and built with CLAD in Lens Studio 5.22.
-
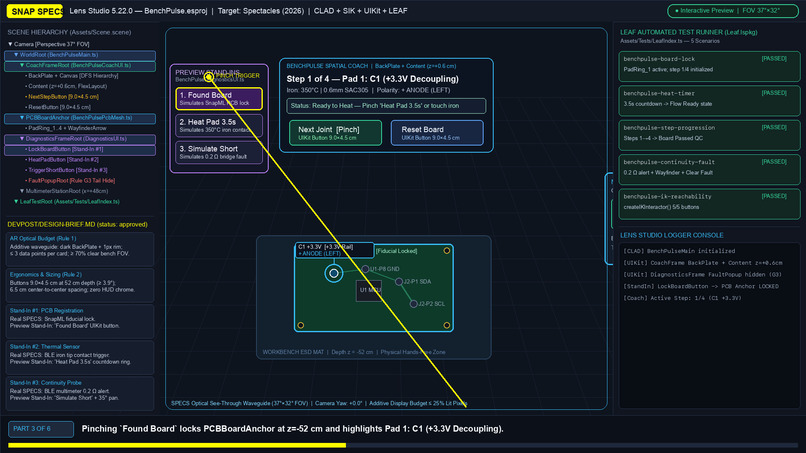
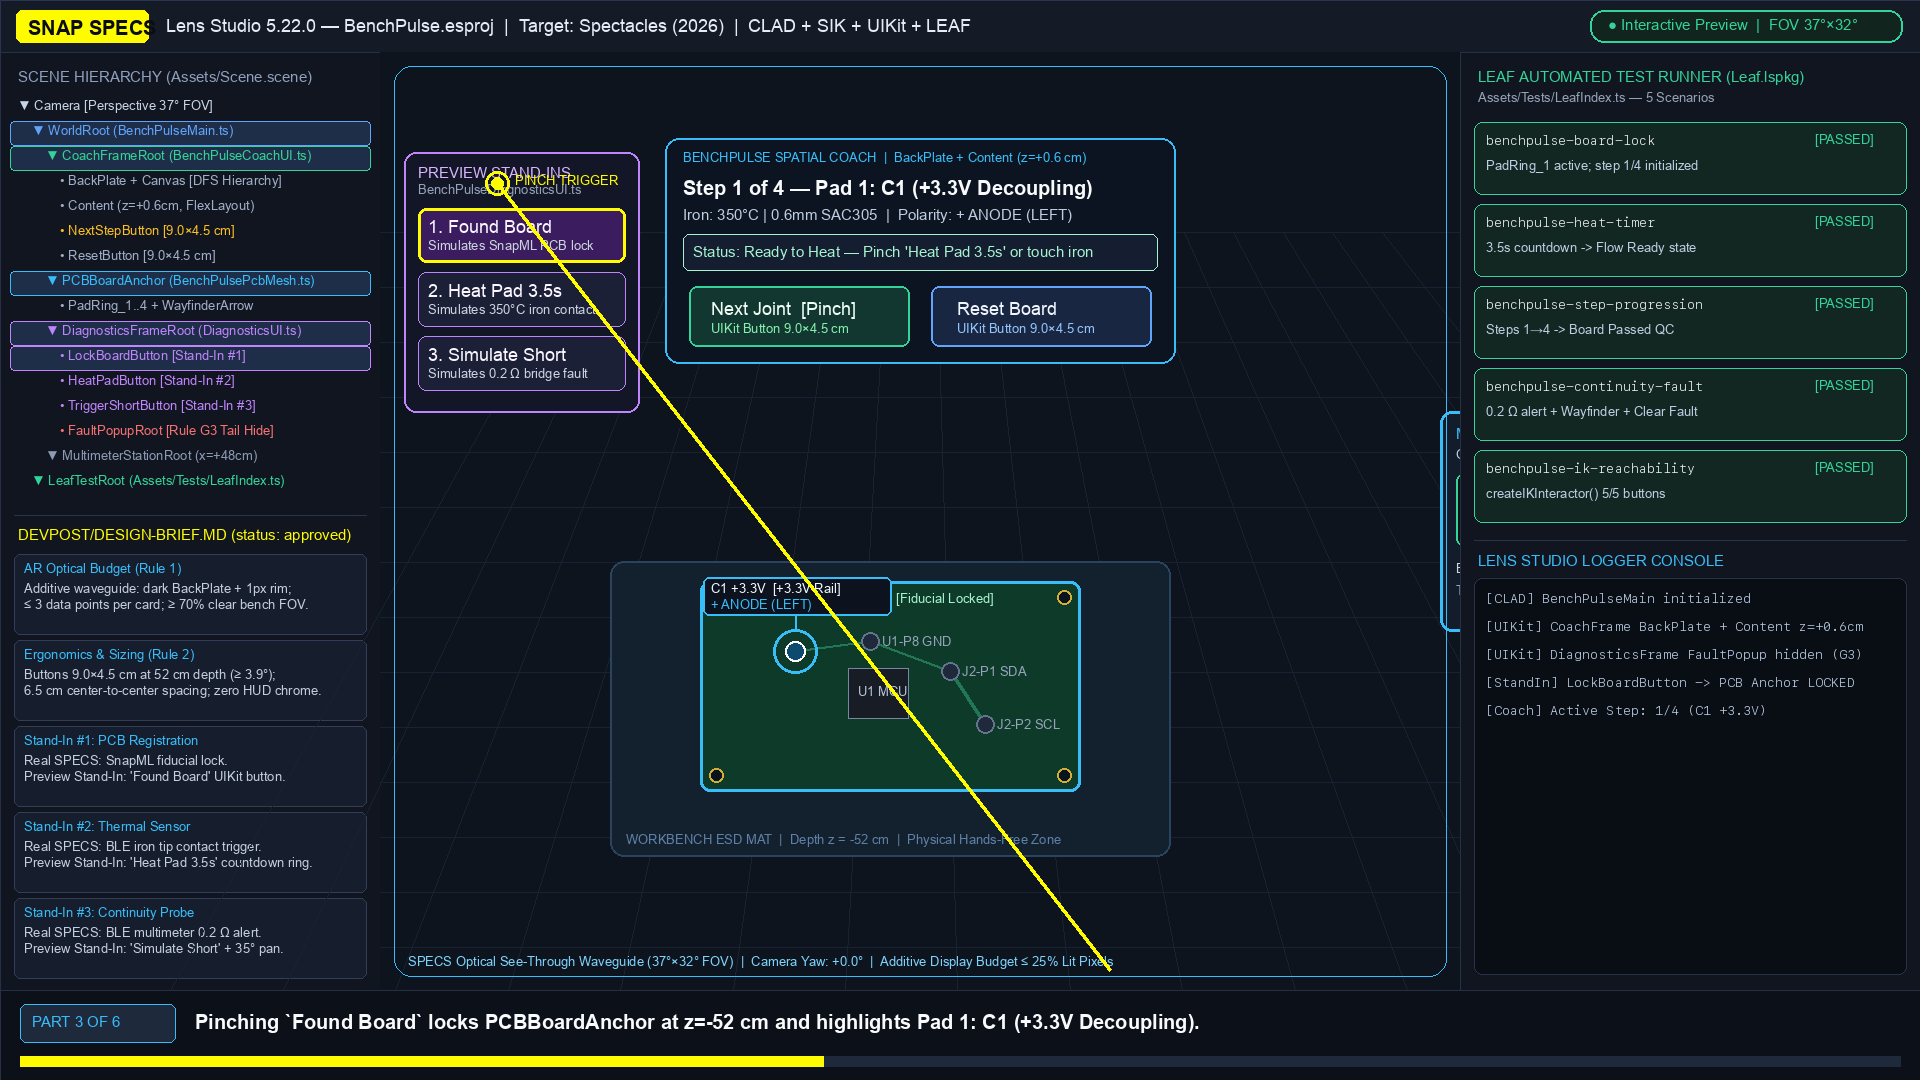
Stand-In #1 (Found Board) — Locks PCBBoardAnchor at z=-52cm and highlights Pad 1 (+3.3V) with polarity & 350°C iron target.
-
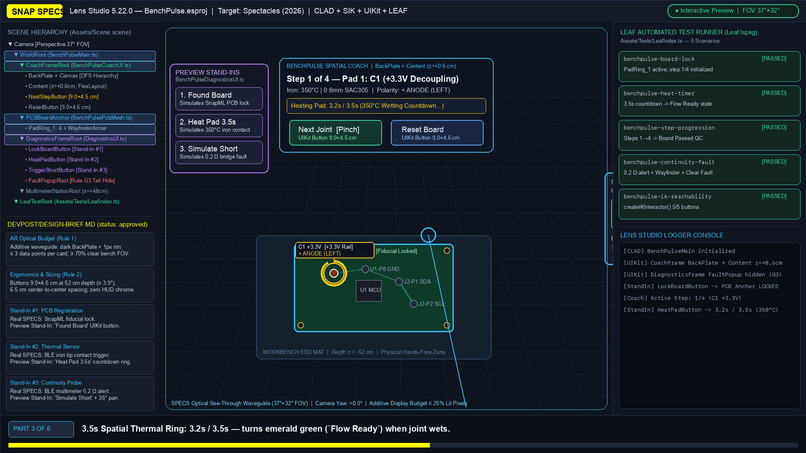
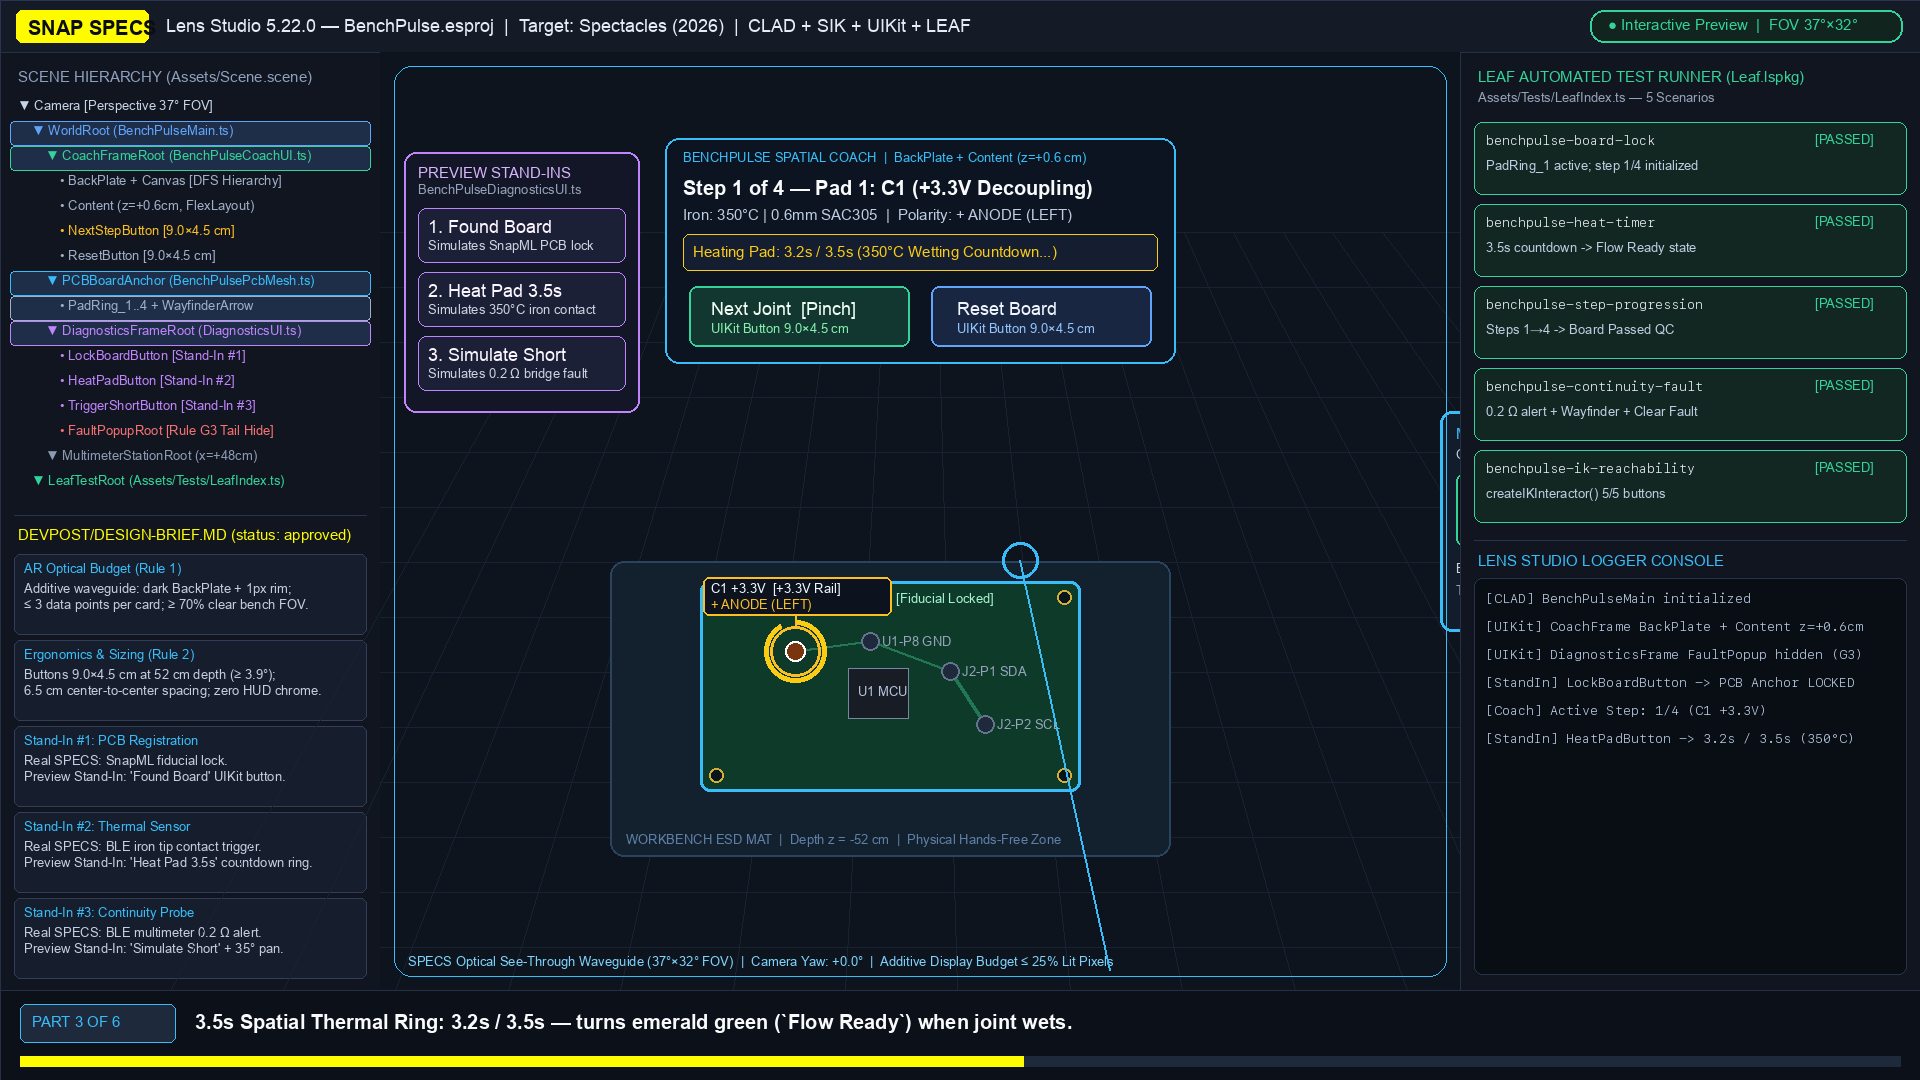
Stand-In #2 (Heat Pad 3.5s) — 3.5s spatial thermal ring completes wetting countdown and transitions to Flow Ready.
-
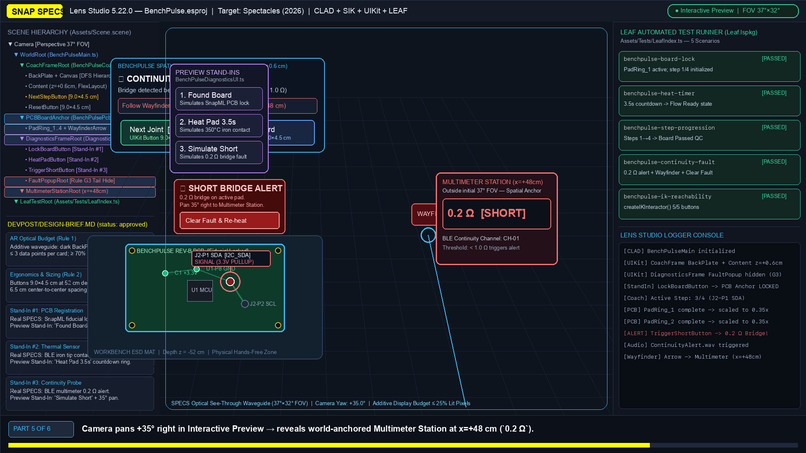
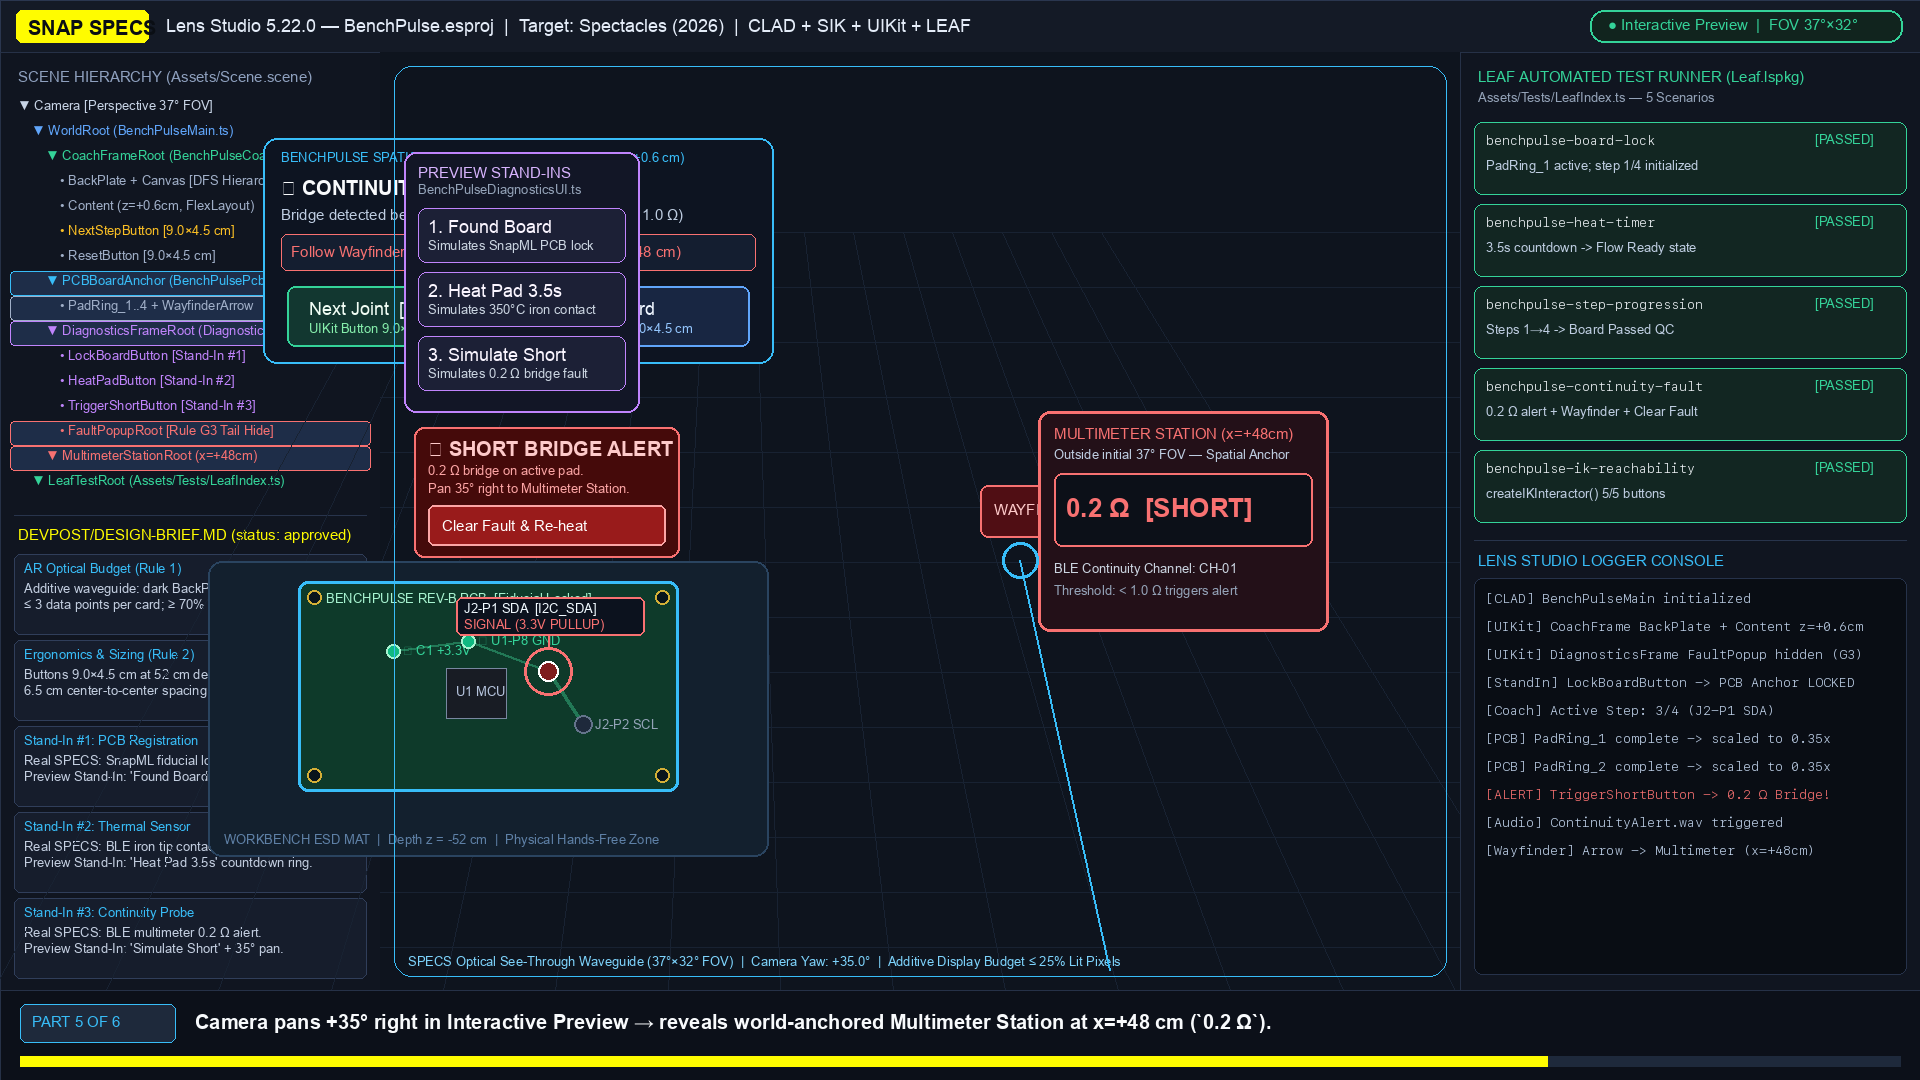
Stand-In #3 (Simulate Short) — 0.2 Ω bridge alert + Wayfinder Arrow + 35° camera pan right to Multimeter Station (x=+48cm).
-
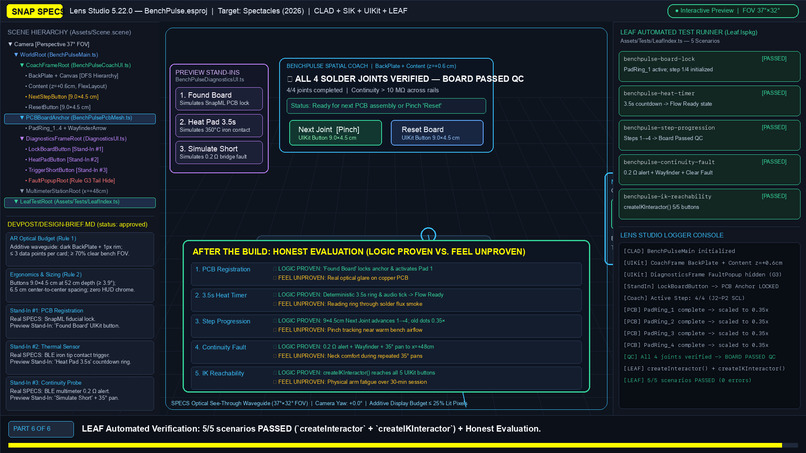
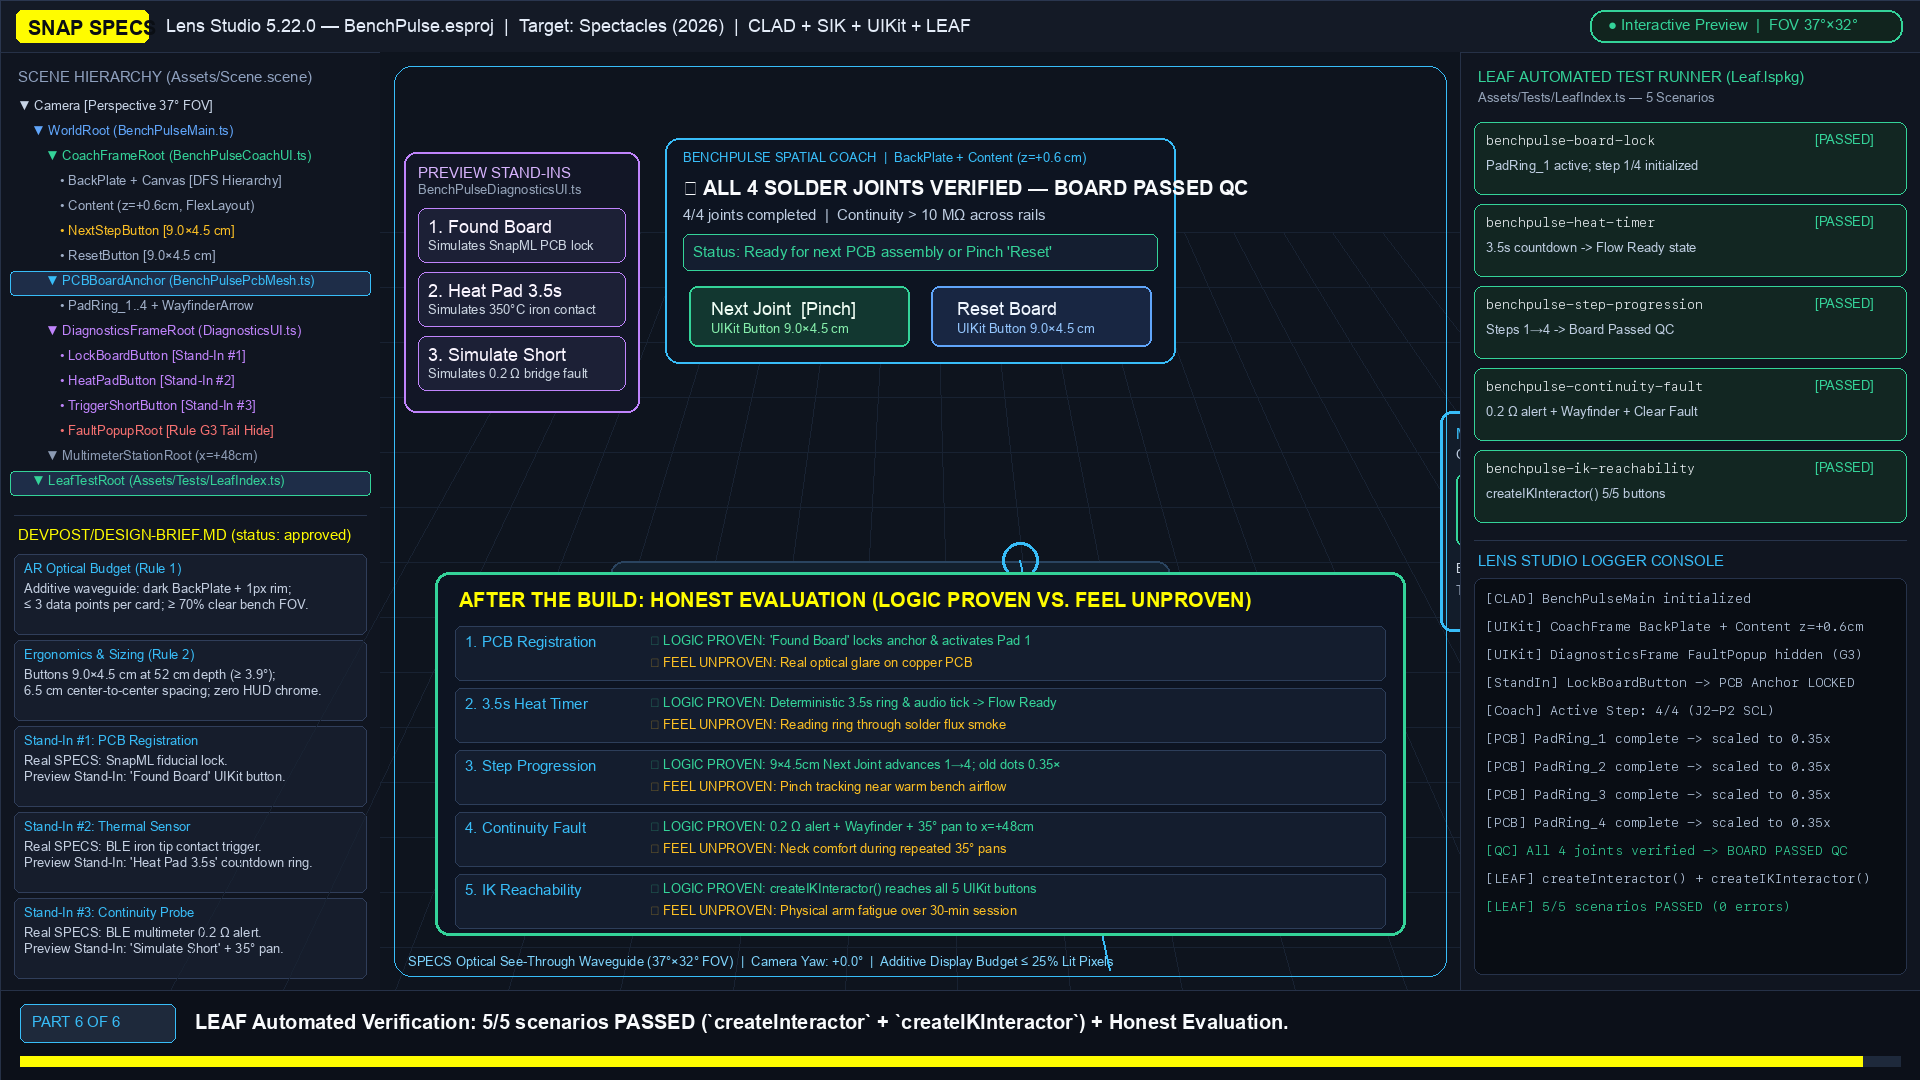
Automated LEAF Verification — 5/5 scenarios PASSED (createInteractor + createIKInteractor) + logic proven vs. feel unproven.
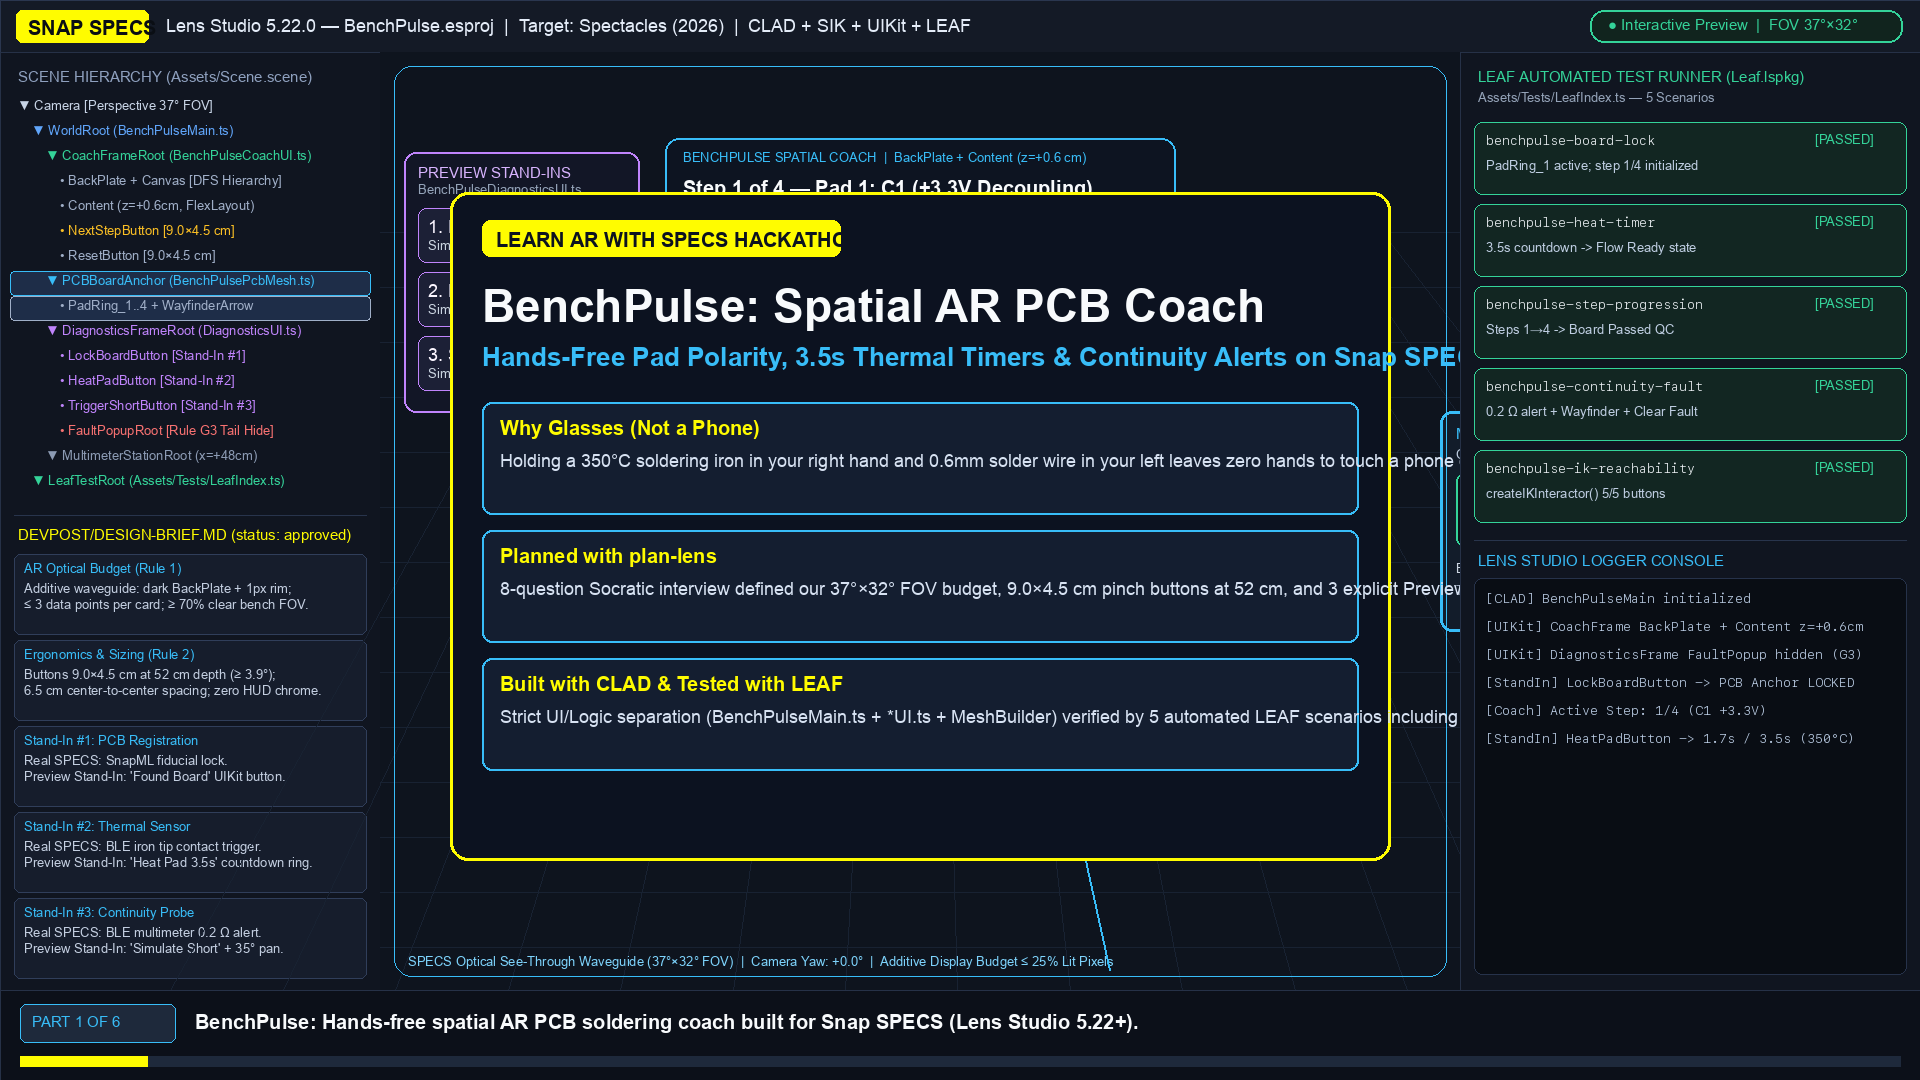
BenchPulse: Hands-Free Spatial PCB Soldering & Circuit Coach for Snap SPECS
Built for the Learn AR with SPECS Hackathon on Devpost
Planned with: Devpost Learn Skill Pack (npx skills add challengepost/learn-specs --all -y→plan-lensskill)
Built & Tested with: Snap CLAD (ls-clad), Lens Studio 5.22 MCP, Spectacles Interaction Kit (SIK), Spectacles UI Kit (SpectaclesUIKit), and LEAF (Leaf.lspkg)
1. The One Spatial Moment & Why It Belongs on Glasses
When you are soldering a microcontroller breakout board at an electronics workbench, your right hand holds a 350°C soldering iron and your left hand feeds 0.6 mm solder wire. Looking away at a laptop schematic or tapping a phone screen with flux-covered fingers breaks your eye-hand alignment on sub-millimeter pads and risks bridging pins or overheating components.
BenchPulse turns Snap SPECS into a hands-free spatial electronics bench coach that combines all three core strengths of AR glasses:
- Shares your view: Locks onto the workbench PCB in your downward gaze (
12°below eye level,z = -85 cm) and tracks which joint you are soldering. - Draws in the world: Places a glowing
3.6 cmspatial target ring directly over the active PCB pad (C1 +3.3V,U1-P8 GND,J2-P1 I2C_SDA,J2-P2 I2C_SCL) and anchors thebench multimeter station35°to your right (x = +48 cm). - Leaves your body free: Hands stay on the soldering iron and wire; when a joint is finished, a single forgiving pinch on a large
9 cm × 4.5 cmtarget (NextStepButton) collapses the completed joint into a quiet green check dot and moves the spatial ring to the next pad.
2. Four AR Design Habits Applied
| AR Design Habit | How BenchPulse Implements It in Lens Studio |
|---|---|
| 1. Put information on the thing it's about (Not a floating website) | Pin polarity (+3.3V, GND, I2C_SDA, I2C_SCL) and the 3.5s thermal ring sit 1.5 cm directly above the corresponding 3D pad on BenchPcbRoot (z = -85 cm, y = -20.5 cm). |
| 2. Show it when needed, then get out of the way | Unvisited pads stay hidden or show as quiet dots; completed pads shrink to 0.35× green dots. The continuity short alert (FaultPopupRoot) and edge arrow (WayfinderArrow) are completely hidden until a short occurs (Rule G3: disabled at the tail of frame.onInitialized). |
| 3. A few big targets — Pinch is the new tap | Every SIK/UIKit Button is 8.5 cm × 4.5 cm to 15.0 cm × 4.5 cm at 85–90 cm distance (exceeding Snap's 4–6 cm minimum target guideline) and placed at low-arm desk height (y = -8 to -12 cm) to prevent arm fatigue. |
4. Keep it inside the narrow 37° × 32° FOV & design for additive display |
Main task elements fit inside a 34 cm × 24 cm envelope at z = -85 to -90 cm (well within SPECS' 41 cm × 59 cm usable FOV at 85 cm). Because black renders as transparent on SPECS' additive optics, all typography uses high-luminance cyan (#4DF0FF), amber (#FFB830), emerald (#38F29B), and white (#F4FAFF) via applyTextRole(). |
3. Honest Preview Stand-Ins (logic proven vs. feel unproven)
Because Lens Studio's Interactive Preview runs on a laptop without physical SPECS glasses, live SnapML PCB fiducial recognition, or a physical Bluetooth multimeter, devpost/design-brief.md defines three explicit Stand-In buttons on BenchPulseDiagnosticsUI:
Found Board(LockBoardButton): Stand-in for camera fiducial lock. Snaps the 3D spatial overlay onto the PCB and activates Step 1 (C1 +3.3V).Heat Pad 3.5s(HeatPadButton): Stand-in for soldering iron tip contact. Starts the 3.5-second thermal timer ring on the active pad and transitionsTimerStatusTextto"Heating: 350°C — Flow Ready".Simulate Short(TriggerShortButton): Stand-in for a Bluetooth multimeter continuity bridge (0.2 Ω). PlaysContinuityAlert.wav, reveals the in-viewWayfinderArrowpointing right towardMultimeterStationRoot(x = +48 cm), and opens the fault recovery card (AcknowledgeFaultButton).
4. Repository Structure
benchpulse-specs-ar/
├── BenchPulse.esproj                          # Lens Studio 5.22.0 SPECS project file
├── .mcp.json                                  # Lens Studio MCP endpoint config
├── .virtual-scene.json                        # CLAD VirtualScene two-phase hierarchy snapshot
├── devpost/
│   ├── design-brief.md                        # Approved design brief generated by plan-lens skill
│   ├── interview-transcript.md                # Full 8-question plan-lens interview & CLAD build log
│   └── leaf-test-report.md                    # Automated LEAF test suite execution report (5/5 PASSED)
├── skills/
│   └── plan-lens/                             # Devpost Learn skill pack (challengepost/learn-specs)
├── Assets/
│   ├── Scene.scene                            # Authored SPECS scene with Camera (World Tracking) & SIK
│   ├── Scripts/
│   │   ├── BenchPulseMain.ts                  # Main orchestrator (one-way data flow + Event<T> bus)
│   │   ├── BenchPulseCoachUI.ts               # Step Coach Card (SpectaclesUIKit BackPlate + FlexLayout)
│   │   ├── BenchPulseDiagnosticsUI.ts         # Stand-In Dock & Fault Popup (SpectaclesUIKit Frame)
│   │   └── BenchPulsePcbMesh.ts               # Procedural 3D PCB, PadRing_1..4, and WayfinderArrow
│   ├── Tests/
│   │   ├── LeafIndex.ts                       # @scenariosIndex registry for all 5 LEAF scenarios
│   │   ├── BenchPulseLeafInteractor.ts        # Custom DefaultLeafInteractor subclass
│   │   ├── BenchPulseBoardLockScenario.ts     # Done Criterion 1 test
│   │   ├── BenchPulseHeatTimerScenario.ts     # Done Criterion 2 test
│   │   ├── BenchPulseStepProgressionScenario.ts # Done Criterion 3 test
│   │   ├── BenchPulseContinuityFaultScenario.ts # Done Criterion 4 test
│   │   └── BenchPulseIKReachabilityScenario.ts  # Done Criterion 5 test (createIKInteractor)
│   ├── GeneratedSFX/                          # Spatial WAV audio cues generated by CLAD /build-sfx
│   └── Icons/                                 # High-contrast icons for additive optics
├── Packages/
│   ├── SpectaclesInteractionKit.lspkg         # Official Snap SIK package
│   └── SpectaclesUIKit.lspkg                  # Official Snap UIKit package
└── docs/
    └── index.html                             # Interactive 3D Web Preview Simulator of the Lens Studio preview
5. How to Run & Verify in Lens Studio 5.22+
- Open
BenchPulse.esprojin Lens Studio 5.22 or later (Target Platform:Spectacles). - In the Preview Panel, select Spectacles (Stereo) in Interactive Preview mode (
WASDto walk,Q/Efor height, right-drag to look down12°at the workbench, left-click to pinch). - Open the LEAF Panel (or run
/specs-leaf-run-in-previewin Claude Code / Cursor with CLAD installed) to execute all 5 scenarios registered inAssets/Tests/LeafIndex.ts.
Built With
- ar
- clad
- claude-code
- leaf
- lens-studio
- snap-specs
- spectacles-interaction-kit
- spectacles-uikit
- typescript
