-
-
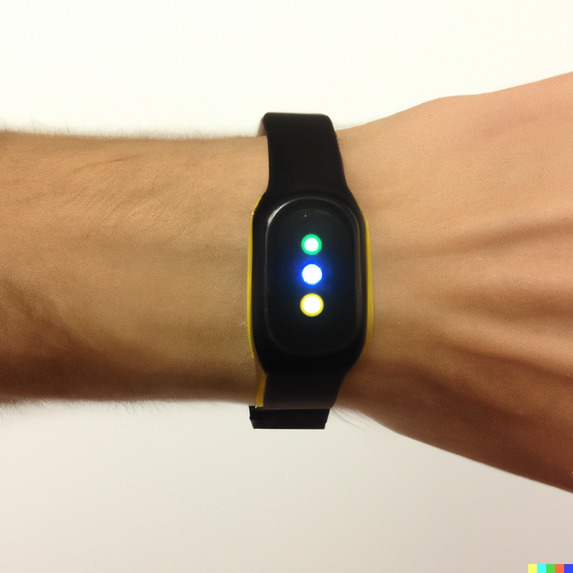
Commerialized product sample

Inspiration
After attending the fireside chats with Tiktok Software Engineers, we went through intense brainstorming and after running through different ideas such as a smartwatch that tracks data metrics of expenditures. We finally decided on a physical budgeting system utilising the capabilities of what was provided to us (the ESP32-S3-DevKitC)
What it does
What it does is essentially utilising the LED lights and capabilities of the ESP32-S3-DevKit to help our users make sure their credit card expenditure is within their own set limits. Utilising 3 LEDS of the colours RED, YELLOW and GREEN. We can display to the user their budgeting status using these 3 lights. Furthermore, we have a light sensor to help us track when a transaction is made. When the card is tapped, the light sensor will be facing the POS machine and as a result when light detected on the light sensor is minimal, a transaction is made and logged into the program. When enough transactions are made, it will turn from a healthy GREEN status of budgeting turning on the green LED to a rather dwindling status of YELLOW to warn the user that their budget is about to be exceeded by turning on the yellow LED and finally will turn to RED status when their budget has been exceeded. This will be effective as humans associate the colour RED with halting and will thus help them to control their spending limits and achieve a smooth experience that will not result in remorse.
How we built it
In the process of constructing the device, our team meticulously selected and employed the ESP32-S3-DevKitC-1 as the core microcontroller due to its robust capabilities and versatility in embedded applications. This choice ensured that our device not only performed efficiently but also allowed for potential future expansion and connectivity to broader networks.
To facilitate the interactive aspect of our device, we integrated three Light Emitting Diodes (LEDs) directly with the ESP32-S3-DevKitC-1. These LEDs were chosen for their visual appeal and ability to provide clear and distinct visual cues to the user. The LEDs were connected in a carefully designed circuit configuration, allowing us to control them individually through the microcontroller. This customization allowed us to provide users with meaningful feedback through different light patterns, enhancing the overall user experience and understanding of the device's functionality.
Incorporating a Light-Dependent Resistor (LDR) into our device was a crucial design choice. The LDR, also known as a photoresistor, was strategically positioned to detect ambient light levels in the device's surroundings. This sensor's analog nature provided our device with the ability to respond to changes in light intensity in a manner that mimics human perception. By accurately gauging variations in light, the device can make real-time adjustments, which is particularly beneficial for applications where the device's behavior needs to adapt to different lighting conditions. This feature not only increases the device's usability but also showcases its adaptability and responsiveness to environmental changes.
The intricate process of connecting the components was executed with precision. Each LED and the LDR were methodically soldered onto the microcontroller's development board, ensuring stable and reliable connections. Wiring was managed meticulously to prevent interference and to maintain a clean and organized layout. The choice of component placement and arrangement aimed to strike a balance between functionality and aesthetics, resulting in a device that is not only efficient but also visually appealing.
Challenges we ran into
For challenges, everything was a challenge. From our mental ability to our mental stability it was challenging, firstly we decided to use an ESP32-S3-BOARD which is an LCD display screen. While working with Espressif ESP32, it was very foreign to us and to get everything working was a nightmare. We had spent hours upon hours trying to fix different problems that kept appearing, while working on the first LCD screen we tried running code however, different problems started arising. Firstly, upload ports were not working and we had to make sure that the wire wasn't spoiled. Secondly, different problems started arising regarding to ninja on the Espressif IDE. Lastly, when the code finally ran, it brought the LCD screen into a boot loop or a forced perpetual loop and the screen fried. Unfortunately enough, we tried the LCD screen again and you guessed it, it died again. So to overcome these arduous challenges and setbacks, we picked up where we left off and decided to simplify our program down and to just utilise the ESP32-DevKit instead. Meanwhile, while doing this we ended up in more problems as the Arduino IDE could not identify which port the ESP32 was connected to even though it was clearly connected and we could see it in Device Manager, after countless troubleshoots and scouring the internet for different solutions we finally found out that to solve it we had to use the cable at a certain angle to be able to upload the code properly by changing ports it miraculously started to work.
Accomplishments that we're proud of
We are proud of being able to complete our project despite the countless attempts of failures and errors that were thrown at us.
What we learned
We have learned a lot about the ins and outs of the Arduino IDE alongside the ESP32 development kits. We found out that ESP32 has many different features and we could incorporate many of our ideas into them. It was an exhilarating experience to encounter countless errors in the span of 5 hours of troubleshooting. We also learned that it is NOT okay to give up, we thought of giving up many times but we continued to strive till the end until 9.30pm on SUTD campus. We tried and tried again and then it finally worked. We also learned the power of friendship can take us far into the horizon and send us flying into the realm of success.
What's next for beanis
We will join more hackathons and achieve success
Built With
- c++
- esp32

Log in or sign up for Devpost to join the conversation.