-
-

ROS Node Architecture
-
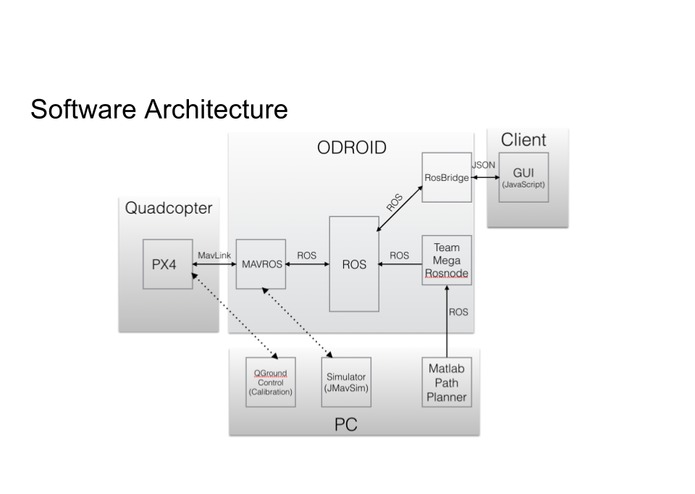
Software Architecture
-

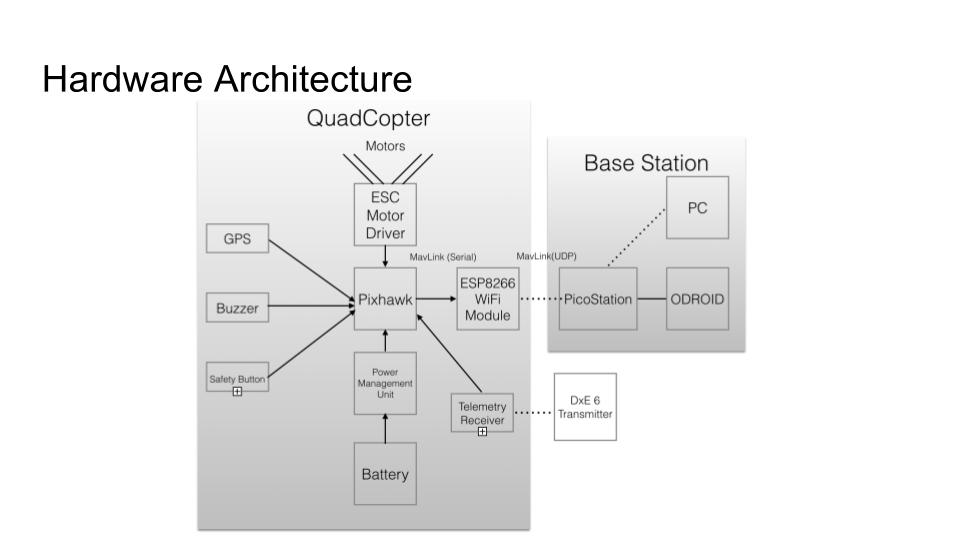
Hardware Architecture
-
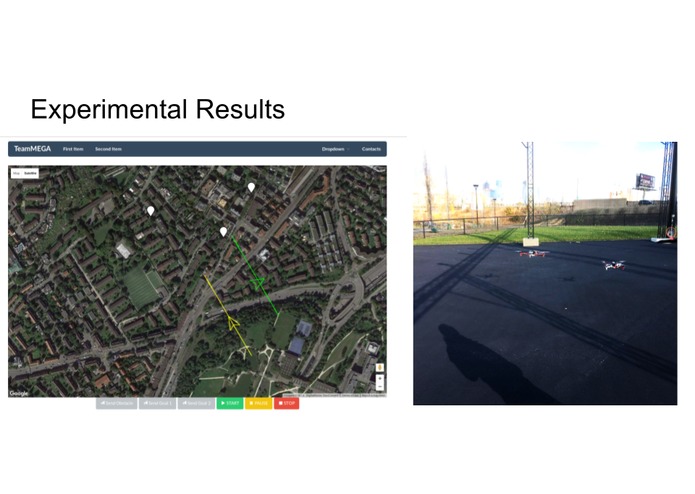
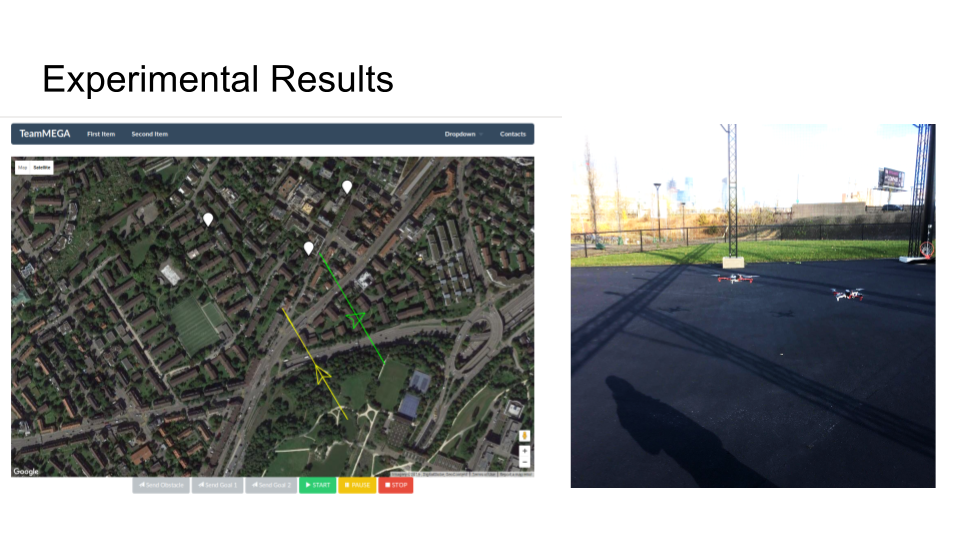
Experimental results
-
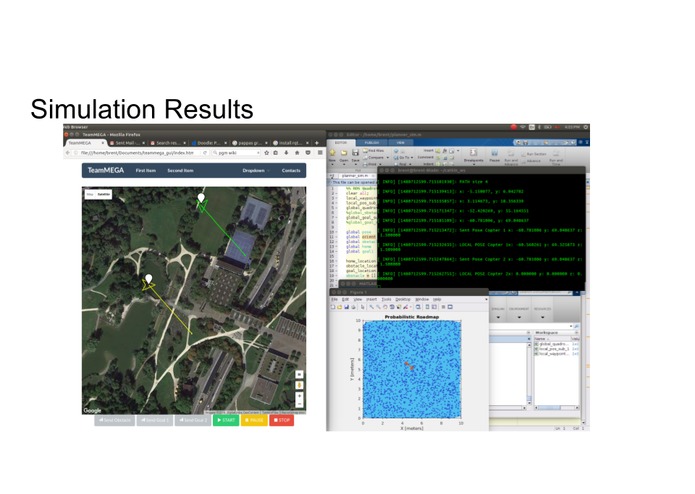
Simulation results


Inspiration
Drones, specifically autonomous quadrotors, are poised to make a huge impact for businesses and society in general. Companies are already using drones for delivery, surveillance, and photography. There are countless other applications like agriculture and communication. In order to operate a dense fleet of quadrotors in a busy urban environment, an autonomous routing paradigm must be developed to allow for safe and efficient operation.
What it does
The goal of our project is to simulate existing air traffic control methods in a small-scale and hands-on way. We aim to create a quadrotor based testbed for existing and new traffic control algorithms. This system will accelerate the development of modular self-contained autonomous routing controllers for dense low-altitude fleets of quadrotors.
How it's made
The hardware components of the project include 4 quadrotors and a base station. The quadrotors are based on a PixHawk autopilot, which connects to a GPS, motor drivers, power module, safety switch, radio receiver, and WiFi module.The quarotors have a diameter of 450mm and carry 5000 mAh batteries. The hardware of the base station includes an ODROID controller, a PicoStation, and a GPS module. We use two radio transmitters that will manually control the quadrotors in case of an emergency. The ODROID runs Ubuntu Linux and MAVROS.
Github Repos:
- GUI https://github.com/katetolstaya/teammega_gui
- C++ controller https://github.com/brent8149/teamMEGA
- Matlab Path Planner https://github.com/brent8149/Matlab_planner
Challenges and Timeline
Up to 10/31/16
- Quadrotor design and purchasing parts
- Exploring existing software: QGroundControl https://www.gitbook.com/book/donlakeflyer/qgroundcontrol-user-guide/details
Item,Cost,Quantity
- CrazePony Autopilot $74 - 4
- ESP8266 Serial to Wifi $6.50 - 4
- DJI F450 ARF + Naza $300 - 1
- DJI F450 ARF $190 - 3
- Extra Props 10.89 - 4
- Ublox NEO-M8N GPS $28.99 - 4
- PicoStationM2HP $72.52 - 2
- ODROID-XU4 with US Plug $74 - 2
- USB GPS Module $25 - 2
- 64 GB eMMC module with eMMC and USB adapters $75.9 - 2
- Charger adapters (4 pack) $10.99 - 1
- Accucell S60 AC Charger $29 - 4
- Battery Bag $7.80 - 2
- 5000 mAh battery 4s $19.53 - 8
- DSMX Remote Receiver $34.99 - 4
- DXe Transmitter $59.99 - 2
- DXe Programming cable $17.99 - 2
- Deans Plug 10 Pack $5.95 - 1
- Power Module $10.98 - 4
- Battery Straps 5 pack $7.99 - 1
- F450 landing gear $5 - 3
Week of 10/31/16
- Setup and testing of transmitter/receiver system: https://www.spektrumrc.com/ProdInfo/Files/SPMAR8000-Manual.pdf
- Testing the Naza autopilot
Week of 11/7/16
This week, we finally received the majority of our parts for quadrotor assembly. We followed this video to do the majority of assembly and wiring. Since we are using the PixHawk, not the Naza autopilot, we used these wiring guides 1 and 2. We then used QGroundControl to upload firmware to the PixHawk and calibrate the sensors and transmitter. Meanwhile, we worked to set up a local WiFi network for the PixHawk using the HUZZAH ESP8266 module. We found excellent firmware and guide to help us. Learning manual controls was extremely challenging. We found that it was easiest to control the quadrotor when the autopilot was in Loiter or AltHold modes. Finally, we moved on to testing autonomous flight and MAVLink protocol using MissionPlanner/QGroundControl software. There is a detailed guide that we followed here
Week of 11/14/16
This week, we focused on setting up the network between the ODROID, PicoStation and the the PixHawk. First, we installed ROS and MAVROS on the ODROID. You can find a guide here. We set up the PicoStation as a access point with Static IPs according to the guide here Next, we changed the settings of the ESP8266 to Station mode, connecting to the PicoStation network, with a tutorial here. We were able to send offboard commands to 1 vehicle based on the tutorials found here and here
Week of 11/21/16
This week, we worked on setting up MAVROS to communicate with 2 PixHawks. MAVROS is not designed for communicating with multiple vehicles from one node, so we had to run 2 instances of MAVROS nodes with different names. Then, we were able to subscribe to sensor data topics. This week, we also presented our work for our first demo. After the demo, we received a lot of feedback. Prof. Mangharam helped us refine our final goals:
- First, create a simple GUI that shows current locations of quadrotors and obstacles. The user can click to pick landing positions for the quads or to generate an obstacle. The GUI also makes it easy to view and switch between flight modes.
- Mission 1: 1-4 quadrotors take off, fly to targets, and return to takeoff location
- Mission 2: Mission 1 + quadrotors avoid a 3D obstacle can move based on user controls
- Mission 3: Mission 1 + quadrotors avoid a sphere around a manually-controlled quadrotor
Week of 11/28/16
In the final week, we first worked on developing the GUI. We based our approach on this project. To this project, we added support for multiple vehicles. We also implemented the feature that allows us to click on the map and publish waypoints to ROS, rather than just subscribing to data. The main building blocks of the system are the HTML and JS code running in the browser, and also ROSBRIDGE that allows JSON queries to send and receive ROS messages. We tested the GUI with 2 simulated quadrotors and 2 actual quadrotors.
Some difficulties were encountered while implementing the clickable GPS landing locations that were used for creating missions. Our planner relied on having cartesian coordinates for planning, e.g. in the X-Y plane. Thus, it was essential to use a mapping from GPS to some sort of flat world space. To solve this problem, we used coordinates generated from the Universal Transverse Mercator (UTM) system, which is a projection of the globe onto a flat map. Over short distances, such as where our quadrotors would fly, this proved effective in planning accurate trajectories.
We worked on the planning and control portion of the code. We used the Matlab ROS libraries to incorporate the PRM path planning method (https://www.mathworks.com/examples/matlab-ro).
Finally, we were able to send take-off and circling commands to the quadrotors, but were unable to get precise tracking of paths given by the GUI. Incorrect RTL settings, etc caused damage to the quadrotor with too little time left to redo the experimental portion.
Ultimately, we are very proud of the software stack we have created. It is a great tool for further algorithm testing and development, both in simulation and experimentally.
Accomplishments
[X] Baseline 1: Demonstrate communication between base station and multiple quadrotors
[X] Baseline 2: Generate a computer simulation for traffic control
[X] Baseline 3: Generate an autonomous trajectory for at least 1 quad from the base station
[X] Reach 1: Generate full autonomous trajectories for multiple quadrotors in simulation
[X] Reach 2: Development of a GUI for real-time tracking and and commands
[ ] Reach 3: Generate full autonomous trajectories for at least 3 quadrotors experimentally
- Preliminary Demo Video: https://www.youtube.com/watch?v=SCWnQ9CvTcI
- Final Demo Video: https://youtu.be/143S_53mW3s
Built With
- dji-f450
- mavros
- odroid
- picostation
- pixhawk
- px4
- ros
- ubuntu

Log in or sign up for Devpost to join the conversation.