Inspiration
I made a change in my PC's BIOS and it stopped booting. The fix was clearing the CMOS, a reset that takes minutes and is done at a pair of pins on the motherboard. But I couldn't tell where those pins were or which parts were safe to touch, and I was too scared to find out. So my PC sat dead for months.
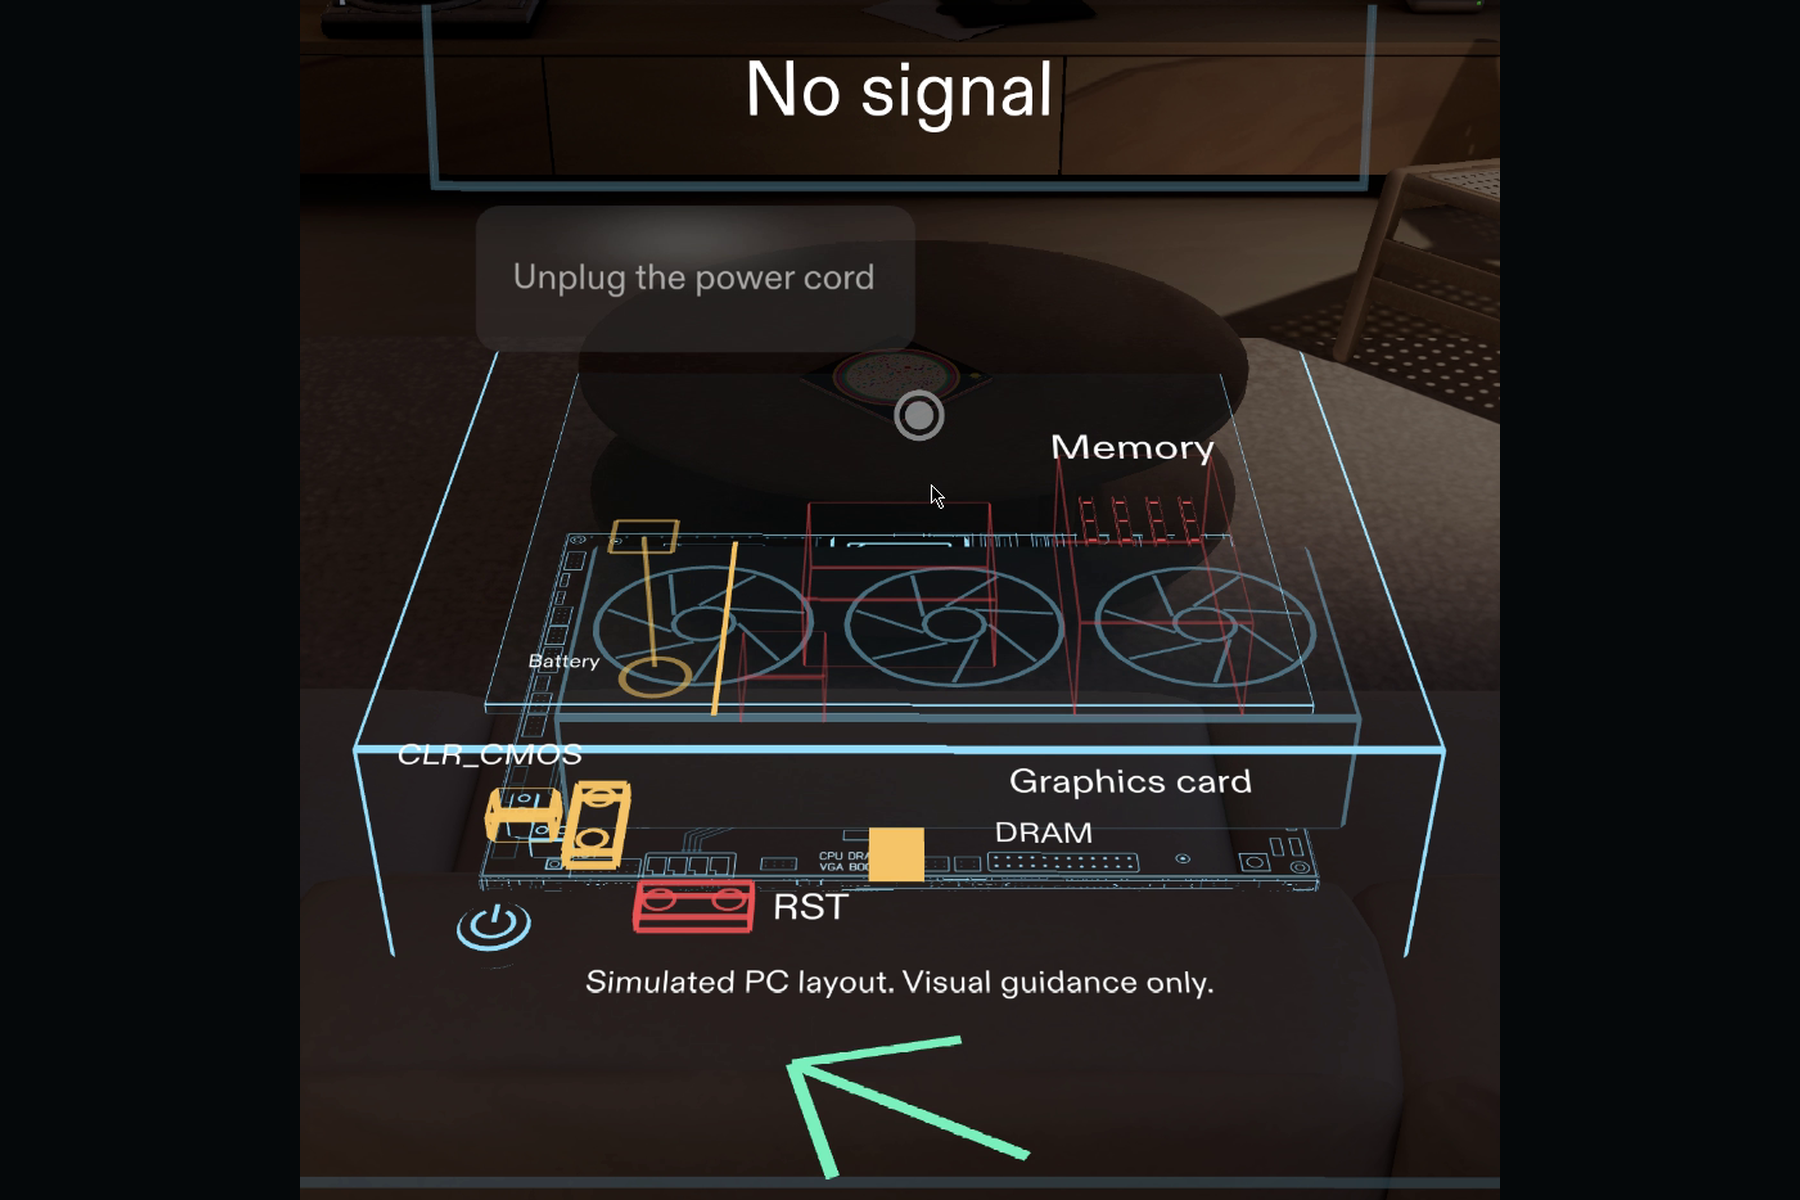
That's why we built Clear CMOS, a Lens for Snap's SPECS glasses that walks you through that reset, for new PC builders and anyone stuck with a dead PC. Clearing CMOS is a common first fix, though it doesn't always work. In the Lens, you look at a simulated open PC, and it shows you the board through the parts on top and leads you to the reset pins.
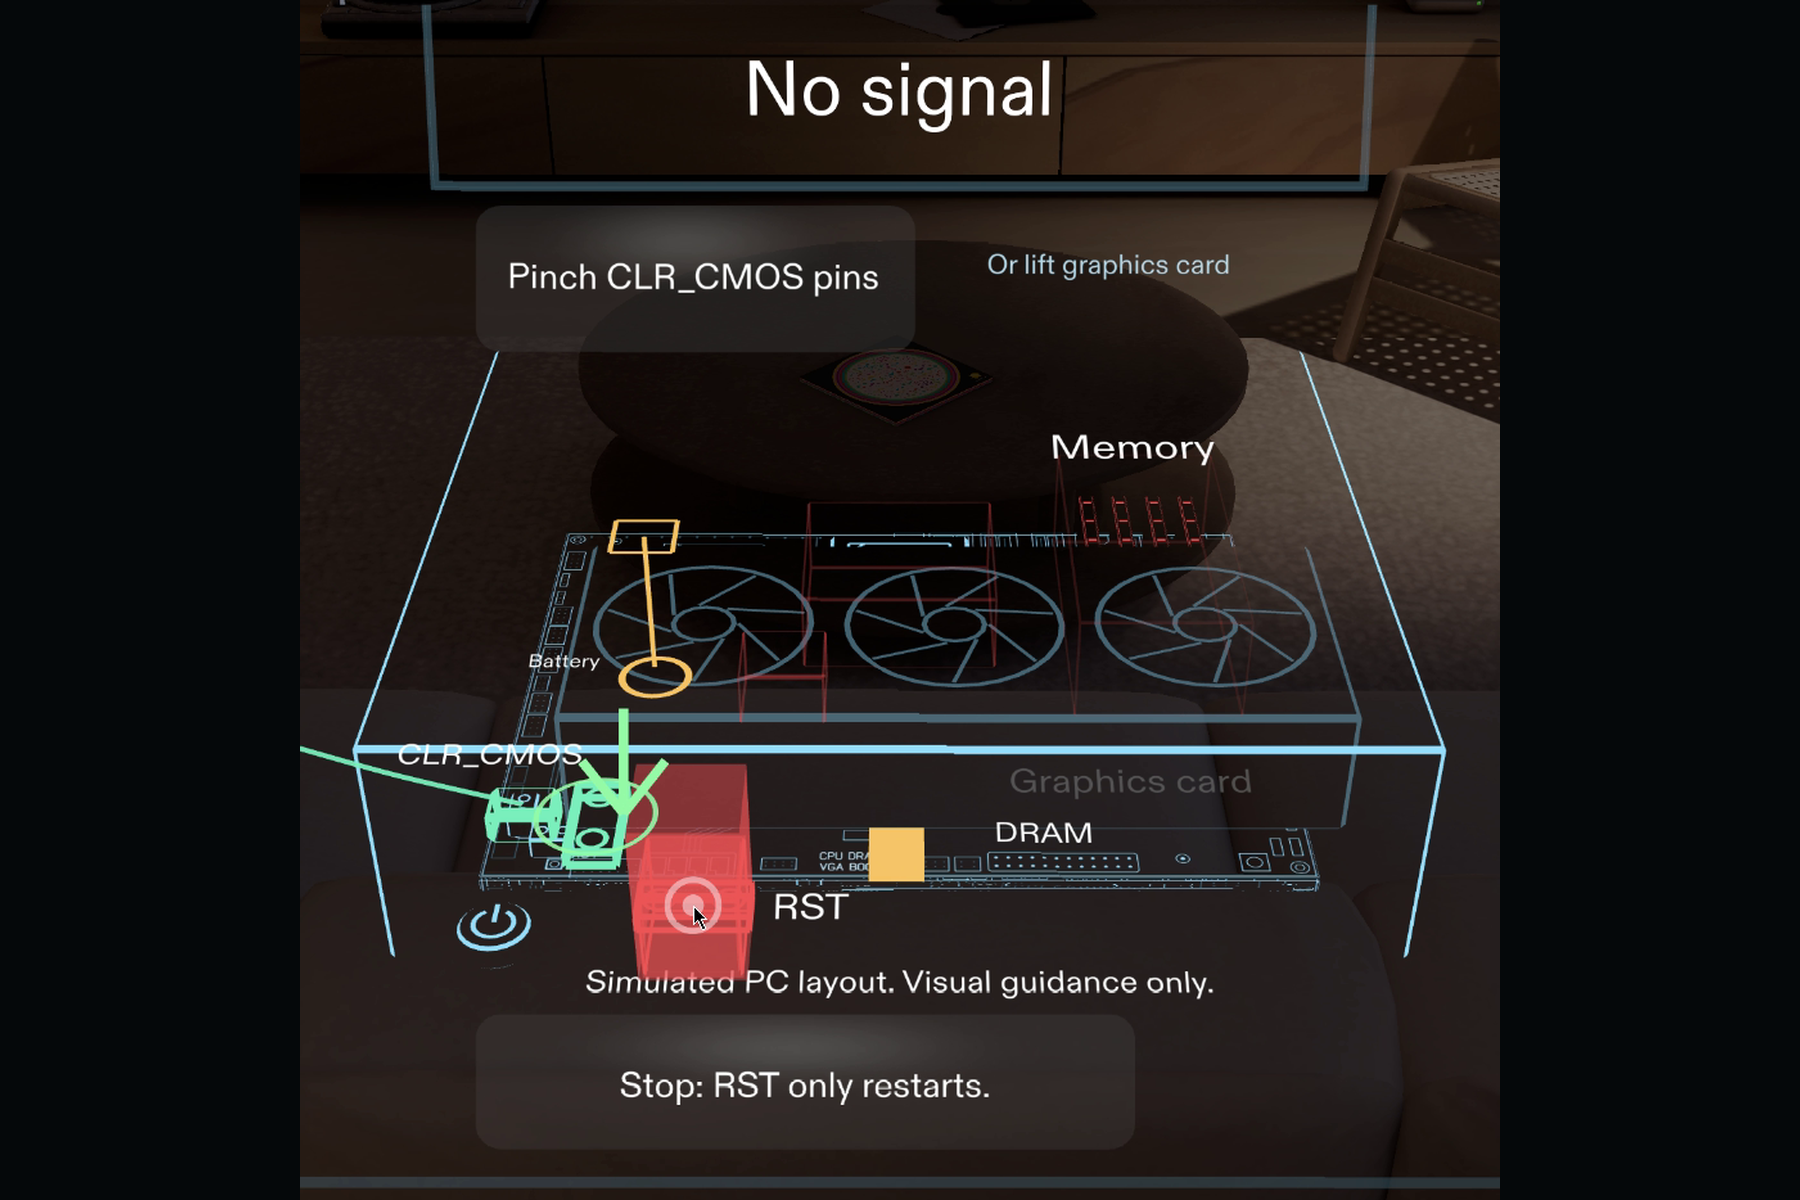
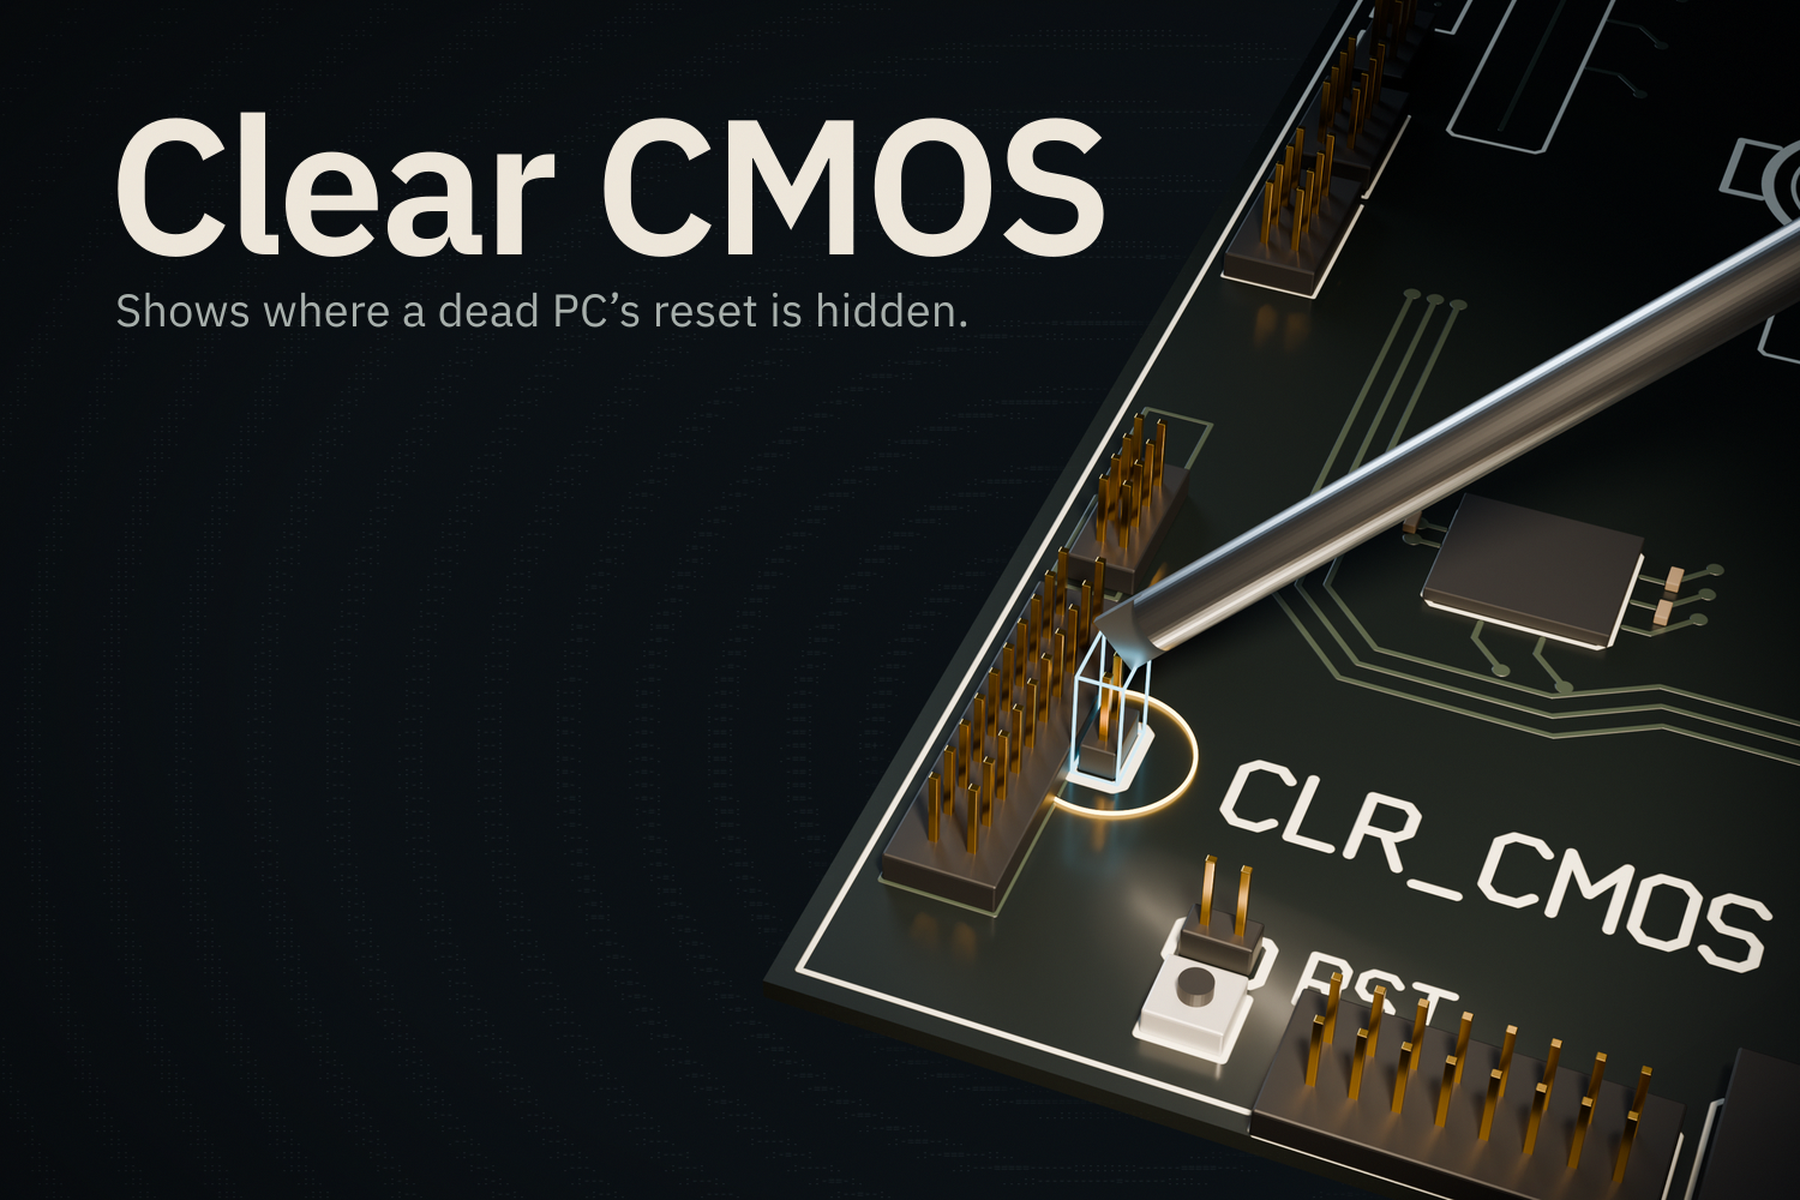
The part I needed back then is the warning. On the board in our Lens, the CLR_CMOS pins you want sit right beside the RST pins. If you pause over RST, a red wall rises and tells you why: "Stop: RST only restarts." You get warned while you're still deciding, before you touch anything.
Guided AR repair tools like Dynamics 365 Guides and FieldFix AR already have X-ray views, blocked steps and red keep-out areas, and we don't claim those as new.
What it does
You look at an open PC. The DRAM light is on and the monitor says "No signal". You pinch the light itself. Its label reads "DRAM light stuck on? Pinch it." and a note says "If it just started, wait. Memory training can look like this." Then you pinch "Scan this PC (simulated)".
An amber sweep shows the board through the parts on top. A line drops through the graphics card to the battery under it, and a 3x callout sits beside the CLR_CMOS jumper. A safe-path ribbon draws itself from the power cord to the reset and stays clear of the red no-go boxes. The cord is placed outside the view on purpose. While it is out of view, a world-space arrow points to it, and a chime plays once when the arrow appears. The glowing path stays on the table, not on your face. From the cord step until it's unplugged, pinching anything else gets a refusal. Then the glass lifts.
The Lens warns before you click. When the cursor stays inside a red no-go box for 350 ms, the box flashes, a red wall rises, and a short line gives the reason. On the RST pins it reads "Stop: RST only restarts." On the memory it reads "Stop: BIOS reset comes first." On the CPU socket it reads "Stop: CPU pins bend easily." On any other red part it reads "Stop: leave the red part." If you click anyway, the part shakes and refuses with its own line. Virtual parts push back with nothing your fingers can feel, so the Lens warns, with the reason, while you are still deciding, and your hands stay free for the real case. Each line shows for 2.5 s. The memory refusal reads: "Try the BIOS reset first."
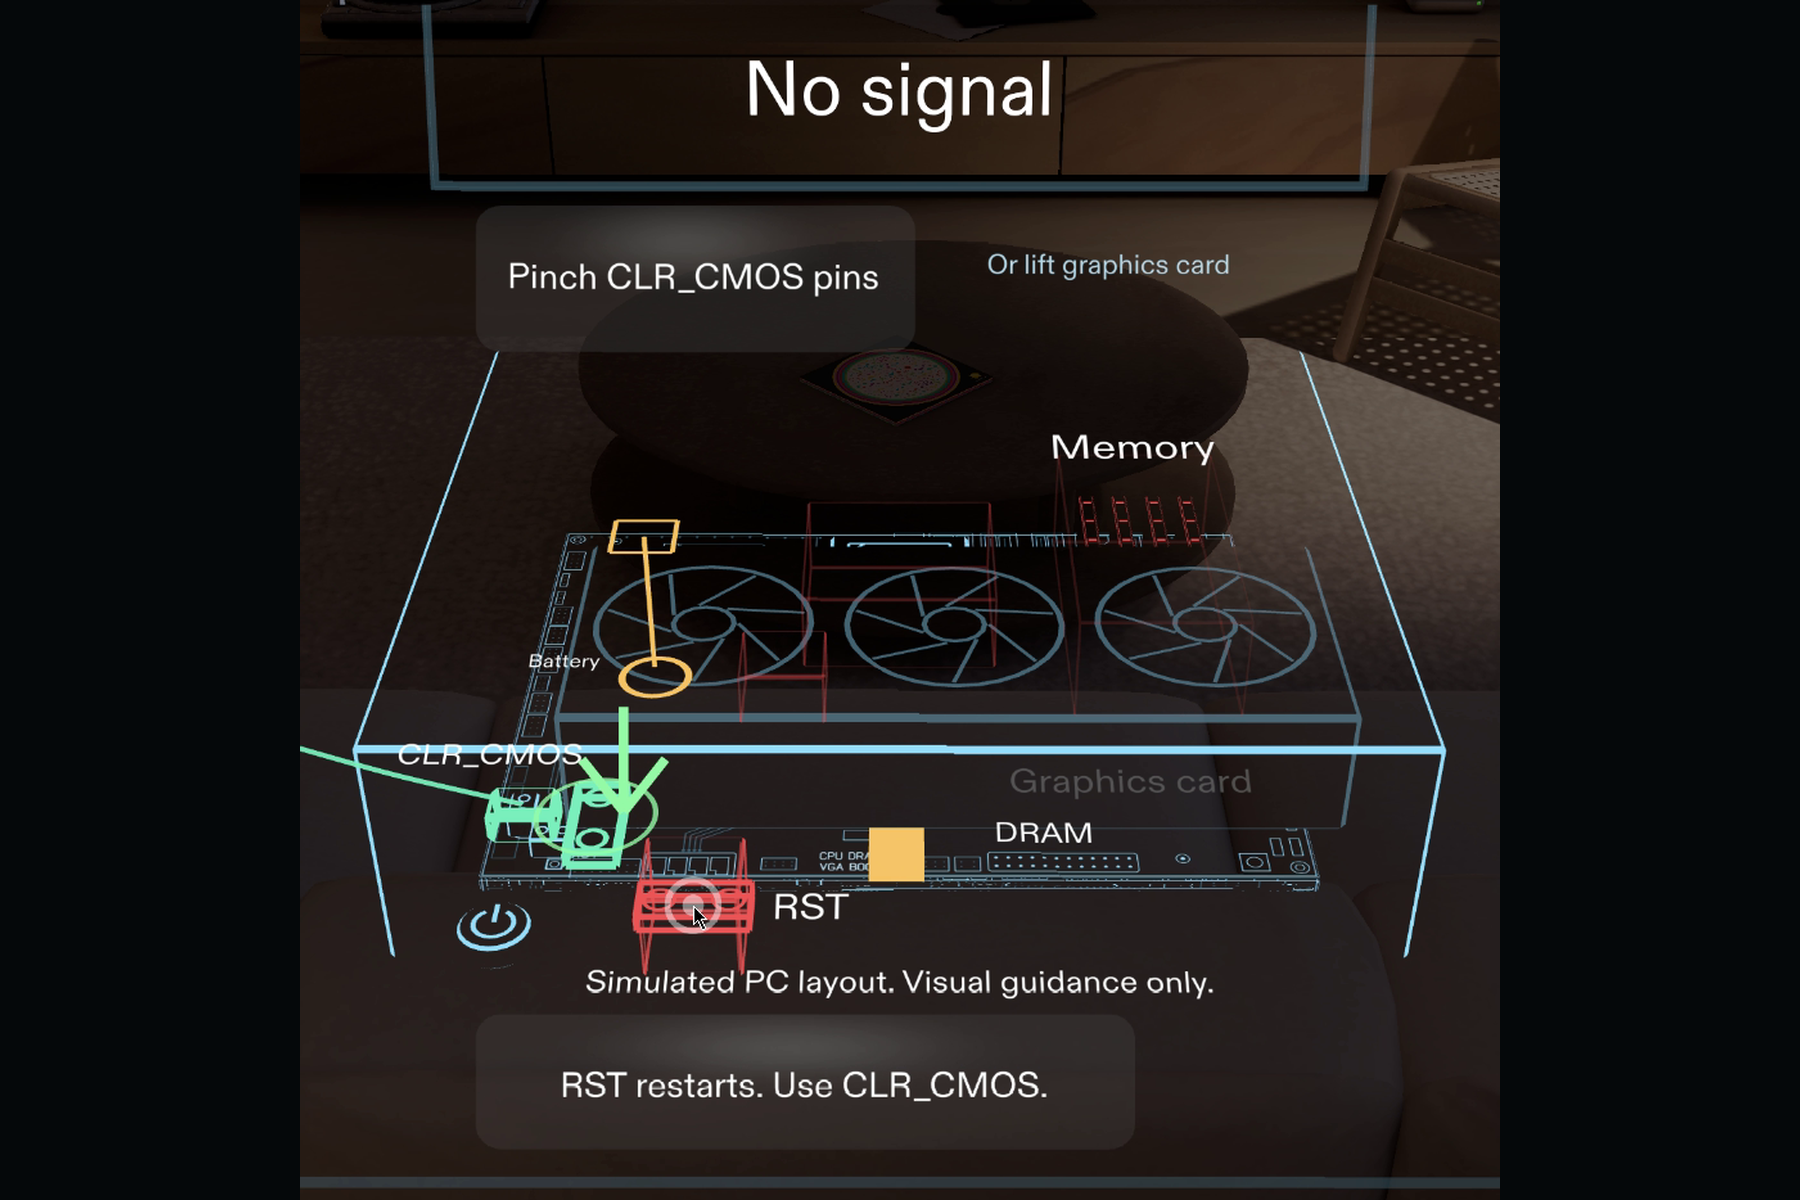
The board manual puts two pairs of pins side by side, RST and CLR_CMOS, and one of them clears the setting. Rest on RST and the warning reads: "Stop: RST only restarts." Click it anyway and the refusal reads: "RST restarts. Use CLR_CMOS."
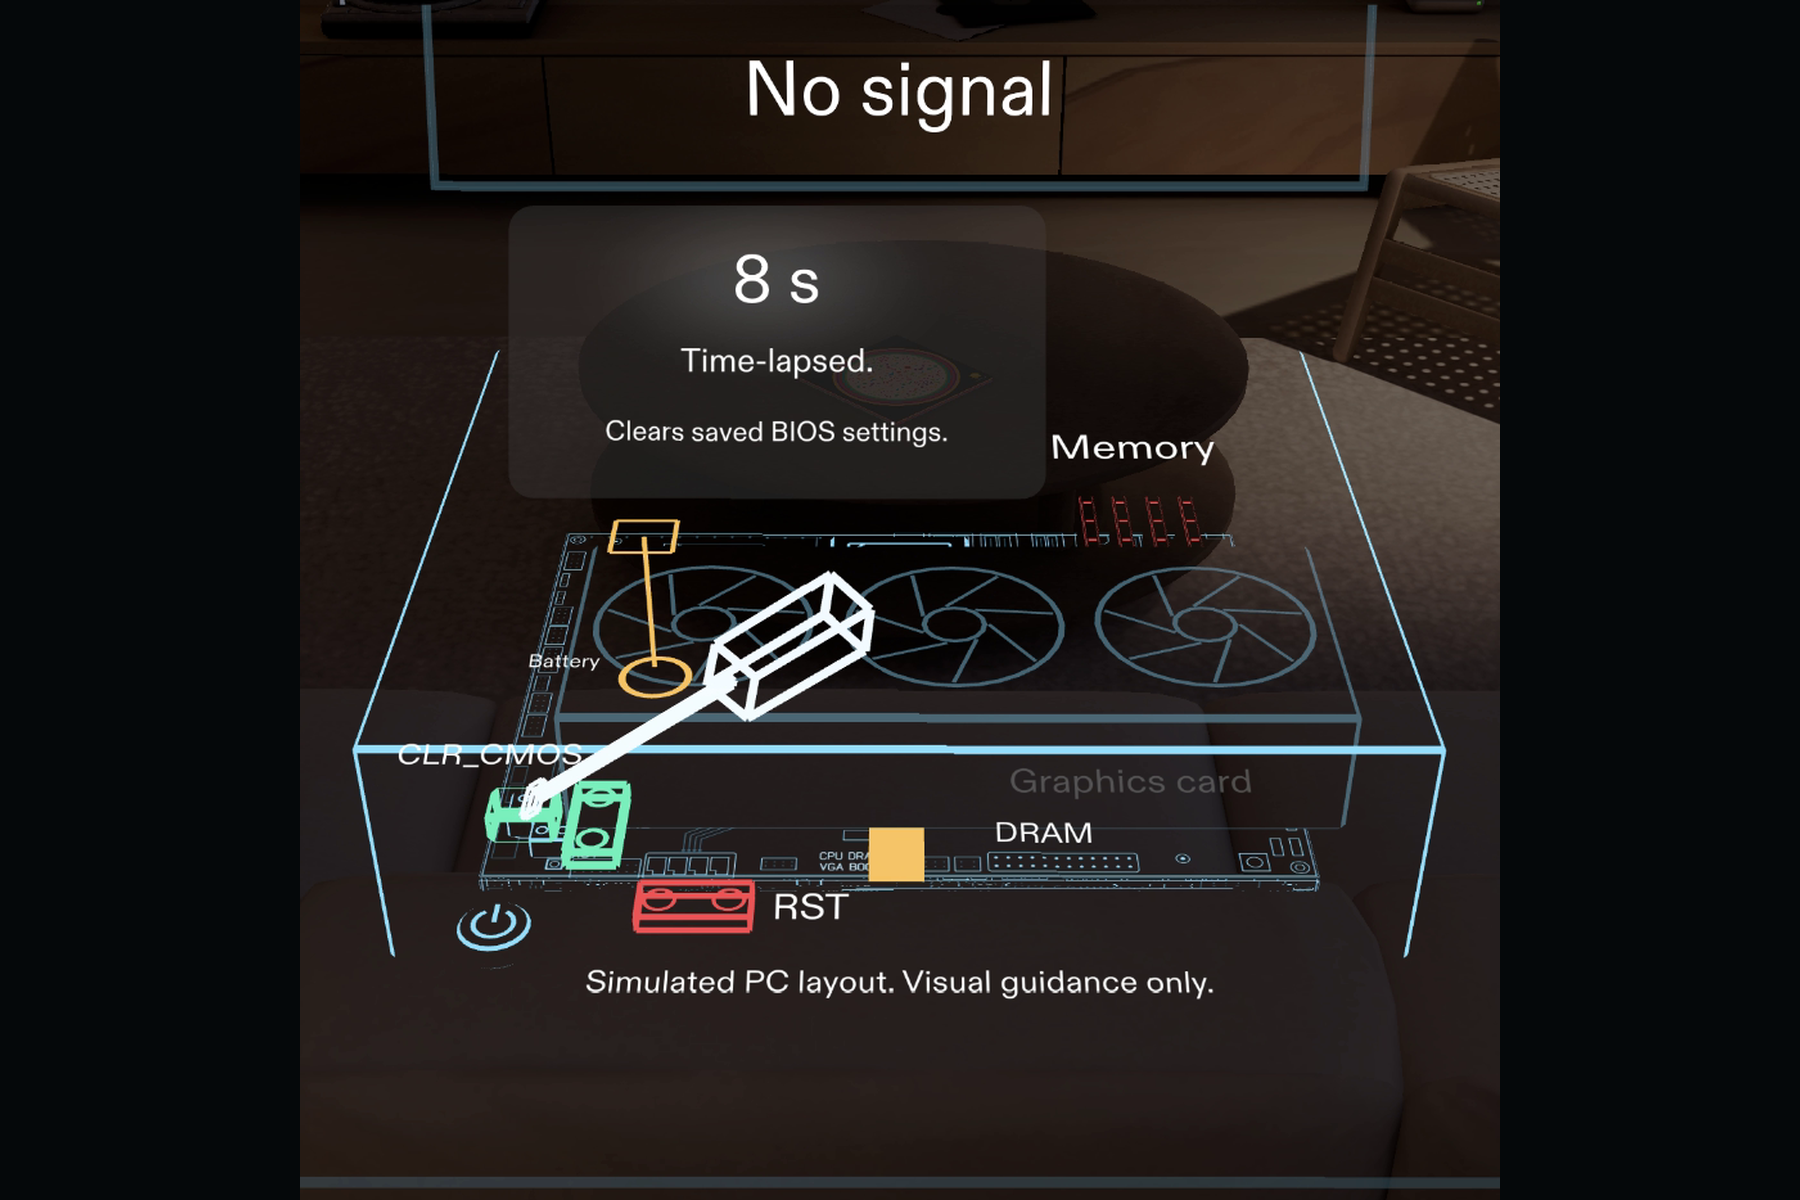
The fix is the CLR_CMOS jumper. The real steps: Unplug the PC. Touch the two pins with a metal screwdriver for a few seconds. In the Lens, a screwdriver animation shorts the two pins, and a wait card then counts down in time-lapse. The fallback route is dragging the battery onto a marked pad, after lifting the graphics card.
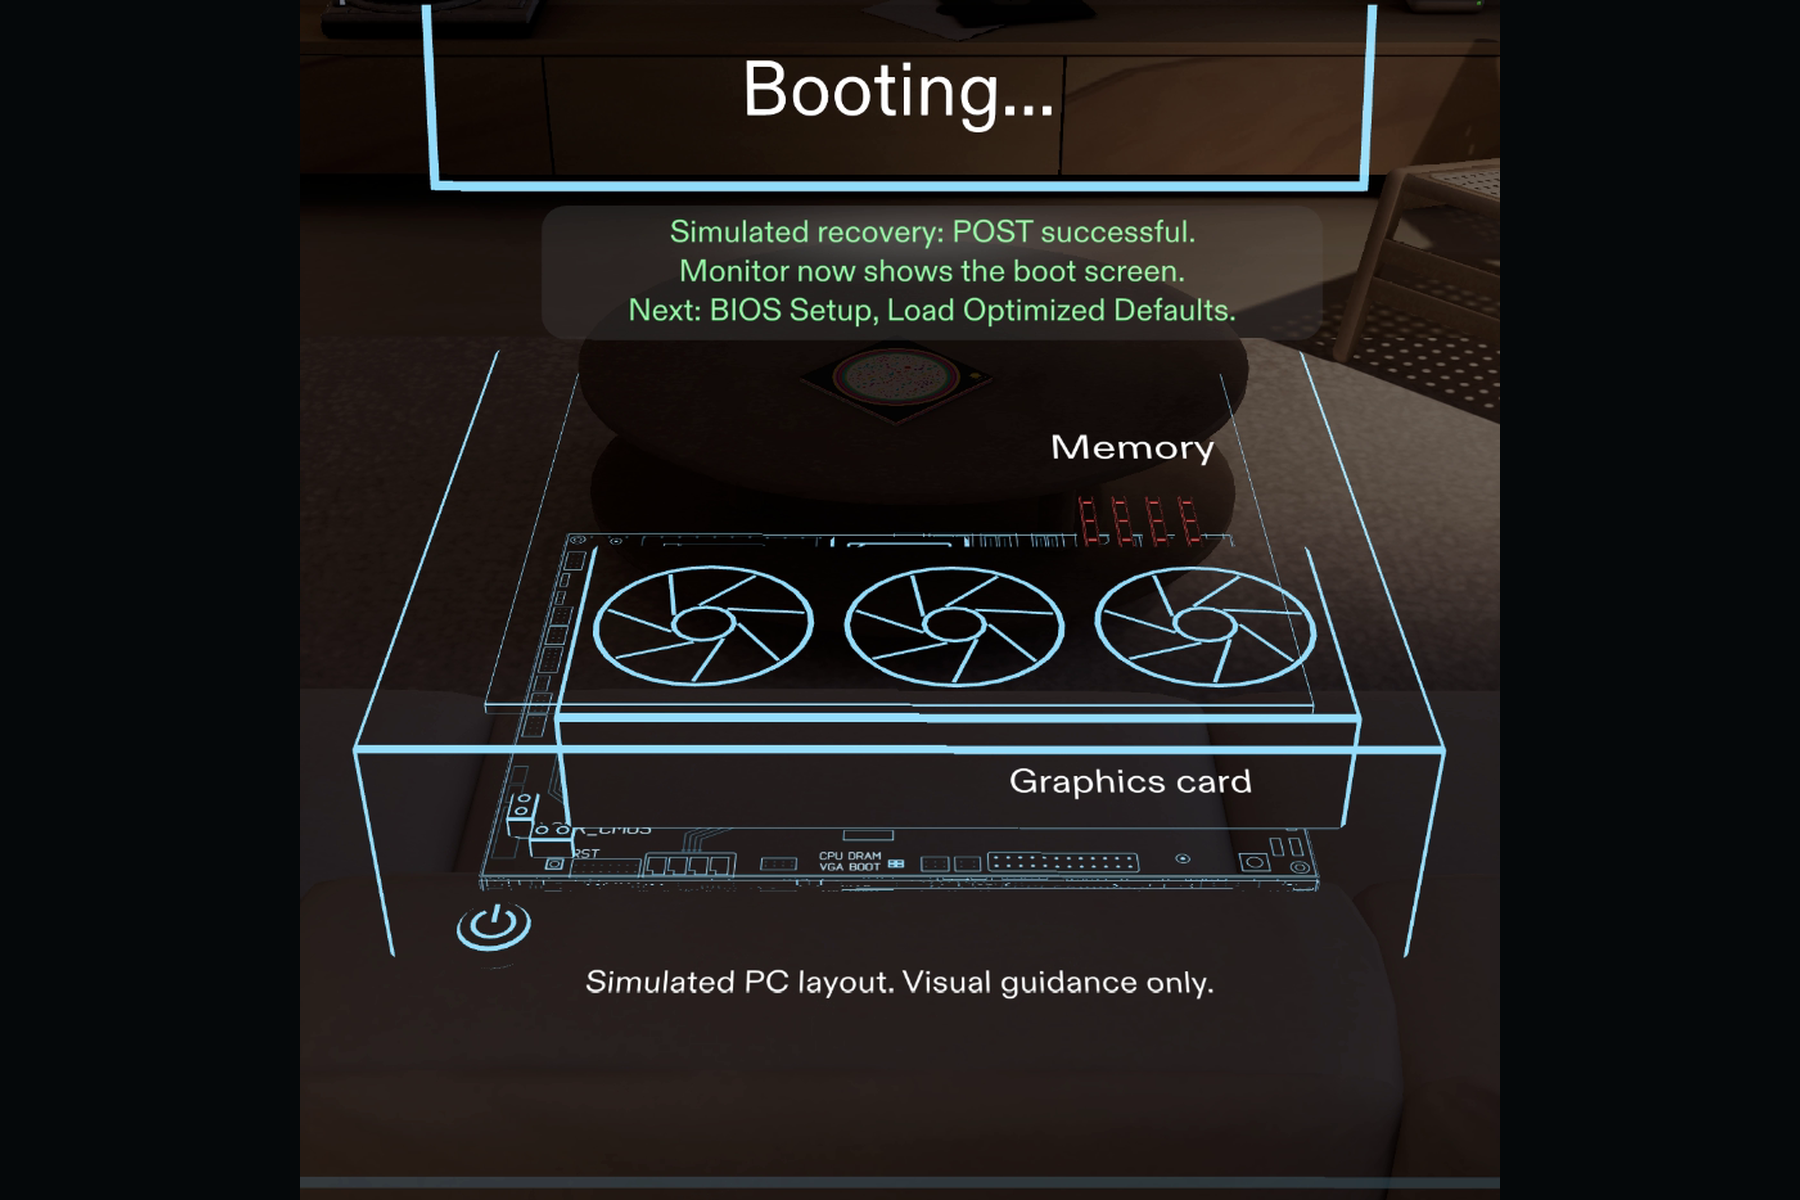
You then rebuild and power on. The DRAM light stays on with "First boot may take minutes." Then the light goes out, a ring fires from it, and the Lens says "Simulated recovery: POST successful."
Who it's for: new PC builders and anyone with a dead machine who doesn't know which part is safe to touch.
Why glasses: the reset is a physical spot behind the glass panel you have to lift, and both your hands are in the case.
Simulated: a button stands in for recognition, the mouse stands in for the hand, and the PC is virtual (modeled on a Gigabyte B650 AORUS PRO AX). Part positions are estimates read from the layout page of the board manual (p.4). They are not checked on the physical board. The parts and what they do come from the manual. Placement in this build is illustrative. No test ran on real SPECS hardware, so comfort and real hand tracking are unproven. Recorded in Lens Studio's Spectacles preview. Snap calls its Center view an estimate of what a wearer sees. It is not a device capture. The video caption reads "Cursor = hand. Recognition simulated."
How we built it
We planned with the Devpost Learn plan-lens skill pack and built with CLAD (Closed Loop Agentic Development, Snap's agents and skills for Lens Studio) in Lens Studio through the Lens Studio MCP. We checked edits in the live preview and locked the steps in with LEAF. Spectacles Interaction Kit and UI Kit let the preview mouse stand in for the hand: a click for each pinch, and a drag for the battery. LEAF s5b checks the drag with a scripted pointer. We did not test the drag with a real mouse. A reviewer agent scored build rounds 1 to 3 and we fixed its top flaw after rounds 1 and 2.
10 of 10 LEAF scenarios passed with scripted input at the working view on the final build (commit fc04bbc in our private development history, logged in devpost/build-log.md). A real Windows cursor, moved by script with no person at the controls, ran the whole flow from Symptom to Done. The same cursor resting on the RST pins and on the memory, with no click, fired the warning. The click on RST was refused. No device was used.
How the skill pack helped: the Devpost Learn plan-lens skill interviewed us before anything was built. It made us name the one spatial moment, say where each thing sits, choose a stand-in because the preview cannot recognize a real board, and write done criteria that can be checked in the preview. Five of those six criteria became our LEAF scenarios.
Challenges we ran into
- Leaf must match the Interaction Kit version. We installed Leaf 2.0.2 to match.
- An invisible collider on the step label blocked clicks to the memory.
- Text placement. In the final build, "No signal" sits lower on the monitor, inside the working view. The part labels RST, CLR_CMOS, DRAM and Memory are larger.
- Refusal text was not visible at the 35 degree working view. Fix: show it in a lane above the board, in line with the refused part, or below the board at steps where a button or card fills that lane.
- Lens Studio froze mid-build and we had to restart it. We suspect a slow memory leak in the long-running Lens Studio process, but we did not confirm the cause.
Accomplishments that we're proud of
- LEAF: 10 of 10 scenarios passed with scripted input at the working view on the final build.
- Red zones, a warning that gives the reason, shake, and refusal with a reason are built.
- The amber X-ray sweep with a 3x callout, the safe-path ribbon, the calm boot hold, and the ending ring are built. A real-cursor run on the final build (cursor moved by script, no person) went from Symptom to Done.
- The warning before the click fired from a real Windows cursor at rest on the RST pins and on the memory, with no click, no person at the controls and no device.
What we learned
Glasses are a small canvas. At 70 cm the display covers about 30 cm across, and a motherboard is 30.5 cm wide. At our 85 cm working distance the board takes most of the display width (30.5 cm of about 36 cm in the preview). Snap advises leaving margins, and ours are thin. Labels clipped until we designed around where you actually look.
Black disappears. Black is transparent on these displays. Our early version was a white slab with a lavender graphics card. Bright edges with the world showing through are what made it look like AR.
Passing tests is not the same as working. Every automated test passed on an earlier build that William clicked through, and the instructions still didn't match the board. The DRAM light sat about 27 cm from where the board art prints it. After that, a person's hands-on test outranked any agent's opinion.
Read the drawing yourself. Agents read the manual's layout page, and William then confirmed by eye that RST sits right beside CLR_CMOS. That detail became the wrong-pins moment in the Lens.
The idea got narrower and better. Guided AR repair already exists, so we stopped pitching that and focused on warning you while you are still deciding, before you touch the wrong part.
Our advice for your next Lens: have a real person click through it before you trust passing tests.
What's next for Clear CMOS
After a real CMOS clear, the manual says to enter BIOS Setup and load defaults (p.30: Load Optimized Defaults) or set things up again. Our Lens ends at the boot screen with "Next: BIOS Setup, Load Optimized Defaults." Doing that step is still on you. If the DRAM light never goes out, the reset may not have worked.
We want to check the jumper and battery positions on a real board, and comfort on real glasses.
Pre-existing work and credits
Pre-existing tools and packages: Snap's SPECS Base Template, Bitmoji 3D package (a LEAF dependency), Devpost Learn plan-lens skill pack, CLAD (the ls-clad plugin), Lens Studio MCP, Claude Code (the AI assistant that ran the skill pack and CLAD), Spectacles Interaction Kit, Spectacles UI Kit, Leaf, Icons and Motion packages. The video captions and the thumbnail use the IBM Plex Sans font (OFL).
The Echopark.hdr environment map in Assets/Render was added with the project setup, and we did not make it.
AI agents generated the scripts, meshes, sound effects, the video's music bed, board art and thumbnail during the submission period.
Board art: the board drawing is original artwork. Part positions are estimates based on the publicly available layout of a Gigabyte B650 AORUS PRO AX motherboard. No manufacturer images or manuals are included. Not affiliated with or endorsed by Gigabyte. Gigabyte and AMD names describe the hardware.
By Kartikeya Lathi and William Lu.
Built With
- clad
- claude-code
- devpost-learn-skill-pack
- leaf
- lens-studio
- lens-studio-mcp
- specs
- spectacles-interaction-kit
- spectacles-ui-kit
- typescript