-
-
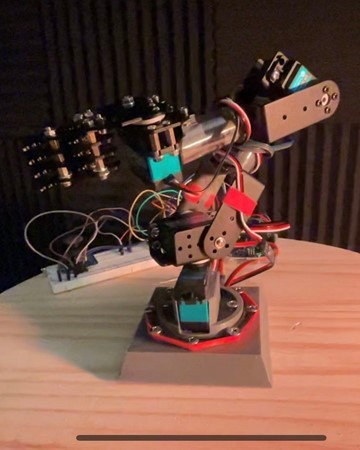
ARM Overview
-
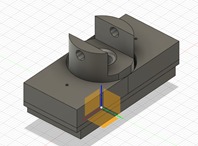
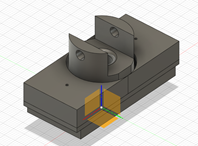
Figure_1. Interaction joint locker
-
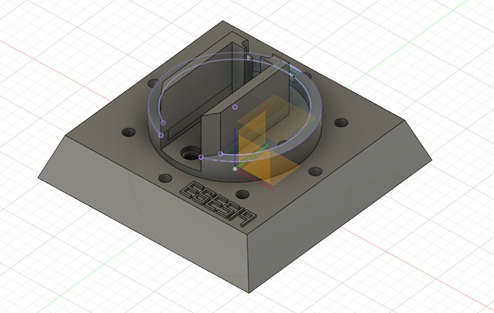
Figure_2. ARM base

Abstract
Nowadays, bionic, robotics are starting to become hot topics. To follow the pace, our team is building a robotic arm that can help users to grab some objects. Robotic arms can be found in many fields, including industrial manufacturing, medical treatment and entertainment services. They have a variety of situations and can perform certain tasks in two or three dimensions depending on the command. Our final goal is to use the joysticks to control the robotic arm. In this project, we used four servo motors to simulate the movement and rasping mode of the human arm. In the project, we encountered problems such as insufficient grasping strength, insufficient power and difficulty in controlling four motors at the same time. We solve these problems by replacing equipment, purchasing external power supply and adopting the idea of interlocking. Eventually we solved these problems.
Motivation
As the Abstract mentioned, robotics is really a hot topic in this century. There is a huge opportunity related to this topic. We used to watch “Iron man”, and we found his suit is so cool and powerful. When the first time this project was introduced, making something like his arm popped up in our mind. After setting the goal that we are going to, we then start thinking about what else a robotic arm can do and can help. We think using robotic arms can improve the efficiency of the task, and to some extent improve the safety of the process. Related to this idea, developing a robotic arm as an embedded system that can help the human or user is a fantastic project. From a different perspective, to optimize the performance of the robotic arm and as well as to the next level, we need to maximize the torque power of the motor or even using different mechanisms. Another reason is that one of our team members is really interested in the robotic field, thus making a robotic arm from scratch will help the team member learn more related problems, knowledge regarding the field. Our intended purpose is to be able to have a robotic arm grab some objects by our manual control or program input. We think it can be used for entertainment, such as the doll clip machines which are often seen in shopping malls. It can also be used for industrial purposes, such as grabbing dangerous objects (highly corrosive chemicals, etc.). It could also be used as a medical device, for example, to equip people with disabilities with robotic arms that they can use in other ways (Such as brain wave control or voice control).
Goals
Milestone 1
First of all, we have to imagine the project model we want to design, and use Autodesk Fusion 360 to model our equipment. Then 3D print the parts and check the design if it meets the design scenario .Since we need to control at least four servo motors, we need to verify if the design can meet certain angles that we wanted.(such as Does the shoulder joint move 270 degrees? etc).
Milestone 2
We will use the joystick combined with PWM to control the movement of a single servo motor. If we can use one axis of the joystick to control the ADC to control one motor. Can we use the next axis to move the next servo motor? According to the data we have obtained, the pulse generated by PWM is different, the servo motor will rotate in different directions. It is convenient to prove the joystick is totally accurate and work for one part, like the shoulder, and then move to the next part.
Milestone 3
Finally, we need to control and test the grasping ability of the robotic arm. Our ultimate goal is to be able to grab something with this robotic arm. We will debug and test it.
Final Demo
For our end result, we need to combine each model and test if it is available to execute. We want the robotic arm to be able to move with joysticks, and the hand part of the a robotic arm should be able to grab a tennis ball.
Methodology
3D printing and welding technology
Using Autodesk Fusion 360 to design the part that helped us to achieve the final goal. We made a base to hold the base motor, as well as the pipe locker to connect the PCB pipe with servo arm. Figure 1, 2 are showing the final design for those models. We also screwed a few nails through the base that we designed into a wood base to provide enough stability which will be shown in the demo video.
Timer and timer interrupts
We started with giving time 0 a prescale factor of 010 and set it to a fixed frequency. Then we assigned its TCNT to count to a certain value in order to generate a PWM that fit our requirements for servo motors. Next we enabled timer0’s overflow interrupt and based on the math if timer0 overflow is less than 125 times that it will assign the timer0 count to 0XEB, 235 (the time timer0 needs to make a 20 us pulse) and let overflow increment. At the same time if in those count values there is one that matches a value that servo wants to make; and also it is its sequence (it’s flag is active), It will write a low to that servo port (deactivate the servo motor at the time it desired). After waiting the timer_count count to 126, we will assign high to all the servo ports and also set the next timer0 only count to 0x97 to make a long pulse delay for all the channels. Waiting for the timer0 with new count value counts to 130, assign a high to all the pins and reset the counter.
Angle Conversion
In order to make the previous section work, converting the angle that we want to move into a timer value is necessary. Here is a rough conversion we are using right now. It is not that accurate, like if we want to let the motor move at an angle of 90, I have to assign 120 to the motor. One reason that might hold this conversion is that the counter we were using in the previous section is integer type, but in order to make the angle accurate, we might need to figure it some way either using a double type somehow or flooring and ceiling in some condition. As a result, it is good enough for now to make the arm move. But if there is a next step, updating this part will help with the accuracy.
ADC with its interrupts to collect multiple data
ADC In the project, we used two Joysticks to control two servo motors respectively. The purpose of these four motors is: the two servo motors at the bottom are combined to simulate the human shoulder. The servo motor in the middle is used to simulate the human elbow. And the top servo is designed to mimic the human wrist. According to the test, we can get the data that the X and Y axes of the two Joysticks can reach 0 to 1023. I've written ADCSRA |= (1<<ADSC) to the main loop. In order to execute the loop once at a time, the corresponding Analog PIN is read.
ADC Interrupts Since our ultimate goal is to use joysticks to control the multiple servo motors through the adc ports. However, when using ADC conversion, only one channel can be read, instead of multiple channels at the same time. And also Atmega328p only executed sequentially, not simultaneously (or it might not be worth the time and resources to do multi-thread).
So after discussion, we decided to use the idea of interlocking to solve this problem. That is, when one Channel is being used, the other Channel is stopped. So when an ADC conversion is complete, the main program jumps to the ADC Interrupt to execute some programs. The function of these programs is not only to control the movement direction of the motor, but also to continuously enable different analog pins independently.
We set when the data is greater than 700, the servo motor can turn clockwise; When the data is less than 300, the servo motor can turn counterclockwise, and when the data is between 300 and 700, the servo motor will not move. There are two reasons why we set the numbers slightly to extremes. First, the ADC's value doesn't stay around 500 when we're not moving the Joystick, even sometimes it can reach 600. Second, due to the limited control accuracy of humans, we cannot guarantee that the data of the Y-axis will not change when we change the data of the X-axis. Augmentation of adc data improves the error tolerance of human operations.
Results
The result is four servo motors that work independently of each other. Meanwhile, the motion direction of the manipulator can be controlled by controlling Joysticks. Finally, the arm's pincers can grasp round objects.
Conclusion
From this project, we have learnt how to use 3D parts making, which includes learning to design models using Autodesk Fusion 360. And we also learned how to control servo motors. By reading the datasheet, we know the period of the servo motor is 20ms, changing the time of the high level will change the rotation angle of the servo motors. In order to get 4 values of two joysticks at the same time, we have learnt how to switch the ADC channel by using ADC interrupts. Finally, we also learned how to use brainstorming to come up with some very novel ideas or designs, and complete a project with good communication between teammates. We thought that reading multiple adc data from the joystick and passing the servo motor might have much more delay than what we expected. But the result is pretty smooth. We also worried about whether there is enough power to lift the whole system for the base motor, but from the demo video, this worry is too much. It went better than we expected. We can line all the joints into a line and the base motor can move that even with some extra weight. We are very happy with the result as well as code design. Initially, we were worried that using OCR0A/B to change the duty cycle of the PWM pulse is enough to control multiple motors. But, instead of using OCR0A/B approach, we thought about using timer overflow to generate a pulse that servo needs and overflow to a preset value to achieve the amount of the angle needed to move. After a few trials, it went really well, even though the conversion is not fully accurate, like if I want to move 90 degrees, I need a value around 120. But we are happy with the progress and this approach. The next level of this project or If we have more time we might replace 4 DoF with 6 DoF, and make some algorithm with the Arm, like the arm can remember the movement it did a while ago. Or we can use some other type of the input device, muscle signal is another hot topic and it will make this project more interesting.
Built With
- arv
- c
- clion


Log in or sign up for Devpost to join the conversation.