-
-

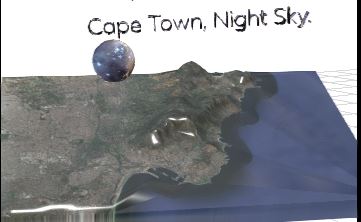
Table mountain floating object found within Wanderhop 2049
-
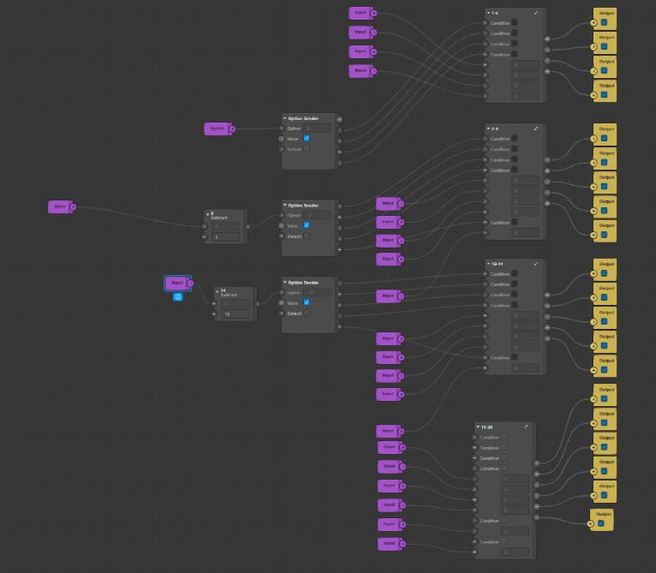
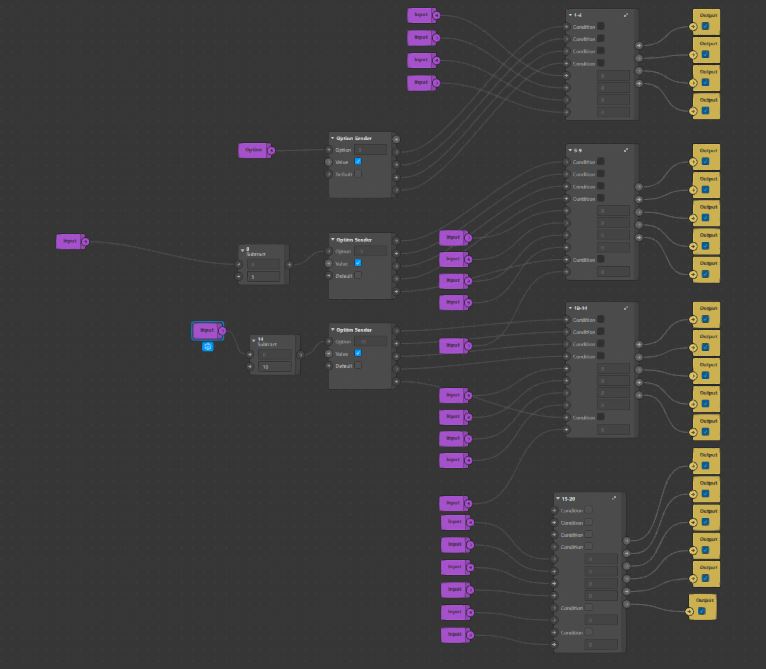
Nzuzo Patch Sender. Custom Patch Group I Created To Maintain State Within My World Effect.
-
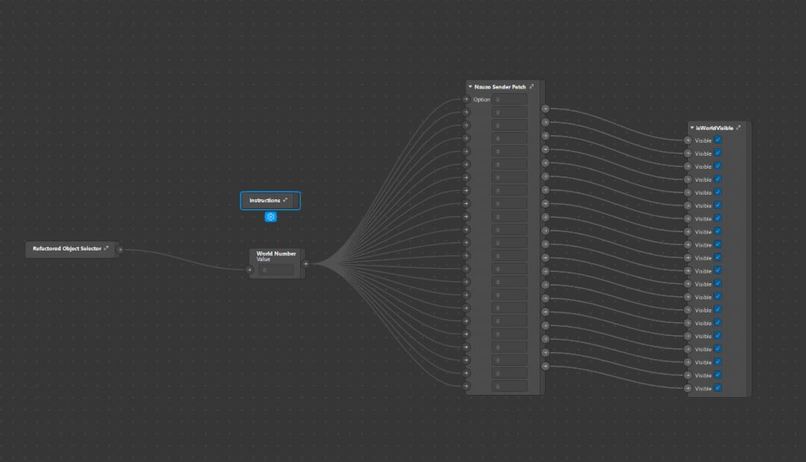
Back Camera State Management Solution I Created Which Allows Me To Control The Visible State Of 3D Objects Within The Scene
-

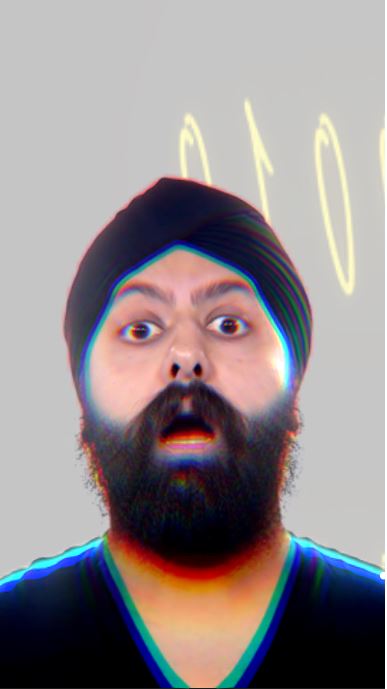
WanderHop 2049 Front Camera Effect. (1)
-

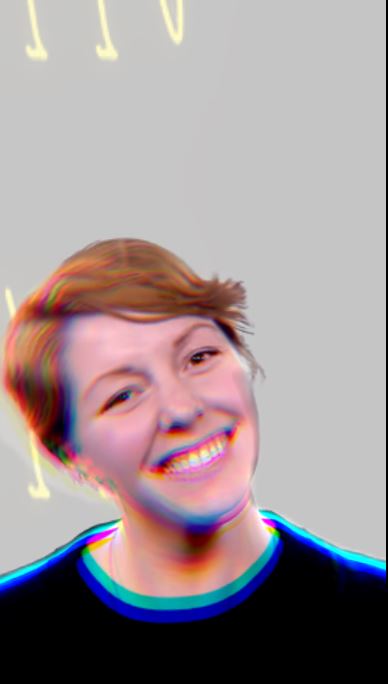
WanderHop 2049 Front Camera Effect. (2)

Inspiration
My inspiration for this project is three fold:
The first time I saw a visual depiction of teleportation was in the video game series portal, the game was filled with puzzles and caused players to think in a unique way. I had played many games before but it amazed me how many unique experiences being able to teleport created in a game.
After registering for the hackathon I had to learn everything from scratch and did a few days of research to try get my bearings with the Spark AR developement software. I already had the intention of doing something portal related and found the project Portal Sphere on GitHub which inspired me to implement floating sphere objects into my design. The project itself seemed limited in its experience but I was determined to learn from it and make something more fun from what I had learned.
I was also inspired by the binary machine language, and thought it would be fun the give the user the experience of being part of the data flowing through their devices in some of my world effects.
What it does
Back Camera
Wanderhop 2049 is a World AR effect using the back camera to put the user into a scene surrounded by 3D floating objects.
Within this scene there are 14 floating spheres, 6 billboards, and a floating 3D model of Cape Town's beautiful table mountain.
The Spheres are 3D objects are encapsulated by double sided images to create the effect of a floating world, when tapped they expand to envelope the whole cameras view space so the users can pan their phone around to explore the new world they have been teleported to. Each sphere offers a completely unique experience and some have audio which compliment their own experience. There are 3 spheres related to binary code which form part of a puzzle, this was my attempt to gamify the effect. One of the three spheres contains an ASCII table which allows the user to decode another sphere which is full of binary values. when decode the sphere spells out Spark AR.
The mountain object shown in the effect is used to offer a different type of portal experience in comparison to the spheres. In its normal state it hovers below a world called Cape Town Night Sky which demonstrates the beauty of my home town in of its self but when the mountain is tapped it expands by a factor of 3 and causes all the other 3D objects to become invisible. This experiences allows the user to closely examine a objects, walk around them, look over an under them, and appreciate their full slender in detail without being completely enveloped by the expanded object.
The billboards stand tall and large to preview the world effects awaiting the user before they tap the spheres and teleport to another scene.
Front Camera
The front camera allows the user or content creator to take a highly stylized selfie. The filter creates a color shifting glare which smooths out any rough edges made by the page segmentation of the body and flashing binary numbers are used as a background to add liveliness to the image.
How I built it
Week 1
The first week was purely research driven in this time i focused on:
- Installing Spark AR.
- Reading through Spark AR documentation.
- Brainstorming on how to implement my inspirations into an interesting filter that can be used by content creators.
- Watching Spark AR tutorials on YouTube and practicing my skills by making a diverse array of small practice effects.
- Learn what other skills I would need to learn or harness to achieve my goal.
Week 2
The second week was all about taking what I had learnt and implementing my ideas into a tangible beta version of my effect, in order to get to reach that milestone I had to:
- Import appropriate assets from the Spark AR library; namely 3D objects, textures, audio files.
- Import appropriate assets from royalty free providers from the web, namely Unsplashed for texture images and freesound for audio files.
- Set all 3D objects as children of a plane tracker, from there I set the plane tracker to be readjusted with a 2D coordinate given by a screen tap pulse.
- Format the 3D layout of my world effect.
- Create a front camera effect that implements page segmentation to take stylish selfies that can be used for content creators. This will give users the added option of just taking a stylish selfie if they don't have time or the creativity to explore the full world effect. I figured the more functionality the effect has the more suitable use cases content creators would have.
- I used Photoshop cc5 to compress all my image files to retain as much quality as possible.
- I used Blender with the (GIS plugin)[https://github.com/domlysz/BlenderGIS] to create a 3D model of the famous landmark Table Mountain. File size was quite large so I converted the GLB file into a gltf with seperated binary/image files then compressed the file using an open source GTLF to GLB converter I found during my research.
- Repeatitive testing was done in the Spark AR development environment.
- I managed to reduce my project size to under 3 Mbs considering it uses a large number of assets.
Week 3
This was the final stage of development, I had dedicated this towards finishing the final edits of my demo video and to testing my effect on as many different phones as humanly possible within my reach. I phoned family and friends and got an overwhelming amount of data. This led me to make several changes based on the bugs people had informed me about.
After tapping the floating spheres to trigger the portal effect some people noticed wholes in the spheres as seen in this video I posted Spark AR portal effect test. I recognized that this issue occurs more regularly when the world size is set to larger than 1000 in the x,y and z planes. This also happens when the world is placed to far away from the recording device. I significantly reduced the occurrence of this bug by adding a transition patch which animates the sphere closer to the device as it expands. A simple solution for a nasty problem.
I also found that the plane tracker worked more effectively on Apple phones than older android phones (my personal phone), with this insight I create an instruction and a patch which allows the user to reposition the effect to help older phones have an easier experience navigating the 3D space.
Challenges I ran into
This hackathon came with a variety of unexpected challenges for me and it was very fulfilling to overcome them and learn from mistakes I made along the way. Here are some of the areas in which I faced challenges in.
Learning From Scratch
I previously had no experience with Spark AR or blender before registering into this hackathon, I spent 3 weeks working on my project and spent almost all of the first week learning how to use Spark AR and familiarizing myself with the environment. I made small simple effects at first, then increased their complexity with the patch editor.
I continuously abstracted my effects while following countless YouTube tutorials and reading the spark ar documentation until I felt completely competent in my ability to create an effect that was completely unique.
Compression
One of the hardest things I grappled with was creating a mind blowing effect then later realizing its file size is far too big to be published or even tested on your phone effectively. I had to teach myself to use Photoshop and other online resources for compressing images, 3D object files, and audio files.
Device Testing
Testing on multiple devise was essential as the simulator on Spark AR is not perfect. Effects on different phones can perform in unexpected ways compared to how they would on the Spark AR simulator.
I got hold of members of my family and friends to help me test my effect
Limited Time for Large Ambitions
As a full time university student I found it challenging to balance my studies and this hackathon, I had to compromise on larger aspects that I would have liked to implement but for the most part I am quite satisfied with the project I have produced with my own personal constraints put into consideration.
Accomplishments that I'm proud of
I found that there is an exponential difficulty when creating more than 5 indexed 3D objects that send data through the option sender to set their visible boolean property. I had to get creative and uses my mechatronics engineering knowledge from my studies to devise a multiplexer like patch which uses the Add patch to filter through tapped selections. This approach solved the problem of managing the state of a large amount of objects and can be applied to any number of 3D object instances and is an approach I would like to keep working on.
I made it into a group(custom patch) and called it Nzuzo's Sender Patch.
What I learned
This is the first time I have made an effect so every aspect of this project that was built in the 3 week development process was a first for me. I had some basic knowledge of Photoshop but never used it in a professional capacity.
This hackathon also taught me that time management is important above all else.
What's next for WanderHop 2049
I believe the applications are limitless, but here are some ventures I believe Wanderhop 2049 could be used in more specifically than others at the moment those would be:
- Real Estate, virtual touring of houses to international clients.
- Travel Agencies, Virtual tours of different countries destinations to international clients.
- Content Creation, Scenic videos displaying different worlds that compliment the creators environment.
- Festival Marketing, The architecture of this effect could be applied to market different stages at a large music festival
- Education, The world view layout could be used to tell stories about history in a very creative way making sure that learners are captivated by the lessons they learn by immersing them in different educational scenes.

Log in or sign up for Devpost to join the conversation.