-
-

Plants coming to life
-

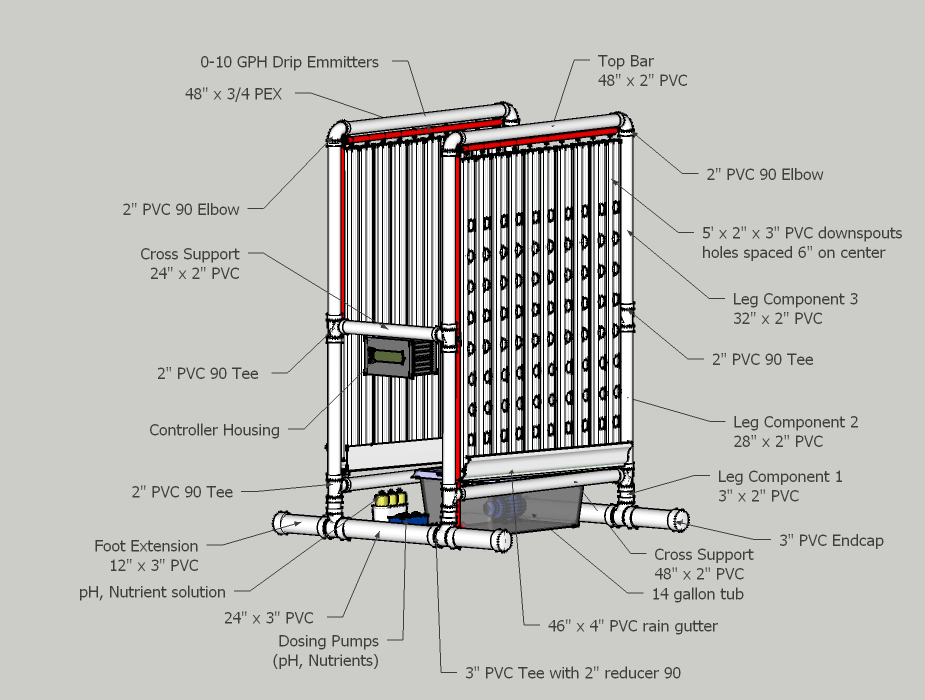
Full Diagram
-

Sections
-

Leg
-

Top
-

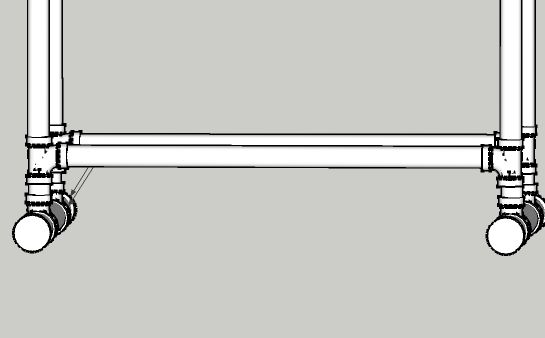
Base
-

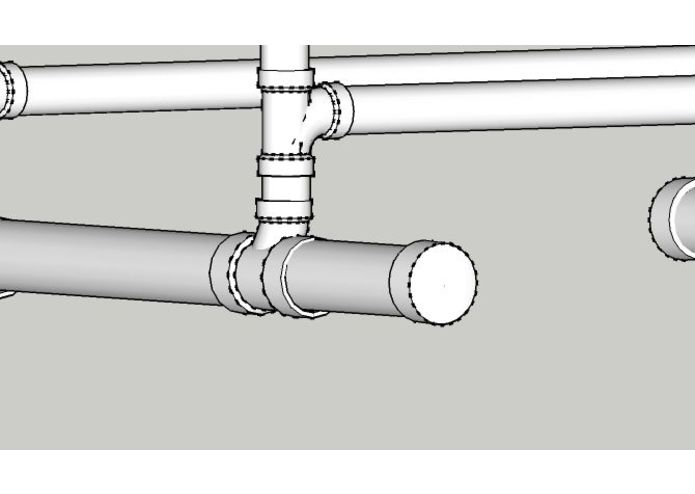
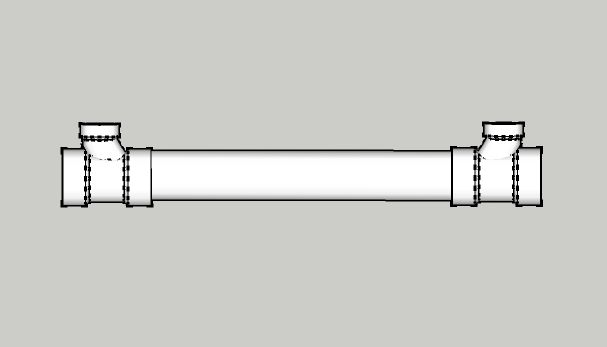
Plumbing detail
-

Plumbing detail
-

Grow area
-

More growth
-

Some growth!
-

Plants under lights
-

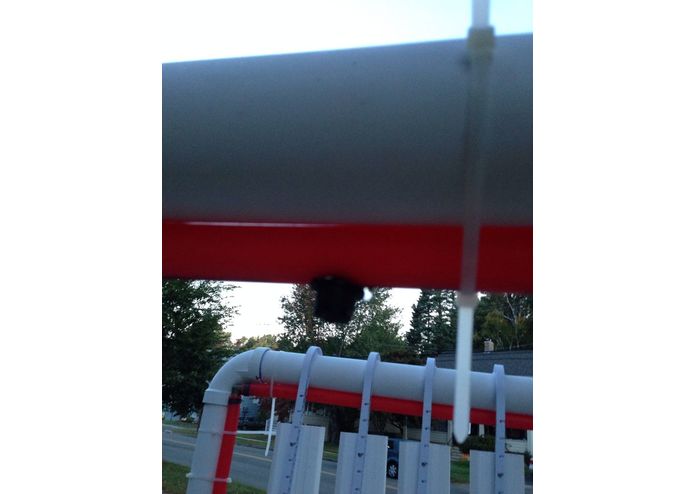
Lights
-

-

Lights
-

-

-

-

-

-

-

Cross member
-
Legs
-

Form for making pockets
-

Base
-

Pocket
-

Form for making pockets
-

Form for making pockets
-

Form for making pockets
-

Downspout with pockets
-

-

Water return
-

Pipe hangers
-

Downspout hanger hole
-
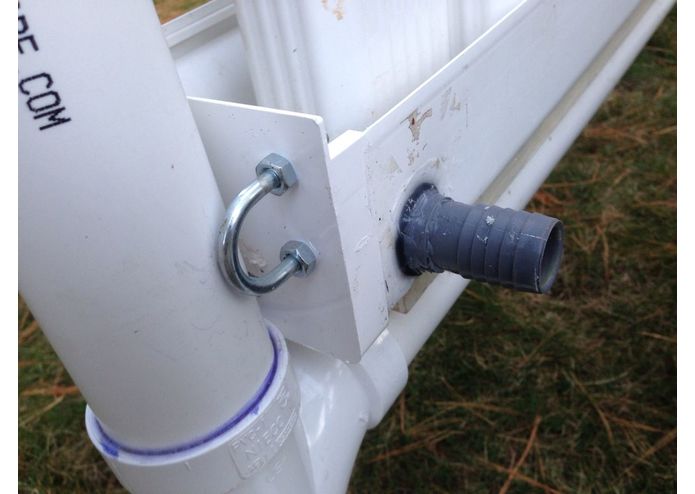
Return connectors
-

Zip tie fasteners
-

Plumbing
-

Tubing
-

Pex fitting
-

Pipe hangers
-

Drip emitters with downspouts
-
Drip emitter
-

Water bucket
-

Water return
-

Float switch
-

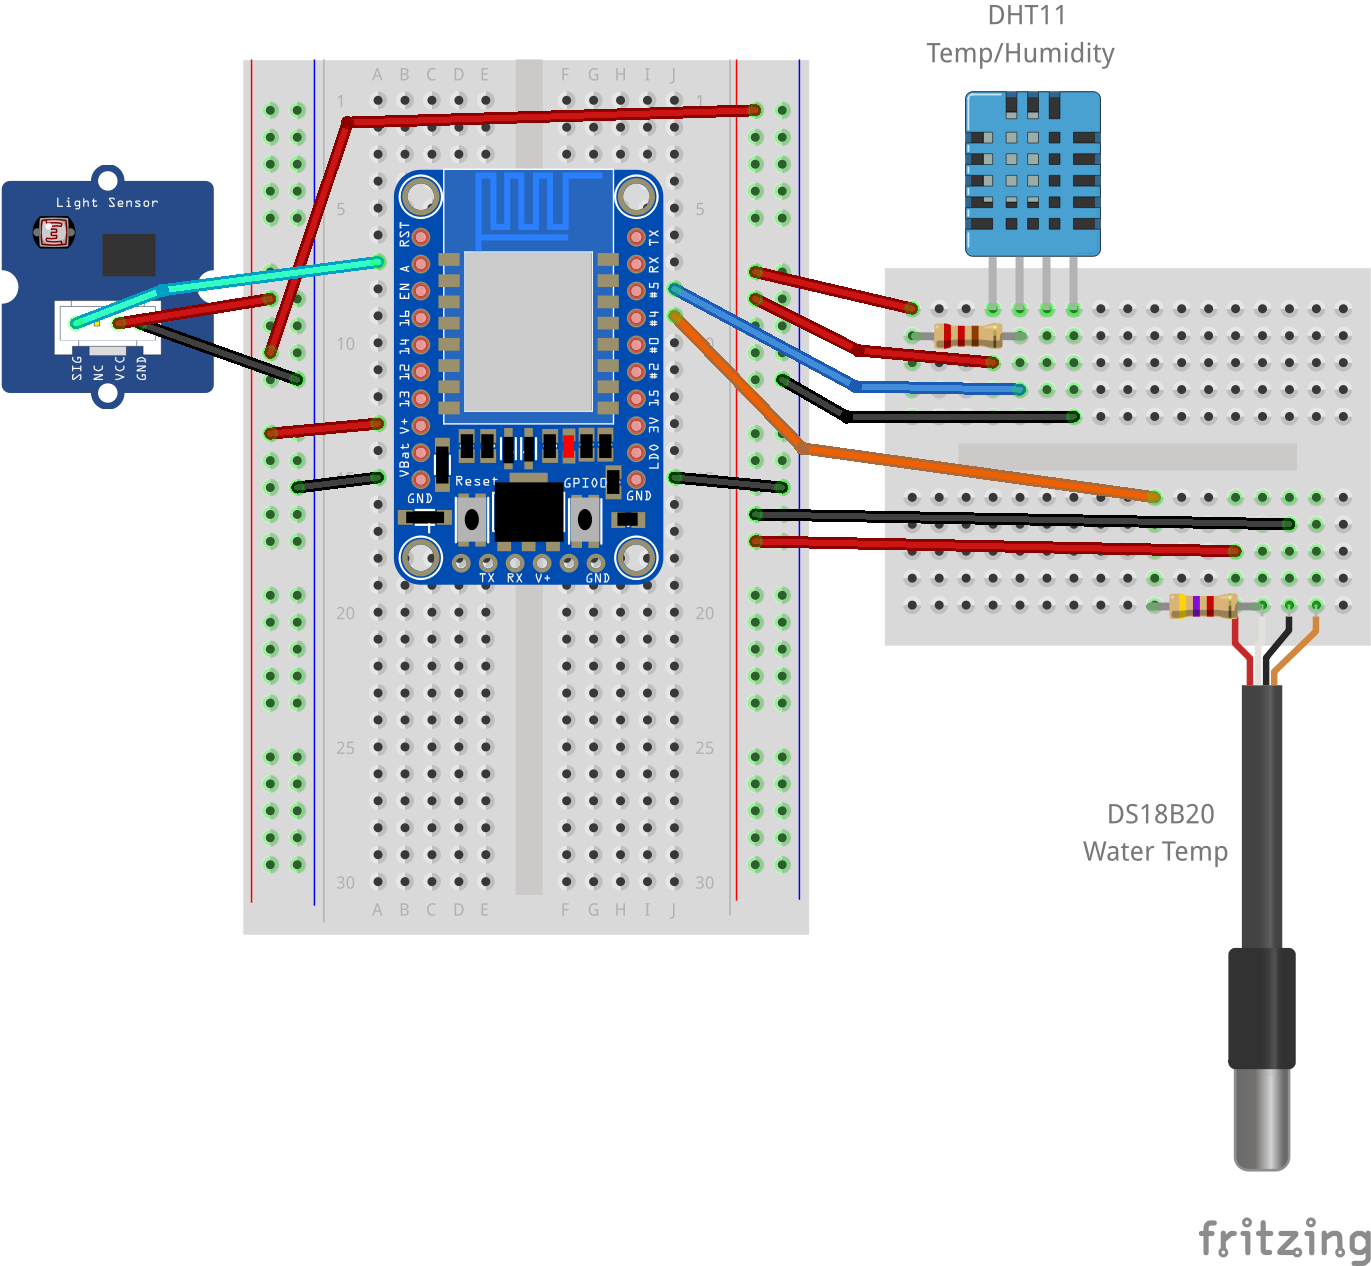
Environmental Sensor Array
-

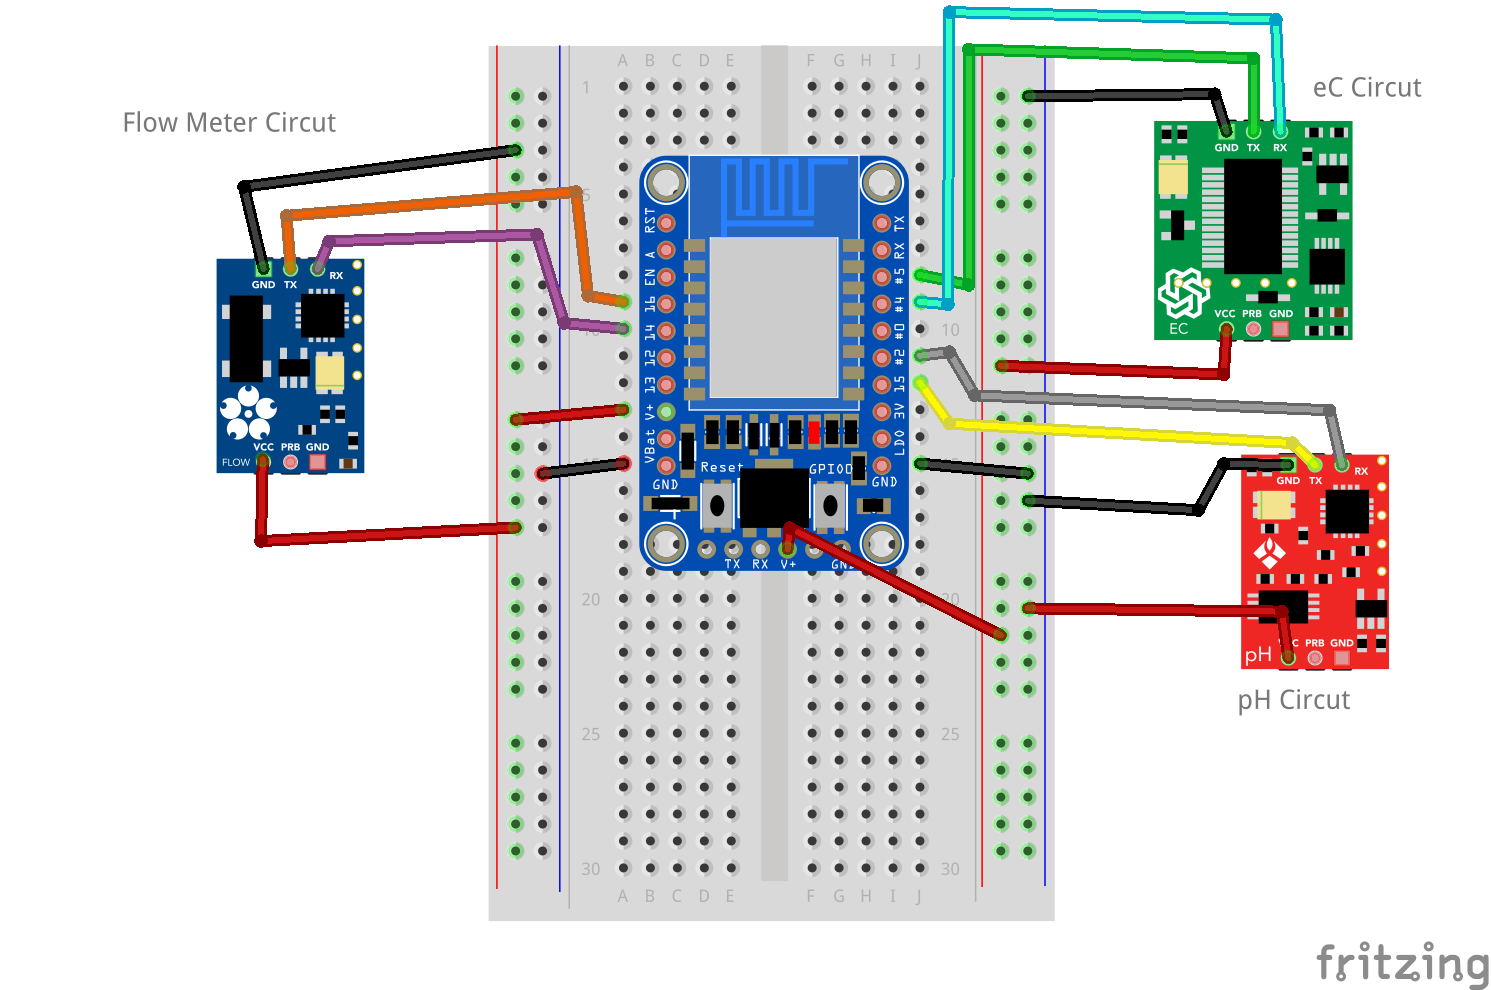
Water Sensor Array
-

-
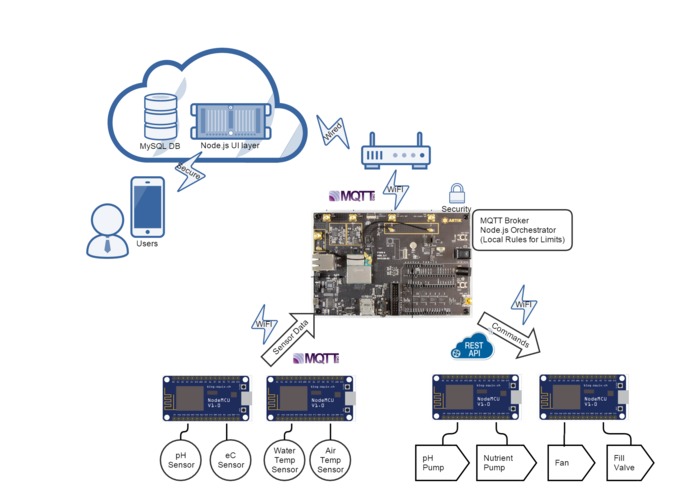
High level flow
-


What is "Urban Hydroponic Oasis"
A vertical hydroponic garden
- Allowing for high density yields and shorter growth cycles
- Reducing resource consumption - water, fertilizer and space
- Labor saving - no weeds or soil to till
- Higher consistency of crops with great tasting results
Maintained by a Samsung Artik 5 and ESP8266
- Watering cycles - monitor and auto refill levels
- Plant nutrients and pH - monitor and correct
- Temperature monitoring
- Air Circulation & Lighting controls (for indoor operation)
Smart and Connected
- Farm Controller App for smartphone, tablet and pc
- Get notified when the system needs a refill
- Alerts when something isn't running as expected
- Year round growing - fresh produce every month of the year
- Perfect for Urban setting with limited space
- Reduced operational time and maintenance with automation
- Eliminate the guesswork of nutrients and watering cycles
Why we built it
Hydroponics is a subset of hydroculture and is a method of growing plants using mineral nutrient solutions, in water, without soil.
The word hydroponics technically means working water, stemming from the Latin words "hydro" meaning water, and "ponos" meaning labor. Many different civilizations from the beginning of time have relied on hydroponics for growing plants, such as the early Mexican and Egyptian civilizations. However, recently growing hydroponically has grown in popularity and use across many different markets.
(from Wikipedia http://en.wikipedia.org/wiki/Hydroponics)
Green and Efficient
Water is recirculated which allows for great efficiency, often more than 90% efficiently on water consumption.
Our vertical design allows for a higher density of plants in a much smaller footprint. With a space less than 5' x 5' we are growing 160 plants.
Automation
The system is maintained with a series of ESP8266s controllers using a Samsung Artik 5 as a centralized gateway. Watering cycles, pH levels, nutrient levels, lighting cycles and ventilation fans are all maintained via the Arduinos and Artik.
The ESP8266s are networked to the Artik via WIFI to allow all system parameters to be monitored and updated in real time. The running sample data is aggregated in the cloud to maintain a historical log of all the systems running data and make it available via a set if web services.
A companion smartphone/tablet app interfaces with the cloud allowing for configuring and monitoring your entire system from anywhere in the world.
What are we growing?
Vertical hydroponics lends itself very well to leafy green vegetables.I am currently growing successfully lettuces (romaine, boston bib, spring mix) , cabbages (red and green), herbs (basil, cilantro, mint, dill, chives), spinach, kale (dwarf curly variety), broccoli and petunias.
How I built it
Step 1: What To Buy

For construction of model pictured in STEP 1
Parts and Pieces (What to buy)
Support Frame
(5) 10' - 2" PVC pipe
(1) 10' - 3" PVC pipe
(4) 2" PVC 90° elbow
(8) 2" PVC tee
(4) 3" to 2" PVC tee
(4) 3" PVC endcaps
Note: All PVC pipe and fittings are Schedule 40 - cellular PVC
Towers/Return
(10) 10' - 2" x 3" PVC downspouts
(1) 10' PVC extruded gutter 4"
(4) PVC gutter end caps (make sure to get 2 left and 2 right)
(2) 1" threaded to 3/4" barbed adapter
(2) 3/4" PVC female threaded connectors
(20) 2" PVC Pipe Hangers ("J" hooks)
(20) #6 Stainless 1 1/2 " machine screws and nuts
Water Supply/Return
(1) 10' - 1"ID potable water tubing
(3) 1" threaded to 3/4" barbed adapter
(1) 1" barbed tee
(5) 3/4" PEX 90° elbow - barbed
(1) 3/4" PEX tee - barbed
(1) 1" to 3/4" PEX reducer - barbed
(2) 10 pack PEX crimp rings
(1) 10 pack 1 1/2" hose clamps
(1) 25' - 3/4" PEX
(20) adjustable 0-10GPH drip emitters
(1) 14 gallon soft plastic bucket
Step 2: Building Support Frame

Support Frame
The support frame is constructed from standard Schedule 40 PVC in 2" and 3" OD(outer diameter). The frame was constructed from this material for is modular properties (easy to fit together) and the ease of use for sizing (easy to cut straight with basic tools). This does not preclude the use of other structural material such as wood, plastic and metal as the frame is structural and does not carry water.
Tool note:
PVC pipe for this project is best cut using a mitre saw. These are readily available as an inexpensive hand tool or an electric/power tool. A mitre saw provides good 90° cuts that help add to the stability of the frame.
PVC is glue using a two part glue system.
An Oscillating Multifunction Power Tool was used to cut pockets in vertical towers.
An Electric Heat Gun was used to shape the pockets in the vertical towers.
The support frame is (2) main leg components joined by the (2) "top bar" components and (2) "cross supports".
The length of the "top bar" and "cross supports" dictate the capacity of the towers your system will support.
There are two additional leg extensions made from the 3" PVC that can provide addition support against the elements when used outside. These can be omitted for indoor use.
At 4' we are supporting (10) grow towers spaced at 4.5" on center apart.
Step 3: Main Legs

The core to the frame structure are (2) identically constructed leg units.
We glued our individual leg components together for stability but did not glue them to the cross pieces for ease of disassembly when the unit is moved indoors.
The majority of the legs are 2" PVC with the exception of pieces #4 and #8 which are 3".
Main Leg Cut List
From a 10' section of 2" PVC
- Cut (2) sections at 32" - (these are Part #1 - first set)
- Cut (2) sections at 28" - (these are Part #3 - first set)
From a 10' section of 2" PVC
- Cut (2) sections at 32" - (these are Part #1 - second set)
- Cut (2) sections at 28" - (these are Part #3 - second set)
From a 10' section of 2" PVC
- Cut (2) sections at 24" - (these are Part #2 - first & second set)
- Cut (4) sections at 3" - (these are Part #7 - first & second set)
- Reserve remaining 60" for cross pieces
From the 10' section of 3" PVC
- Cut (2) sections at 24" - (these are Part #4 - first & second set)
Main Leg Assembly Instructions
Part #5 and Part #6 are 2" 90° PVC tee's. You will need (8) in all to complete both legs. Part #8 is a 3" to 2" 90° PVC tee. You will need (4) in all to complete both legs.
Dry fit the following:
- Fit 3" pipe Part #4 into (2) Part #8 90° tee with 2" opening on the top
- Fit small 2" pipe Part #7 into top of Part #8 90° tee
- Fit 2" 90° tee Part #6 into Part #7 with the opening of the tee at 90°
- Fit 2" pipe Part #3 into Part #6 90° tee
- Fit 2" 90° tee Part #5 into Part #3 with the opening of the tee at 90° facing towards other side of leg
- Fit 2" pipe Part #1 into Part #5 90° tee
- Fit 2" pipe Part #2 into the (2) Part #5 90° tee adding support to the leg


Step 4: Support Top

The top support dictates the size of the grow system and the number of towers the system can support.
Our current plan includes a 4' length of 2" PVC with towers spaced at 4.5" on center. The spacing can be modified to support larger growing areas by increasing spacing between the centers of the towers.
Additional you can decrease the length of pipe to support a smaller number of grow towers.
The support top structure are (2) identically constructed units.
Support Top Cut List
- From a 10' section of 2" PVC
- Cut (2) sections at 48" - (these are Part #1 - first & second set)
Support Top Assembly Instructions
Dry fit the following:
- Fit 2" pipe Part #1 into (2) Part #2 90° elbow

Step 5: Support Bottom

Like the top support, the bottom cross dictates system size, the piece must be the same width as the support frame top.
Our current plan includes a 4' length.
The support bottom piece are (2) identically 4' sections.
Also included in the bottom of the frame are (2) optional extension legs that are good when the unit is set up outside to provide additional support against wind.
Support Bottom Cut List
- From a 10' section of 2" PVC
- Cut (2) sections at 48" - (these are Part #1 - first & second set)
- From the remaining section of 3" PVC
- Cut (4) sections at 12" - (these are Part #2)
Support Top Bottom Instructions
Dry fit the following:
- Fit 2" pipe Part #1 into the Part #6 90° tee of the main leg component
- Note:You man need an additional person to help hold up the legs when installing bottom cross pieces
- Optional: Fit 3" pipe Part #2 into the Part #9 90° tee of the main leg component
- Optional: Install cap Part #3 into the 3" pipe Part #2


Step 6: Grow Towers/Water Return

The towers provide the grow area for the plants in this system.
Or current design supports a very high density of plants by spacing the 3" vertical grow towers 4.5" apart on center (distance from center of tower to neighboring tower), providing approximately 1.5" between towers.
The current 4' length supports (10) towers with (8) slots per tower. With two sides we get (160) plants for our entire system.
There are some limitations to this high density and vertical grow systems to the types of plant you can grow. We are continuing to test the limits of what we can grow and will share our successes and failures in our What to Grow sections of our wiki.
Towers/Return Overview
The towers are 2" x 3" PVC modified downspouts. The downspouts are generally available in 10' sections.
The availability of 10' sections dictated the 5' height of our design.
The water returns are 4" PVC rain gutters. Also available in 10' sections. They are cut and capped on the ends with gutter caps. Make sure you pick up both left and right versions of the end caps as they are different.
Towers/Return Construction Steps
Part 1: Towers
Towers Cut List
- From a 10' sections of 2" x 3" PVC downspouts Cut (10) sections in half at 60"
Tower Shaping Instructions


We constructed a wood template tool to help form the plant pockets
- Divide the (20) towers in to (2) sets of (10).
- To improve grow space we offset/stagger the plant slots in the grow towers.
- Mark a horizontal line across the front of the first set of (10) towers every 6" starting 6" from the bottom for (8) lines.
- A speed square is helpful and getting a straight line across the down spout material.**
- Mark a horizontal line across the front of the first set of (10) towers every 6" starting 9" from the bottom for (8) lines.
- Using a Oscillating Multifunction Power Tool with the straight cut bit, cut a 2" slice on the drawn lines.
- Using the Electric Heat Gun soften the plastic for a few seconds (approx. 15-30 seconds depending on wattage of your heat gun) 3" above and 3" below the cut. The PVC will start to pucker or sink and takes on the appearance of wet saggy paper.
- Use your wood template to slide into the softened PVC at the cut. Hold in place for approximately 30 seconds.
- Repeat for remaining slots in the tower.
- Drill a 3/16" hole on the top, back side of the tower to put the screw for the tower hanger.
Part 2: Water Return
Water Return Cut List
From a 10' sections of 4" PVC gutters
Cut (4) sections at 46"
Water Return Assembly Instructions
- Identify the right and left gutter end caps.
- Test fit end caps on the sections of gutter.
- We roughed up the gutter plastic with some 150 grit sandpaper where the caps overlap the gutter (about 5/8") for a better adhesion.
- Spread a liberal bead of silicone PVC adhesive on the inside overlapping edge of the end caps.
- Carefully fit the end cap on the gutter making sure glue contacts all around the gutter material.
- We used our finger to push excess adhesive around the edge of the gutter and cap to ensure good contact.
- Place a piece of masking tape or other easily removable tape on the cap till the recommended dry time.
- Repeat for other 3 sides and set aside till dry.
- Drill a 1" hole on the back wall of the 4" gutter to insert 1" to 3/4" barbed adapter.
This will serve as the connector for the water return to the 14 gallon bucket. - Thread the 1" threaded side of the adapter and thread into the female 1" connector on the inside of the gutter.
- Cut a (2) - 12" section of soft 1" vinyl hose for each side of the water return.
- Join at the center with the 1" barbed tee.
- Cut a section of vinyl tube to length to where you position your 14 gallon water tank.
Step 7: Water Supply

We choose 3/4" PEX for the main water supply lines for it's potable water safety properties and the ease of installation because we had a PEX crimp installation tool. CPVC would also be an excellent choice if the crimp tool was not available, CPVC is also certified for potable water but requires glue and joint connectors for assembly.
Water Supply/Return Overview

The water supply is laid out so there is a single rise that forks at the center cross piece of the main leg. This design was implemented to reduce the overall height load on the water pump. Instead of (2) 6' rises reducing overall water flow, the rise is slightly more efficient to the pump.
Water Supply/Return Construction Steps
- Parts #1 - #6 are 3/4" PEX cut to mirror the main leg dimensions.
- These are best sized by taking the measurements of the legs.
- Crimp Part #1, Part #2 and Part #3 together with Part #7 - 3/4" barbed PEX tee.
- Crimp Part #3 and Part #4 together with Part #8 - 3/4" PEX 90° elbow.
- Crimp Part #4 and Part #5 together with Part #9 - 3/4" PEX 90° elbow.
- Crimp Part #2 and Part #6 together with Part #10 - 3/4" PEX 90° elbow.
- Drill holes in Part #5 and Part #6 for Part #11 - drip emitters.
- Starting at elbow end of Part #5/Part #6 - measure from end 4" and mark first hole at the bottom of the PEX pipe.
- It is helpful to draw a line along the bottom of the PEX pipe marking the bottom for the remaining marks.
- Measure 4.5" from first mark and make a second mark.
- Repeat every 4.5", the last mark should be 4" from the opposing leg from the elbow.
- Using 3/16 drill bit drill on the mark.
- Starting at elbow end of Part #5/Part #6 - measure from end 4" and mark first hole at the bottom of the PEX pipe.
- Fit in the the drip emitters - Part #11
- The hole is slightly snug for the drip emitters to prevent unwanted dripping, soften the PEX briefly (30 sec.) with the heat gun, this will allow for easier insertion of the drip emitters into the PEX.
- Cut a 1" hole in the 14 gallon water bucket.
- Thread the 1" to 3/4" barbed adapter through the wall of the water container.
- Attach the soft vinyl hose from the return gutters tee to the water bucket.


Electronics
Used to detect and maintain environmental data.
Boards (1) Samsung Artik 5 - Hub, MQTT broker, and orchestrator
(4) ESP8266 - Wifi connected sensor and actuator controllers
Relays
(4) 2 Channel Relay Module Board and Shield For Arduino (source: eBay)
Sensors
(1) Waterproof DS18B20 Digital Temperature Sensor Probe for Arduino (source: eBay)
(1) Side Mounted Water Level Control Float Switch Normal Closed (source: eBay)
(1) pH Meter Kit Options 1.$ RobotMesh.com 2. $$ atlas-scientific.com
(1) Arduino Conductivity Sensor Options 1. $ eBay 2. $$ atlas-scientific.com
(1) 1" Water Flow Meter Options 1. $Amazon 2. $$ atlas-scientific.com
Actuators
(2) 12V DC Peristaltic Dosing Pump (source: Amazon)
(1) 1/2" DC 12V Electric Solenoid Valve Water Inlet Flow Switch Normally Closed (source: eBay)
Lights
(1) 15 Meter - LED based - 12v Flexible 5050 5:1 Red/Blue (source: eBay)
Hardware that will vary given your sizing
(1) Circulation Fan sized to your space
(1) 620 GPH Submersible Pump (source: Harbor Freight)
Wiring Schematics
Environmental Sensor Array
Sensors for air temperature and humidity, water temperature and light.

Water Condition Sensor Array
Sensors for air temperature and humidity, water temperature and light.

Actuator Array
Relay example wiring. Repeat for all your actuators (fans, lights, heaters).

Setting up the ARTIK 5

The ARTIK documentation library can be found at https://developer.artik.io/documentation/
Follow the Getting Started guide that matches your development environment; there are guides for Windows, Mac and Linux.
MQTT & Node.js
We used the ARTIK as an orchestrator, gateway and message broker for our sensor and actuator units. You need to set up Node/NPM and Mosquito on the ARTIK to act as a MQTT server/broker.
Initial Setup Install node and npm on your ARTIK board.
Log in to the terminal on your ARTIK device via ssh or the serial connection.
Enter the commands noted. The downloads may take some time to complete.
  $ dnf update
  $ dnf install node
  $ dnf install npm
Start Mosquitto (message broker) and run it as a background process.
$ mosquitto &
We deployed our orchestration engine, developed in Node.js, to the ARTIK.
Example payload in our sensor message:
{"status": {"msg":"READING", "unitType":"envModule", "unit":"743346", "timeStamp":"68763", "data": { "extAir":"75.20", "extHumidity":"30.00", "extHeatIdx":"73.83", "extWaterTemp":"74.53", "localWaterLevel":"97.00", "localpHLevel":"6.18"}}}
Challenges I ran into
I would have to say the biggest challenge we ran into was the cost of the equipment, in particular the higher end sensors (pH, eC and flow).
The main grow structure cost approximately $350 at my local hardware store; this included all the PVC, PEX tubing, brass connectors and vinyl tubing.
We went with the cheapest sensors would could find but struggled with quality and the sensor being the right type of protocol (Analog vs. Digital vs. I2C). In future versions we will be using the higher end sensors. The schematics above for Water Condition reflect the higher end sensors.
Accomplishments that I'm proud of
We were very happy with our first crop of lettuces and herbs. It was nice to see the project come together initially as a viable way of growing food and then the marriage of technology to make it something that could be used by others.
What's next
We designed our software portal to be a hub and growers resource for users to learn from each other. Users can contribute their success and failures to help the community find the best "plant recipe" for their desired crop.
Our plan is to encourage others to build our system and contributing their data so that others can get a jump start on their own gardens, maximize their results, reduce their loss due to inexperience and hardware failures.
We look forward to finding a way to bring our design to others to help solve issues related to drought, food shortages, food quality while reducing the carbon footprint required to bring quality local food to people.
Built With
- artik-5
- javascript
- mqtt
- node.js


Log in or sign up for Devpost to join the conversation.