Inspiration
The idea behind this project was inspired by the interactive and engaging nature of Jackbox games. Jackbox has a unique way of bringing people together through creative and often hilarious activities that encourage participation and laughter. Similarly, this project aims to capture that spirit by allowing users to draw with their fingers and immediately see themselves integrated into their artwork.
What it does
Creative Drawing: Use your fingers to draw on a digital canvas with a variety of colours and brush sizes.
Interactive Interface: Easy-to-use buttons for tool selection, canvas clearing, and saving artwork.
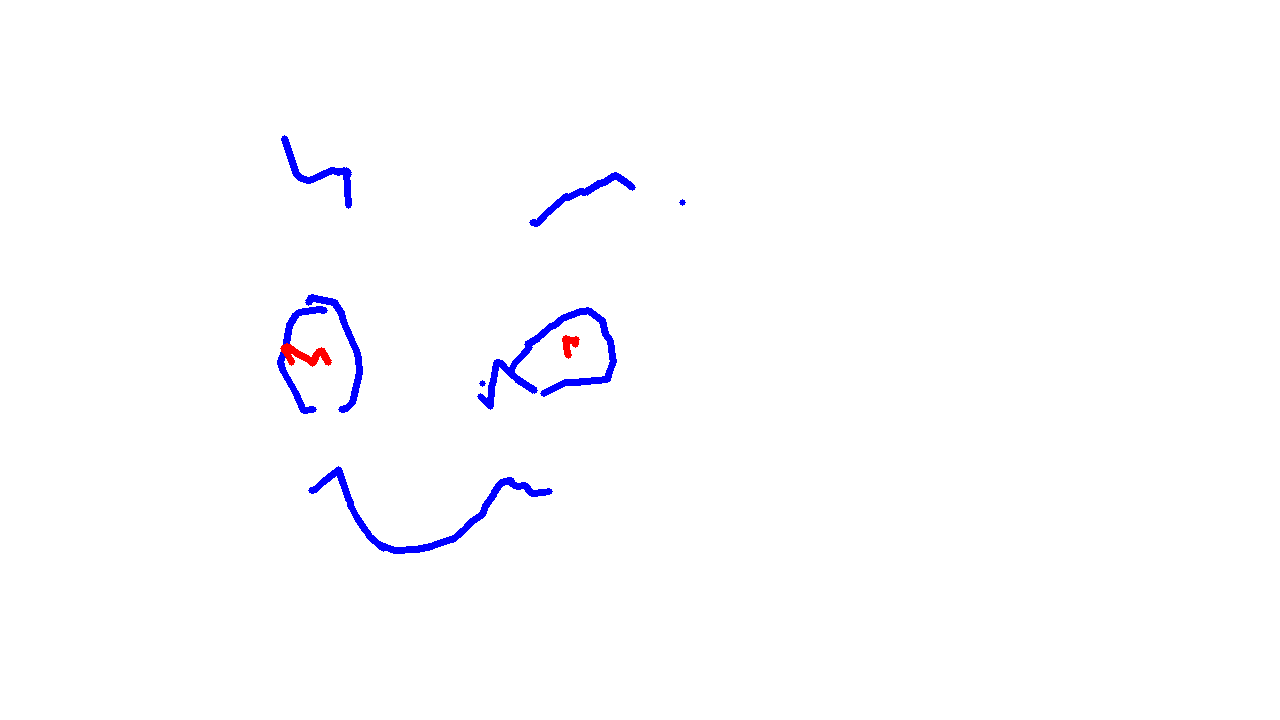
Pose Detection: Accurate pose detection ensures that the overlay is perfectly placed on your chest.
Saving Artwork: Once players are satisfied with their drawing, they can save it with a simple button click.
Real-Time Overlay: The saved drawing is then overlaid on the player’s chest in real-time using pose detection.
Transparency Handling: The game ensures that the saved drawing maintains its transparency, enhancing the overlay effect and making the integration more visually appealing.
How we built it
I built it using python, opencv, mediapipe.
- The Start Screen (start.py):
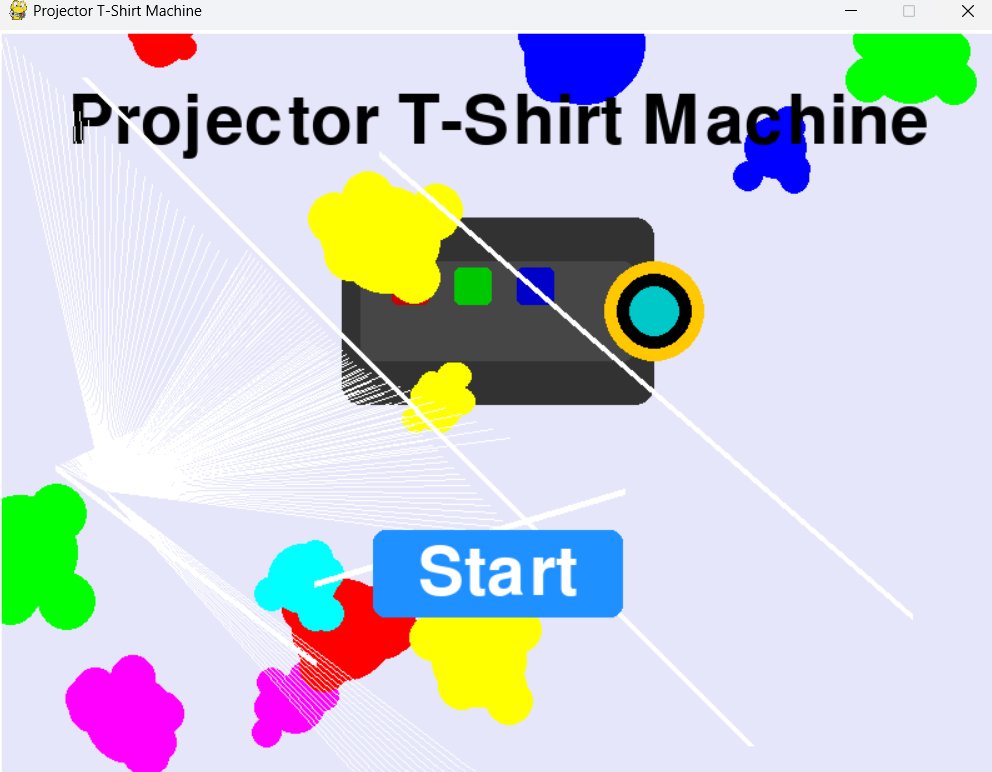
When running the project, run start.py, which will display an abstract looking canvas of a start screen created using Pygame. The canvas start screen features splashes of paint in random spaces of the screen in various colours and a bunch of lines/walls inspired by Kandinsky's Jaune Rounge Bleu painting. A projector is drawn using squares and circles with the title written on top. The mouse acts as a dynamic light source casting rays using Bresenham's line algorithm to create a sun light effect and the start button takes you to the projector t-shirt machine.
Hand Tracking(handTracking.py): The
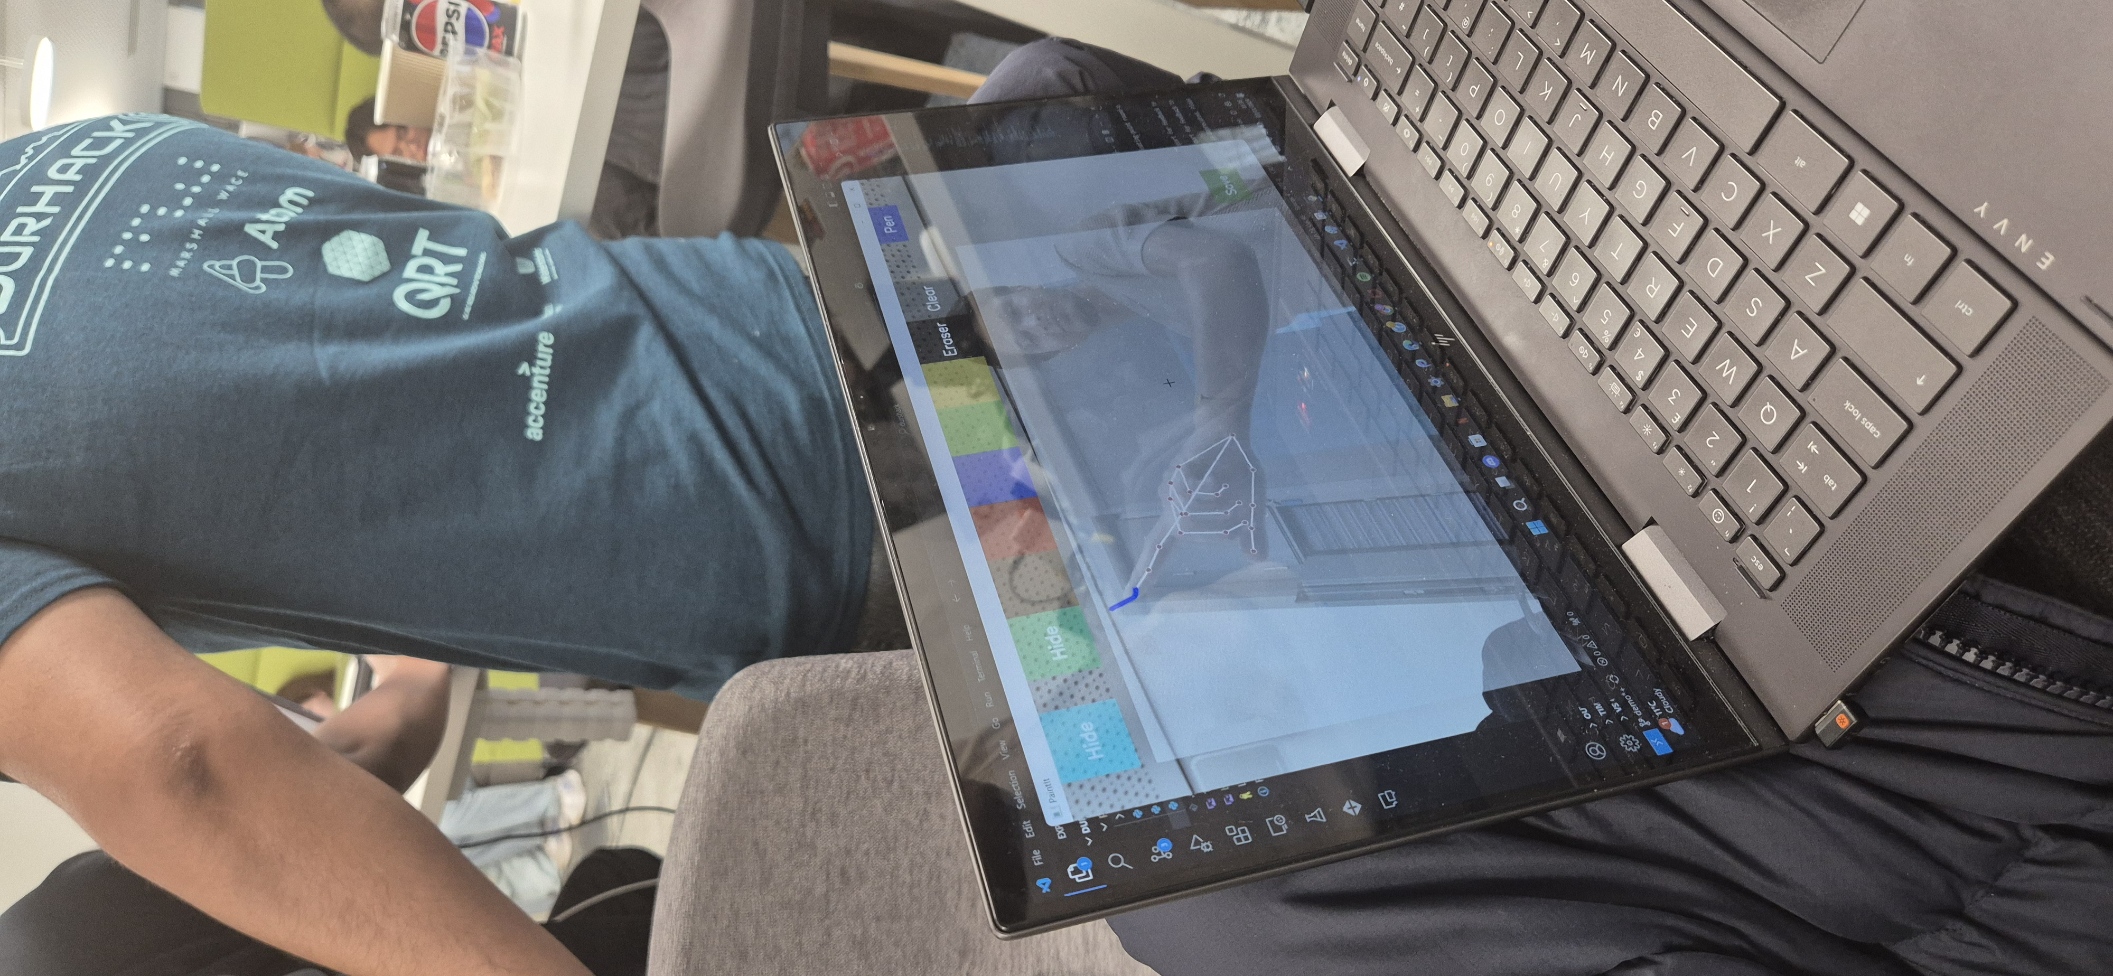
handTracking.pyis used to capture your hand movements in real-time, using MediaPipe and OpenCV landmark detection to find the x and y coordinates for each finger joint through processing every frame. The getPosition method gets the 2D-pixel coordinates of each finger joint and the getUpFingers returns a list of booleans that indicate which fingers are raised based on the relative position of the joints to determine gestures such as fingers raised. This is used to turn your hands into a paintbrush and for navigation.Virtual Canvas and Overlay (project.py): When you launch project.py through start.py, your webcam opens and displays an array of buttons on your camera window. These buttons allow you to select colours, change brush size, clear the canvas, toggle the drawing board, and save your creation. Buttons can be selected by raising a finger, with handTracker.py tracking your finger movements on the window.
When you select the board button by raising your finger, the visibility of the board is toggled. The button, controlled by boardBtn, switches between "Board" and "Hide." When the board is visible, whiteBoard.drawReact(frame) renders it over the main frame, allowing you to draw on it.
Raising your finger to select the colour palette button opens a colour menu, including an Eraser and Clear option. The menu, controlled by colorsBtn, toggles between "Colours" and "Hide" based on whether it’s open or hidden. When the index finger is extended (raised) and no other fingers are up, upFingers from handTracker.py detects this and activates a drawing mode. In drawing mode, cv2.line draws a line from the previous finger position (px, py), creating a continuous drawing effect as you move your finger. The RGB and alpha values adjust based on the selected colour. Selecting the Eraser sets the colour to black, which effectively removes parts of the drawing rather than adding to it.
To change the brush size, penBtn displays available pen sizes, and selecting one updates brushSize. To indicate which colour or brush size is selected, the button’s transparency (alpha) is adjusted, making it clear what has been clicked.
When you click saveBtn, the current drawing is saved as an image, board_drawing.png, in the tshirtsdesigns folder, with a transparent background applied using add_transparency. A copy of the image is also saved in the gallery folder, allowing it to be overlaid on the chest in other applications.
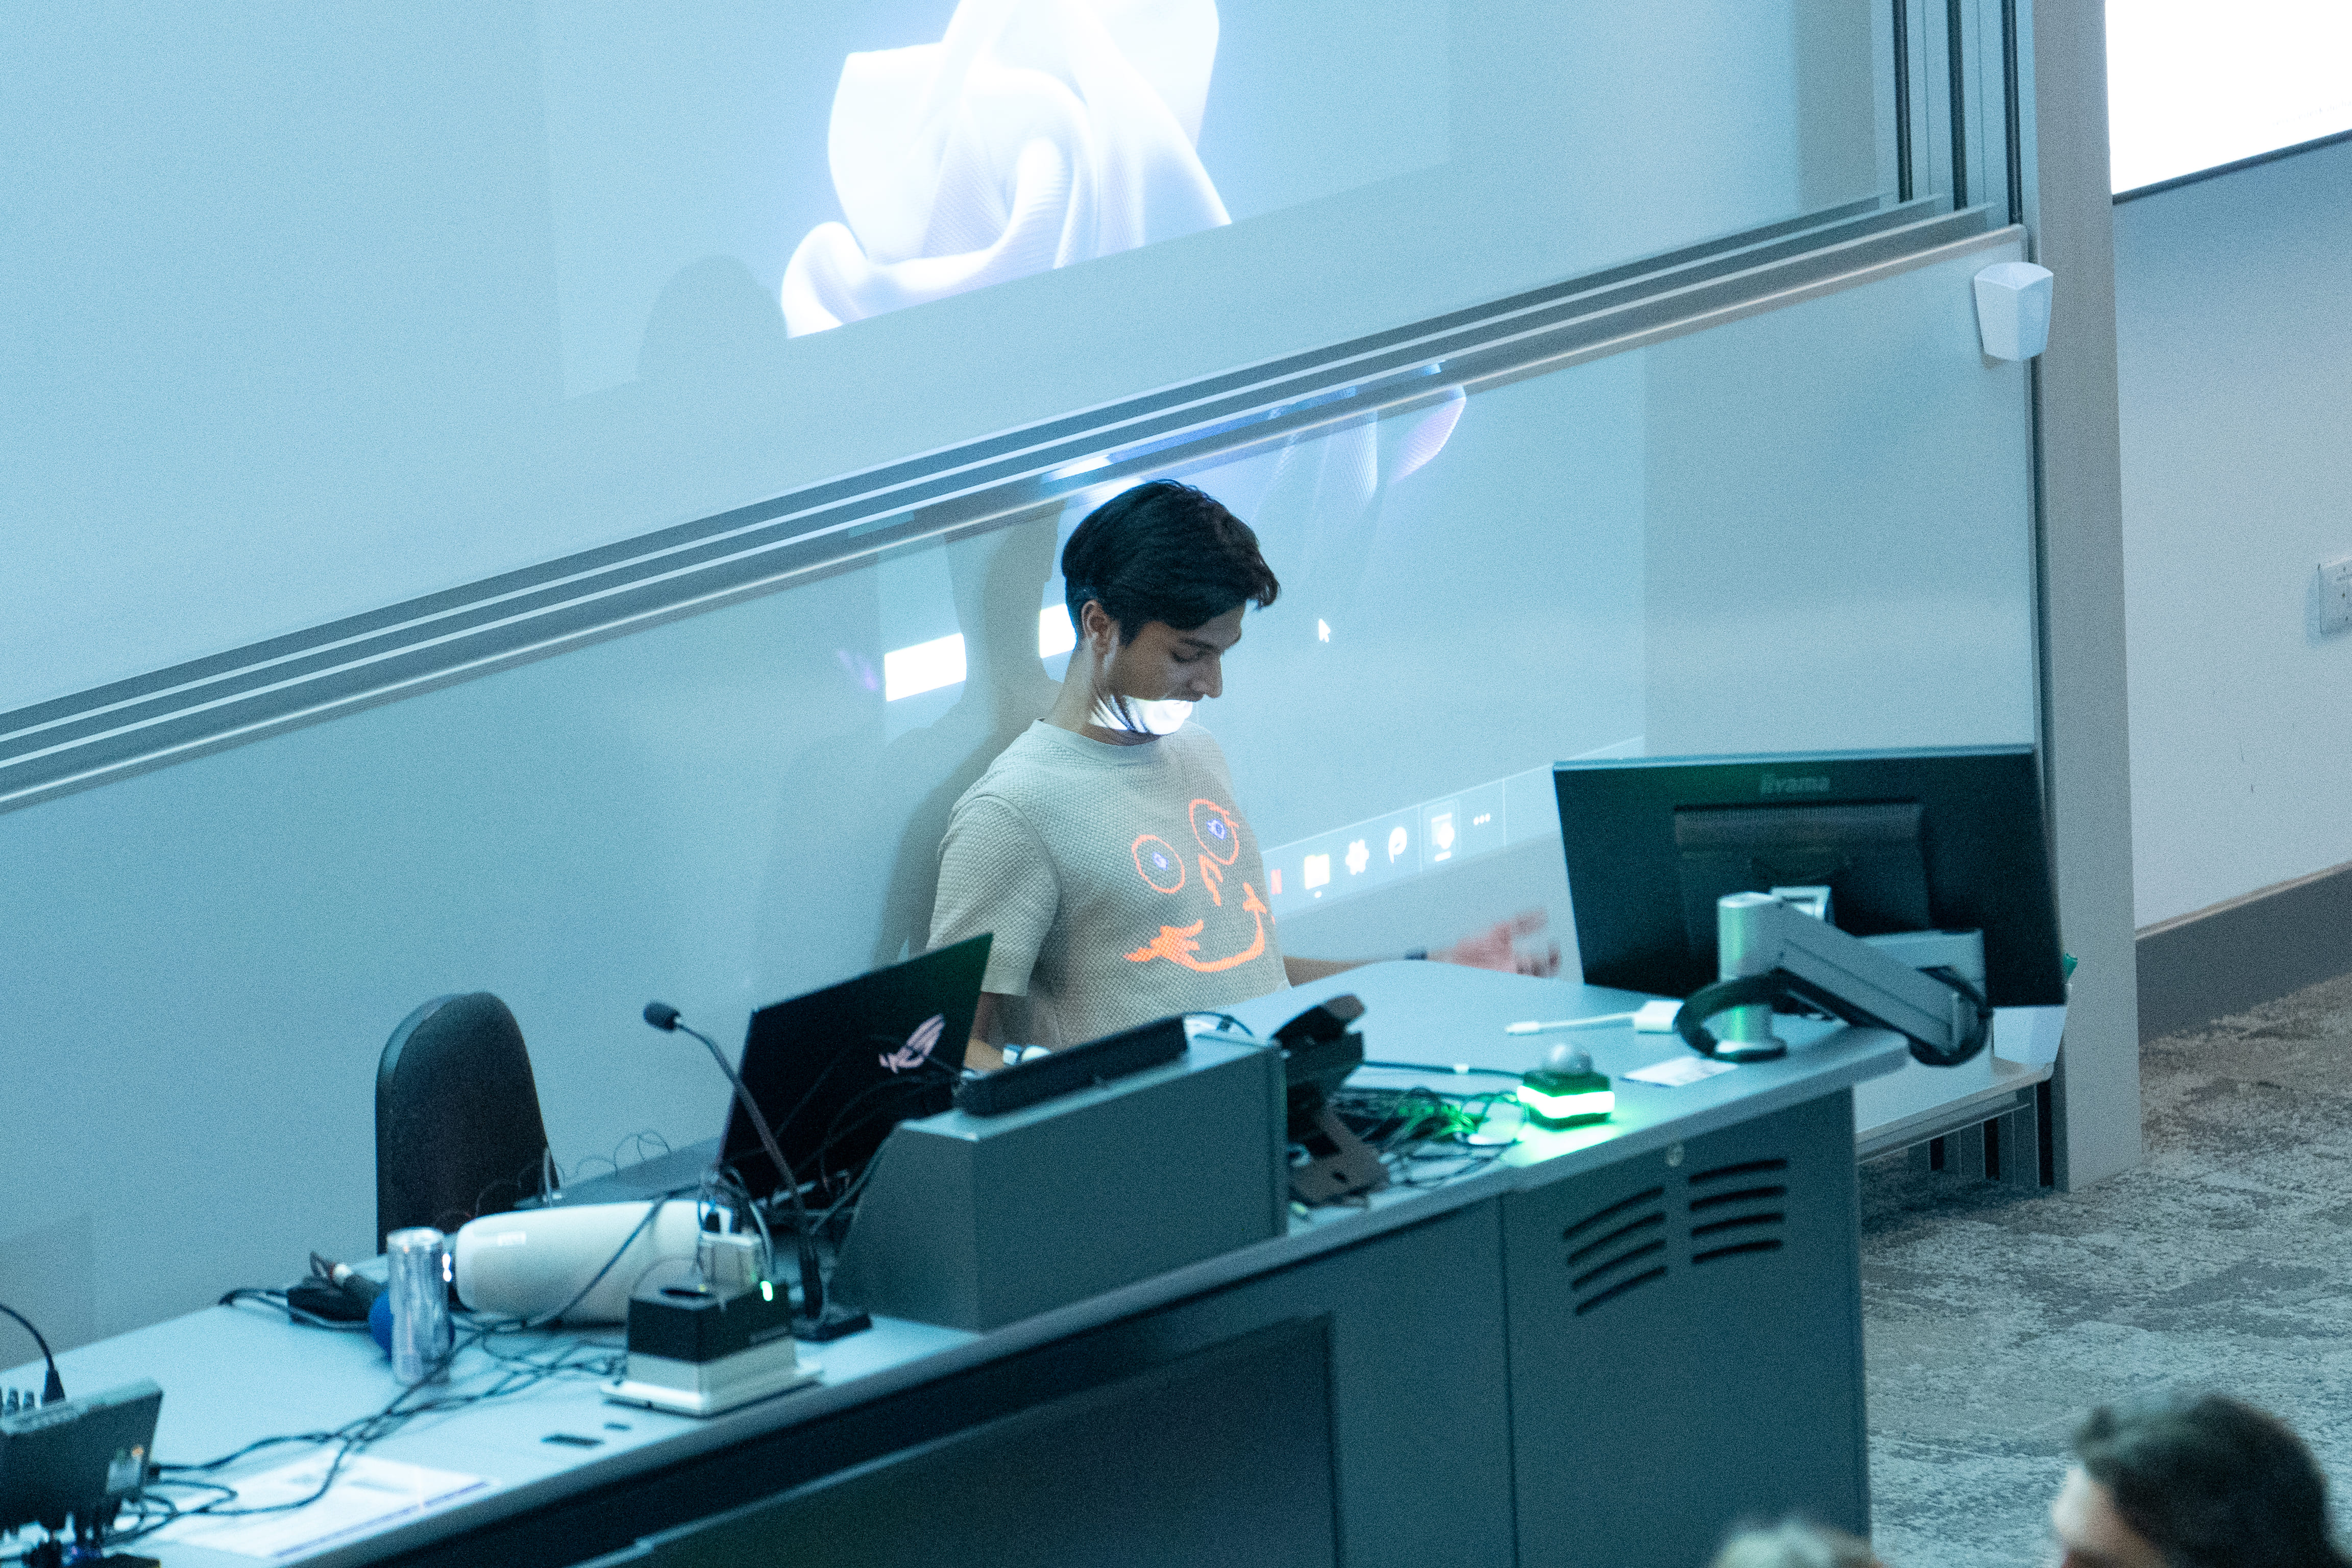
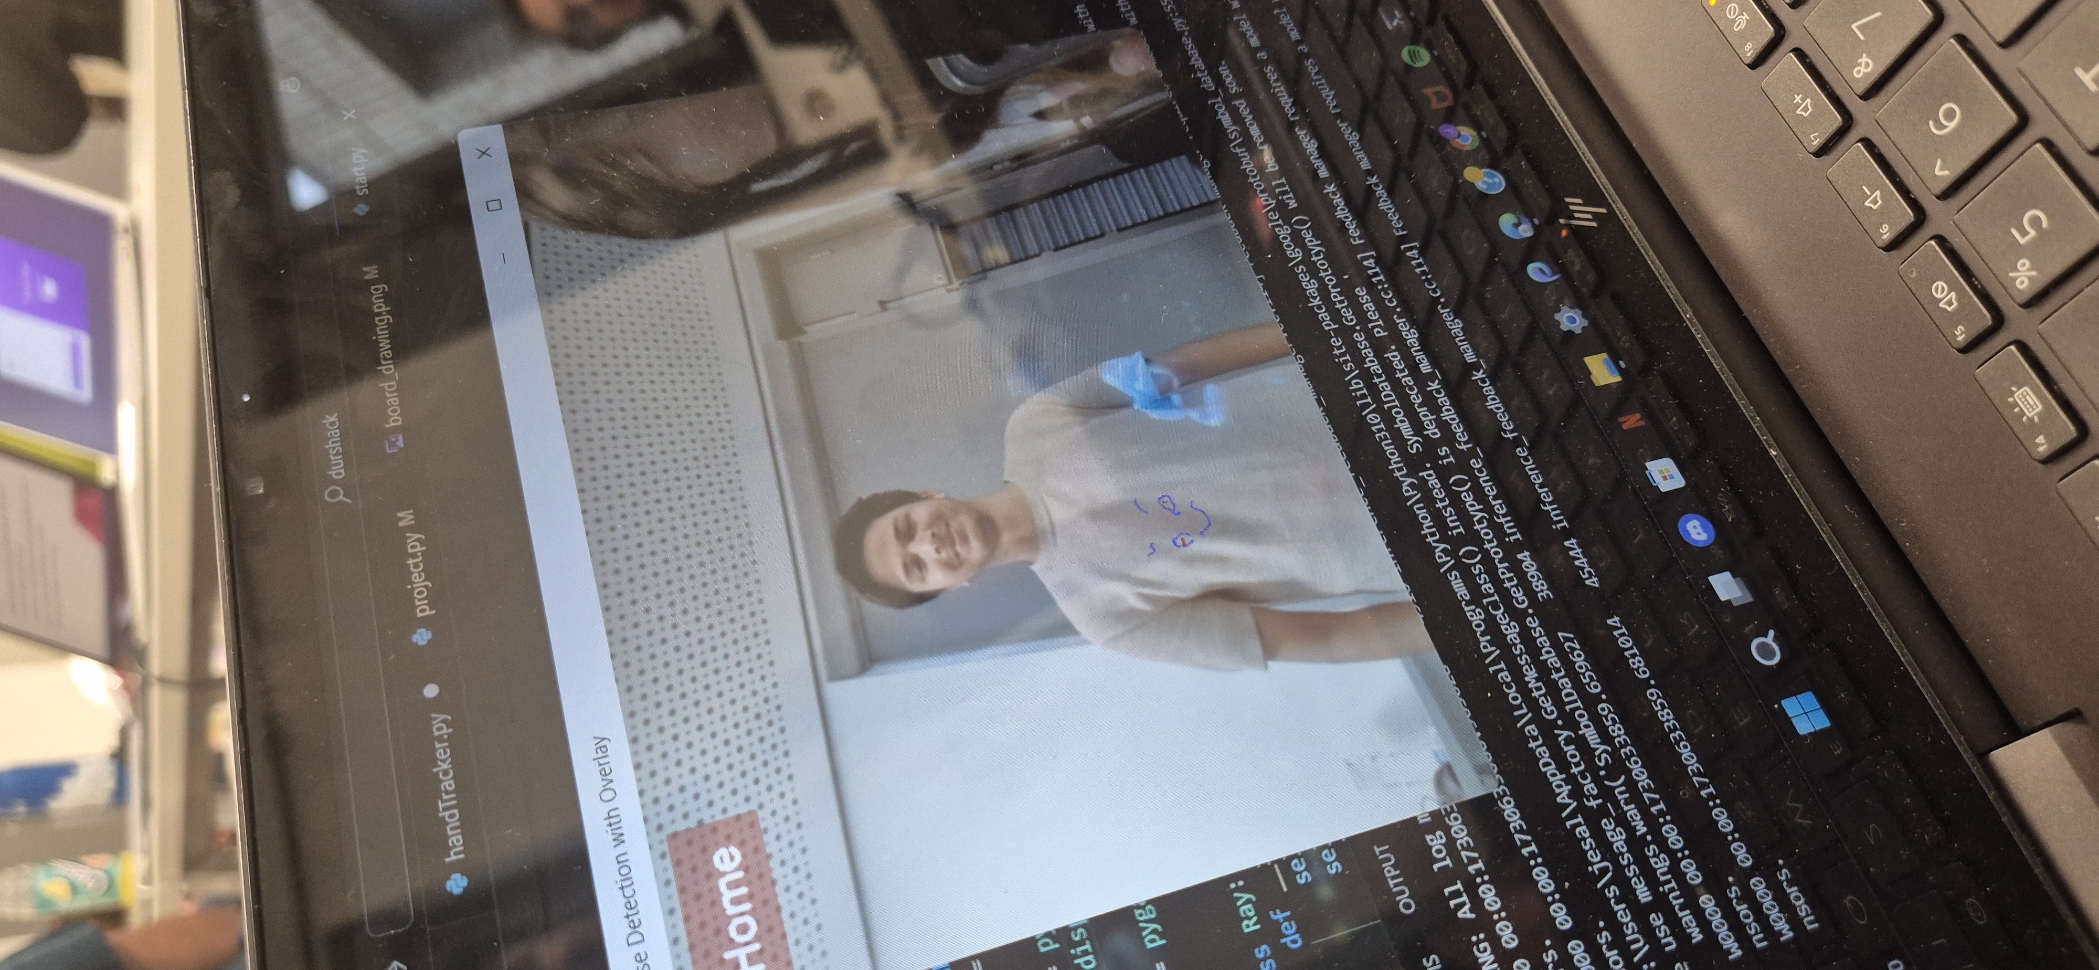
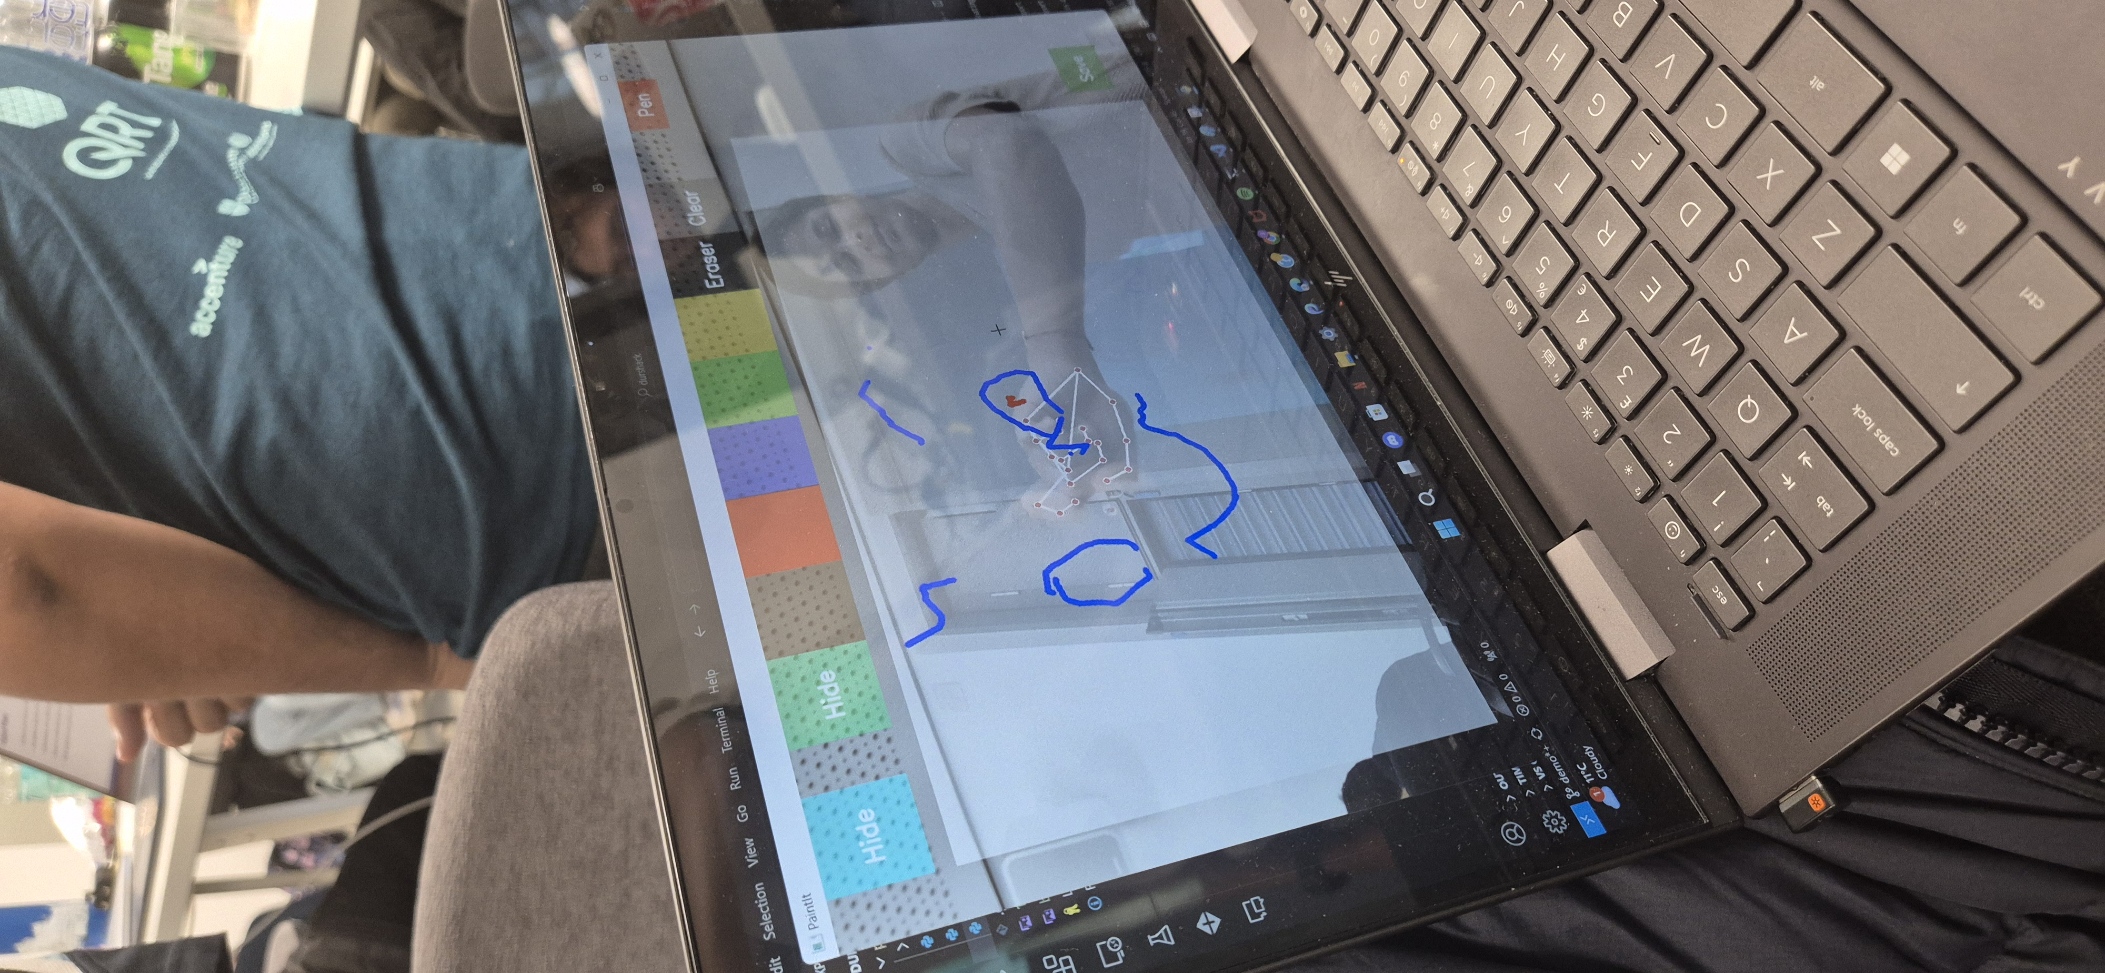
Pose Detection with Overlay (project.py): After saving your art, PoseOverlay is initialised to project your art onto your T-Shirt by converting "board_drawing.png" into an RGB format using imgRGB which is required of MediaPipe and calculates the chest's central position and width based on landmark11 and landmark12 using "find_chest_area". If no landmarks of the chest are detected it returns none, none values for error handling and once identified, overlay_on_chest positions the image at the chest centre and scales it to match your chest width while adjusting its height for natural fit and transparency. Before applying the overlay, the method checks whether the new position fits within the image boundaries so you can move around and the projection will be accurate. A home button is also on this window so return home using left click.
Overlay Projection (project.py)
Another window opens to project your art onto yourself in real life via a projector by using "display_overlay_only" method which projects the overlay in a separate, resizable window. This method calculates the size and position of the overlay dynamically based on the chest width relative to the primary window’s dimensions by defining the maximum and minimum projection sizes as proportions of the primary window width and uses linear scaling to adjust the overlay size between these bounds using "projection_mapping". The overlay is resized to this projection size and positioned according to the chest centre, with its movement limited by a specified factor, "overlay_movement_factor".
When projecting use "Extended Mode", drag the Overlay Projection window onto the extended side for clear image projection onto the T-Shirt. Also, unlike myself in this image, use darker lighting for a better effect.
Challenges we ran into
Hand Tracking: Implementing accurate hand tracking was a significant challenge. Ensuring that the system could reliably detect and track hand movements in real time required extensive fine-tuning and testing. This was crucial for enabling users to draw effectively on the screen.
Drawing with Colors: Getting the colours to draw correctly on the screen was another tough aspect. Ensuring smooth and responsive drawing functionality, allowing users to select and use various colours and brush sizes seamlessly, was complex. Handling the transparency and blending of colours added to the difficulty.
Pose Detection and Overlay: Making the artwork appear on the user’s body using pose detection was particularly challenging. Accurately detecting the user’s pose and overlaying the drawing in real-time, ensuring it stayed in the correct position on the body, required precise calibration and handling of edge cases.
Projector Integration: Using a projector to display the artwork on the user’s body added another layer of complexity. Ensuring that the projection was aligned correctly and that the artwork appeared in the right place, even as the user moved, was challenging. This involved enlarging the image text box to give the illusion that the artwork remained in the same place relative to the user’s body, regardless of their movements.
Accomplishments that we're proud of
I'm particularly proud of how I tackled the challenges of pose detection and overlay, ensuring the artwork stayed in the correct position on the user's body in real-time, and integrating the projector to maintain the illusion that the artwork remained in place as the user moved.
What we learned
I developed my skills adeptly in computer vision.
What's next for Projector T-Shirt Machine
Projecting jeans, head colour, tattoos


Log in or sign up for Devpost to join the conversation.